
1. Introduction
This manual provides detailed instructions for assembling and maintaining your HOTUT Cherry Blossom Micro Building Kit. This kit allows you to construct a miniature Japanese architectural scene featuring a cherry bonsai tree, waterfall, and LED lighting. Please read all instructions carefully before beginning assembly to ensure a smooth and enjoyable building experience.

Image 1.1: The HOTUT Cherry Blossom Micro Building Kit, showing the assembled model and its packaging.
2. Package Contents
Verify that all components are present in your package before starting assembly. The kit includes 1435 micro building pieces and an LED light strip. The main components are:
- 1 x Taohuatan Puzzle Toy (1435 pieces)
- 1 x LED Light Strip
- 1 x User Manual (this document)
The building blocks are made from high-quality ABS plastic.
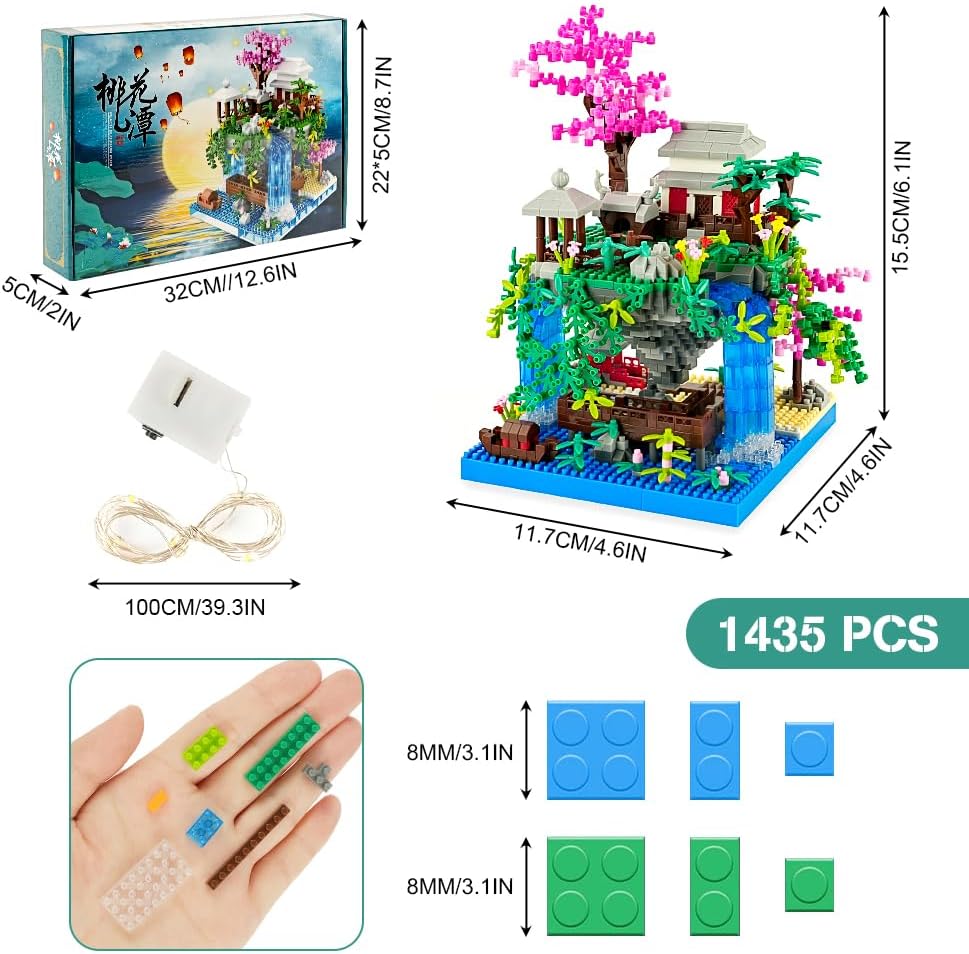
Image 2.1: Overview of package contents including the assembled model's dimensions and the LED light string.
3. Safety Information
- Choking Hazard: This kit contains small parts and is not suitable for children under 3 years of age. Adult supervision is recommended for younger builders.
- Age Recommendation: Suitable for adults and youth.
- LED Light: Handle the LED light strip with care. Do not immerse in water. Ensure batteries (not included) are inserted correctly if applicable.
- Material: The building blocks are made of ABS plastic. Avoid exposure to extreme heat.
4. Setup and Assembly Instructions
The HOTUT Cherry Blossom Micro Building Kit is designed for an engaging and challenging assembly experience due to its micro-sized blocks and intricate details. Patience and careful attention to the included instruction manual are key.
- Preparation: Before starting, carefully open the packaging and sort the building blocks by color, shape, or size. This will significantly aid in locating specific pieces during assembly. Refer to the detailed instruction manual provided in the box for part identification.
- Follow the Manual: The kit includes a comprehensive step-by-step instruction manual. Follow each step precisely. Micro building blocks are smaller than standard blocks, requiring precision during placement.
- Base Construction: Begin by assembling the base structure as indicated in the manual. This forms the foundation for the entire model.
- Architectural Elements: Proceed with constructing the Japanese architectural elements, including the gazebo, bridges, and the main structure.
- Landscape Details: Add the cherry blossom tree, other foliage, and water features. The waterfall effect is created using translucent blue blocks.
- LED Light Integration: Integrate the LED light strip as directed in the manual. This typically involves weaving the lights through designated areas to illuminate the model. Ensure the light strip is securely placed to avoid damage.
The assembly process is designed to enhance problem-solving skills and hand-eye coordination.

Image 4.1: Illustrates the process of assembling the micro building blocks.

Image 4.2: Details of the assembled model, emphasizing the intricate design and the skills developed during construction.
5. Operating the LED Light
The kit includes an LED light strip to enhance the visual appeal of your assembled model, simulating flowing water and ambient light.
- Power Source: The LED light strip requires a power source, typically a small battery box (batteries not included). Refer to the light strip's specific instructions for battery type and installation.
- Connection: Connect the LED light strip to the battery box.
- Activation: Turn on the LED lights using the switch on the battery box. Position the light strip within the model as instructed during assembly to achieve the desired illumination effect.

Image 5.1: The assembled model with the LED light string activated, creating a glowing effect.
6. Maintenance
To ensure the longevity and appearance of your HOTUT Cherry Blossom Micro Building Kit:
- Cleaning: Gently dust the model regularly with a soft, dry cloth or a soft brush. Avoid using harsh chemicals or abrasive materials.
- Storage: Store the assembled model in a stable location away from direct sunlight, extreme temperatures, and high humidity to prevent discoloration or damage to the plastic components.
- Disassembly: If disassembling, do so carefully to avoid breaking or losing small pieces. Store pieces in a secure container.
7. Troubleshooting
If you encounter issues during assembly or with the product, consider the following:
- Missing Pieces: Double-check all packaging materials. If pieces are genuinely missing, contact customer support with details of the missing parts.
- Difficulty Assembling: Ensure you are following the instruction manual step-by-step. Micro blocks require precise alignment. If a step is unclear, review the diagrams carefully.
- LED Lights Not Working: Verify that batteries are correctly installed and charged. Check the connection between the light strip and the battery box.
- Loose Connections: If parts feel loose, ensure they are fully pressed together. Micro blocks often require firm but gentle pressure to connect securely.
8. Specifications
| Feature | Detail |
|---|---|
| Brand | HOTUT |
| Model Number | V7-241107THT1K4-FBA |
| Number of Pieces | 1435 |
| Material | ABS plastic |
| Product Dimensions (assembled) | Approximately 11.7 x 11.7 x 15.5 cm (L x W x H) |
| Educational Objective | Problem Solving Skills |
| Special Features | Unique Japanese architecture, LED lights, micro blocks, high difficulty |
9. Warranty and Support
For warranty information, returns, or further product support, please refer to the purchase documentation or contact the seller directly. Keep your proof of purchase for any warranty claims.