1. Introduction
Thank you for choosing the TOCHIC 40-inch 7-Tier Chrome Crystal Chandelier. This instruction manual provides essential information for the safe installation, operation, and maintenance of your new lighting fixture. Please read this manual thoroughly before beginning installation and retain it for future reference.
This elegant chandelier features a modern chrome finish with seven tiers of K9 crystals, designed to enhance the aesthetic of high-ceiling spaces such as entryways, staircases, foyers, living rooms, bedrooms, and dining rooms.
2. Safety Information
- Professional Installation Recommended: Due to the size and weight (approximately 59.9 pounds) of this chandelier, professional installation by a qualified electrician is strongly recommended. Ensure the ceiling structure can support the fixture's weight.
- Electrical Safety: Always turn off the main power supply at the circuit breaker before installation, maintenance, or bulb replacement. Do not connect electricity until your fixture is fully assembled.
- Handle with Care: Crystals are fragile. Handle them carefully during unpacking and installation to prevent breakage or chipping.
- Wear Gloves: Wear clean gloves when handling crystals to avoid fingerprints and smudges.
- Proper Tools: Use appropriate tools for installation.
- Indoor Use Only: This fixture is designed for indoor use only and is not water resistant.
3. Package Contents
Verify that all components are present and undamaged before proceeding with installation. If any parts are missing or damaged, contact customer support.
- Chandelier Frame (Chrome)
- Mounting Canopy and Hardware
- Adjustable Chain
- K9 Crystal Elements (various sizes/shapes for 7 tiers)
- Instruction Manual
Note: E12 bulbs are not included and must be purchased separately.
4. Setup and Installation
Installation of this chandelier requires careful attention to detail and electrical wiring knowledge. It is highly recommended to have two people for installation due to the size and weight.
- Prepare for Installation:
- Turn off power at the circuit breaker.
- Unpack all components and lay them out on a clean, soft surface to prevent scratches.
- Review the parts list and ensure all items are accounted for.
- Mount the Canopy:
- Secure the mounting bracket to the ceiling junction box using the provided screws. Ensure the bracket is firmly attached and can support the chandelier's weight.
- Connect the fixture's ground wire to the house ground wire. Connect the neutral wire (white) to the house neutral wire and the hot wire (black) to the house hot wire. Secure connections with wire nuts.
- Attach the canopy to the mounting bracket, securing it with the canopy screws.
- Adjust Chain Length:
- Determine the desired hanging height for your chandelier. The chain length is 71 inches and is fully adjustable.
- Open the chain links as needed to achieve the correct length.
- Attach one end of the chain to the canopy and the other end to the chandelier frame.
- Install Bulbs:
- Carefully screw 20 E12 base bulbs (max 60W each, not included) into the sockets. This fixture is compatible with dimmable LED, energy-saving, and halogen bulbs.
- Attach Crystals:
- Beginning from the top tier, carefully hang each crystal element onto the designated hooks on the chandelier frame. Refer to the diagram for the correct placement of each crystal type and tier.
- Work systematically to ensure all crystals are securely attached.
- Final Check:
- Double-check all electrical connections and ensure all crystals are properly hung.
- Restore power at the circuit breaker.
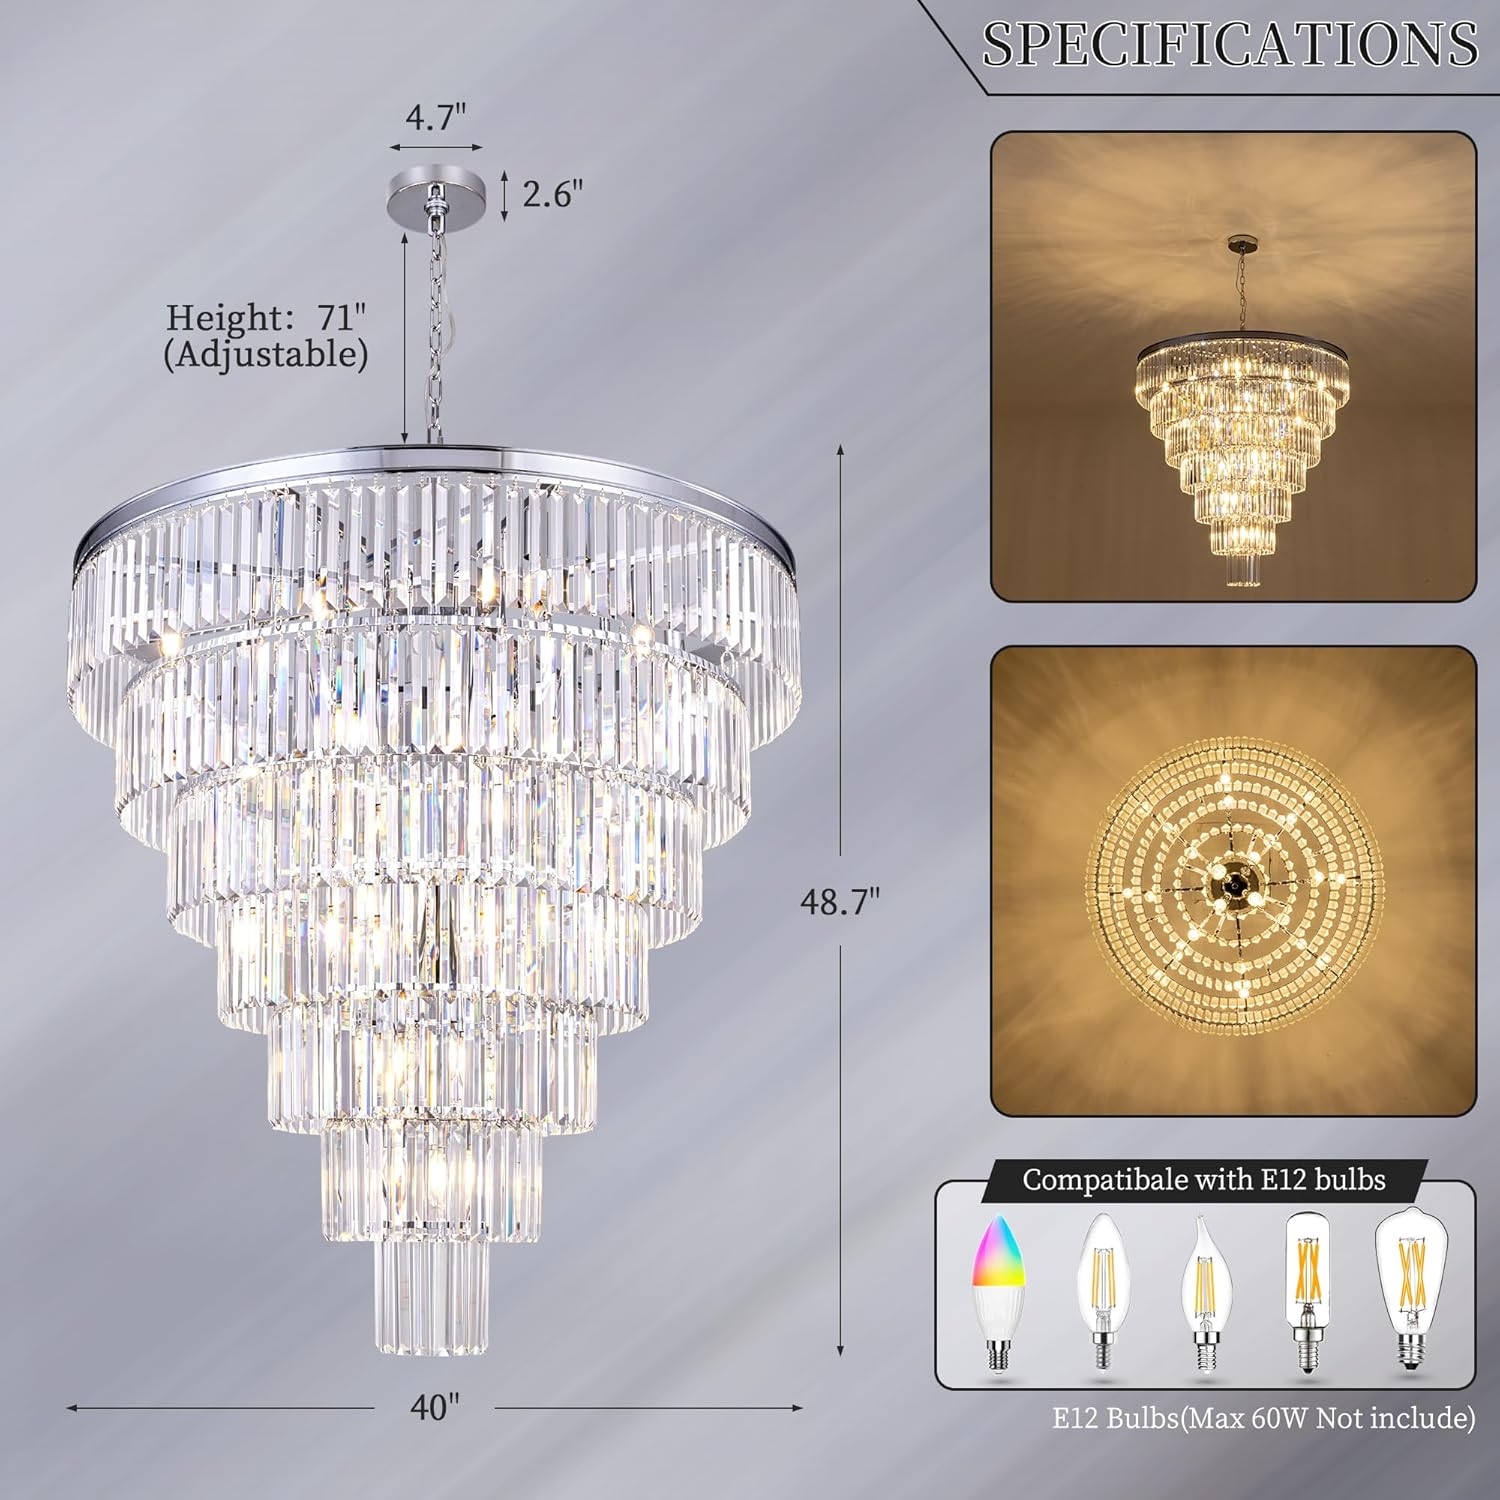
Figure 1: Chandelier dimensions and bulb compatibility. The fixture measures 40 inches in diameter and 48.7 inches in height, with an adjustable chain up to 71 inches. It uses E12 bulbs (max 60W, not included).
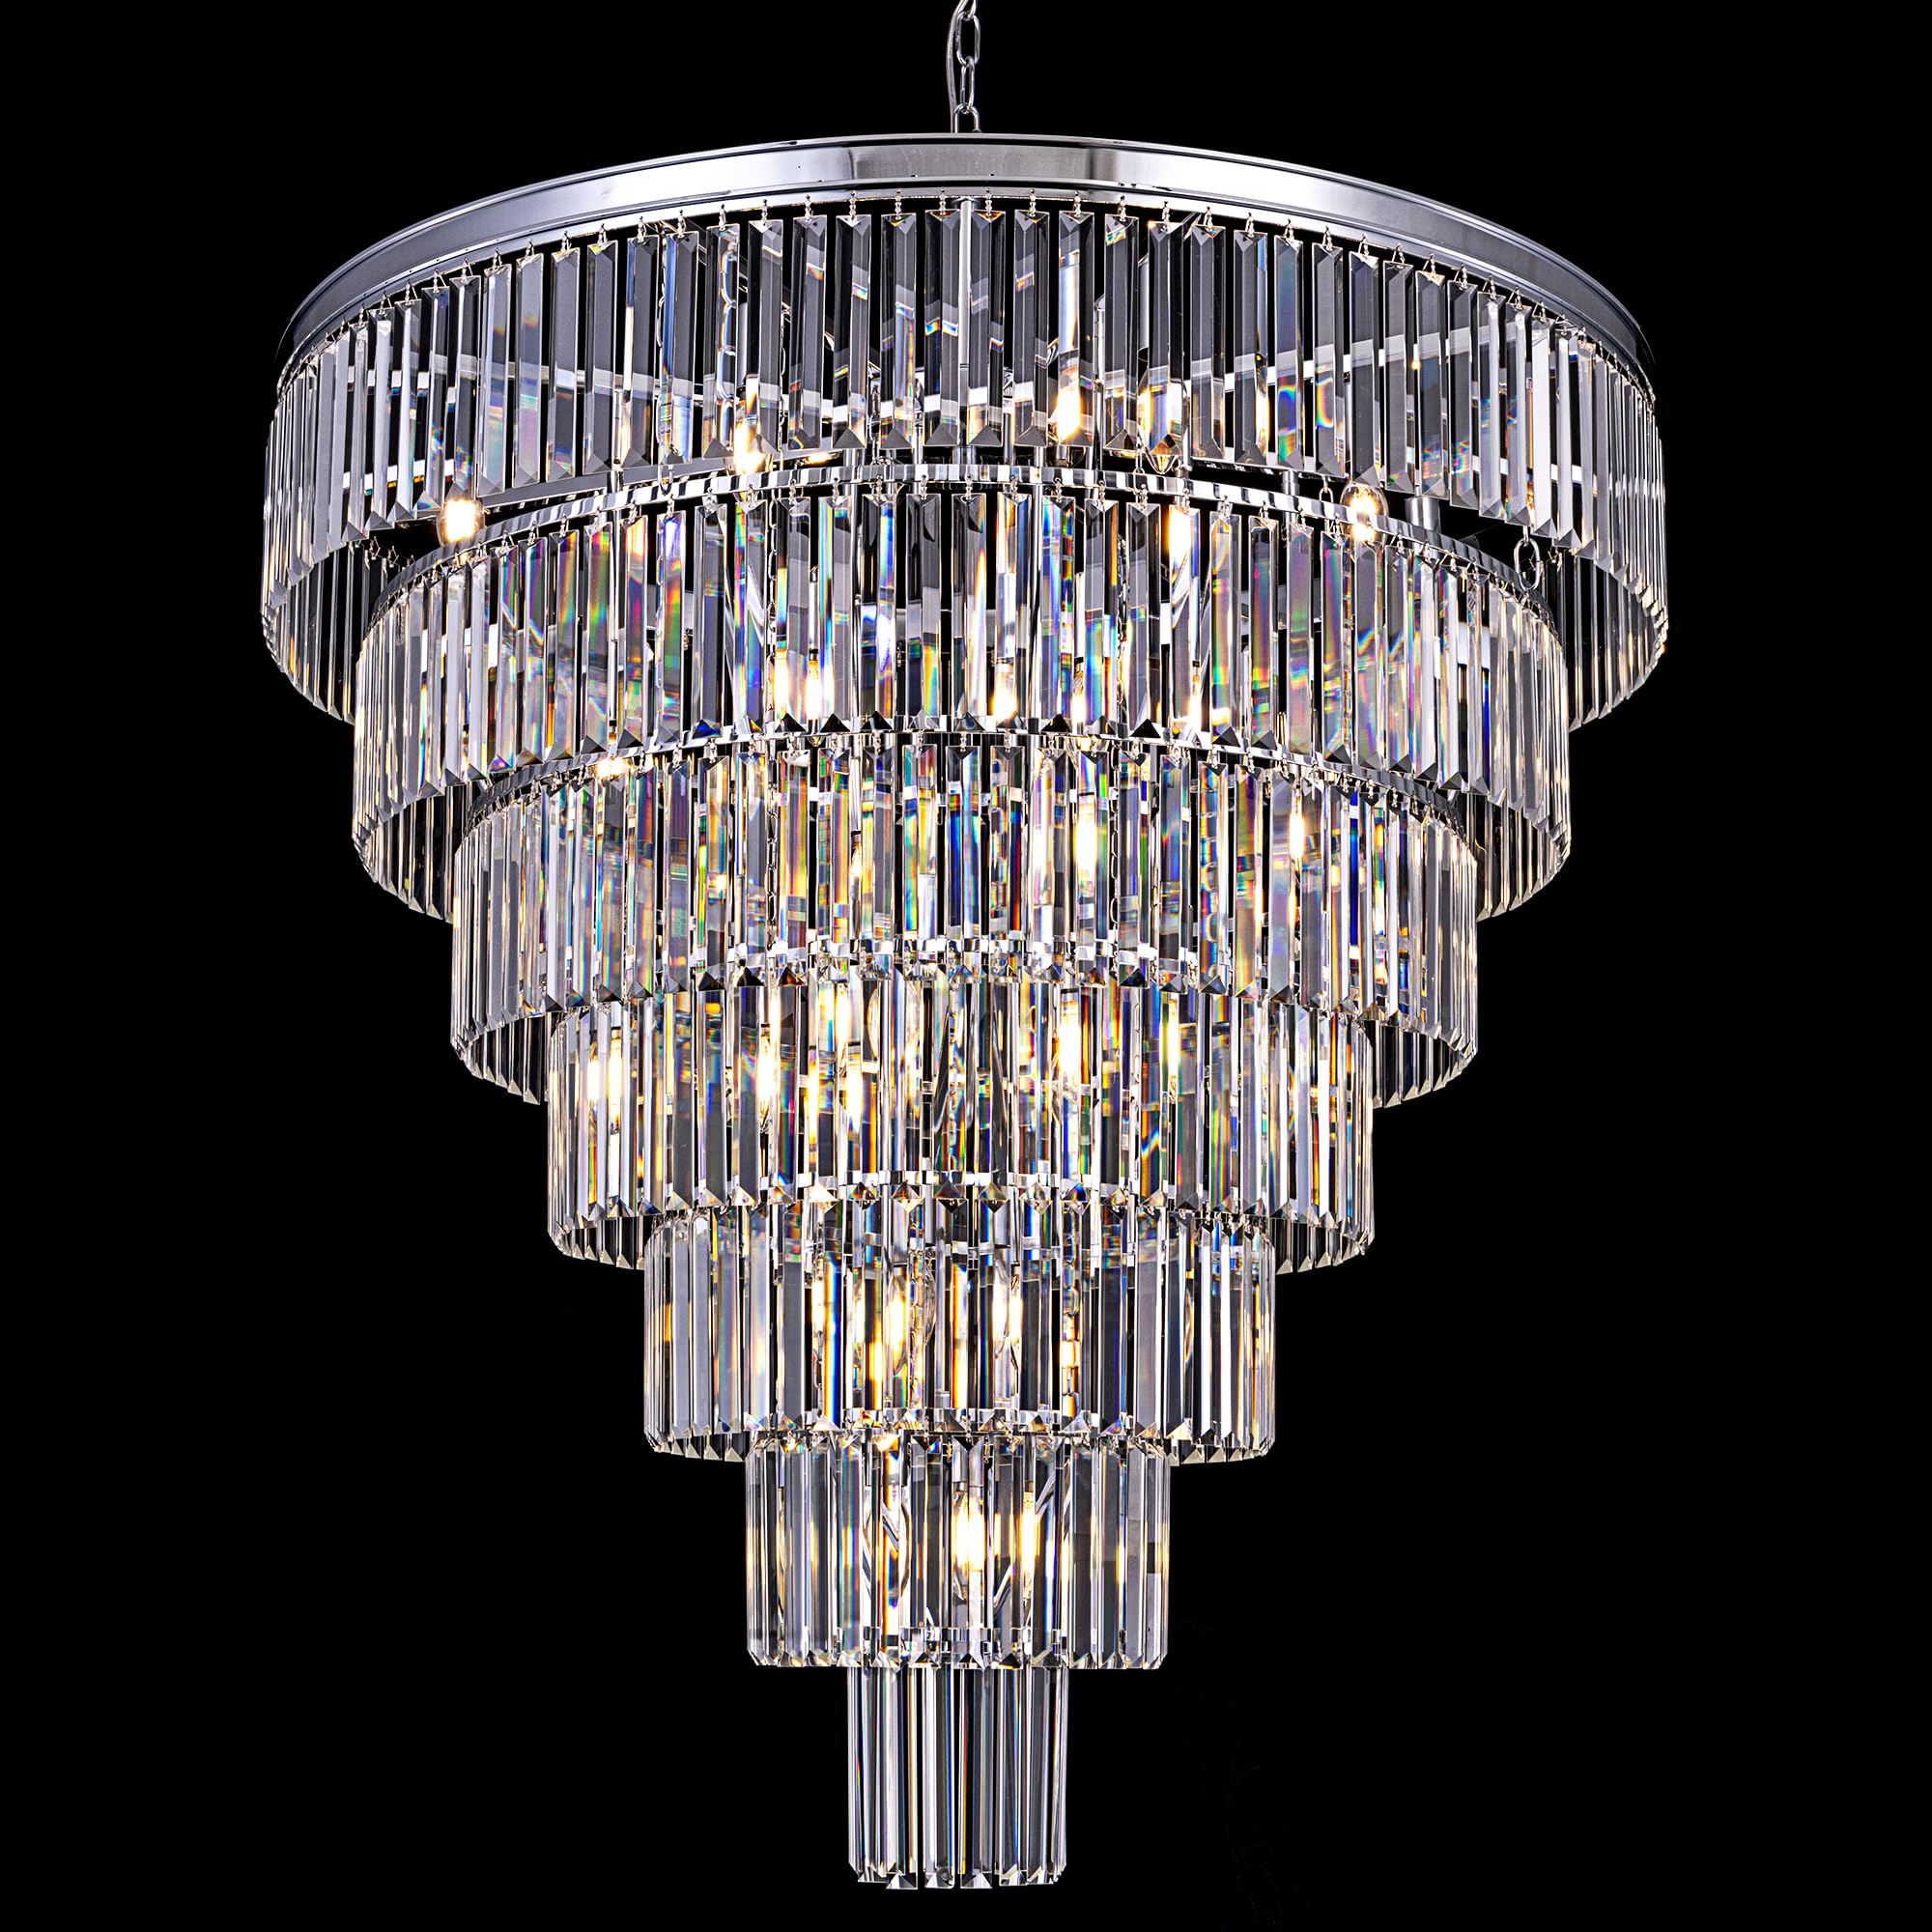
Figure 2: The TOCHIC 40-inch 7-Tier Chrome Crystal Chandelier, showcasing its design and scale in a spacious living room setting.
5. Operating Instructions
Once installed, operate your chandelier using a standard wall switch. This fixture is designed to be dimmable, allowing you to adjust the light intensity with a compatible dimmer switch (not included) and dimmable E12 bulbs.
- Power On/Off: Use the wall switch connected to the fixture to turn the chandelier on or off.
- Dimming Function: If a compatible dimmer switch is installed, rotate or slide the dimmer control to adjust the brightness of the lights. Ensure you are using dimmable E12 bulbs for this feature to work correctly.
6. Maintenance
Regular maintenance will help preserve the beauty and functionality of your chandelier.
- Cleaning the Crystals:
- Turn off the power to the fixture before cleaning.
- Use a soft, lint-free cloth to gently wipe the crystals. For a deeper clean, lightly dampen the cloth with a mild glass cleaner or distilled water. Avoid spraying cleaner directly onto the crystals or metal frame.
- Dry immediately with a clean, dry cloth to prevent water spots.
- Cleaning the Metal Frame:
- Wipe the chrome finish with a soft, dry cloth. Avoid abrasive cleaners or harsh chemicals, as these can damage the finish.
- Bulb Replacement:
- Ensure the power is off and bulbs have cooled completely before attempting to replace them.
- Unscrew the old bulb and screw in a new E12 bulb (max 60W).
7. Troubleshooting
If you encounter issues with your chandelier, refer to the following common problems and solutions:
| Problem | Possible Cause | Solution |
|---|---|---|
| Light does not turn on |
|
|
| Lights flicker |
|
|
| Crystals appear dull or dirty | Dust or fingerprints on crystals. | Clean crystals as described in the Maintenance section. |
If the problem persists after attempting these solutions, please contact customer support.
8. Specifications
| Feature | Detail |
|---|---|
| Brand | TOCHIC |
| Model Name | DS-CCL061-Chrome-US |
| Color | Chrome |
| Material | Crystals |
| Style | Modern |
| Product Dimensions | 40"L x 40"W x 50"H (Fixture only) |
| Chain Length | 71" (Adjustable) |
| Light Fixture Form | Chandelier |
| Room Type | Bedroom, Dining Room, Entryway, Foyer, Living Room |
| Power Source | Corded Electric |
| Installation Type | Suspended, Ceiling Mount |
| Special Features | Adjustable Height, Dimmable |
| Control Method | Touch (via compatible dimmer switch) |
| Light Source Type | LED (compatible) |
| Number of Light Sources | 20 |
| Voltage | 110 Volts |
| Bulb Base | E12 |
| Max Wattage per Bulb | 60W |
| Item Weight | 59.9 pounds |
| Assembly Required | Yes |
9. Warranty and Support
This TOCHIC chandelier comes with a Limited Warranty. Please refer to the warranty card included in your package or contact TOCHIC customer service for specific terms and conditions.
For technical assistance, missing parts, or warranty claims, please contact TOCHIC customer support through the retailer where the product was purchased or visit the official TOCHIC website for contact information.


