Introduction
This manual provides detailed instructions for the installation, operation, and maintenance of your AIDA Single Pole Motion Sensor Light Switch. This device is designed to enhance convenience and energy efficiency by automatically controlling lighting based on occupancy. Please read this manual thoroughly before installation and use to ensure proper function and safety.

Image: The AIDA Single Pole Motion Sensor Light Switch shown alongside its product packaging, highlighting its design and key features.
Important Safety Information
WARNING: RISK OF ELECTRIC SHOCK. Improper installation can be dangerous or illegal. Always consult a qualified electrician if you are unsure about any part of the installation process.
- Turn off power: Always disconnect power at the circuit breaker or fuse box before installing or servicing the switch.
- Neutral Wire Required: This device requires a neutral wire for proper operation. If your electrical box does not have a neutral wire, this switch is not compatible.
- Single Pole Only: This switch is designed for single-pole control only and is not suitable for 3-way or multiple-way circuits.
- UL/CUL Certified: The switch is UL and CUL listed, ensuring compliance with safety standards.
- Operating Voltage: Ensure your electrical system operates at 120 Volts (AC).
Package Contents
Verify that all components are present before beginning installation:
- AIDA Single Pole Occupancy Motion Sensor Light Switch
- Screwless Wall Plate
- Wire Nuts (Terminal caps)
- Mounting Screws
- Instruction Manual (this document)
Product Specifications
| Feature | Detail |
|---|---|
| Input Rating | 120/277V~50/60Hz |
| Applicable Load Types | 200W LED/CFL, 500W MLV, 500W INC/HAL, 5A Ballast (120V), 1/6HP Fan (4.4A 120V) |
| Switch Type | Single pole |
| Wire Gauge | #14 - #12 AWG |
| Wiring Type | Terminal cap |
| Operating Temperature | 32°F to 104°F (0°C to 40°C) |
| Product Size | 4.17"x1.73"x1.77" (106x44x45mm) |
| Material | Copper, Brass (Contact Material) |
| Control Method | Sensor, Touch |

Image: A visual representation of the product dimensions and a detailed table of specifications for the AIDA motion sensor switch.

Image: A chart illustrating the universal compatibility of the AIDA motion sensor switch with various load types including LED/CFL, MLV, INV/HAL, Ballast, and Fan.
Setup and Installation
Before You Begin:
- Turn off power: Locate your circuit breaker panel and turn off the power to the switch box you will be working on. Verify power is off using a voltage tester.
- Identify Wires: Carefully remove the existing wall plate and switch. Identify the following wires:
- Line Wire (Black): Carries power from the circuit breaker.
- Load Wire (Black): Carries power to the light fixture.
- Neutral Wire (White): Required for this switch.
- Ground Wire (Green or Bare Copper): For safety.
- Confirm Neutral Wire: This switch requires a neutral wire. If you do not have a neutral wire (typically white) in your electrical box, this switch is not compatible.
Wiring Instructions:
Follow the wiring diagram carefully. Use the provided wire nuts to secure connections.
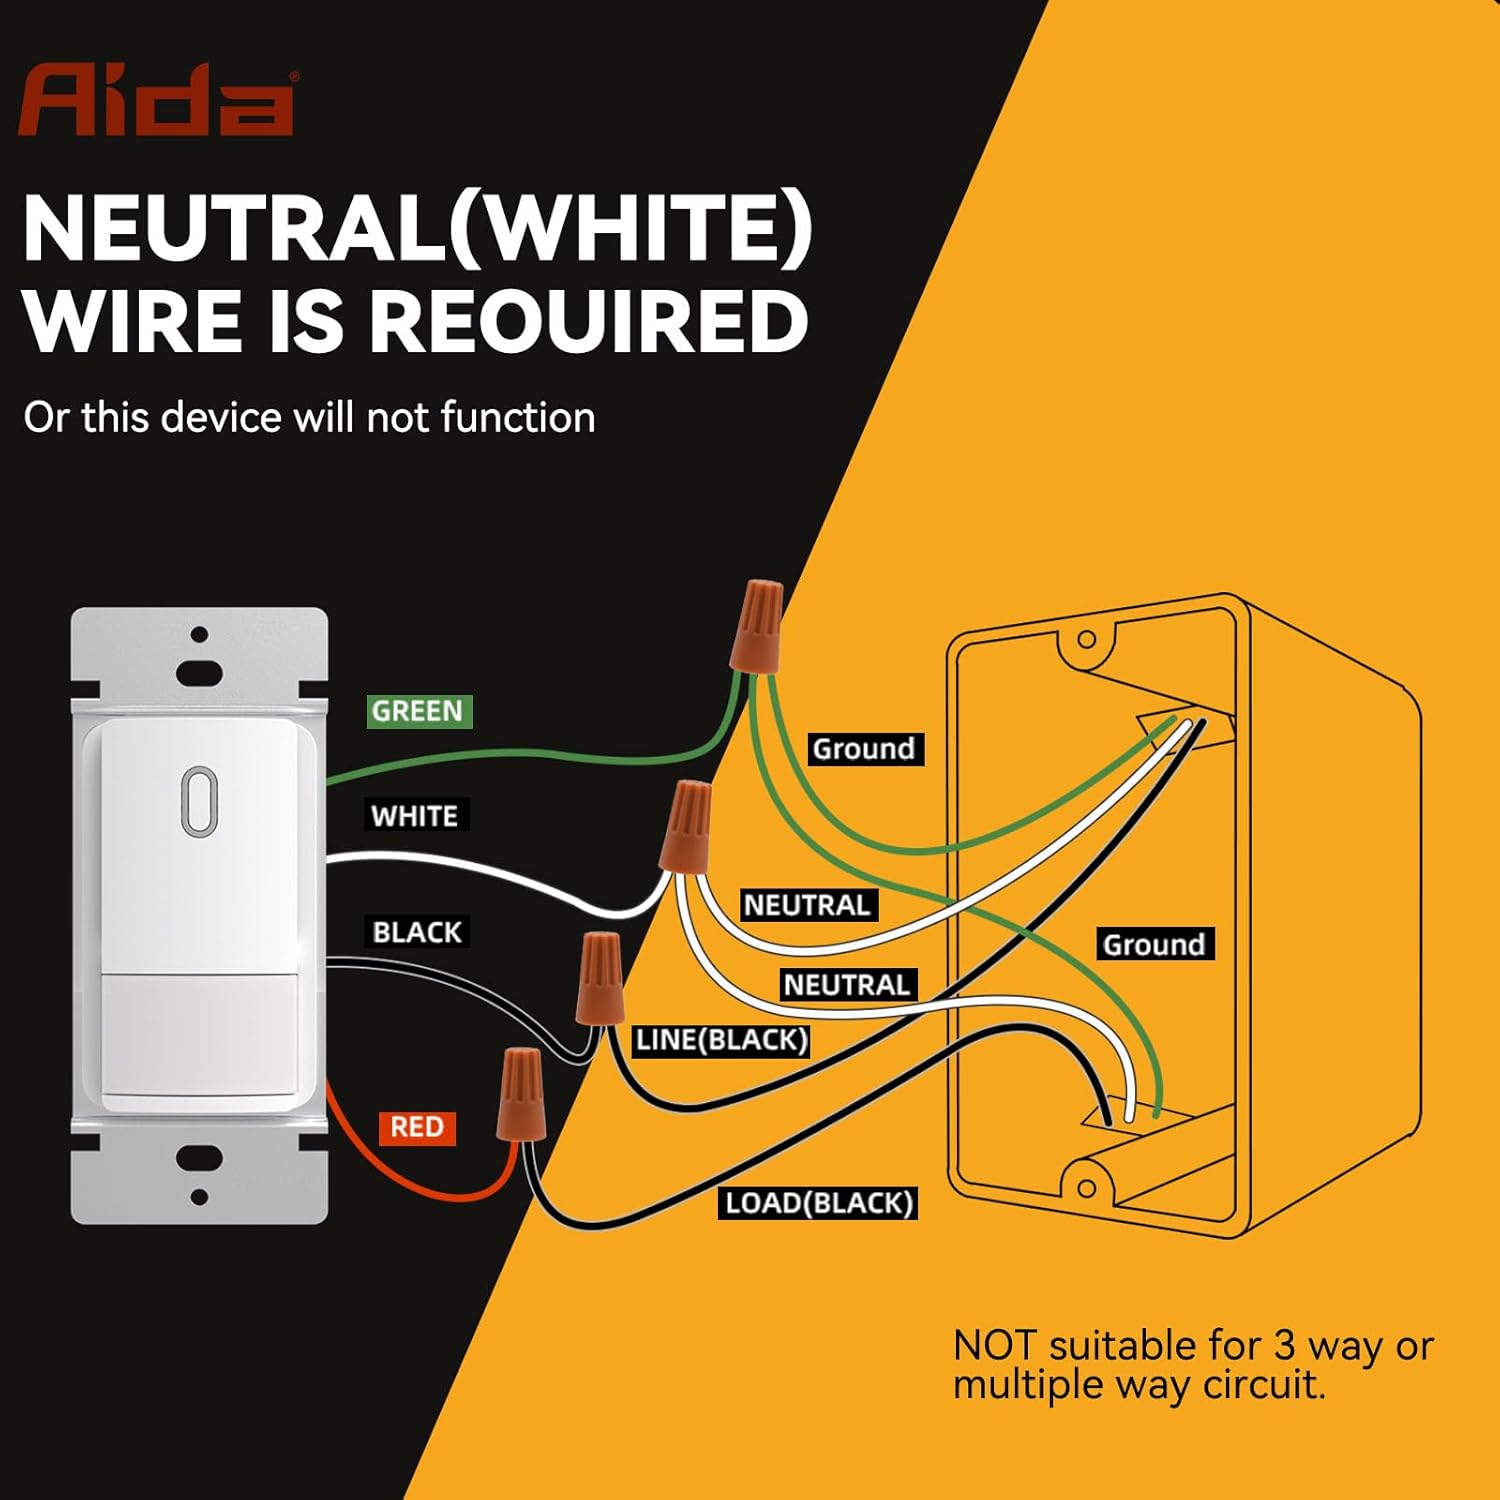
Image: A detailed wiring diagram showing connections for the AIDA motion sensor light switch, including Line, Load, Neutral, and Ground wires. It explicitly states that a neutral wire is required and the switch is not suitable for 3-way or multiple-way circuits.
- Connect the GREEN wire from the switch to your house's GROUND wire.
- Connect the WHITE wire from the switch to your house's NEUTRAL wire.
- Connect the BLACK wire from the switch to your house's LINE (hot) wire.
- Connect the RED wire from the switch to your house's LOAD wire (to the light fixture).
Important: Ensure all connections are secure and insulated with wire nuts. This switch is for single-pole applications only. Do not use in 3-way or multi-way circuits.
Mounting the Switch:
- Carefully fold the wires and push the switch into the electrical box.
- Secure the switch to the electrical box using the provided screws.
- Attach the screwless wall plate.
- Restore power at the circuit breaker.

Image: A diagram showing the precise dimensions of the AIDA motion sensor light switch, its mounting bracket, and the screwless wall plate for easy installation.
Operating Instructions and Customization
The AIDA motion sensor switch offers various modes and adjustable settings to suit your needs.
Modes of Operation:
- Occupancy Mode (Auto-On/Auto-Off): Lights automatically turn ON when motion is detected and OFF after a set delay when no motion is detected. Ideal for high-traffic areas like bathrooms, laundry rooms, and kitchens.
- Vacancy Mode (Manual-On/Auto-Off): Lights must be manually turned ON, but will automatically turn OFF after a set delay when no motion is detected. Suitable for bedrooms or TV rooms where you prefer manual control for turning on lights.
Adjustable Settings:
The switch features internal dip switches for customizing settings. Carefully remove the faceplate to access these controls.

Image: A close-up view of the AIDA motion sensor switch's internal settings, showing dip switches for Adjustable Light Level (Timeout), PIR Sensitivity, and Ambient Light Sensor Mode.
- Adjustable Light Level (Timeout): This setting determines how long the light stays on after the last detected motion. Options typically include 30 seconds, 1 minute, 5 minutes, 15 minutes, or 30 minutes. Refer to the switch's internal labels for specific settings.
- PIR Sensitivity: Adjusts the sensitivity of the Passive Infrared (PIR) sensor to detect motion. Settings range from Low (L) to High (H). A higher sensitivity detects smaller movements or movements at a greater distance.
- Ambient Light Sensor Mode: Controls how the switch reacts to ambient light.
- Low/High: The switch will only turn on lights if the ambient light level is below a certain threshold (e.g., only turn on at night).
- Off: The ambient light sensor is disabled, and the switch will turn on lights regardless of ambient light.
- Custom: Allows for more specific ambient light level adjustments.
Note: After adjusting any internal settings, reattach the faceplate securely.

Image: A detailed view of the AIDA motion sensor switch with its cover removed, showing the dip switches for adjusting timeout, PIR sensitivity, and ambient light sensor mode.
Maintenance
The AIDA Motion Sensor Light Switch is designed for long-lasting, maintenance-free operation. To ensure optimal performance:
- Cleaning: Periodically wipe the switch and wall plate with a soft, damp cloth. Do not use abrasive cleaners or solvents, as these can damage the finish or internal components.
- Obstruction: Ensure the sensor lens is not obstructed by furniture, decorations, or other objects, as this can impair motion detection.
- No User Serviceable Parts: There are no user-serviceable parts inside the switch. Do not attempt to open or repair the unit beyond adjusting the dip switches.
Troubleshooting
| Problem | Possible Cause | Solution |
|---|---|---|
| Light does not turn ON with motion. |
|
|
| Light stays ON constantly. |
|
|
| Light turns OFF too quickly or too slowly. |
|
|
| Switch makes a clicking noise. |
|
|
Warranty and Customer Support
AIDA products are manufactured to high-quality standards and are backed by a limited warranty. For specific warranty details, please refer to the warranty card included with your purchase or visit the official AIDA website.
If you encounter any issues or have questions regarding your AIDA Single Pole Motion Sensor Light Switch, please contact our customer support team:
- Website: Visit the AIDA Store on Amazon (for general product information)
- Email: Refer to product packaging or official website for contact email.
- Phone: Refer to product packaging or official website for contact phone number.
Please have your model number (B0DM4SGNBQ) and purchase date ready when contacting support.


