Introduction
Thank you for choosing the Ashfly Kids Digital Pocket Microscope. This device is designed to introduce children to the microscopic world, offering a magnification range of 10x to 1000x. Its compact and user-friendly design makes it ideal for exploration both indoors and outdoors. This manual provides essential information for the safe and effective use of your new microscope.
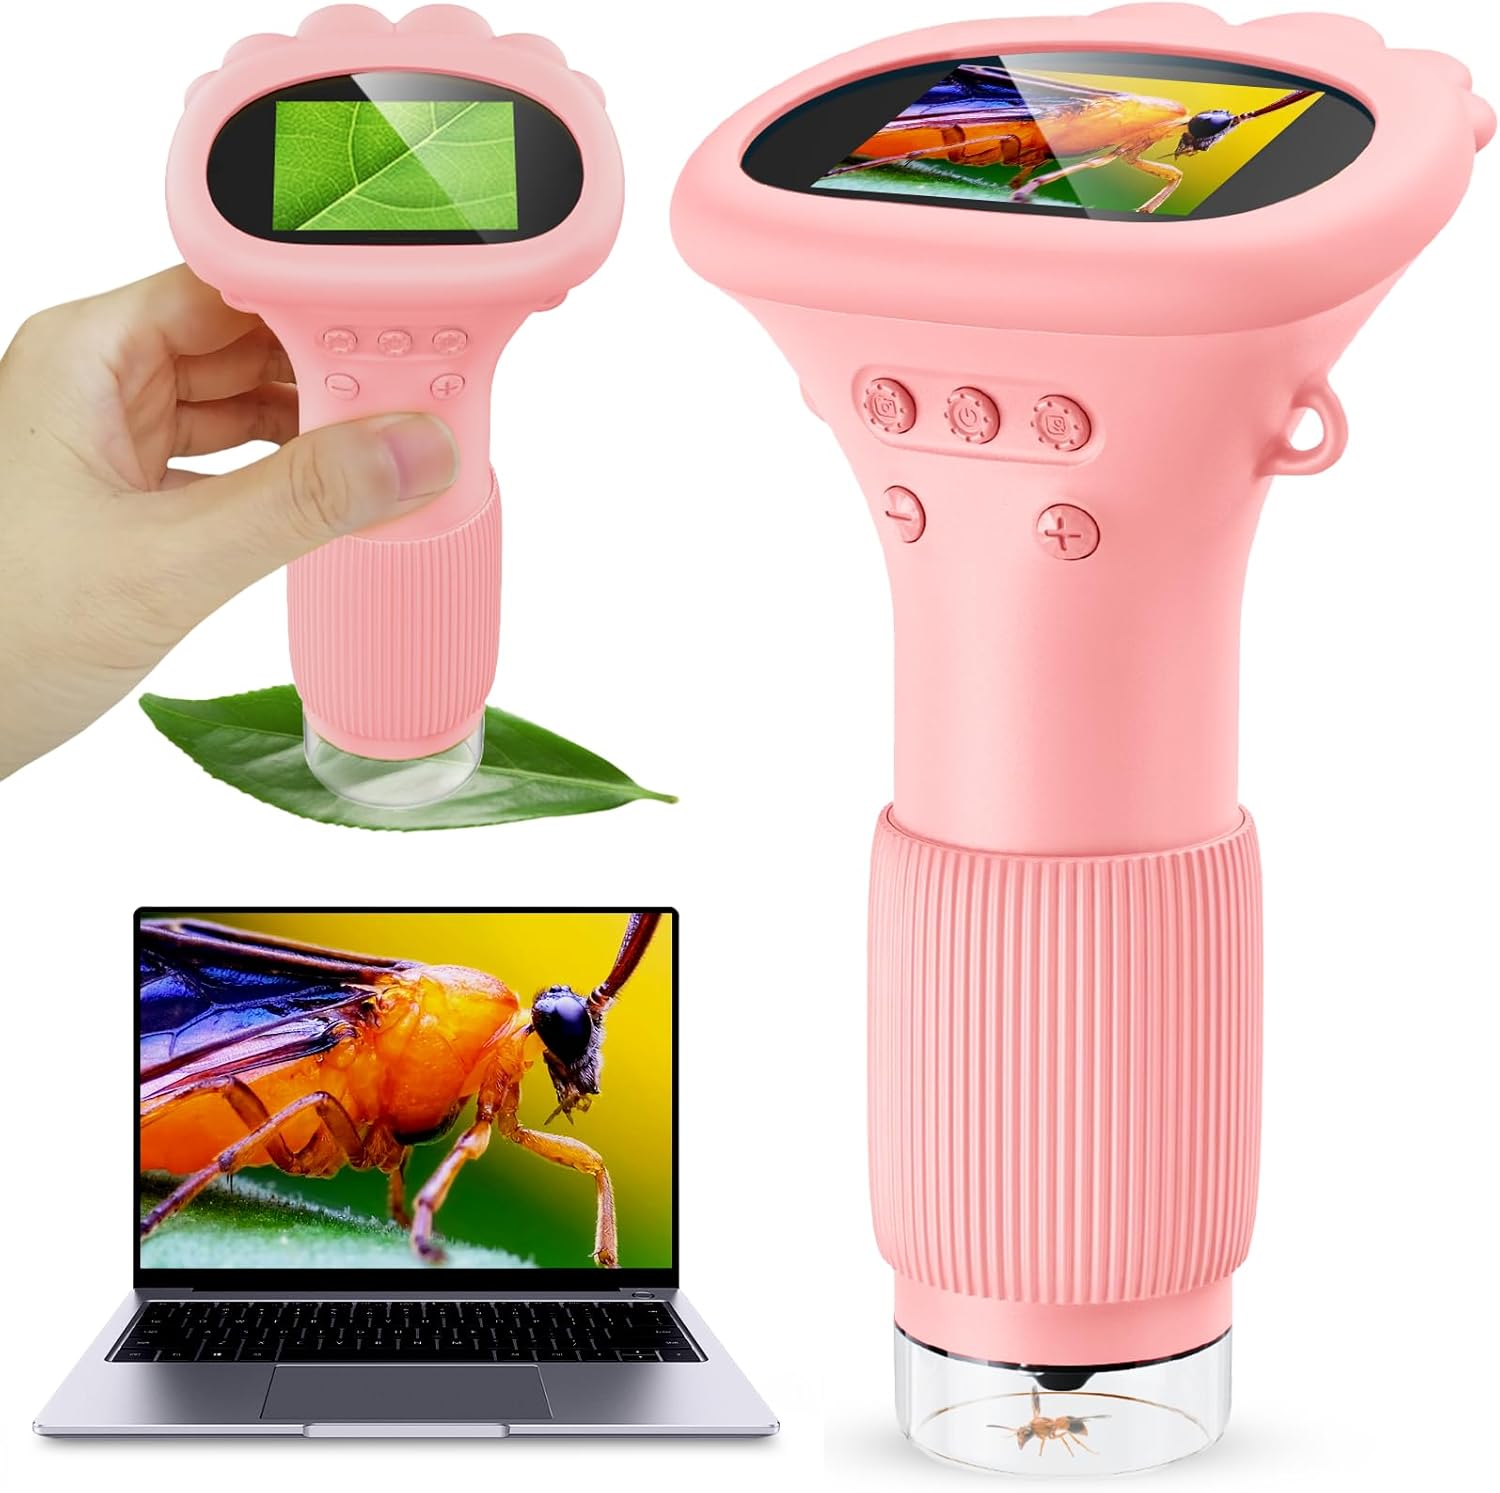
Figure 1: Ashfly Kids Digital Pocket Microscope in use, magnifying a leaf and an insect, with a laptop showing a magnified view.
Safety Information
- This product is intended for educational and recreational use by children aged 3 and above, under adult supervision.
- Do not look directly into bright light sources with the microscope.
- Keep the device away from water and excessive moisture to prevent damage.
- Avoid dropping or subjecting the microscope to strong impacts.
- Use only the provided Type-C rechargeable cable for charging.
Package Contents
- 1x Ashfly Kids Digital Pocket Microscope
- 1x Portable Neck Lanyard
- 1x User Manual (this document)
- 1x Type-C Rechargeable Cable

Figure 2: The Ashfly Kids Digital Pocket Microscope, lanyard, and charging cable included in the package.
Product Features
- Excellent Digital Magnification: Offers a 10x-1000x magnification range for observing tiny details.
- 2.0-Inch Digital Screen: Provides a clear display for easy viewing.
- Mini Portable Design: Detachable kit and portable lanyard for on-the-go exploration.
- 3 Levels Brightness Adjustment: Equipped with 8 LED lights for optimal viewing in various lighting conditions.
- MacOS & Windows Connectivity: Connect to a computer for a larger view and enhanced exploration.
- Built-in Storage: Stores up to 400 photos without an external memory card.

Figure 3: The 2-inch high-definition display of the microscope, showing a magnified view of a leaf.

Figure 4: The microscope's adjustable LED lights, offering three levels of brightness for clear observation.
Setup
- Charging: Before first use, fully charge the microscope using the provided Type-C cable. Connect the cable to the microscope's charging port and a compatible USB power source. The battery indicator on the screen will show charging status.
- Attaching Lanyard: If desired, attach the portable neck lanyard to the designated loop on the microscope for easy carrying and to prevent accidental drops.
- Power On: Press and hold the power button (usually marked with a power symbol) for a few seconds until the screen illuminates.
Operating Instructions
1. Observation and Magnification
- Place the bottom lens of the microscope directly over the object you wish to observe.
- Adjust the focus by rotating the ribbed ring near the bottom of the microscope until the image on the screen is clear.
- Use the '+' and '-' buttons to digitally zoom in or out, adjusting the magnification level.
2. Adjusting LED Lights
- The microscope features 8 built-in LED lights to illuminate your subject.
- Press the light adjustment button (often indicated by a sun icon) to cycle through 3 different brightness levels to achieve optimal visibility.
3. Taking Photos and Videos
- While observing, press the photo button (camera icon) to capture a still image.
- To record a video, press and hold the photo button for a few seconds. Press again to stop recording.
- Captured media is saved to the internal memory.
4. Connecting to a Computer (MacOS & Windows)
- Connect the microscope to your computer using the Type-C cable.
- Follow the instructions in the user manual (this document) for specific software installation or driver requirements for your operating system. This allows for a larger viewing experience and easier file management.

Figure 5: The compact and portable design of the microscope, shown with its neck lanyard.

Figure 6: The microscope connected to a laptop, showing a magnified view on a larger screen.
Video 1: Official Ashfly demonstration of the microscope's magnification capabilities on various small objects, including insects.
Maintenance
- Cleaning: Use a soft, dry cloth to clean the exterior of the microscope. For the lens, use a specialized lens cleaning cloth and solution. Do not use abrasive cleaners or solvents.
- Storage: Store the microscope in a cool, dry place away from direct sunlight and extreme temperatures.
- Battery Care: For optimal battery life, avoid fully discharging the battery frequently. Charge it regularly, even if not in use for extended periods.
Troubleshooting
| Issue | Possible Solution |
|---|---|
| Microscope does not power on. | Ensure the battery is charged. Connect to power source and try again. |
| Image on screen is blurry. | Adjust the focus ring near the bottom of the microscope. Ensure the lens is clean. |
| Cannot connect to computer. | Ensure the Type-C cable is securely connected. Check computer's USB ports and drivers. Refer to your computer's manual for external device connection. |
| LED lights are dim or not working. | Check battery level. Press the light adjustment button to cycle through brightness levels. |
Specifications
| Feature | Detail |
|---|---|
| Model Number | inskam372 |
| Magnification Range | 10x-1000x |
| Screen Size | 2.0 inches |
| Light Source | 8 LED lights (3 brightness levels) |
| Connectivity | USB (MacOS & Windows compatible) |
| Internal Storage | Up to 400 photos |
| Battery Type | 1 Lithium Ion battery (included) |
| Product Dimensions | 1.97 x 1.18 x 6.3 inches |
| Item Weight | 8.4 ounces (0.24 Kilograms) |
| Material | Plastic |
Warranty and Support
Ashfly products are designed for quality and durability. For specific warranty information regarding your Kids Digital Pocket Microscope, please refer to the warranty card included in your product packaging or visit the official Ashfly website.
If you encounter any technical issues or have questions about your product, please contact Ashfly customer support. Contact details can typically be found on the product packaging or the official brand website.


