1. Introduction
Thank you for choosing the AM ARROWMAX Mini Electric Drill Pen. This precision tool is designed for detailed drilling tasks in various materials, offering portability, adjustable speed, and an intuitive OLED display. Please read this manual thoroughly before use to ensure safe and optimal operation.

Image 1.1: The AM ARROWMAX Mini Electric Drill Pen with its accompanying bit storage case.
2. Safety Information
- Always wear appropriate eye protection when operating the drill.
- Keep hands and loose clothing away from rotating parts.
- Ensure the workpiece is securely clamped or held to prevent movement during drilling.
- Do not operate the drill in wet conditions or near flammable liquids or gases.
- Keep the tool out of reach of children.
- Use only the specified drill bits and accessories.
- Disconnect the power source (USB-C cable) before changing bits or performing maintenance.
- If the tool shows signs of damage or malfunction, discontinue use immediately.
3. Package Contents
Verify that all items are present in your package:
- 1 x AM ARROWMAX Mini Electric Drill Pen
- 10 x Titanium-Coated Steel Drill Bits (0.6mm to 2.2mm)
- 1 x USB-C Charging Cable
- 1 x Instruction Manual (this document)
- 1 x Magnetic CNC Alloy Storage Box (for drill bits)

Image 3.1: Overview of the complete kit, including the drill pen, drill bits, storage box, manual, and USB-C cable.
4. Product Overview
The AM ARROWMAX Mini Electric Drill Pen features a compact design with an aluminum alloy body, an OLED display, LED work lights, and a USB-C charging port. It offers 5 adjustable speed settings for versatile use.
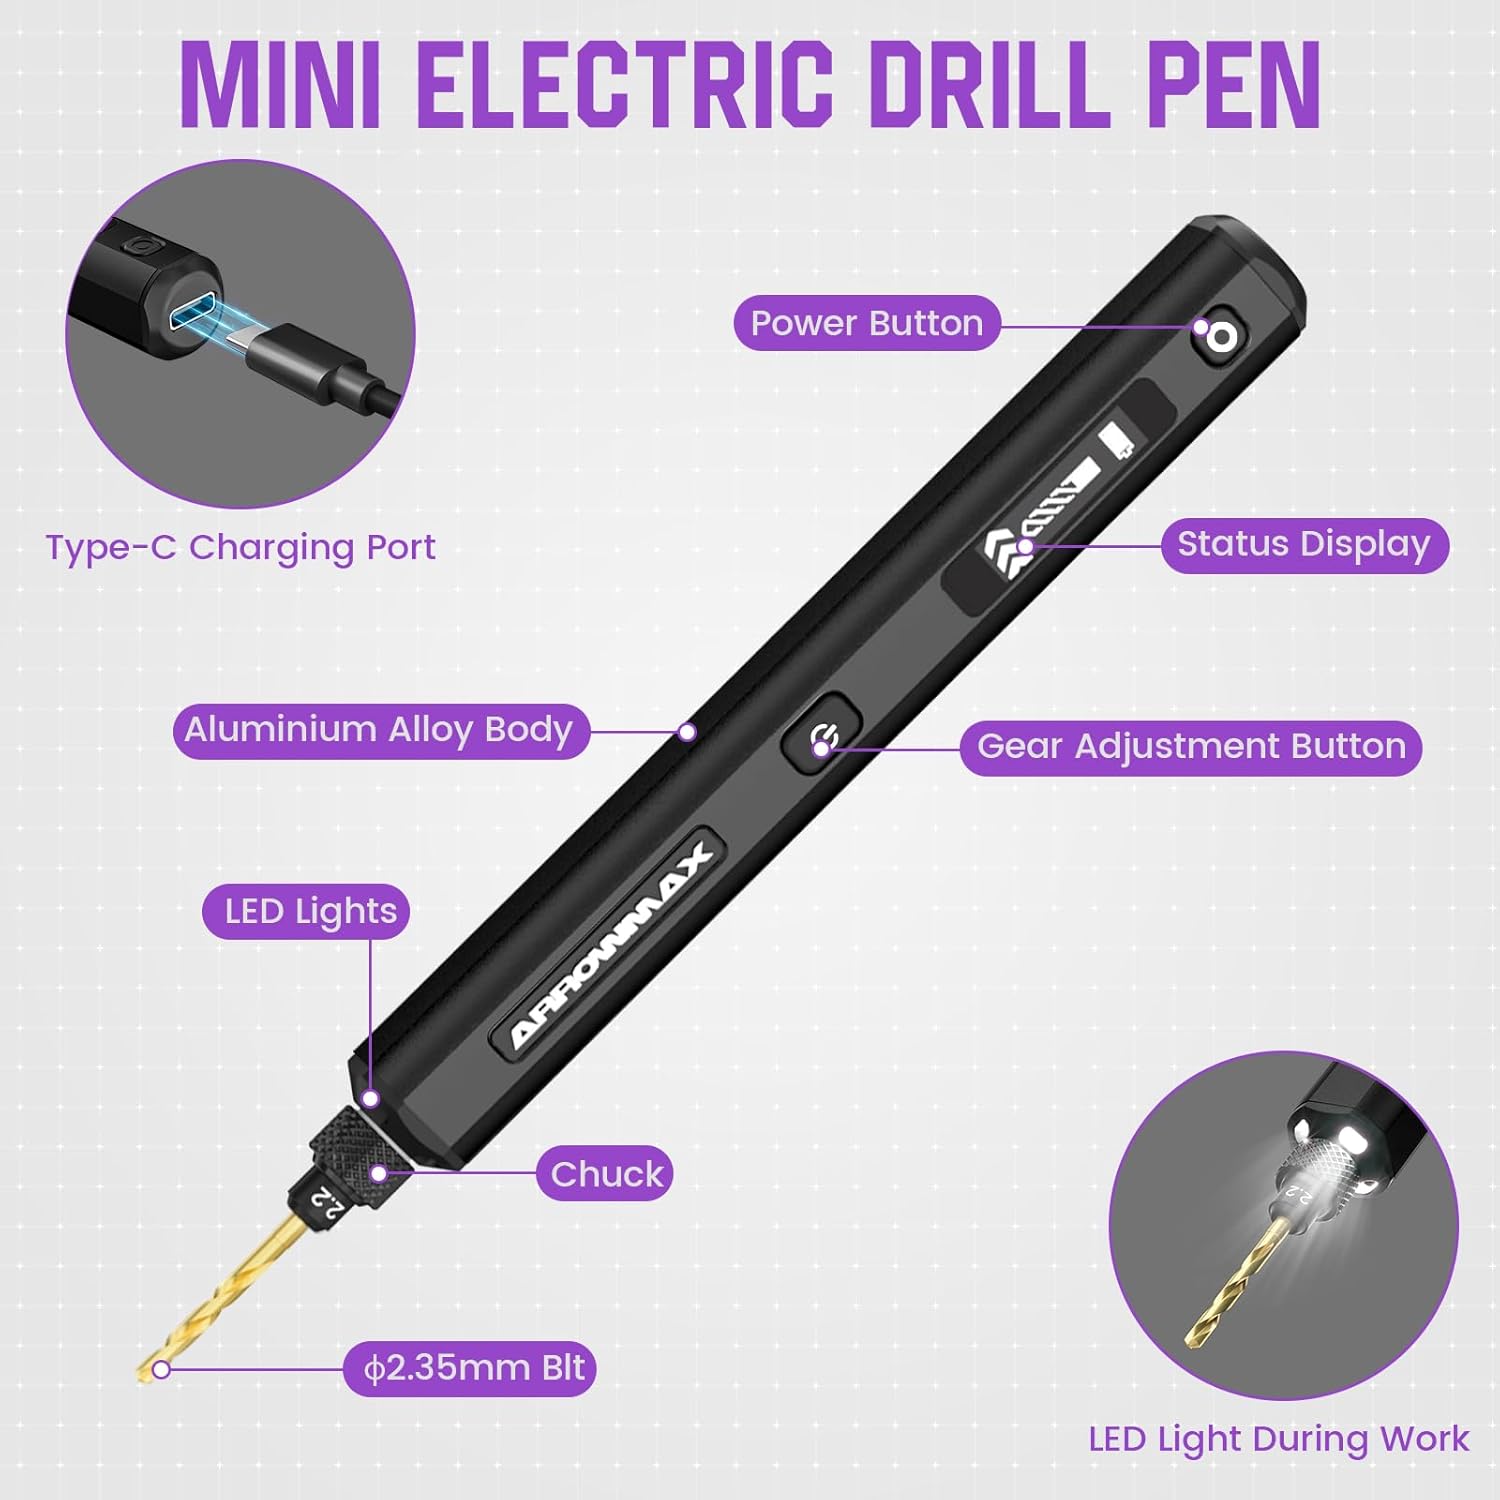
Image 4.1: Detailed diagram highlighting key components: Type-C Charging Port, Power Button, Status Display (OLED), Gear Adjustment Button, Aluminium Alloy Body, LED Lights, Chuck, and ⌀2.35mm Bit.
5. Setup
5.1 Charging the Device
- Connect the provided USB-C cable to the charging port on the drill pen.
- Connect the other end of the USB-C cable to a compatible 5V USB power adapter (not included) or a computer USB port.
- The OLED display will indicate the charging status. A full charge typically takes approximately 3 hours and provides up to 3 hours of continuous use.
5.2 Installing/Changing Drill Bits
- Ensure the drill pen is powered off before changing bits.
- Unscrew the chuck at the front of the drill pen counter-clockwise to loosen it.
- Insert the desired titanium-coated steel drill bit into the chuck. Ensure the bit is fully seated.
- Tighten the chuck clockwise until the drill bit is securely held. Do not overtighten.

Image 5.1: The included titanium-coated steel drill bits range from 0.6mm to 2.2mm, all with a ⌀2.35mm shaft.
6. Operating Instructions
6.1 Power On/Off
- To power on, press and hold the Power Button (⑂) for approximately 2 seconds. The OLED display will illuminate.
- To power off, press and hold the Power Button (⑂) again for approximately 2 seconds.
6.2 Adjusting Speed (RPM)
- Once powered on, tap the Gear Adjustment Button (⇔) to cycle through the 5 available speed settings.
- The OLED display will show the current speed level (1-5) and corresponding RPM.
- Available speeds: Level 1 (500 RPM), Level 2 (600 RPM), Level 3 (700 RPM), Level 4 (800 RPM), Level 5 (900 RPM).
6.3 Changing Rotation Direction
- While the drill is operating, quickly double-press the Power Button (⑂) to toggle the rotation direction (clockwise/counter-clockwise). The OLED display will indicate the current direction.
6.4 LED Work Lights
- The integrated LED lights automatically illuminate when the drill is operating, providing better visibility of your workpiece.

Image 6.1: The OLED display indicates the current speed level and allows for rotation direction changes by toggling the power button.
7. Maintenance
7.1 Cleaning
- After each use, wipe the drill pen with a clean, dry cloth to remove dust and debris.
- Do not use harsh chemicals or abrasive cleaners.
- Ensure the charging port is free of debris.
7.2 Drill Bit Care
- Clean drill bits after use to remove material residue.
- Store drill bits in the provided magnetic storage box to prevent damage and loss.
- Replace dull or damaged drill bits to maintain drilling precision and prevent strain on the motor.
7.3 Storage
- Store the drill pen and accessories in a cool, dry place, away from direct sunlight and extreme temperatures.
- Ensure the device is fully charged before long-term storage to preserve battery health.
8. Troubleshooting
| Problem | Possible Cause | Solution |
|---|---|---|
| Drill does not turn on. | Low battery or no charge. | Charge the drill pen using the USB-C cable. Ensure the charging indicator is active. |
| Drill bit is loose or wobbles. | Chuck not tightened sufficiently. | Power off the drill, then securely tighten the chuck around the drill bit. |
| Drill stops rotating or operates intermittently. | Low battery; excessive pressure during drilling; motor overload. | Recharge the device. Reduce pressure on the workpiece. Allow the motor to cool down if it feels warm. Ensure the bit is not jammed. |
| Device not charging. | Faulty cable or power adapter; debris in port. | Try a different USB-C cable and power adapter. Clean the USB-C port gently. |
| OLED display is not working. | Device is off; malfunction. | Ensure the device is powered on. If the issue persists, contact customer support. |
9. Specifications
| Feature | Detail |
|---|---|
| Brand | ARROWMAX |
| Model | SDS-BLACK (230875-B) |
| Power Source | Battery Powered |
| Battery Type | Lithium Polymer |
| Battery Capacity | 500 mAh |
| Voltage | 5 Volts |
| Number of Speeds | 5 |
| Maximum Rotational Speed | 900 RPM |
| Drill Bit Shaft Diameter | ⌀2.35mm (Universal) |
| Included Drill Bit Sizes | 0.6mm, 0.8mm, 1.0mm, 1.2mm, 1.4mm, 1.5mm, 1.6mm, 1.8mm, 2.0mm, 2.2mm |
| Special Features | Portable, LED Lights, OLED Display |
| Product Dimensions | 7.28"L x 2.76"W x 1.18"H |
| Item Weight | 9.1 ounces |
| Material | Metal |
10. Warranty and Support
For warranty information and customer support, please refer to the official ARROWMAX website or contact your retailer. Keep your purchase receipt as proof of purchase.
Note on Videos: The provided product data indicates the presence of videos. However, specific video URLs and metadata (such as 'creator_type') required for embedding were not available. Therefore, no videos have been embedded in this manual.


