
1. Introduction
This manual provides comprehensive instructions for the Richmat HJH55 Wireless Remote Control, designed for use with compatible adjustable bed bases. It covers essential information regarding product setup, operation, maintenance, and troubleshooting to ensure optimal performance and user experience. This specific model is referred to as 'Remote 1'.
The Richmat HJH55 remote is compatible with various adjustable bed brands, including MLILY, MATTRESS FIRM, CLASSIC BRANDS, and INNOVA. Always verify compatibility with your specific control box device before attempting to pair.
2. Safety Information
- Keep the remote control away from water or excessive moisture.
- Avoid dropping the remote control or subjecting it to strong impacts.
- Do not attempt to disassemble or repair the remote control yourself. Refer to qualified service personnel.
- Ensure batteries are inserted with correct polarity.
- Remove batteries if the remote control will not be used for an extended period to prevent leakage.
3. Setup
3.1 Battery Installation
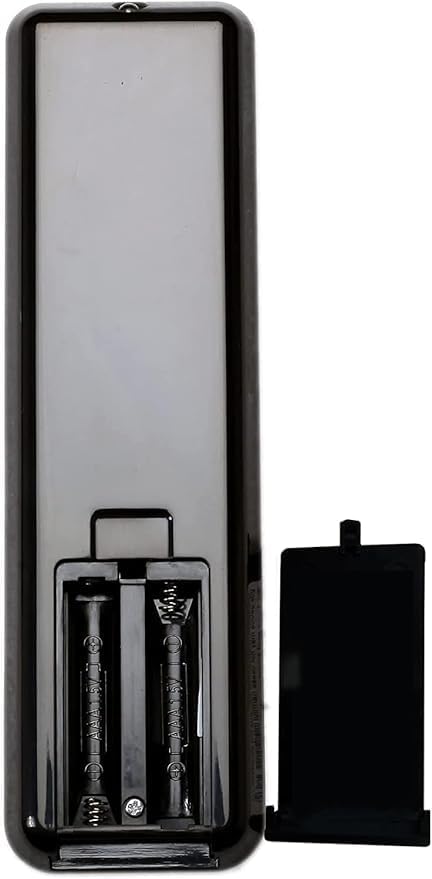
The Richmat HJH55 remote control requires two (2) AAA batteries (not included). To install or replace batteries:
- Locate the battery compartment cover on the back of the remote control.
- Slide the cover downwards to open the compartment.
- Insert two AAA batteries, ensuring the positive (+) and negative (-) terminals align correctly with the markings inside the compartment.
- Slide the cover back into place until it clicks securely.
3.2 Remote and Control Box Compatibility
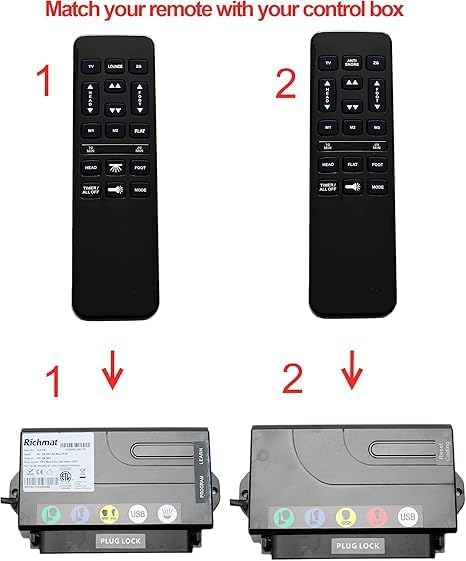
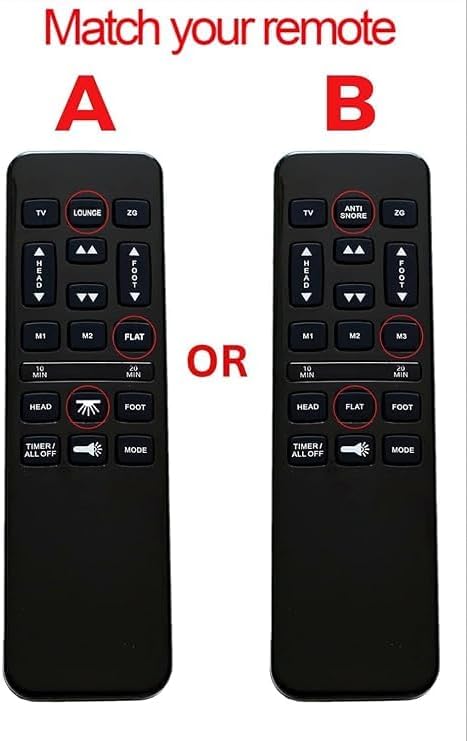
It is crucial to ensure that your remote control is compatible with your bed base's control box. Different Richmat remotes (e.g., Remote 1, Remote 2) are designed to work with specific control box models. Please check your existing remote and control box for matching model numbers or visual identification.
3.3 Pairing Instructions
The remote control does not come pre-paired with your bed base and requires manual pairing. Follow these steps to pair your Richmat HJH55 remote with its control box:
- Ensure Power: Make sure your bed base's power adapter is securely plugged into a wall outlet and the control box.
- Locate Cable Lock: Identify the cable lock mechanism on your power adapter's cable.
- Connect Cables: Connect the power adapter cable to the control box cable, ensuring a secure connection.
- Press Learn Button: On the side of your bed base's control box, locate and press the small 'Learn' or 'Program' button.
- Simultaneous Remote Press: While holding the 'Learn' button on the control box, simultaneously press and hold the HEAD UP (up arrow) and FOOT UP (up arrow) buttons on your Richmat HJH55 remote control.
- Confirmation: Continue holding the buttons until you hear a beep from the control box. This indicates successful pairing.
4. Operating Instructions
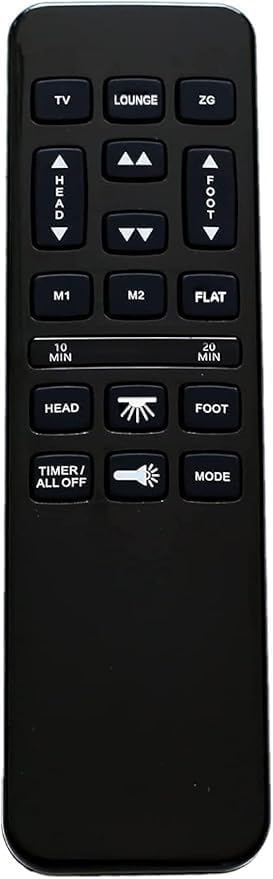
Familiarize yourself with the buttons on your Richmat HJH55 remote control to operate your adjustable bed base effectively.
4.1 Button Functions
- TV: Adjusts the bed to a preset TV viewing position.
- LOUNGE: Adjusts the bed to a preset lounge position.
- ZG (Zero Gravity): Adjusts the bed to a preset Zero Gravity position, which elevates the head and feet to promote circulation and relieve pressure.
- HEAD (Up/Down Arrows): Adjusts the head section of the bed upwards or downwards.
- FOOT (Up/Down Arrows): Adjusts the foot section of the bed upwards or downwards.
- M1 / M2: Programmable memory buttons to save and recall your favorite bed positions.
- FLAT: Returns the bed to a completely flat position.
- 10 MIN / 20 MIN: Activates a massage timer for 10 or 20 minutes.
- HEAD (Massage Icon): Activates or adjusts the head massage function.
- FOOT (Massage Icon): Activates or adjusts the foot massage function.
- TIMER / ALL OFF: Turns off all active functions (e.g., massage, light) or sets a timer for specific functions.
- Light Bulb Icon: Turns the under-bed light on or off.
- MODE: Cycles through different massage modes or light settings.
5. Maintenance
- Cleaning: Wipe the remote control with a soft, dry cloth. Do not use liquid cleaners or abrasive materials.
- Battery Replacement: Replace batteries when the remote's response becomes sluggish or stops working. Always use new AAA batteries.
- Storage: Store the remote in a dry place, away from direct sunlight and extreme temperatures.
6. Troubleshooting
- Remote Not Responding:
- Check if the batteries are correctly installed and have sufficient charge. Replace if necessary.
- Ensure there are no obstructions between the remote and the bed base's receiver.
- Verify that the bed base is properly plugged into a power outlet.
- Remote Not Pairing:
- Review the 'Pairing Instructions' in Section 3.3 carefully and repeat the steps.
- Confirm that your remote control model (Remote 1) is compatible with your bed base's control box. In some cases, newer remotes may not be compatible with older control boxes, even if they appear identical. This may require purchasing a remote and control box combo.
- Ensure the 'Learn' or 'Program' button on the control box is functioning correctly.
- Intermittent Operation:
- Weak batteries can cause intermittent operation. Replace them.
- Ensure the remote is within effective range of the bed base.
7. Specifications
| Model Number | HJH55 |
| Brand | Richmat (Generic Manufacturer) |
| Power Source | 2 x AAA Batteries (not included) |
| Color | Black |
| Special Feature | Backlit buttons |
| Max Number of Supported Devices | 1 (per remote) |
8. Warranty and Support
For specific warranty information, please refer to the documentation provided with your adjustable bed base or contact the original seller or manufacturer of the Richmat HJH55 remote control. Keep your purchase receipt for warranty claims.
If you encounter issues not covered in this manual or require further assistance, please contact the customer support of your bed base manufacturer or the seller of this remote control.


