
1. Introduction
This manual provides essential information for the proper installation, operation, and maintenance of the Raypak 018758F UG/Bypass Assembly. This component is designed for use with specific Raypak pool heater models, specifically the 105F 336-408 series. Please read these instructions thoroughly before proceeding with installation or service to ensure safe and efficient operation.
The UG/Bypass Assembly plays a crucial role in regulating water flow and temperature within the pool heater system, contributing to optimal performance and longevity of the unit.
2. Safety Information
WARNING:
- Installation and service must be performed by a qualified professional. Improper installation, adjustment, alteration, service, or maintenance can cause property damage, injury, or death.
- Always disconnect power to the heater before performing any service or maintenance.
- Turn off the gas supply to the heater before performing any service or maintenance.
- Allow the heater to cool completely before handling any components to prevent burns.
- Wear appropriate personal protective equipment (PPE), such as gloves and eye protection, during installation and maintenance.
- Ensure all connections are secure and leak-free after installation.
CAUTION:
- Use only genuine Raypak replacement parts. Use of non-genuine parts may void the warranty and compromise safety.
- Refer to the main heater manual for additional safety guidelines specific to your Raypak pool heater model.
3. Package Contents
Verify that all components are present and undamaged before beginning installation.
- Raypak 018758F UG/Bypass Assembly (1 unit)
- Installation Guide (this document)
- Note: Additional fasteners or gaskets may be required depending on your specific heater model and are not always included with this assembly.
4. Setup and Installation
This section outlines the general steps for installing the UG/Bypass Assembly. Specific heater models may have slight variations. Always consult your main heater manual for detailed diagrams and instructions.
4.1 Preparation
- Safety First: Ensure the heater is completely powered off, the gas supply is shut off, and the unit has cooled down.
- Drain System: Drain the water from the heater and associated plumbing to prevent spills.
- Access: Locate the existing bypass assembly on your Raypak 105F 336-408 series heater. This typically involves removing an access panel.
4.2 Removal of Old Assembly
- Disconnect Plumbing: Carefully disconnect any plumbing lines attached to the existing bypass assembly. Be prepared for residual water.
- Remove Fasteners: Unscrew and remove the fasteners (bolts/screws) securing the old bypass assembly to the heater manifold.
- Extract Assembly: Gently pull out the old bypass assembly. Inspect the manifold opening for any debris or old gasket material and clean thoroughly.
4.3 Installation of New Assembly
The following images illustrate the Raypak 018758F UG/Bypass Assembly from different perspectives.
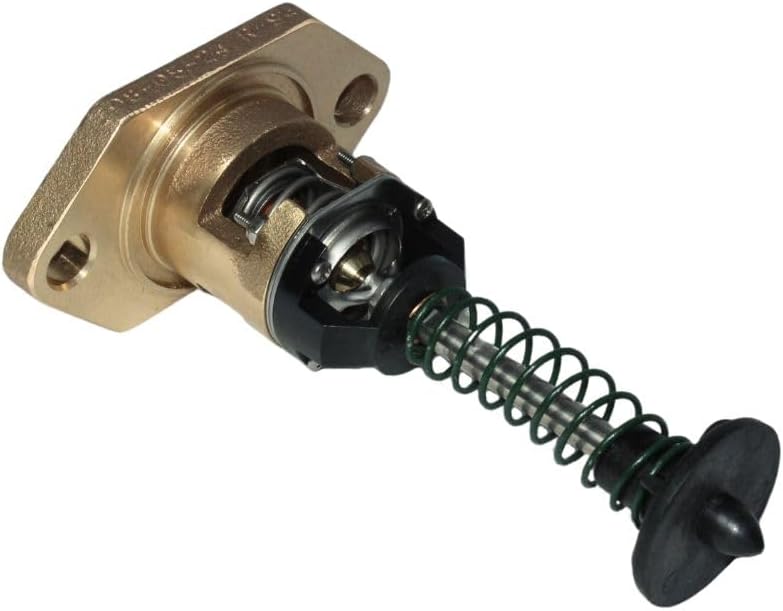
Figure 1: Side view of the Raypak 018758F UG/Bypass Assembly. This image shows the brass flange, internal spring mechanism, and the bypass valve component. The flange is designed for secure mounting to the heater manifold.

Figure 2: Top-down view of the Raypak 018758F UG/Bypass Assembly. This perspective highlights the threaded connection point on the brass flange and the fully extended spring and valve mechanism, ready for installation into the heater's water manifold.
- Apply Gasket: If a new gasket is required (check your heater manual), apply it to the manifold opening or the flange of the new bypass assembly.
- Insert Assembly: Carefully insert the new Raypak 018758F UG/Bypass Assembly into the manifold opening, ensuring it seats correctly.
- Secure Fasteners: Reinstall and tighten the fasteners to secure the assembly. Do not overtighten, as this can damage the assembly or manifold.
- Reconnect Plumbing: Reconnect any plumbing lines that were detached. Ensure all connections are tight.
4.4 Post-Installation Checks
- Refill System: Slowly refill the pool heater system with water, checking for any leaks around the newly installed assembly.
- Restore Power/Gas: Once confident there are no leaks, restore the gas supply and electrical power to the heater.
- Test Operation: Operate the heater according to its main instruction manual and observe the water flow and temperature regulation to ensure the bypass assembly is functioning correctly.
5. Operating Instructions
The Raypak 018758F UG/Bypass Assembly is an internal component that operates automatically within the pool heater system. It does not require manual adjustment or direct user operation. Its function is to regulate water flow through the heat exchanger based on water temperature, ensuring efficient heating and preventing overheating.
For general operation of your Raypak pool heater, refer to the specific operating instructions provided with your heater model.
6. Maintenance
The UG/Bypass Assembly itself typically requires minimal maintenance beyond periodic inspection. However, regular maintenance of the overall pool heater system is crucial for its longevity and performance.
- Annual Inspection: It is recommended to have a qualified service technician inspect the bypass assembly and the entire heater system annually. They can check for signs of wear, corrosion, or blockages.
- Water Chemistry: Maintain proper pool water chemistry as per your pool equipment manufacturer's recommendations. Improper water chemistry can lead to corrosion and premature failure of heater components, including the bypass assembly.
- Leak Checks: Periodically inspect the area around the bypass assembly for any signs of water leaks. Address any leaks promptly.
- Cleaning: If the assembly is removed for other service, gently clean any debris or mineral deposits from its surfaces. Do not use harsh chemicals that could damage the materials.
7. Troubleshooting
Issues related to the bypass assembly often manifest as problems with water flow or temperature regulation in the heater. If you suspect a problem with the bypass assembly, it is recommended to contact a qualified service technician.
| Symptom | Possible Cause (Bypass Related) | Recommended Action |
|---|---|---|
| Heater not reaching desired temperature or heating slowly. | Bypass assembly stuck open, allowing too much water to bypass the heat exchanger. | Have a qualified technician inspect and potentially replace the bypass assembly. |
| Heater overheating or cycling off prematurely. | Bypass assembly stuck closed, restricting water flow through the heat exchanger. | Have a qualified technician inspect and potentially replace the bypass assembly. |
| Water leaking from the bypass assembly area. | Damaged gasket, loose connections, or cracked assembly housing. | Turn off heater, drain water, inspect connections and gasket. Replace damaged parts or tighten connections. If housing is cracked, replace the assembly. |
Note: Many heater issues can stem from various components. Always consult a professional for accurate diagnosis and repair.
8. Specifications
| Feature | Detail |
|---|---|
| Model Number | 018758F |
| Part Type | UG/Bypass Assembly |
| Compatibility | Raypak 105F 336-408 series pool heaters |
| Product Dimensions | Approximately 1 x 1 x 1 inches (2.54 x 2.54 x 2.54 cm) |
| Item Weight | Approximately 1 pound (0.45 kg) |
| Manufacturer | Raypak |
9. Warranty Information
Specific warranty details for the Raypak 018758F UG/Bypass Assembly are typically covered under the warranty policy of the original Raypak pool heater or as a replacement part. Please refer to the warranty documentation provided with your Raypak pool heater or contact Raypak customer support for precise warranty terms and conditions. Keep your proof of purchase for any warranty claims.
10. Customer Support
For technical assistance, replacement parts, or service inquiries regarding your Raypak product, please contact Raypak customer support or visit their official website.
- Raypak Official Website: www.raypak.com
- Authorized Service: Always seek service from a Raypak authorized service provider to ensure proper repair and maintenance.