Introduction
This manual provides comprehensive instructions for the installation, operation, and maintenance of your NETGEAR M4300-12X12F (XSM4324S) 10G 24 Port Managed Switch. This device is a stackable half-width managed switch featuring 12-Port 10GBASE-T and 12-Port 10GBase-X SFP+ interfaces, designed for robust and flexible network environments.

Figure 1: NETGEAR M4300-12X12F 10G 24 Port Switch (Angled View)
This image displays the NETGEAR M4300-12X12F switch from an angled perspective, showcasing its compact design and the arrangement of its front-facing ports.
Safety Information
Please read all safety warnings and instructions before installing or operating this product. Failure to follow these instructions may result in electric shock, fire, or damage to the equipment.
- Ensure proper grounding for all electrical connections.
- Do not expose the device to water or excessive humidity.
- Operate the device within the specified temperature and humidity ranges.
- Use only the power supply provided or specified by the manufacturer.
- Do not open the device casing; refer all servicing to qualified personnel.
- Ensure adequate ventilation around the switch to prevent overheating.
Package Contents
Verify that all items are present and in good condition. If any item is missing or damaged, contact your vendor immediately.
- NETGEAR M4300-12X12F (XSM4324S-100NES) Switch
- Power Cord
- Rack-mounting Kit
- Documentation (Quick Start Guide, Warranty Information)
- Cloud Care Next Business Day Warranty Information
Product Overview
Front Panel
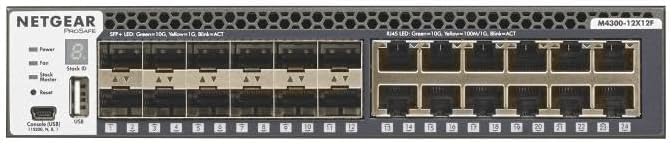
Figure 2: Front Panel Layout
This image provides a detailed view of the front panel of the NETGEAR M4300-12X12F switch, highlighting the 10GBASE-T and SFP+ ports, status LEDs, and console port.
The front panel of the M4300-12X12F switch features various ports and indicators for network connectivity and status monitoring:
- 12 x 10GBASE-T Ports (RJ45): These ports support 10 Gigabit Ethernet connections over copper cabling.
- 12 x 10GBase-X SFP+ Ports: These ports support 10 Gigabit Ethernet connections using SFP+ transceivers for fiber optic or direct attach copper (DAC) cables.
- Status LEDs: Indicators for power, fan status, port link/activity, and stack status.
- Console Port (Mini-USB and RJ45): For local management and initial configuration.
- Reset Button: Used to reset the switch or restore factory defaults.
- Stack ID Display: Shows the switch's ID within a stack.
Rear Panel
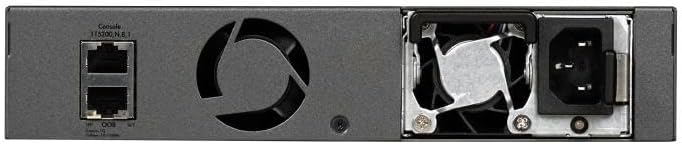
Figure 3: Rear Panel Layout
This image shows the rear panel of the NETGEAR M4300-12X12F switch, detailing the power input, fan module, and additional console port.
The rear panel includes essential components for power and cooling:
- AC Power Inlet: Connects the switch to an AC power source.
- Modular Power Supply Bay: Allows for installation of a modular power supply unit.
- Fan Module: Provides cooling for the internal components. The design supports front-to-back airflow.
Setup
Physical Installation
- Rack Mounting: Use the provided rack-mounting kit to secure the switch in a standard 19-inch equipment rack. Ensure adequate space for airflow around the unit.
- Power Connection: Connect the power cord to the AC power inlet on the rear panel and then to a grounded electrical outlet.
- Initial Power On: Once connected, the switch will power on automatically. Observe the Power LED on the front panel to confirm it is lit.
Initial Configuration
For initial configuration, you can connect to the switch via the console port or through a network connection if DHCP is available.
- Console Connection:
- Connect a console cable (RJ45-to-DB9 or Mini-USB) from your computer to the switch's console port.
- Open a terminal emulation program (e.g., PuTTY, Tera Term) and configure the serial port settings: 115200 baud, 8 data bits, no parity, 1 stop bit, no flow control.
- Log in using the default credentials (refer to the Quick Start Guide for default username/password).
- Web-based GUI:
- If the switch obtains an IP address via DHCP, you can discover its IP address using network scanning tools or by connecting via console.
- Open a web browser and enter the switch's IP address to access the web-based management interface.
Operating the Switch
The NETGEAR M4300-12X12F is a powerful Layer 3 managed switch offering extensive features for complex network environments.
Basic Connectivity
- Connecting Devices: Connect network devices (servers, workstations, other switches) to the 10GBASE-T (RJ45) or SFP+ ports using appropriate cabling.
- Link/Activity LEDs: Observe the port LEDs to confirm link status and data activity.
Advanced Features
The M4300-12X12F supports a wide range of advanced networking capabilities:
- High Flexibility and Stackability: The M4300-12X12F allows mixed stacking with other M4300 models, supporting 10G and 40G configurations, providing scalability and flexibility in network setups.
- Advanced Layer 3 Capabilities: It includes comprehensive L3 features like static, RIP, OSPF, and policy-based routing, suitable for complex network environments.
- Resilient Design: Features Nonstop Forwarding (NSF) and hitless failover for continuous operation even in case of a master switch failure, enhancing network reliability.
- Integrated Multicast for AV-over-IP: Pre-configured with IGMP Plus, simplifying multicast management for professional AV installations without requiring complex PIM routing.
- Energy Efficient: Includes modular power supply with front-to-back airflow design, allowing for efficient cooling and optimal performance in high-density rack environments.
- User-Friendly Management: Equipped with a web-based GUI, CLI, and SNMP support for straightforward configuration and monitoring, making it accessible for various administrative preferences.
Maintenance
- Firmware Updates: Regularly check the NETGEAR support website for the latest firmware versions. Updating firmware can improve performance, add new features, and fix bugs. Follow the instructions provided with the firmware download carefully.
- Cleaning: Keep the switch clean and free of dust. Use a soft, dry cloth to wipe the exterior. Ensure ventilation openings are not blocked. Do not use liquid cleaners or aerosols.
- Environmental Control: Maintain the operating environment within the specified temperature and humidity ranges to ensure optimal performance and longevity of the device.
Troubleshooting
This section provides solutions to common issues you might encounter with your M4300-12X12F switch.
| Problem | Possible Cause | Solution |
|---|---|---|
| Switch does not power on. | No power, faulty power cord, or power supply issue. | Check power cord connection. Ensure the power outlet is functional. Verify the power supply unit is correctly seated. |
| Port LED is off. | No link, faulty cable, or incorrect port configuration. | Verify cable connection. Test with a different cable. Check device on the other end. Ensure port is enabled and configured correctly. |
| Cannot access web GUI. | Incorrect IP address, network connectivity issue, or firewall blocking access. | Verify the switch's IP address. Ensure your computer is on the same subnet. Check firewall settings on your computer. Try accessing via console. |
| Slow network performance. | Network congestion, duplex mismatch, or faulty cabling. | Check network traffic. Ensure duplex settings match on both ends. Inspect cables for damage. Consider upgrading to higher-speed links if necessary. |
For more detailed troubleshooting, refer to the full product documentation available on the NETGEAR support website or contact Cloud Care support.
Specifications
| Feature | Detail |
|---|---|
| Model Number | XSM4324S |
| Switch Type | Layer 3 Managed |
| Number of Ports | 24 (12 x 10GBASE-T, 12 x 10GBase-X SFP+) |
| Interface Type | RJ45, SFP+ |
| Case Material | Metal |
| Compatible Devices | Laptop, Desktop, Printer, Network Devices |
| Manufacturer | NETGEAR & Cloud Care Warranty |
| First Available | October 16, 2024 |
Warranty and Support
This NETGEAR M4300-12X12F switch is covered by the Cloud Care Next Business Day Warranty.
- Warranty Coverage: Cloud Care's All-in-one Warranty SupportPlus allows you to warranty products purchased from their listings.
- Making a Claim: You can make a claim using the same form for any manufacturer product purchased through Cloud Care.
- Support: For technical assistance, troubleshooting, or warranty claims, please contact Cloud Care support. Refer to the documentation included in your package for specific contact details or visit the Cloud Care store on Amazon: Cloud Care Store.


