1. Introduction
Thank you for choosing the Runpu NDI PTZ Camera RP-HD66A-30N. This camera is designed for high-quality live streaming and video production, featuring advanced AI auto-tracking, 30x optical zoom, and multiple output interfaces. This manual provides essential information for setting up, operating, and maintaining your camera to ensure optimal performance.

Figure 1: Runpu NDI PTZ Camera RP-HD66A-30N
2. Package Contents
Please verify that all items listed below are included in your package:
- 1x Runpu NDI PTZ Camera RP-HD66A-30N
- 1x IR Remote Control
- 1x USB3.0 Cable
- 1x DC 12V/2A Power Adapter
- 1x Wall Mount with Screws
- 1x User Manual

Figure 2: Package Contents
3. Product Features
The Runpu NDI PTZ Camera RP-HD66A-30N offers a robust set of features designed for professional video production:
- 30x Optical Zoom: Capture clear and detailed images from a distance with 30x optical zoom.
- AI Auto-Tracking: Advanced AI algorithms enable human shape tracking, face recognition, automatic tracking, and automatic frame selection, ideal for dynamic events.
- Multiple Output Interfaces: Equipped with 3G-SDI, HDMI, USB3.0, and RJ45 (LAN) for versatile connectivity.
- Power over Ethernet (PoE): Supports 802.3af PoE for simplified installation and power delivery via a single Ethernet cable.
- Official NDI Support: Utilizes official Newtek NDI technology for stable, high-quality video transmission over low-bandwidth networks.
- Audio Integration: LINE IN and LINE OUT interfaces allow for simultaneous audio and video streaming (audio device not included).
- Wide Compatibility: Seamlessly integrates with popular live streaming software like vMix, OBS, Propresenter, StreamYards, Streamlabs, Wirecast, Zoom, and compatible with Mac and Windows PCs.
- Sony CMOS Sensor: Features a 1/2.8" Sony CMOS sensor with 2.07 megapixels for FHD 1080p 60fps video capture.
- Low Light Compensation: Automatically adjusts image brightness for clear video even in dark environments.
- Tally Light: Green and red tally lights indicate preview and program status for broadcast applications.

Figure 3: Key Features Overview
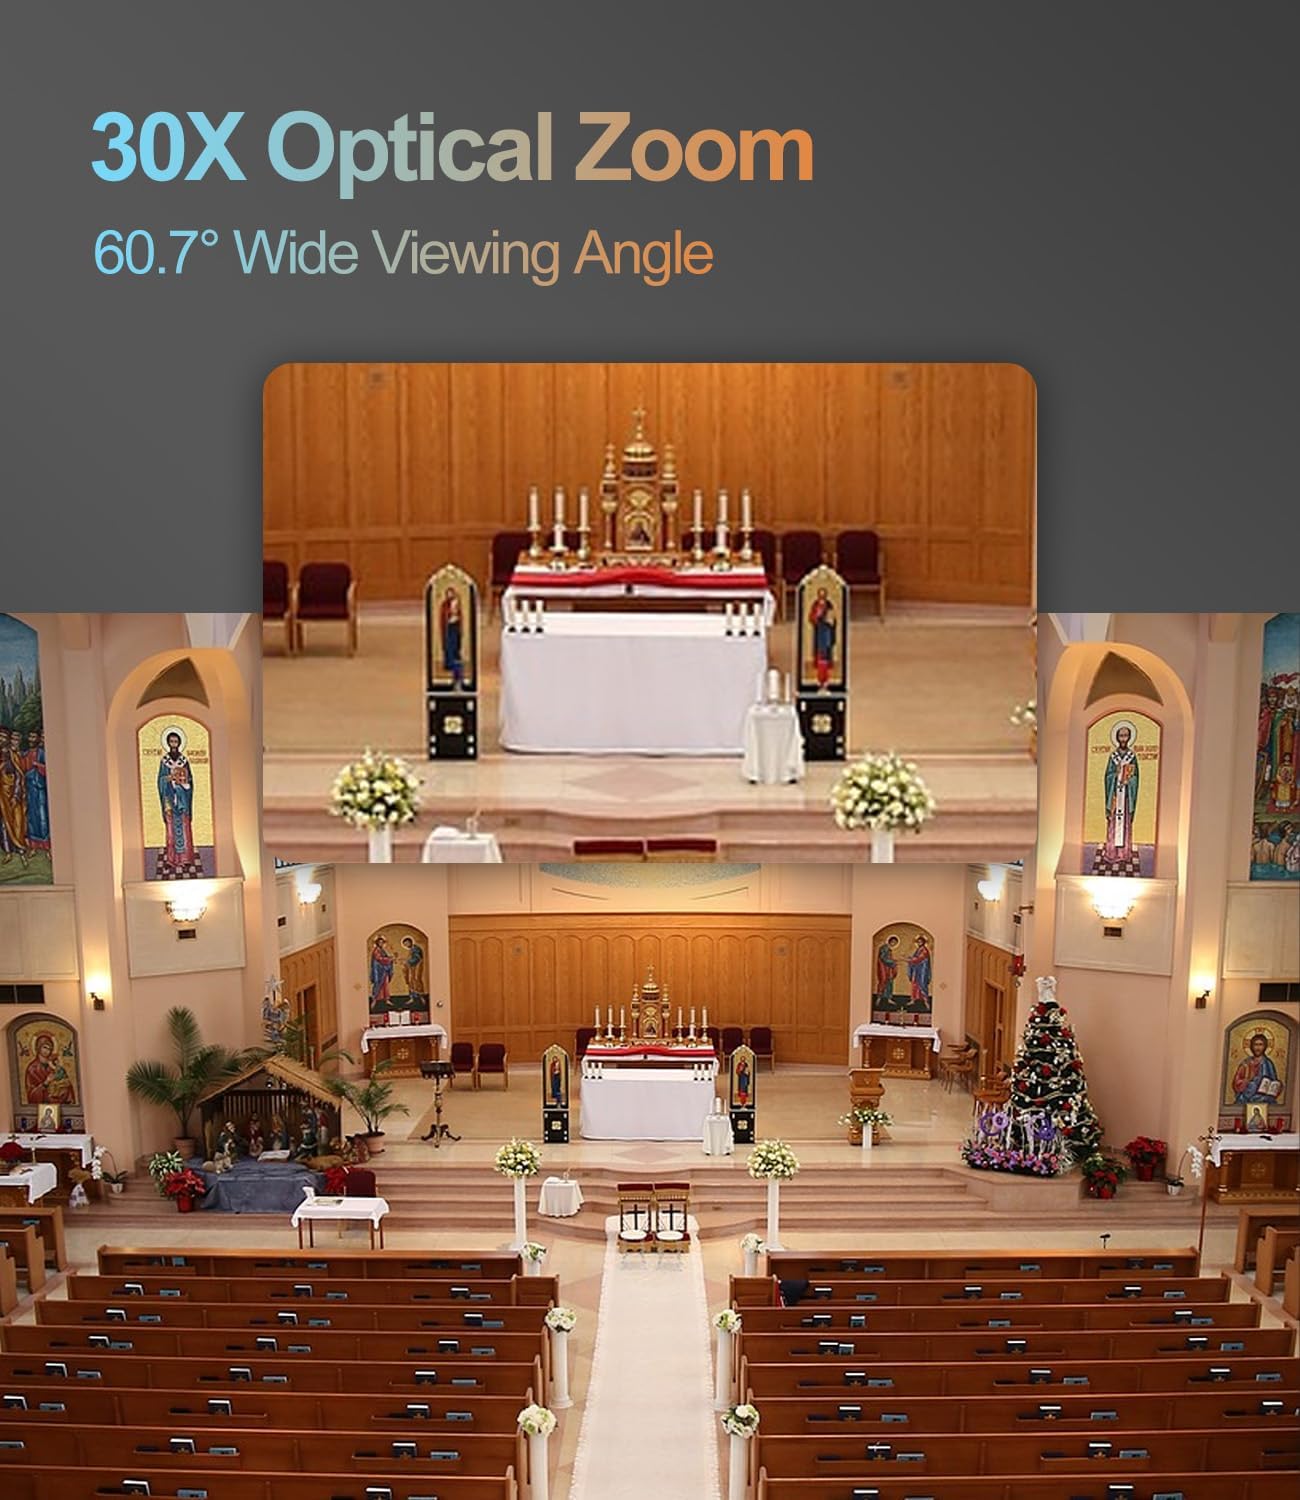
Figure 4: 30X Optical Zoom in action
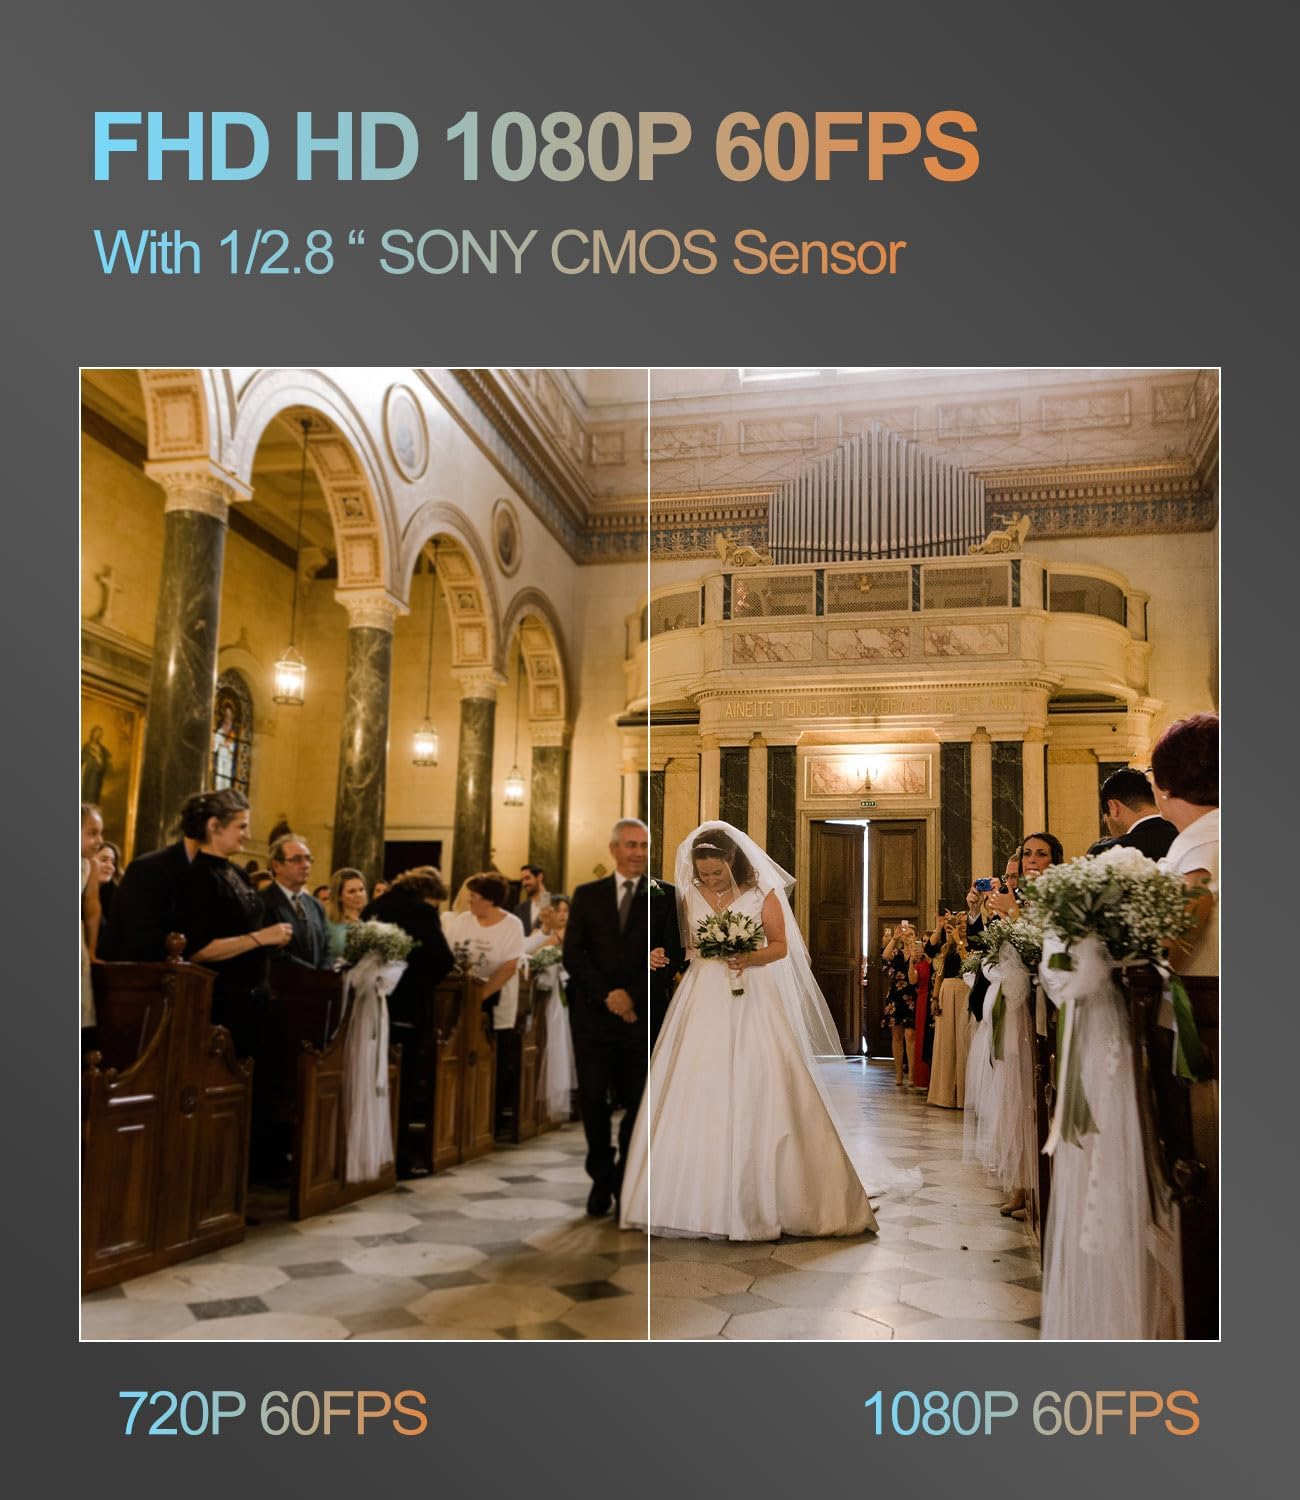
Figure 5: FHD 1080P 60FPS with 1/2.8" Sony CMOS Sensor

Figure 6: AI Human Auto-Tracking

Figure 7: Rich Interface for Diverse Devices

Figure 8: Low Light Compensation

Figure 9: Tally Light for Broadcast Applications

Figure 10: PoE+ (802.3AF/AT 48V) Support
4. Setup
4.1 Physical Connection
To begin, connect your Runpu NDI PTZ Camera and any control devices (like a joystick) to the same network. Power can be supplied via the included DC 12V/2A adapter or through Power over Ethernet (PoE) if your network switch supports it.
- Connect the camera to a PoE switch using an Ethernet cable for both power and network connectivity.
- Connect your control joystick to the same PoE switch.
- Ensure your computer is also connected to the same network (via the PoE switch or a router connected to it).
Video 1: Initial setup and connection of the PTZ camera and joystick to a network.
4.2 Network Configuration
For proper communication, ensure your camera, joystick, and computer are within the same IP address range. The camera typically comes with DHCP mode enabled, simplifying initial network discovery.
- Use the provided upgrade software (available on the Runpu website) to discover cameras on your network.
- Verify that the camera's IP address is in the same range as your computer's IP address.
- If necessary, adjust the joystick's IP configuration to match the camera's network range. The joystick may default to a static IP; switch it to DHCP if needed.
Video 2: Detailed steps on setting up the joystick and camera IP addresses for network communication.
4.3 Software Compatibility
The camera is compatible with various live streaming and video production software:
- vMix
- OBS Studio
- ProPresenter
- StreamYards
- Streamlabs
- Wirecast
- Zoom
It supports both Mac and Windows operating systems.
Figure 11: Camera Control Methods

Figure 12: Product Connection Diagram with various software and hardware
5. Operating Instructions
5.1 Basic Control (Joystick/Remote)
Once connected and configured, you can control the camera's pan, tilt, and zoom functions using the joystick or IR remote control.
- Pan/Tilt: Use the joystick to move the camera horizontally (pan) and vertically (tilt).
- Zoom: Use the zoom rocker switch on the joystick or remote to zoom in and out.
- Speed Adjustment: Adjust the pan/tilt and zoom speeds using the dedicated knobs on the joystick for smooth movements.
5.2 Preset Management
The camera supports setting and recalling multiple preset positions:
- Set Preset: Position the camera to your desired view, then press the 'SET' button followed by a number (e.g., '1') to save the preset.
- Recall Preset: Press the desired preset number (e.g., '1') followed by the 'CALL' button to move the camera to the saved position.
- Home Position: Long-press the 'HOME' button to return the camera to its default home position.
5.3 Menu Navigation
Access the camera's on-screen display (OSD) menu to adjust advanced settings:
- Access Menu: Long-press the 'MENU' button on the joystick/remote for 2 seconds to display the OSD menu.
- Navigate: Use the joystick/arrow buttons to navigate through menu options.
- Select/Confirm: Press the 'ENTER' or joystick knob to select an item or confirm a setting.
- Exit: Press the 'MENU' button again to exit sub-menus, or long-press to exit the main menu.
6. Maintenance
To ensure the longevity and optimal performance of your Runpu NDI PTZ Camera, follow these maintenance guidelines:
- Cleaning: Use a soft, dry cloth to clean the camera body. For the lens, use a specialized lens cleaning cloth and solution. Avoid abrasive cleaners.
- Storage: Store the camera in a cool, dry place away from direct sunlight and extreme temperatures when not in use.
- Firmware Updates: Periodically check the Runpu website for firmware updates to ensure your camera has the latest features and bug fixes.
7. Troubleshooting
If you encounter issues with your camera, refer to the following common problems and solutions:
- No Video Output:
- Check all cable connections (HDMI, SDI, USB, LAN).
- Ensure the camera is powered on and the power indicator light is active.
- Verify the input source selection on your display or video switcher.
- Camera Not Responding to Controls:
- Confirm the camera and control device are on the same network and have compatible IP addresses.
- Check the IR remote's batteries and ensure no obstructions are blocking the IR receiver.
- For network control, ensure the correct protocol (e.g., VISCA over IP) is selected on the control device.
- Poor Video Quality:
- Check lighting conditions; use Low Light Compensation if needed.
- Clean the camera lens for any smudges or dust.
- Adjust camera settings (exposure, white balance, color) via the OSD menu.
- AI Auto-Tracking Issues:
- Ensure the subject is clearly visible and not obscured.
- Check for sufficient lighting in the tracking area.
- Update camera firmware if available.
8. Specifications
| Feature | Specification |
|---|---|
| Model Number | RP-HD66A-30N |
| Optical Zoom | 30x |
| Video Output Interfaces | 3G-SDI, HDMI, USB3.0, RJ45 (LAN) |
| Video Capture Resolution | 1080p |
| Frame Rate | 60fps |
| Photo Sensor Technology | 1/2.8" Sony CMOS (2.07 megapixels) |
| Special Features | AI Auto Tracking, NDI|HX2 Protocol, Low Light Compensation, Tally Light |
| Power Supply | DC 12V/2A or PoE (802.3af) |
| Item Weight | 6.89 pounds |
| Color | Black |
9. Warranty and Support
Runpu is committed to providing high-quality products and excellent customer service:
- Money-Back Guarantee: Enjoy a 30-day, no-questions-asked money-back guarantee.
- Limited Warranty: The camera comes with a 3-year limited warranty.
- Online Support: Benefit from lifetime online support.
- Remote Assistance: Remote setup assistance is available if needed.
For any issues or support inquiries, please contact our dedicated support team. We aim to respond within 24 hours to resolve your concerns efficiently.


