1. Introduction
Thank you for choosing the VEVOR Robot Lawnmower TLM-E502. This intelligent robotic lawnmower is designed to provide efficient and convenient lawn maintenance for areas up to 500 m². Featuring smart app control, automatic obstacle avoidance, and self-charging capabilities, it simplifies the task of keeping your lawn perfectly trimmed. Please read this manual thoroughly before installation and operation to ensure safe and optimal performance of your device.

Image: The VEVOR Robot Lawnmower TLM-E502 positioned on a well-maintained green lawn.
2. Safety Information
Always prioritize safety when operating and maintaining the robot lawnmower. Failure to follow these instructions may result in injury or damage to the product.
- Read the Manual: Familiarize yourself with all controls and safety warnings before use.
- Children and Pets: Keep children and pets away from the working area of the lawnmower. The robot is equipped with collision sensors, but direct supervision is recommended.
- Sharp Blades: The lawnmower has sharp blades. Exercise extreme caution when handling or cleaning the blades. Always turn off the device and remove the battery before performing any maintenance.
- Obstacles: Clear the lawn of any foreign objects such as stones, toys, or wires before operation to prevent damage to the blades or the robot.
- Wet Conditions: The robot lawnmower is equipped with a rain sensor and will return to its charging station in wet conditions. Do not manually operate the robot in heavy rain or on very wet grass.
- Charging: Use only the original charger and battery pack provided by VEVOR. Ensure the charging station is placed on a level surface and protected from direct sunlight and rain.
- Unauthorized Modifications: Do not attempt to modify or repair the robot lawnmower yourself. Contact authorized service personnel for repairs.
3. Package Contents
Carefully unpack the box and ensure all items are present and undamaged.
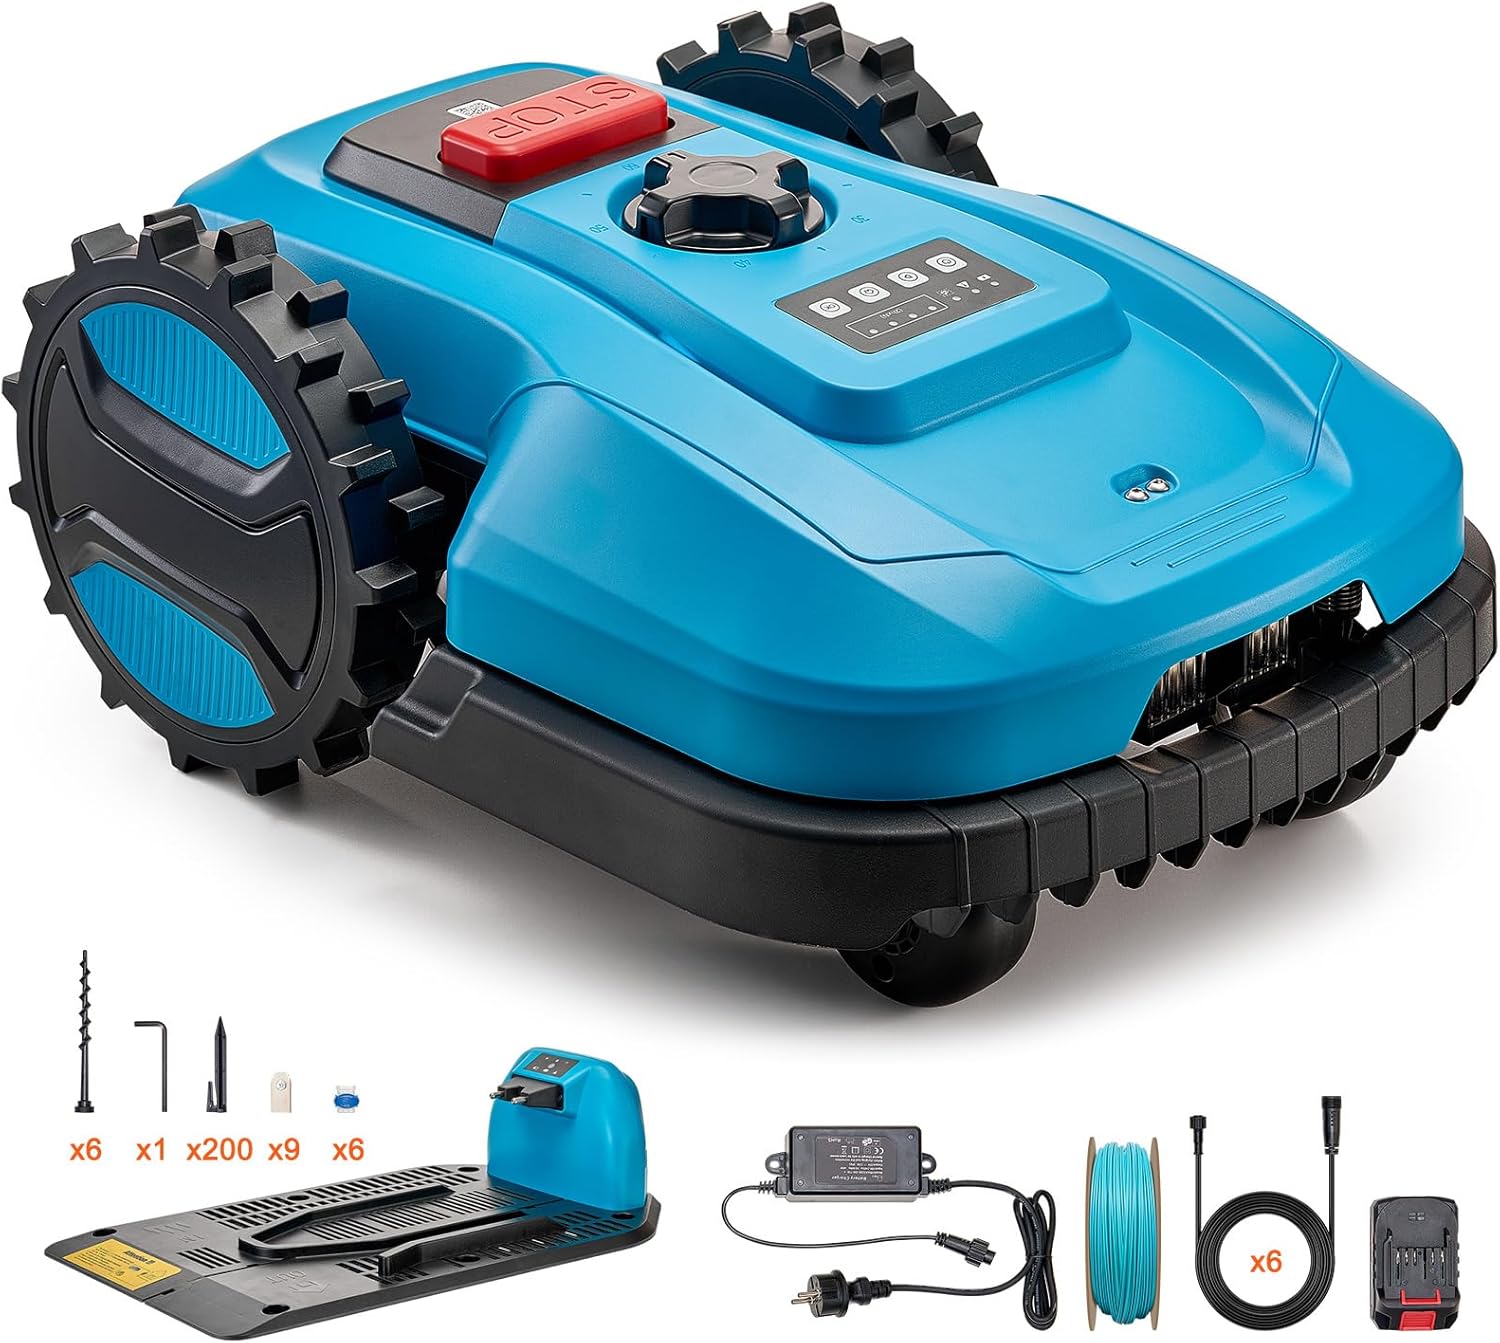
Image: The VEVOR Robot Lawnmower TLM-E502 with all included accessories, such as the charging station, boundary wire, and blades.
- 1 x VEVOR Robot Lawnmower (Model: TLM-E502)
- 1 x Charging Post
- 1 x Adaptor
- 1 x 150 m Boundary Cable
- 6 x Extension Cable
- 1 x 2.0Ah Battery Pack
- 6 x Charging Station Fixing Spikes
- 200 x Boundary Line Ground Spikes
- 9 x Replacement Blades
- 1 x Hexagonal Wrench
- 6 x Wiring Terminals
4. Setup
4.1 Charging Station Placement
Choose a suitable location for the charging station. It should be on a flat surface, preferably in a shaded area, and close to a power outlet. Ensure there is enough clear space around the station for the robot to dock easily. Secure the charging station to the ground using the provided fixing spikes.
4.2 Boundary Wire Installation
The boundary wire defines the mowing area for your robot lawnmower.
- Lay the Wire: Start laying the boundary wire from the "+" port on the back of the charging station. Lay the wire counter-clockwise around the perimeter of your desired mowing area, returning to the "-" port on the charging station.
- Secure the Wire: Use the provided ground spikes to secure the boundary wire to the lawn. The recommended distance between spikes is 1 meter (39.3 inches).
- Depth: The boundary wire should not exceed 2 cm (0.78 inches) if buried underground.
- Obstacles: Create islands around obstacles like flowerbeds or ponds by running the wire from the main boundary to the obstacle and back, ensuring the wires run parallel and close together to cancel out the signal.
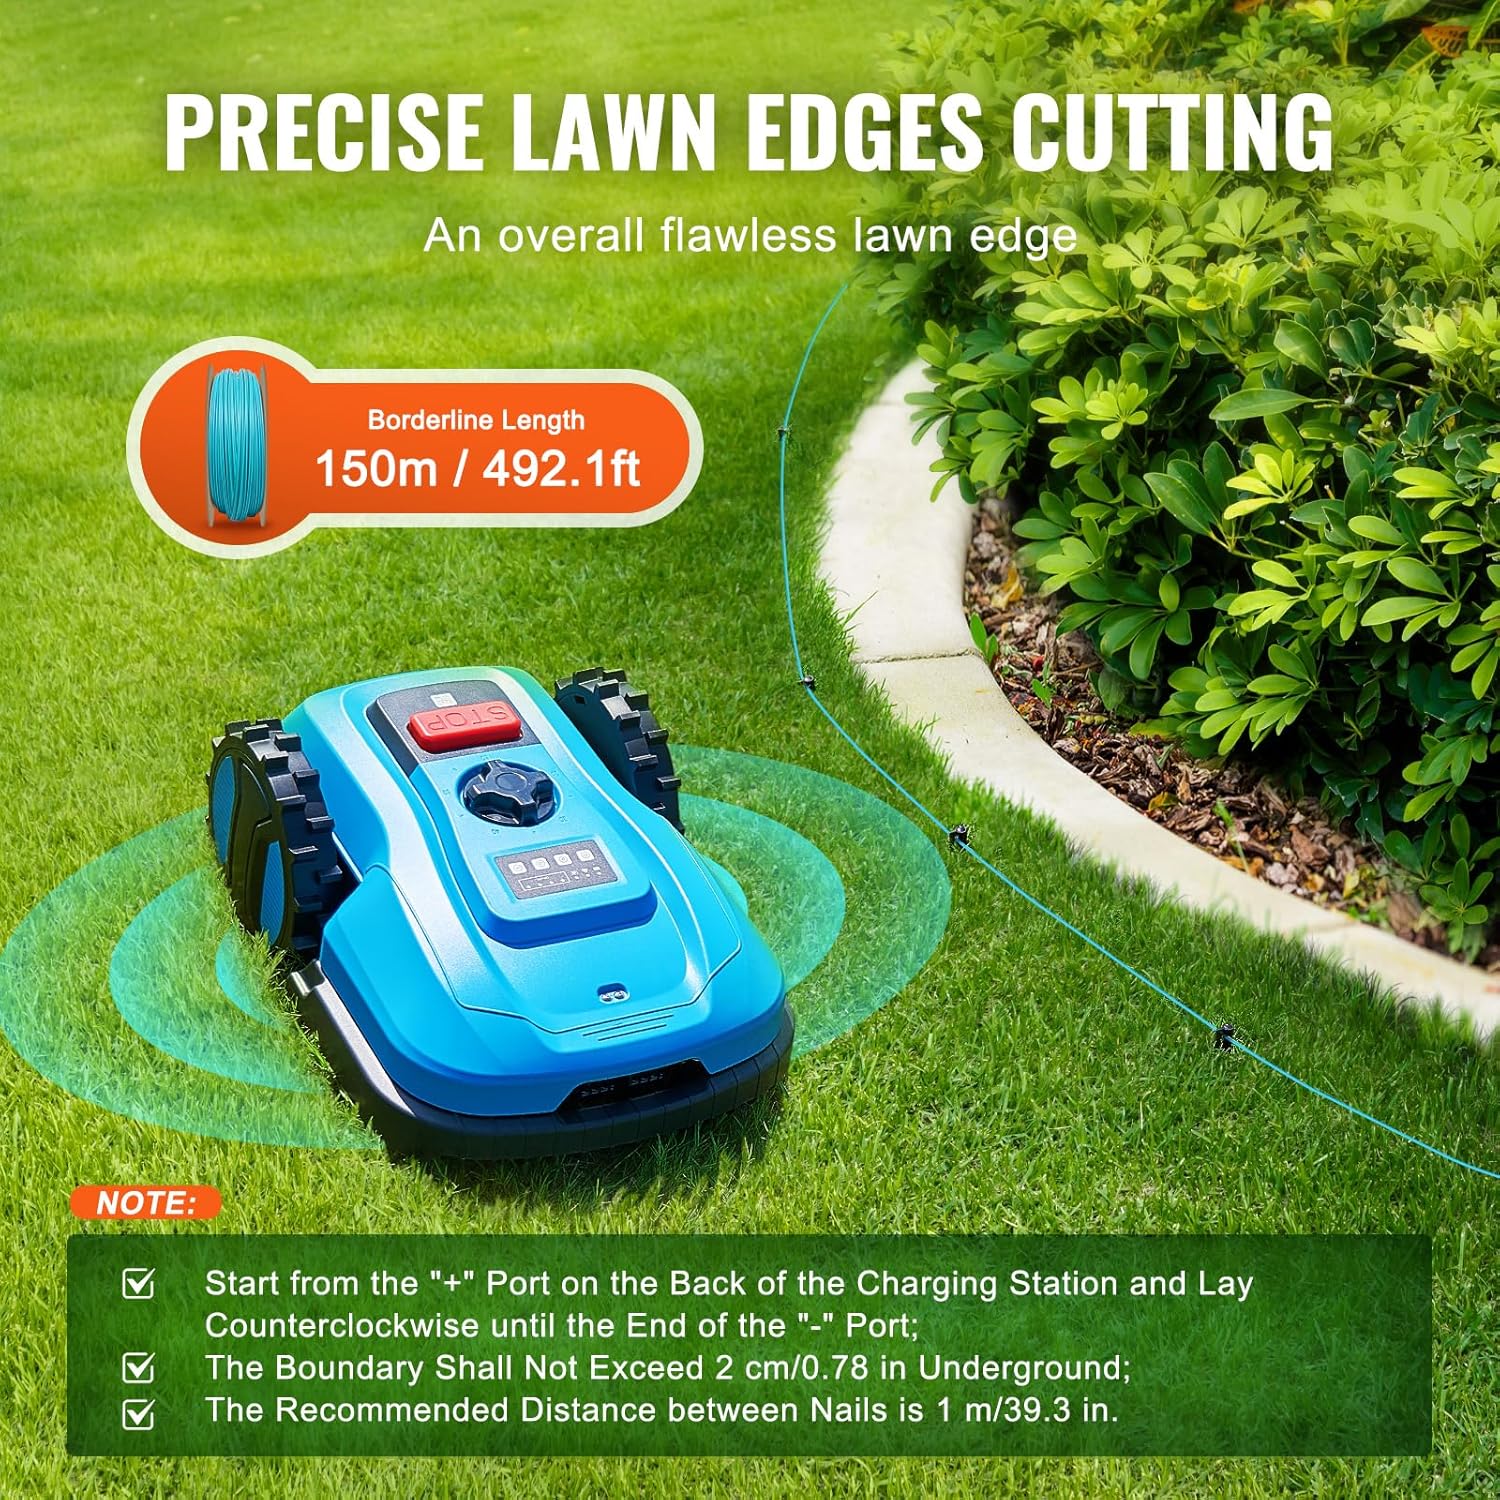
Image: A VEVOR Robot Lawnmower operating near a boundary wire, illustrating precise lawn edge cutting. Notes on wire installation are visible.
4.3 Initial Charging
Once the charging station and boundary wire are set up, place the robot lawnmower onto the charging station to fully charge the battery before its first use. The battery pack is 2.0Ah.
4.4 App Connection (Bluetooth & WiFi)
The VEVOR Robot Lawnmower can be controlled via a smartphone app, compatible with both iOS and Android devices.
- Download App: Search for the official VEVOR robot lawnmower app in your device's app store.
- Connect: Follow the in-app instructions to connect your robot lawnmower via Bluetooth or WiFi. Ensure your WiFi network is 2.4 GHz, as 5 GHz networks may not be supported.
- Configuration: Use the app to set up mowing schedules, define mowing zones, and monitor the robot's status.
Image: A VEVOR Robot Lawnmower with a smartphone displaying the control app, highlighting Bluetooth and WiFi connectivity for smart management.
5. Operating Instructions
5.1 Starting and Stopping
- Start: Press the "START" button on the robot or initiate mowing via the smartphone app.
- Stop: Press the large red "STOP" button on top of the robot for immediate cessation of operation. The robot will also stop if it detects an issue or reaches its charging station.
5.2 Mowing Features
- Area Coverage: Designed for lawns up to 500 m² with a cutting width of 20 cm (7.8 inches).
- Adjustable Cutting Height: The cutting height can be adjusted from 20 mm to 60 mm (0.78 to 2.36 inches) to suit your lawn's needs. Refer to the adjustment knob on the robot.
- Edge Cutting: The robot efficiently performs edge cutting along the boundary wire, ensuring a neat finish.
- Obstacle Avoidance: Equipped with highly sensitive collision sensors, the robot automatically detects and avoids obstacles, preventing damage to itself and garden features.
- Slope Capability: The robot can operate on slopes up to 47% (25°).

Image: The VEVOR Robot Lawnmower highlighting its powerful brushless motor and three mowing blades for fast and smooth weed cutting on lawns up to 500 m².

Image: The VEVOR Robot Lawnmower detecting and avoiding an obstacle (a small dog), showcasing its highly sensitive collision sensor for intelligent obstacle avoidance.
5.3 Smart Functions
- Automatic Recharging: When the battery level drops below 20%, the robot will automatically return to its charging station.
- Rain Detection: A built-in rain sensor detects precipitation. Upon detecting rain, the robot will pause operation and return to the charging station to protect itself and prevent damage to the lawn.
- App Control: Manage your lawnmower remotely through the app. Set mowing schedules, define specific mowing areas, and receive status updates.

Image: Illustration showing the VEVOR Robot Lawnmower automatically returning to its charging station when battery energy is below 20% or when rain is detected by its built-in sensor.
6. Maintenance
Regular maintenance ensures the longevity and optimal performance of your robot lawnmower. Always turn off the robot and remove the battery before performing any maintenance.
- Blade Inspection and Replacement: Regularly check the blades for wear, damage, or dullness. Replace all three blades simultaneously for balanced cutting. Use the provided hexagonal wrench for replacement.
- Cleaning: Clean the underside of the robot, especially around the blades and wheels, to remove grass clippings and debris. Use a brush or damp cloth. Do not use high-pressure water.
- Wheel Cleaning: Ensure the wheels are free of grass and dirt to maintain traction.
- Charging Contacts: Keep the charging contacts on both the robot and the charging station clean and free of corrosion.
- Storage: During off-season or extended periods of non-use, clean the robot thoroughly, fully charge the battery, and store it in a dry, frost-free location.
7. Troubleshooting
If you encounter issues with your VEVOR Robot Lawnmower, refer to the following common problems and solutions.
| Problem | Possible Cause | Solution |
|---|---|---|
| Robot does not start or stops unexpectedly. | Low battery; boundary wire issue; safety sensor triggered; rain detected. | Charge the battery; check boundary wire connection; clear any obstacles; wait for dry conditions. |
| Robot does not return to charging station. | Charging station blocked; boundary wire signal interrupted; station not powered. | Ensure clear path to station; check boundary wire integrity; verify power to charging station. |
| Uneven cutting result. | Dull or damaged blades; incorrect cutting height setting. | Replace blades; adjust cutting height. |
| App connection issues. | Incorrect WiFi frequency; Bluetooth not enabled; app not updated. | Ensure WiFi is 2.4 GHz; enable Bluetooth; update app to the latest version. |
| Robot gets stuck frequently. | Obstacles on lawn; uneven terrain; boundary wire too close to obstacles. | Clear lawn of debris; adjust boundary wire around problematic areas. |
| Robot does not resume operation after rain or scheduled time. | System error; specific app setting. | Check app settings for rain delay or schedule override. Restart the robot if necessary. |
8. Specifications
Technical details for the VEVOR Robot Lawnmower TLM-E502.
| Model Number | TLM-E502 |
| Applicable Lawn Area | Up to 500 m² |
| Cutting Width | 20 cm (7.8 inches) |
| Cutting Height | 20 - 60 mm (0.78 - 2.36 inches), adjustable |
| Max. Slope | 47% (25°) |
| Power Source | Battery (2.0Ah) |
| Material | Plastic and Metal |
| Product Dimensions (L x W x H) | 51.5 x 38 x 22 cm (20.27 x 14.96 x 8.66 inches) |
| Product Weight | 10 kg (22 lbs) |
| Boundary Line Length | 150 m (492.1 ft) |
| Connectivity | Bluetooth, WiFi (2.4 GHz) |

Image: A visual representation of the VEVOR Robot Lawnmower TLM-E502 with key specifications and dimensions labeled, alongside a list of included accessories.
9. Warranty and Support
For warranty information, technical support, or service inquiries, please contact VEVOR customer support. Refer to your purchase documentation or the official VEVOR website for contact details.
VEVOR Official Website: www.vevor.com


