1. Product Overview
The ID-COOLING DX240 MAX is a premium All-In-One (AIO) liquid CPU cooler designed for high-performance computing systems. It features a 240mm radiator, two 120mm high-efficient fans, and a powerful Gen 7 pump to provide effective heat dissipation for CPUs with a Thermal Design Power (TDP) up to 300W.
Key features include vibrant Addressable RGB (ARGB) lighting on the pump cover, a thickened 38mm radiator for enhanced cooling surface, Zero RPM fan support for silent operation at low temperatures, and daisy-chain connectors for simplified cable management.

Image 1.1: The ID-COOLING DX240 MAX Liquid CPU Cooler, showcasing the radiator, fans, and ARGB pump unit.
Components Included:
- Radiator with integrated pump
- Cooling fans (2x 120mm)
- Mounting hardware for Intel and AMD sockets
- Thermal paste
2. Installation Guide
This section provides step-by-step instructions for installing your ID-COOLING DX240 MAX Liquid CPU Cooler. Ensure your system is powered off and disconnected from the power source before beginning installation.
2.1 Compatibility
The DX240 MAX is compatible with the following CPU sockets:
- Intel: LGA1851, LGA1700, LGA1200, LGA1151, LGA1150, LGA1155, LGA1156
- AMD: AM5, AM4
For proper installation, ensure your PC case has adequate clearance. A minimum of 58mm space is recommended between the case and the motherboard for the DX240 MAX.
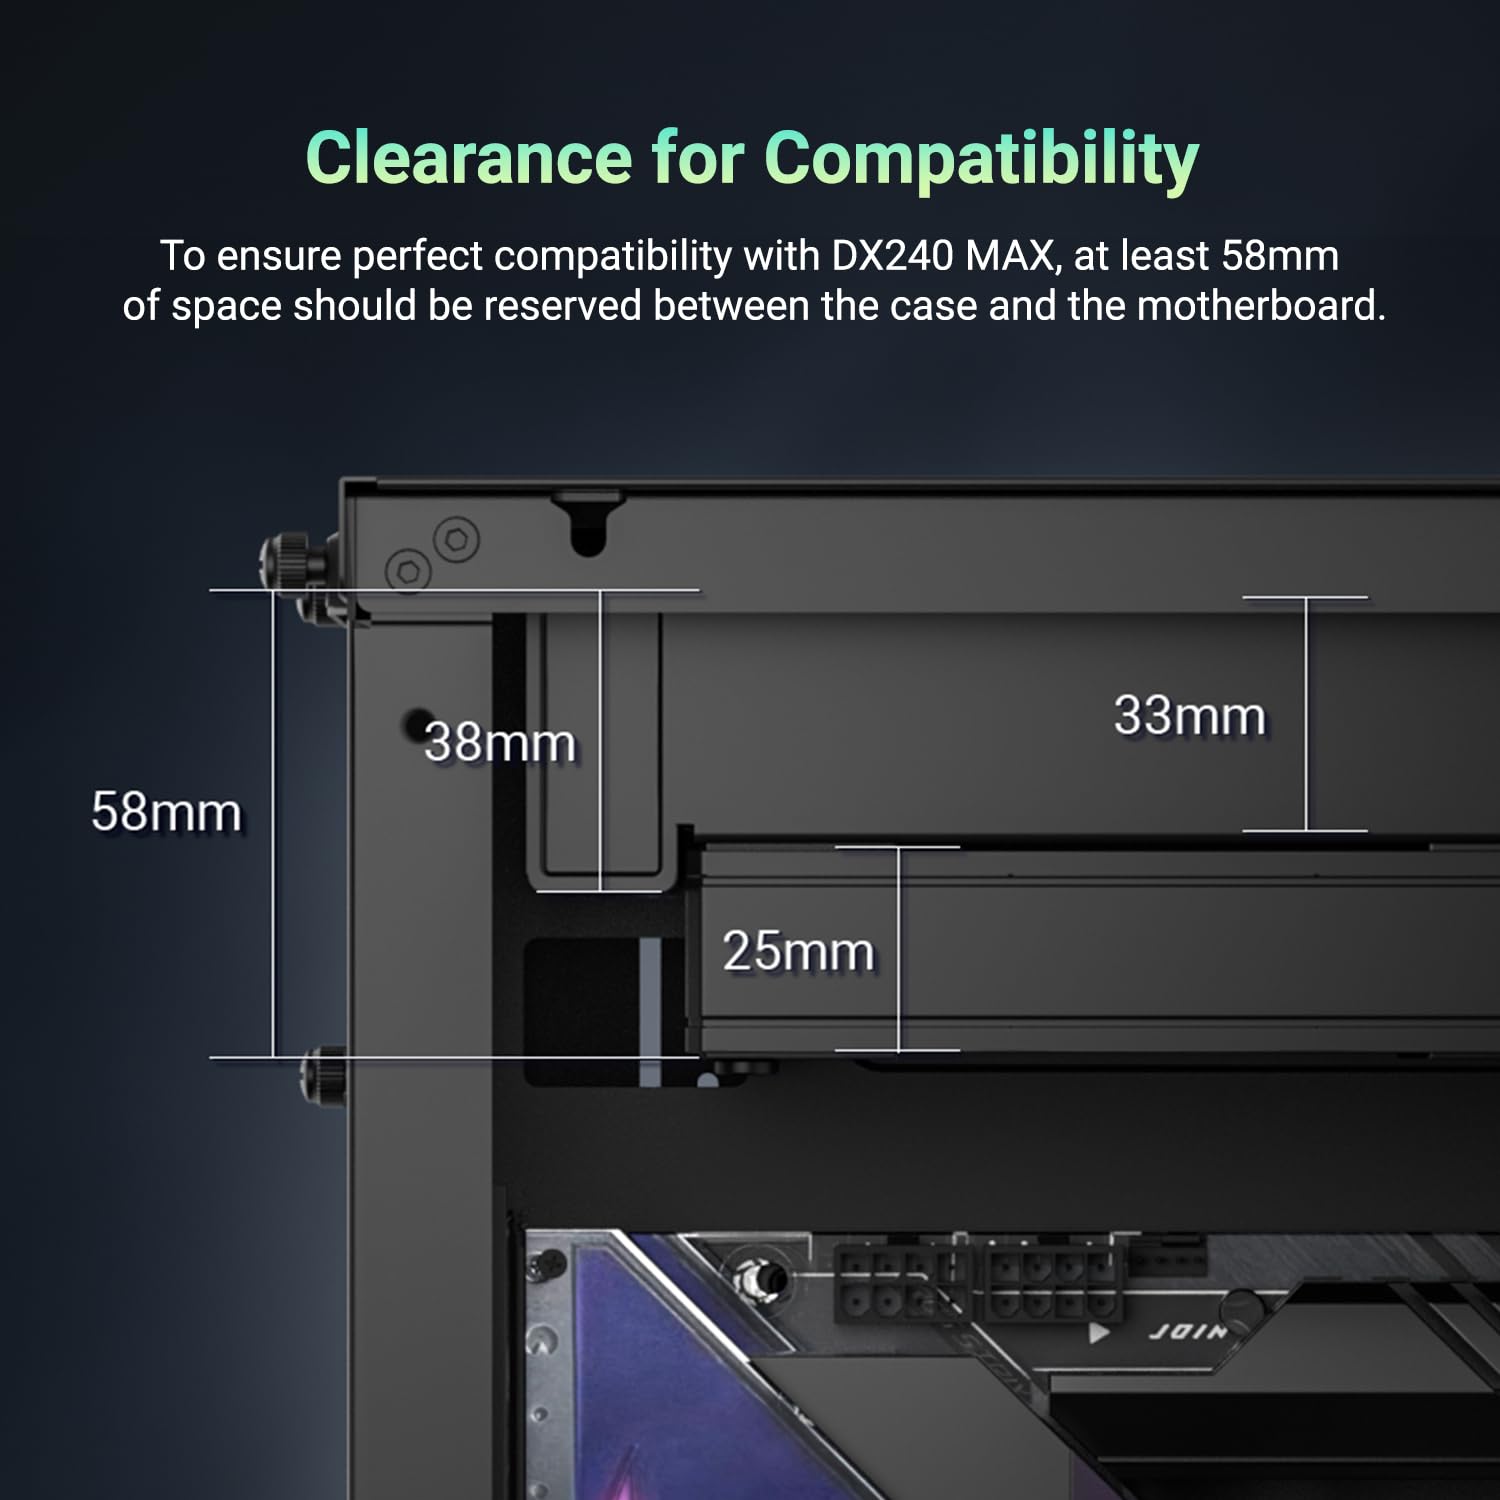
Image 2.1: Clearance diagram illustrating the required 58mm space for installation.
2.2 Pre-Installation Steps
- Unpack all components and verify against the included parts list.
- Prepare your motherboard by removing any existing CPU cooler and cleaning the CPU surface.
- Identify the correct mounting hardware for your CPU socket (Intel or AMD).

Image 2.2: Overview of mounting hardware for different CPU sockets.
2.3 Mounting the Cooler
- Install the appropriate backplate (if required for your socket) on the rear of the motherboard.
- Secure the standoffs to the motherboard through the CPU cooler mounting holes.
- Apply a small amount of thermal paste to the center of the CPU's Integrated Heat Spreader (IHS).
- Carefully place the pump unit onto the CPU, aligning the mounting holes with the standoffs.
- Secure the pump unit with the provided thumb screws or nuts, tightening them in a cross pattern until snug.
- Mount the radiator and fans to an available fan mount location in your PC case (e.g., top, front, or rear).
- Connect the fan cables using the daisy-chain feature to reduce cable clutter.
- Connect the pump power cable to the CPU_FAN or AIO_PUMP header on your motherboard.
- Connect the ARGB cable from the pump to an available 5V ARGB header on your motherboard or an ARGB controller.

Image 2.3: Proper application of thermal paste on the CPU surface.

Image 2.4: Visual guide for mounting the cooler on AMD and Intel platforms.
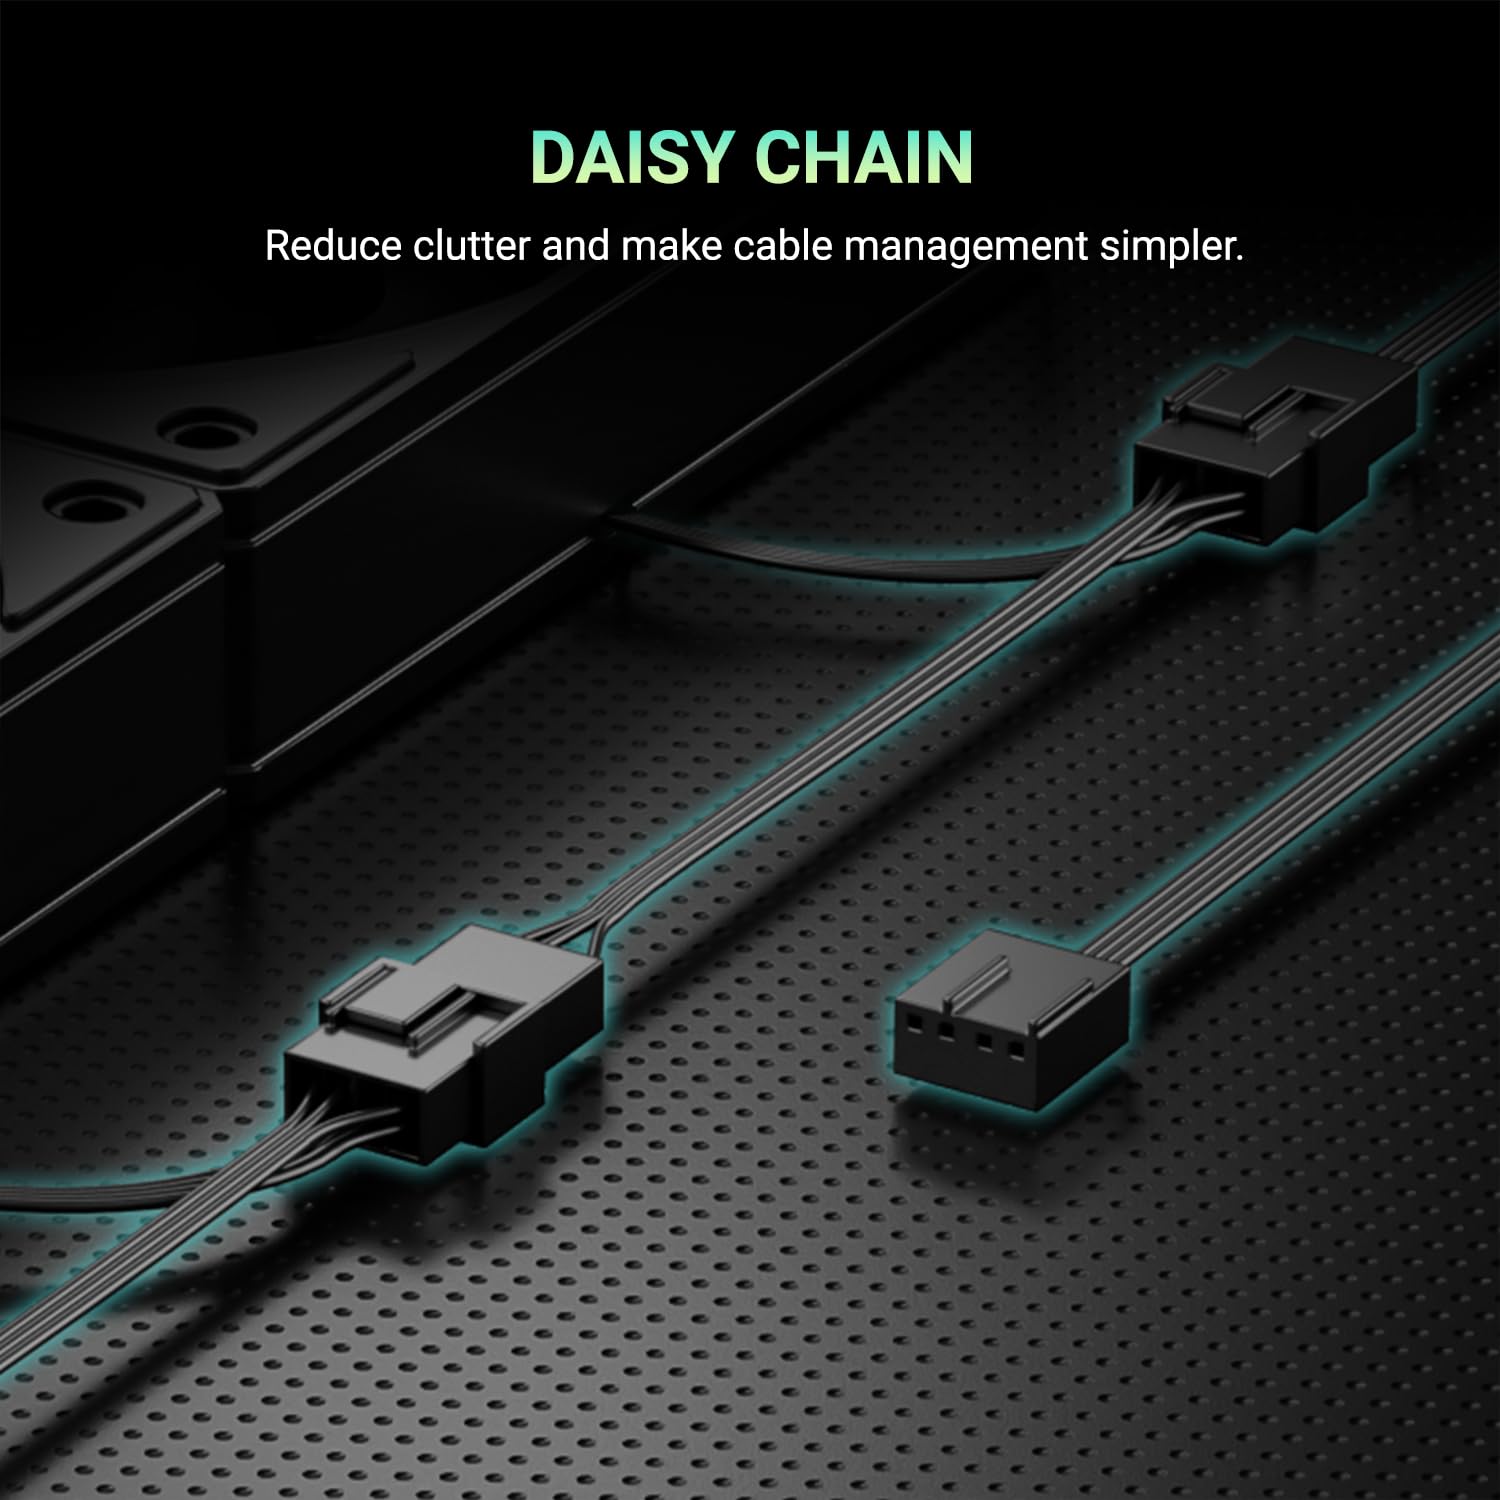
Image 2.5: Daisy-chain connectors for fans, simplifying cable routing.
3. Operating Instructions
Once installed, the ID-COOLING DX240 MAX operates automatically based on your motherboard's fan control settings. This section details its operational features.
3.1 Fan Control (PWM & Zero RPM)
The 120mm fans support Pulse Width Modulation (PWM) control, allowing their speed to be dynamically adjusted based on CPU temperature. This ensures optimal cooling performance while minimizing noise.
The fans also feature Zero RPM support. At low CPU temperatures, the fans can stop completely, eliminating fan noise entirely for a quieter computing experience. Fan speed curves can typically be configured in your motherboard's BIOS/UEFI settings.

Image 3.1: Example PWM fan curve, illustrating fan speed adjustment based on CPU temperature.
3.2 ARGB Lighting
The pump cover features Addressable RGB (ARGB) lighting, which can be synchronized with other ARGB components in your system. Control of the lighting effects is typically managed through your motherboard's RGB software or a dedicated ARGB controller.

Image 3.2: The ARGB lighting on the waterblock, providing customizable visual effects.
4. Maintenance
Regular maintenance helps ensure the longevity and optimal performance of your liquid CPU cooler.
- Dust Cleaning: Periodically inspect the radiator fins and fan blades for dust accumulation. Use compressed air or a soft brush to gently remove dust. Ensure fans are not spinning during cleaning to prevent damage.
- Cable Management: Ensure all cables are securely connected and not obstructing airflow within the case.
- Visual Inspection: Occasionally check the tubing and connections for any signs of leaks or damage. While rare, addressing issues early can prevent further complications.
5. Troubleshooting
If you encounter issues with your ID-COOLING DX240 MAX, refer to the following common troubleshooting steps:
- High CPU Temperatures:
- Verify the pump is running. Check the pump's power connection to the motherboard.
- Ensure fans are spinning. Check fan power connections and BIOS settings for fan curves.
- Confirm proper contact between the pump cold plate and the CPU. Re-apply thermal paste if necessary.
- Check for adequate airflow within your PC case.
- Fans Not Spinning / ARGB Not Lighting Up:
- Check all power connections for fans and pump.
- Ensure the ARGB cable is correctly connected to a 5V ARGB header on the motherboard or controller.
- Verify ARGB software settings on your operating system or in the motherboard BIOS.
- Unusual Noise:
- Identify the source of the noise (fans or pump).
- If fan noise, check for obstructions or adjust fan speed curves in BIOS.
- If pump noise, ensure the pump is mounted correctly and that there are no air bubbles trapped in the loop (this usually resolves itself over time).
If issues persist after following these steps, please contact ID-COOLING customer support.
6. Specifications
| Feature | Specification |
|---|---|
| Model | DX240 MAX |
| Radiator Size | 240mm |
| Radiator Thickness | 38mm |
| Fan Size | 2x 120mm |
| Max. Air Flow | 85 CFM |
| Max. Air Pressure | 2.83 mmH2O |
| Pump Speed | 2900 RPM ±10% |
| Noise Level | 32.5 dB (Max) |
| TDP Support | 300W |
| Compatible Sockets | Intel LGA1851/1700/1200/115X, AMD AM5/AM4 |
| Materials | Aluminum, Copper |
| Power Connector Type | 4-Pin |
| Voltage | 12 Volts (DC) |
| Product Dimensions | 4.72"L x 1.49"W x 4.72"H (Pump/Cold Plate) |
7. Warranty and Support
ID-COOLING products are manufactured to high quality standards and are backed by a limited warranty. Please refer to the official ID-COOLING website or your purchase documentation for specific warranty terms and conditions.
For technical assistance, troubleshooting beyond this manual, or warranty claims, please contact ID-COOLING customer support through their official channels. When contacting support, please have your product model (DX240 MAX) and proof of purchase readily available.
Official ID-COOLING Website: www.idcooling.com


