
1. Introduction
Thank you for purchasing the Ninja Pod & Grounds Coffee Maker. This manual provides essential information for the safe operation, maintenance, and troubleshooting of your new coffee maker. Please read it thoroughly before use and keep it for future reference.
The Ninja PB055AST is a versatile single-serve coffee maker designed to brew both coffee pods and ground coffee. It features multiple brew styles, various cup sizes, a built-in milk frother, and a large removable water reservoir for convenience.
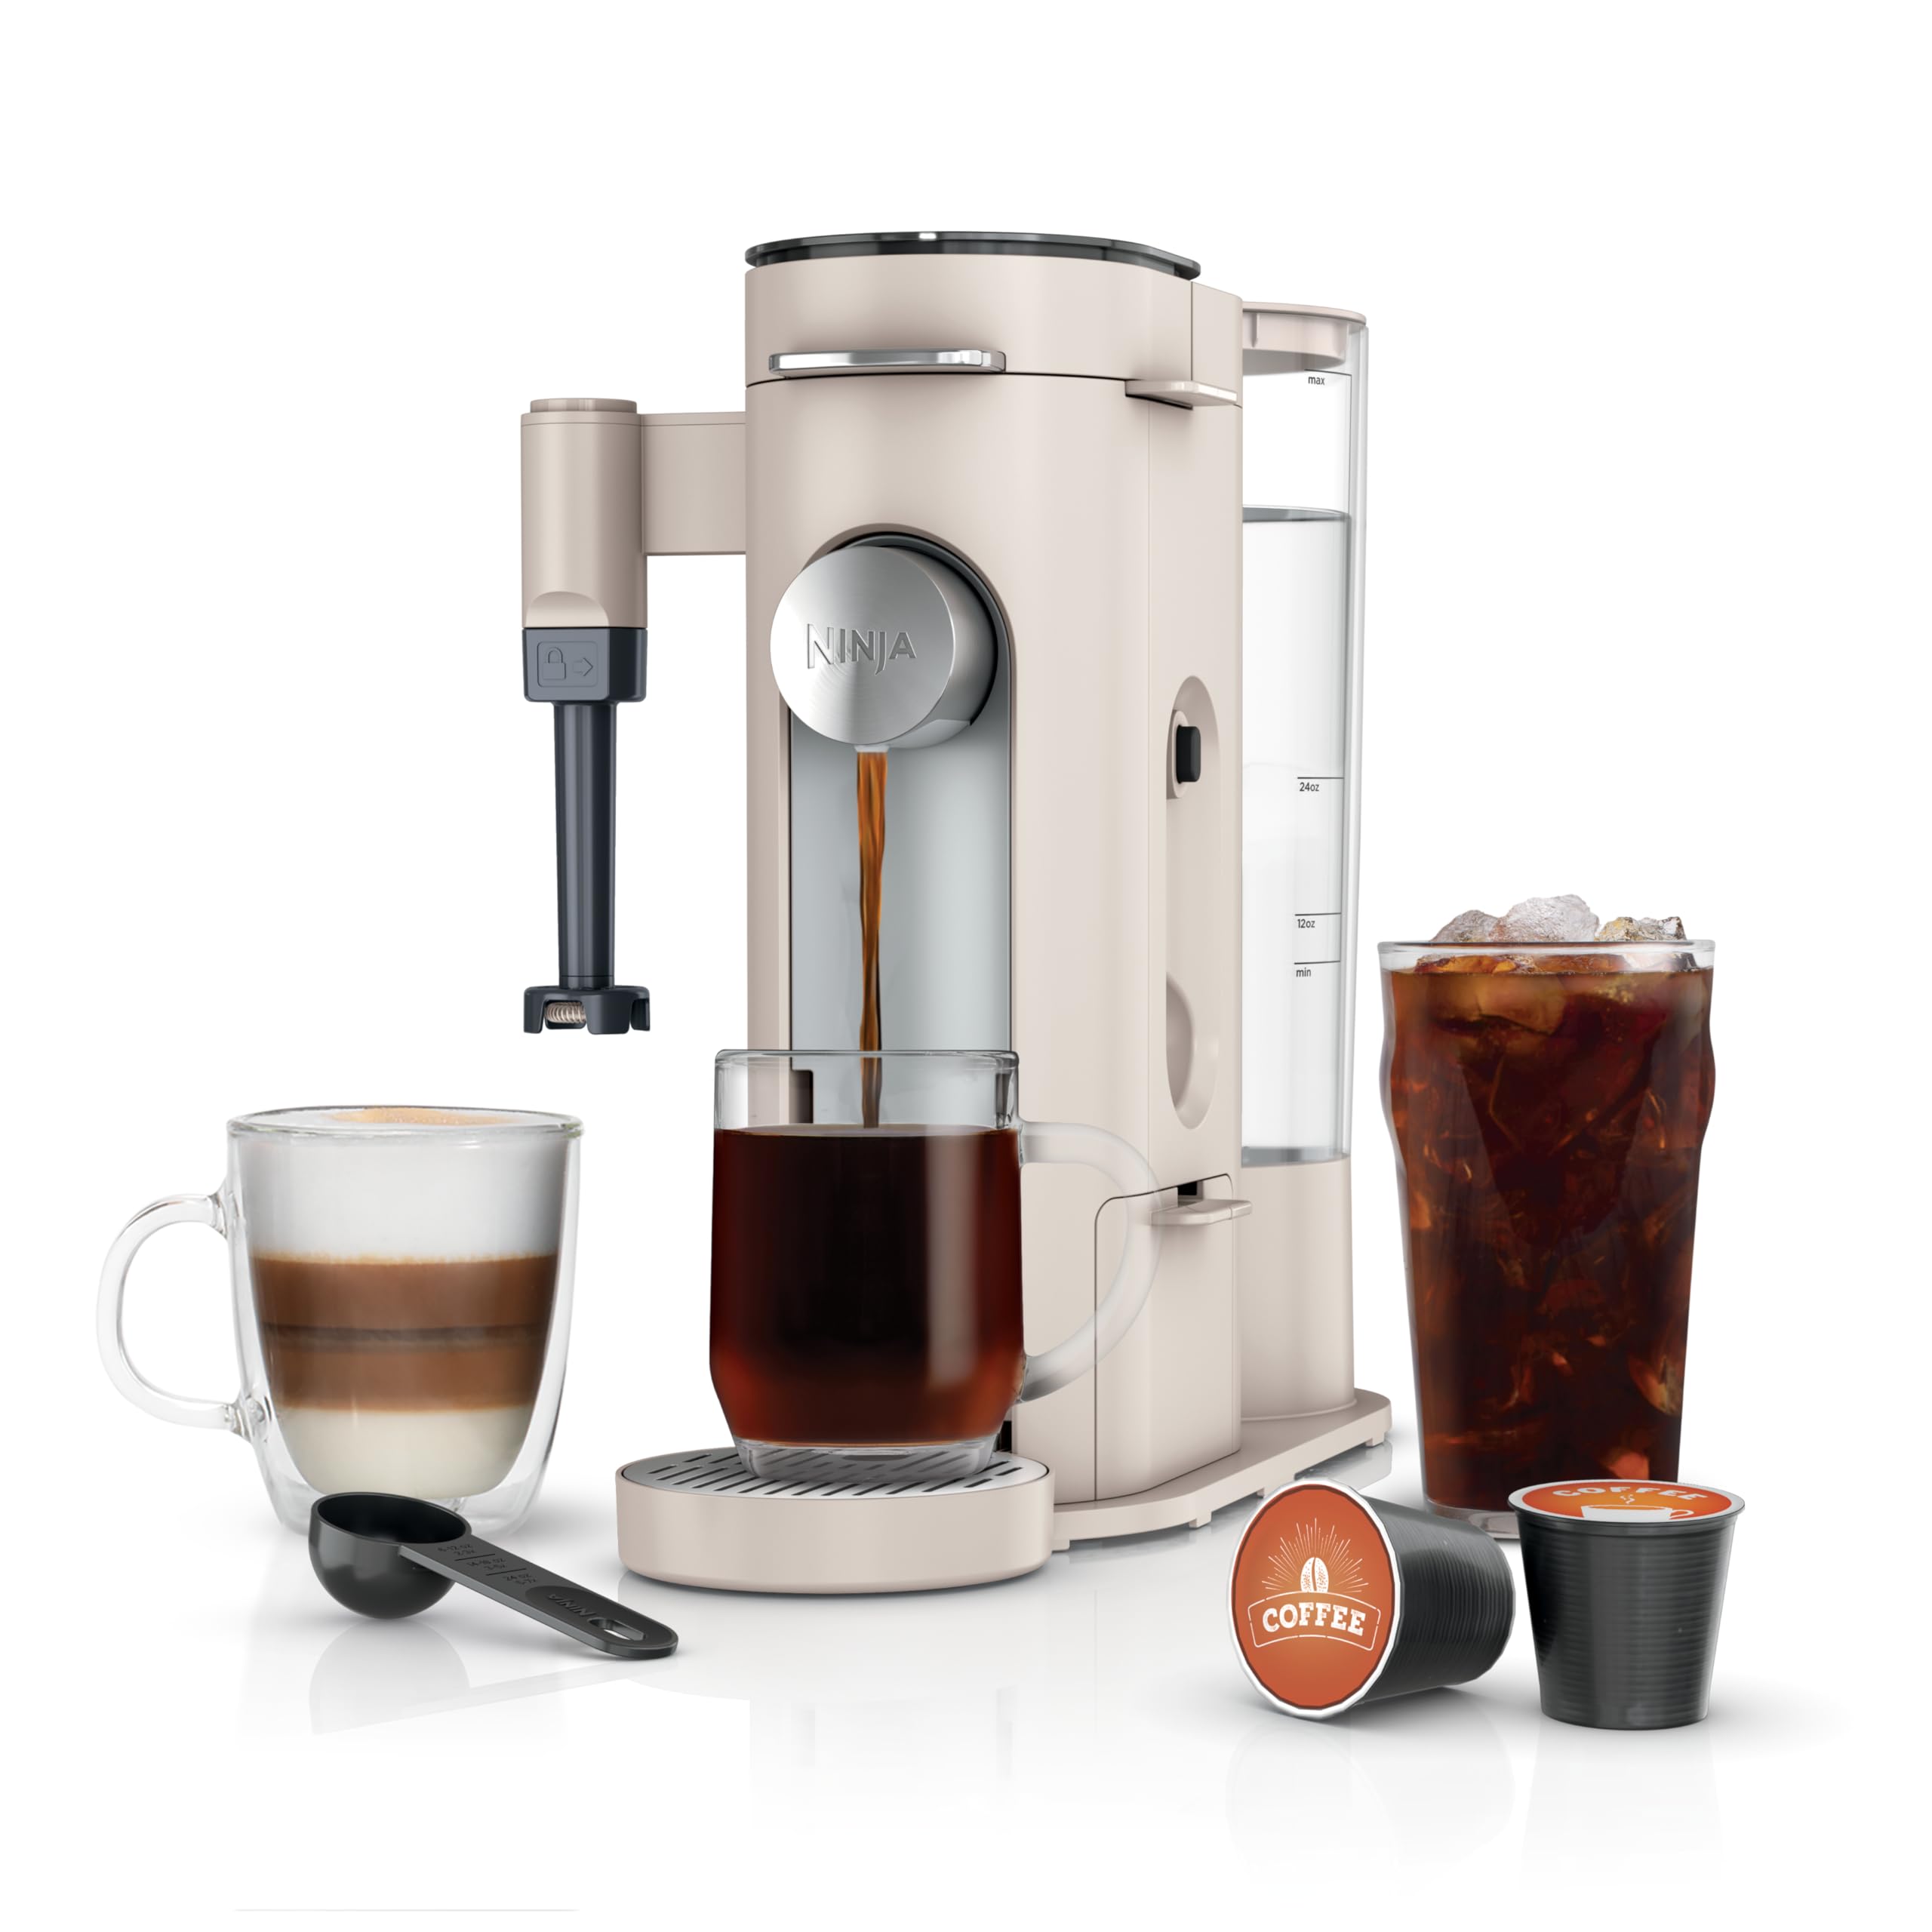
Image 1.1: The Ninja Pod & Grounds Coffee Maker (Model PB055AST) in Stone color.
2. Important Safety Information
Please read all instructions before using your Ninja Pod & Grounds Coffee Maker. Failure to follow these instructions may result in property damage, personal injury, or death.
- Always ensure the appliance is unplugged from the outlet before cleaning or when not in use.
- Do not immerse the appliance, power cord, or plug in water or other liquids.
- Use only cold, filtered water in the water reservoir. Do not use milk, juice, or other beverages.
- Do not open the brew head during the brewing process as hot water may be ejected.
- Keep hands and cords away from hot surfaces.
- This appliance is for household use only. Do not use outdoors.
- Ensure the appliance is placed on a stable, level surface away from the edge of the countertop.
3. What's Included
Unpack your coffee maker and ensure all components are present:
- Ninja Pod & Grounds Coffee Maker (Main Unit)
- 68 oz. Removable Water Reservoir
- Removable Brew Basket
- Ninja Pod Adapter
- Permanent Grounds Filter
- Ninja Smart Scoop
- Built-in, Fold-Away Milk Frother
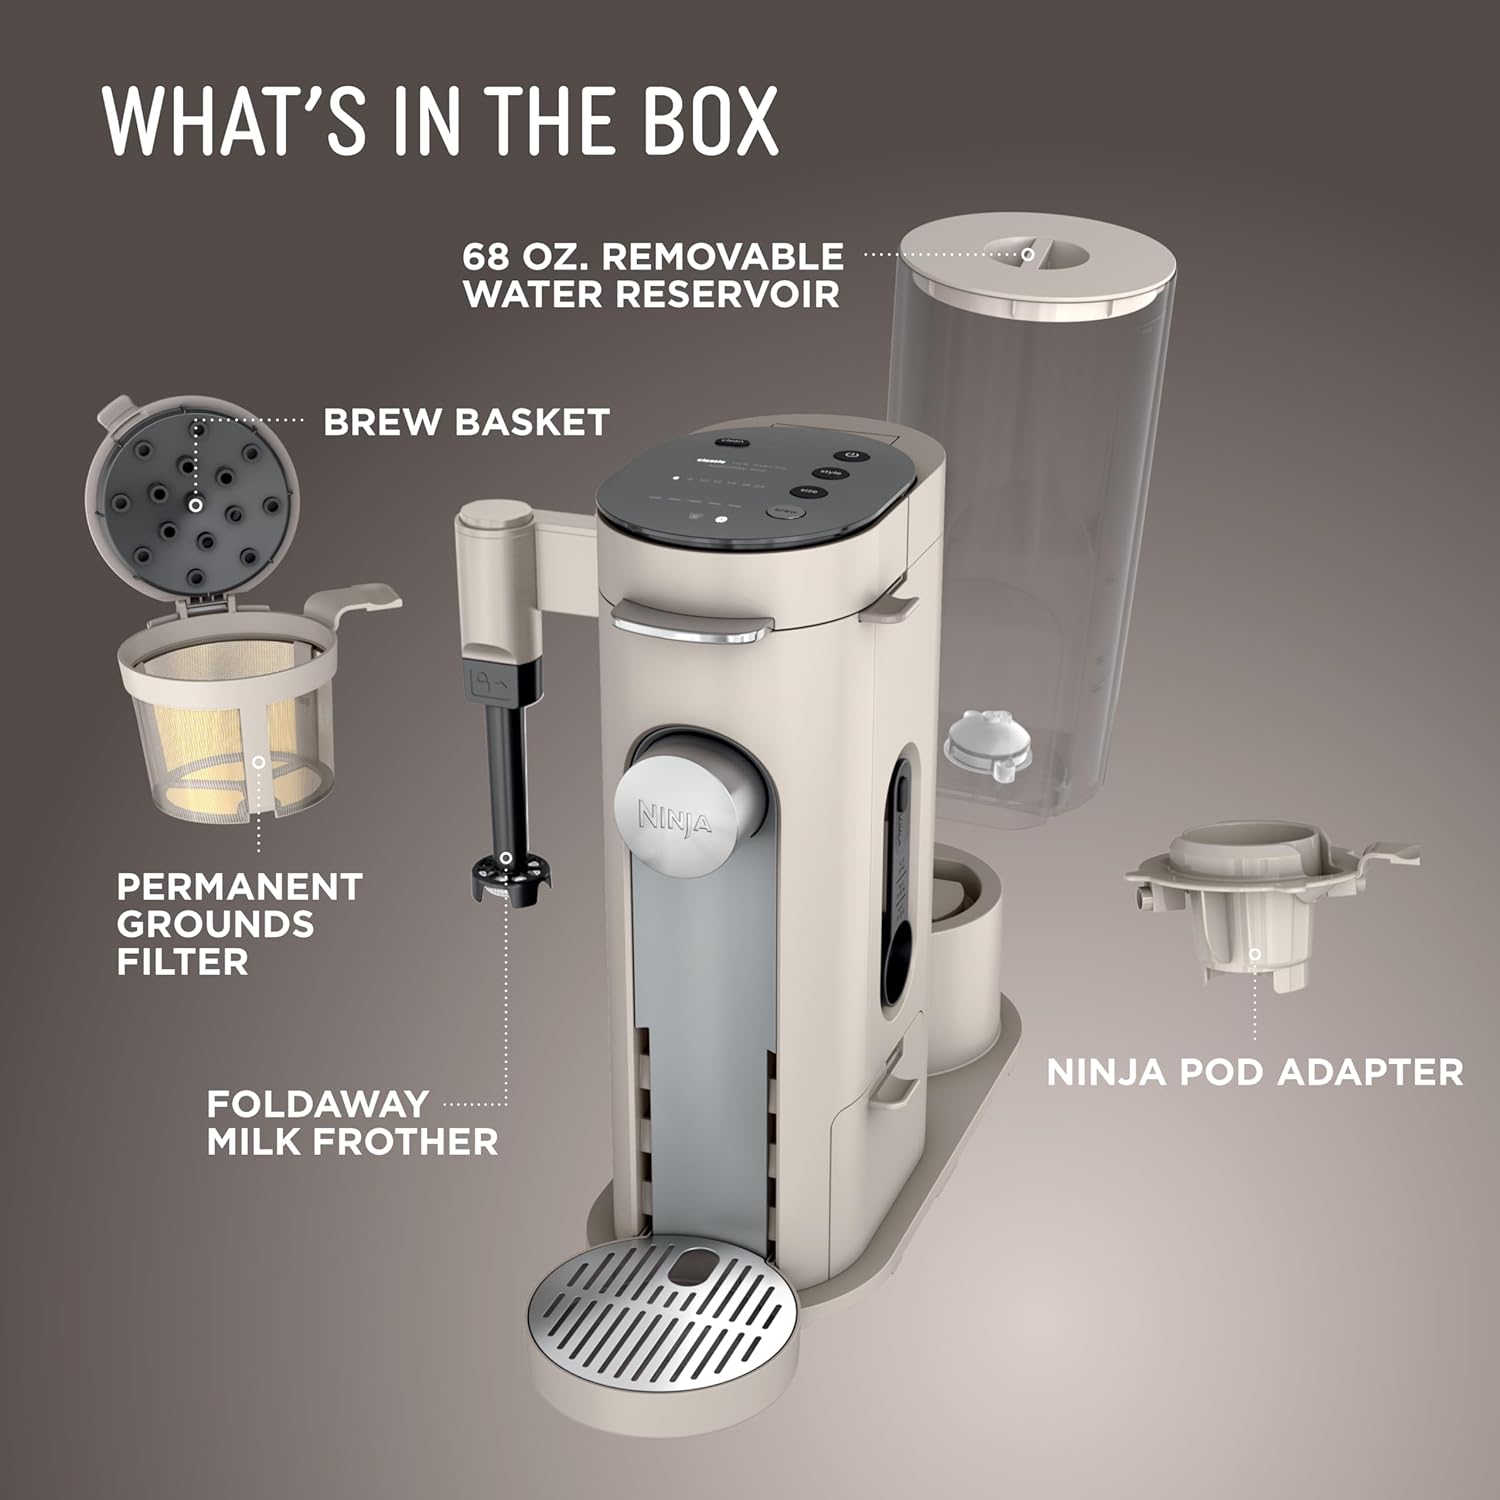
Image 3.1: All components included with the Ninja Pod & Grounds Coffee Maker.
4. Setup
- Placement: Place the coffee maker on a clean, dry, and level surface. Ensure there is adequate space around the unit for ventilation and access to the water reservoir.
- Clean Components: Wash the removable water reservoir, brew basket, permanent grounds filter, Ninja pod adapter, and Ninja Smart Scoop in warm, soapy water. Rinse thoroughly and dry.
- Fill Water Reservoir: Fill the 68 oz. removable water reservoir with cold, filtered water up to the MAX fill line. Place it securely back onto the coffee maker.

Image 4.1: Filling the XL 68 oz. removable water tank.
- Initial Clean Cycle: Before first use, run a clean cycle.
- Ensure the water reservoir is filled.
- Place an empty mug on the drip tray.
- Press the "Clean" button (if available, otherwise run a large brew cycle without coffee).
- Discard the water after the cycle is complete.
5. Features Overview
The Ninja Pod & Grounds Coffee Maker offers a range of features for a customized brewing experience.
- Dual Brewing: Brew with K-Cup compatible pods or your favorite ground coffee.
- Multiple Brew Sizes: Up to 12 oz for pods and up to 24 oz for grounds, accommodating various cup and travel mug sizes.
- 4 Brew Styles: Choose from Classic, Rich, Over Ice, or Specialty (4 oz concentrate).
- Built-in Frother: Create hot or cold milk froth for specialty beverages.
- XL Water Reservoir: A 68 oz. removable reservoir reduces the frequency of refills.
- Thermal Flavor Extraction DUO: Ensures optimal flavor for both pods and grounds through precise temperature control and even saturation.

Image 5.1: Feature comparison with other single-serve coffee makers.
6. Operating Instructions
6.1. Brewing with Coffee Pods
- Ensure the water reservoir is filled.
- Lift the brew head handle.
- Insert a K-Cup compatible coffee pod into the Ninja Pod Adapter. Close the brew head handle firmly until it clicks.
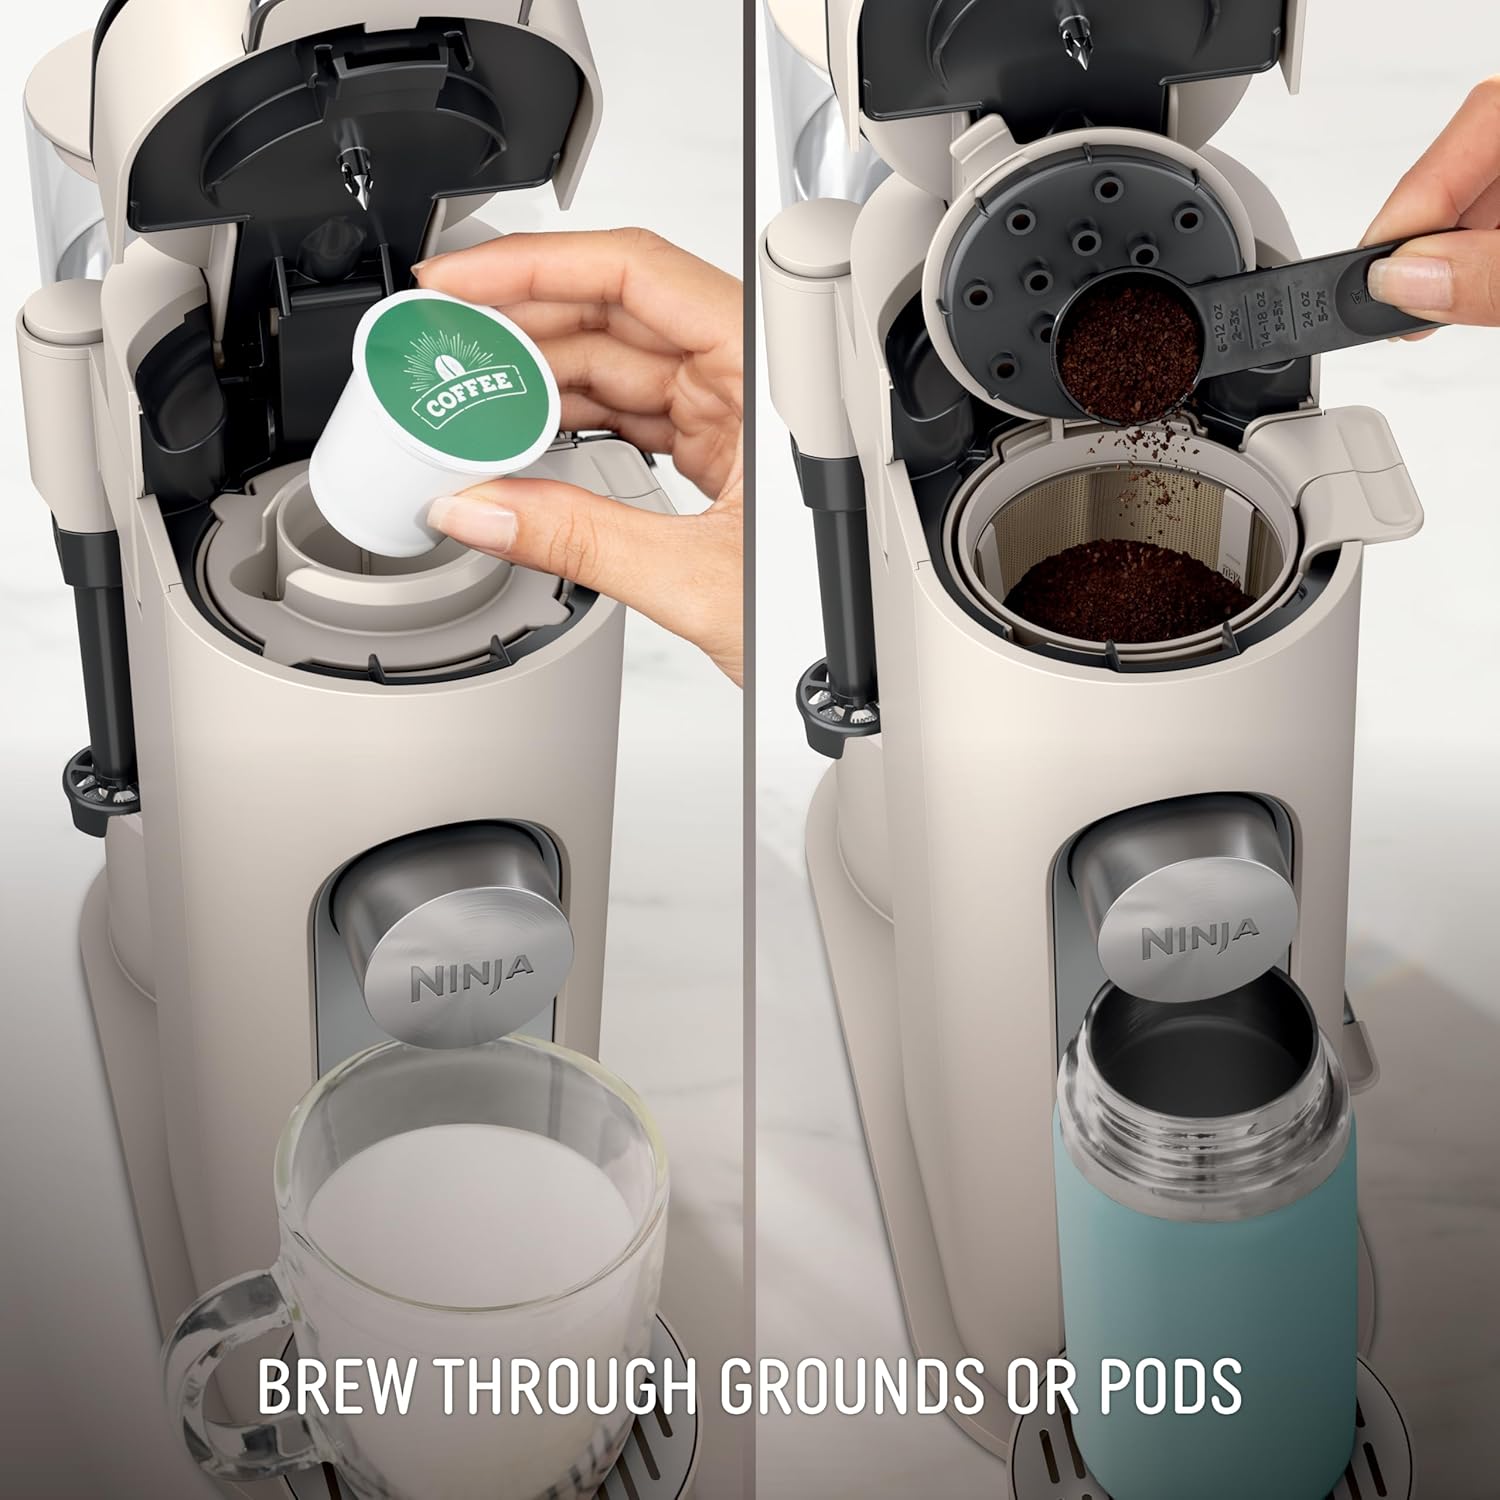
Image 6.1: Inserting a coffee pod into the adapter.
- Place your desired cup or travel mug on the adjustable cup tray.
- Select your desired brew size (6, 8, 10, or 12 oz.) and brew style (Classic, Rich, Over Ice, or Specialty) using the control panel.

Image 6.2: Easy-to-use display for selecting brew options.
- Press the "Brew" button to start. The machine will automatically stop when brewing is complete.
6.2. Brewing with Ground Coffee
- Ensure the water reservoir is filled.
- Lift the brew head handle.
- Remove the Ninja Pod Adapter and insert the Removable Brew Basket with the Permanent Grounds Filter.
- Use the Ninja Smart Scoop to add your desired amount of ground coffee to the filter. Refer to the scoop markings for recommended amounts based on brew size. Close the brew head handle firmly.
Image 6.3: Adding ground coffee to the permanent filter.
- Place your desired cup or travel mug on the adjustable cup tray.
- Select your desired brew size (6, 8, 10, 12, 14, 18, or 24 oz.) and brew style (Classic, Rich, Over Ice, or Specialty) using the control panel.
- Press the "Brew" button to start.
6.3. Brew Styles
Your Ninja coffee maker offers four distinct brew styles:
- Classic: A balanced and smooth coffee experience.
- Rich: A more intense flavor, ideal for black coffee or with milk.
- Over Ice: Brews a concentrated coffee that cools perfectly over ice without tasting watered down.
- Specialty (4 oz.): A super-rich coffee concentrate, perfect for creating lattes, cappuccinos, and macchiatos.

Image 6.4: Examples of the four brew styles.
6.4. Using the Built-in Milk Frother
The integrated fold-away frother allows you to create silky-smooth froth for your coffeehouse-style beverages.
- Swing the frother arm out from the side of the machine.
- Fill a mug with cold or hot milk (or milk alternative) to your desired level.
- Submerge the frother whisk just below the surface of the milk.
- Press and hold the frother button (if applicable, otherwise manually pump) to activate the whisk. Move the mug up and down to create froth.
- Once desired froth is achieved, release the button and remove the mug.
- Immediately rinse the frother whisk under warm water for easy cleaning. Swing the frother arm back into its storage position.
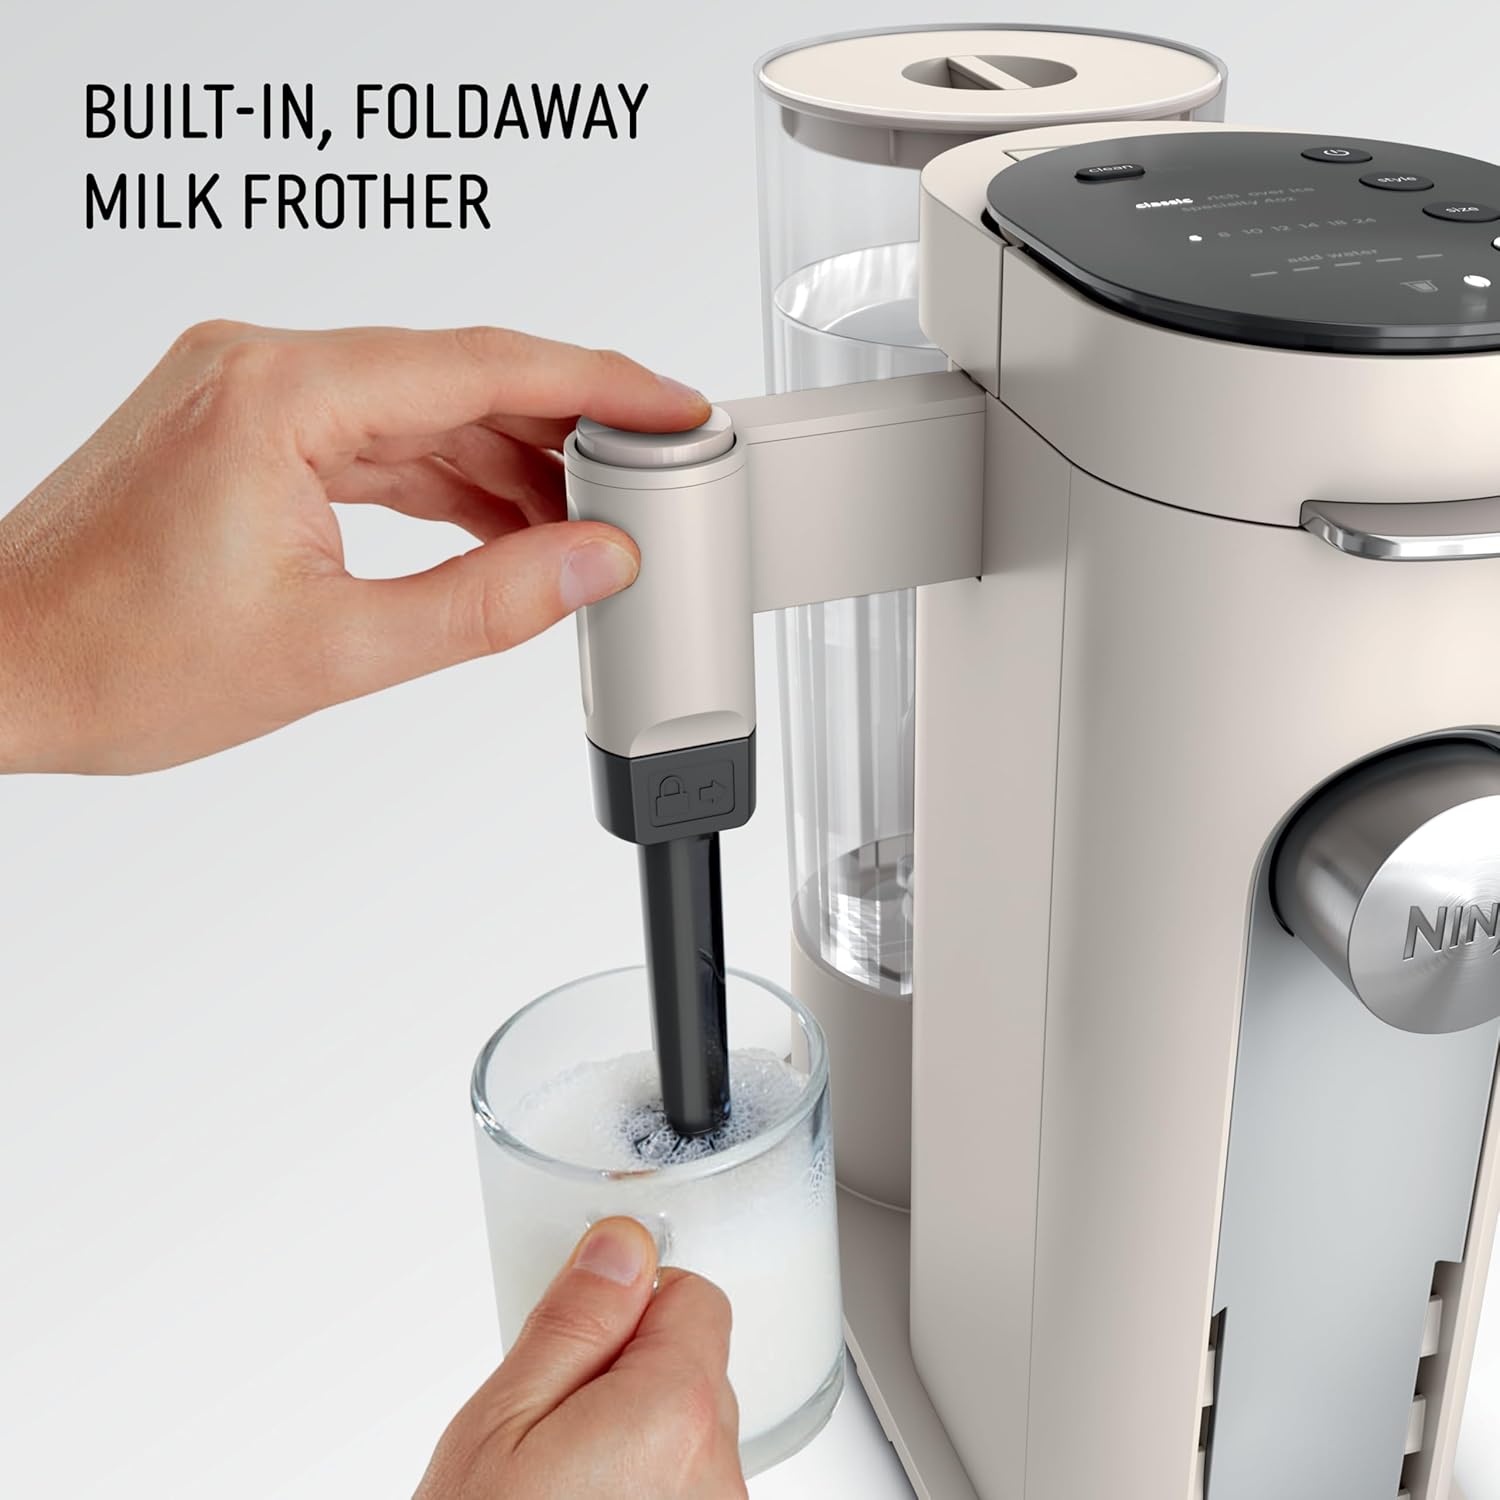
Image 6.5: Using the built-in milk frother.
7. Maintenance and Cleaning
Regular cleaning ensures optimal performance and extends the life of your coffee maker.
7.1. Daily Cleaning
- Water Reservoir: Empty and rinse the water reservoir daily. Refill with fresh, cold water before each use.
- Brew Basket & Filter: After each use, remove and discard used grounds or pods. Wash the brew basket, permanent grounds filter, and Ninja Pod Adapter in warm, soapy water. Rinse and dry.
- Frother Whisk: Immediately after use, remove the frother whisk and rinse it under warm water. The frother whisk is removable for easy cleaning.
- Drip Tray: Empty and clean the drip tray as needed.
- Exterior: Wipe the exterior of the machine with a soft, damp cloth.

Image 7.1: Dishwasher safe parts for easy cleaning.
7.2. Descaling
Over time, mineral deposits (scale) can build up in your coffee maker, affecting performance and taste. The "Clean" light will illuminate when descaling is recommended.
- Prepare Descaling Solution: Mix 16 oz. of white vinegar with 16 oz. of water.
- Fill Reservoir: Pour the descaling solution into the water reservoir up to the 32 oz. line.
- Run Clean Cycle: Place an empty mug on the drip tray. Press the "Clean" button. The cycle will take approximately 20 minutes.
- Rinse Cycles: After the clean cycle, empty the reservoir and fill it with fresh water. Run two full brew cycles with just water to rinse the system thoroughly.
8. Troubleshooting
| Problem | Possible Cause | Solution |
|---|---|---|
| Coffee not brewing. | No water in reservoir; brew head not fully closed; machine not powered on. | Fill reservoir; ensure brew head is clicked shut; check power connection. |
| Weak coffee. | Insufficient coffee grounds/pod; incorrect brew style selected; descaling needed. | Use more grounds/stronger pod; select "Rich" brew; descale the machine. |
| "Clean" light illuminated. | Mineral buildup in the system. | Perform a descaling cycle as described in Section 7.2. |
| Frother not producing foam. | Frother whisk dirty; insufficient milk; incorrect milk type. | Clean whisk; ensure enough milk; try different milk (dairy/non-dairy). |
| Water leaking. | Water reservoir not seated correctly; drip tray full. | Ensure reservoir is firmly in place; empty drip tray. |
If you encounter issues not listed here, please contact Ninja Customer Service.
9. Specifications
- Model: PB055AST
- Brand: Ninja
- Color: Stone
- Dimensions (D x W x H): 13.07" x 5.51" x 13.64"
- Weight: 6.56 pounds
- Water Reservoir Capacity: 68 Fluid Ounces
- Voltage: 120 Volts
- Coffee Input Type: Ground, Pod (K-Cup compatible)
- Special Features: Auto Shut-Off, Milk Frother, Permanent Filter
- Operation Mode: Fully Automatic
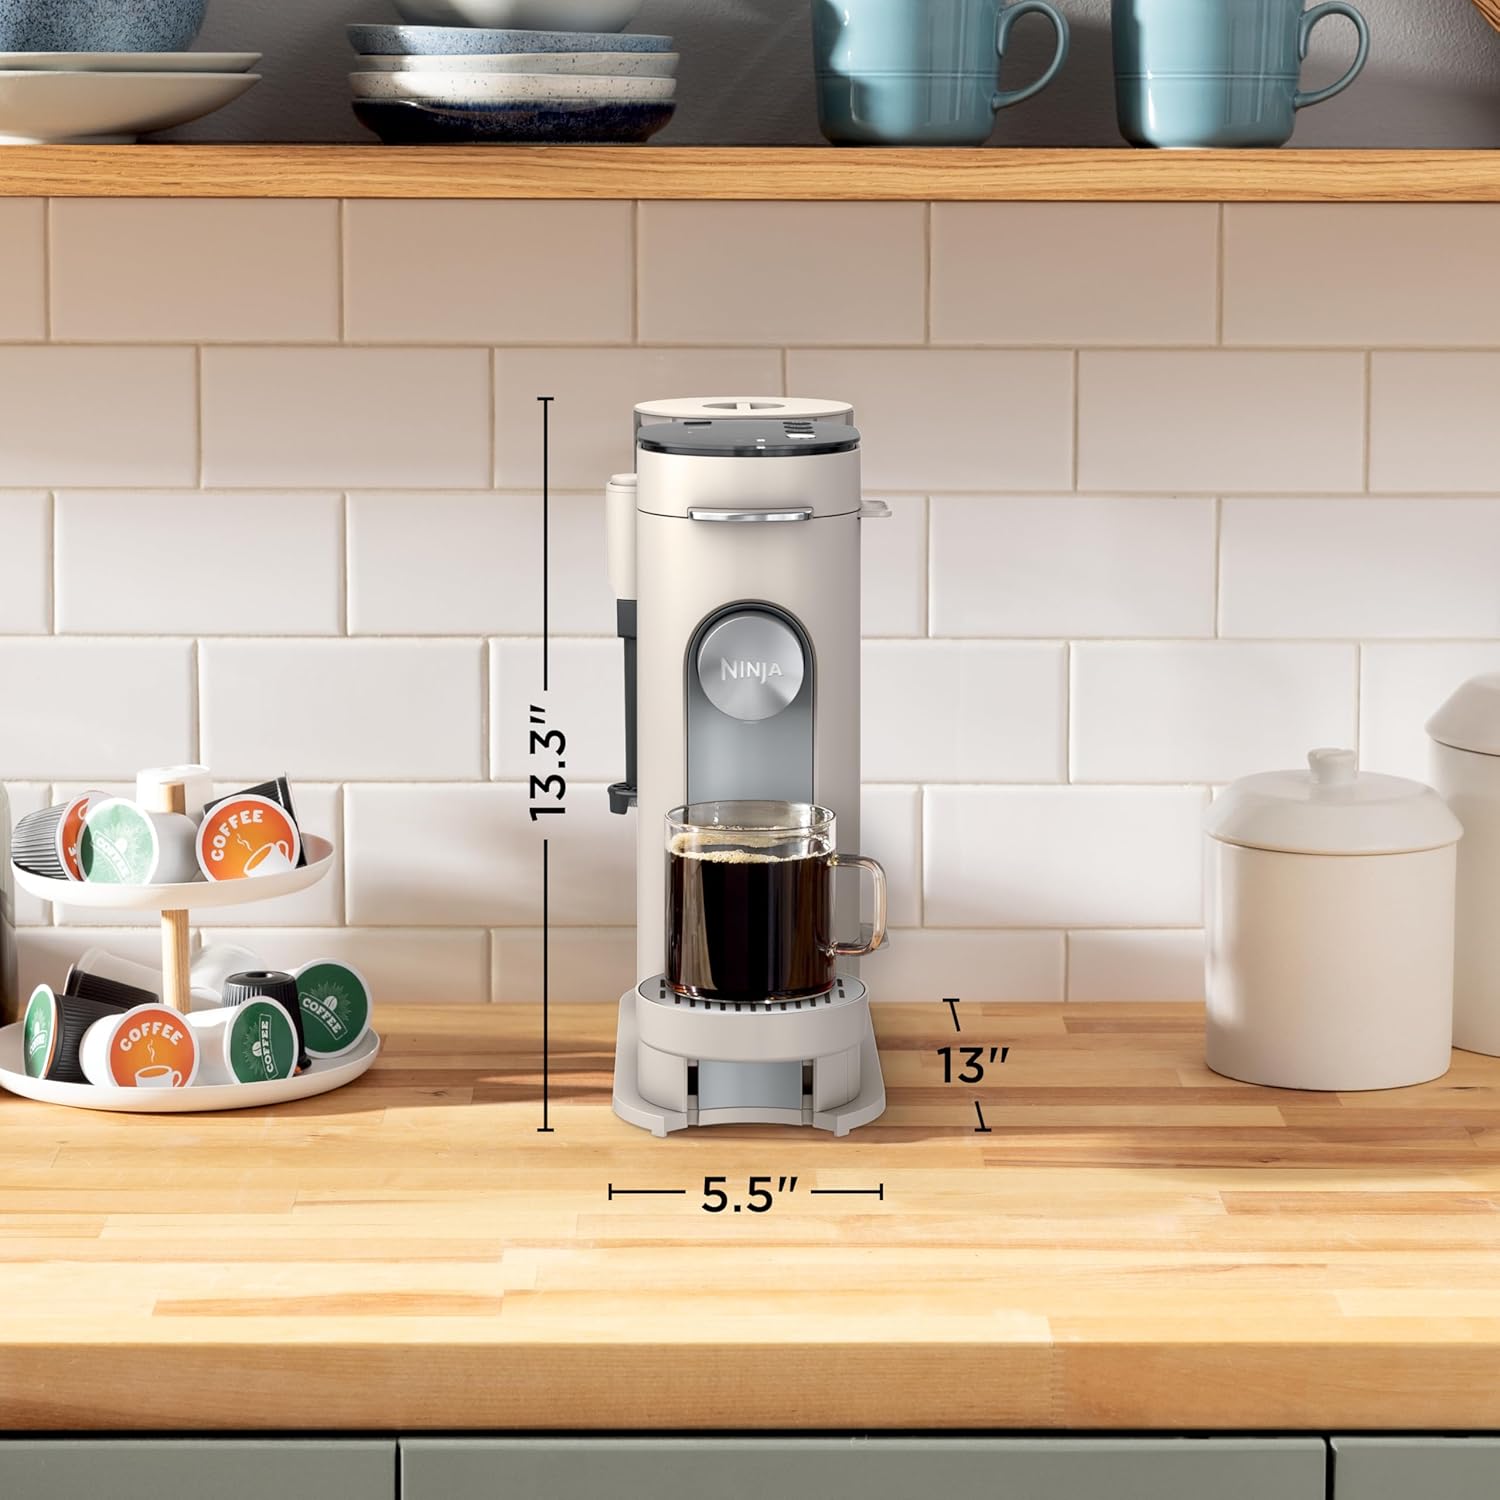
Image 9.1: Product dimensions.
10. Warranty and Support
Ninja products are designed to provide years of reliable performance. For information regarding your product's warranty, please refer to the warranty card included in your product packaging or visit the official Ninja website.
For customer support, replacement parts, or service, please contact Ninja Customer Service through their official website or the contact information provided in your product documentation.
Online Resources: For additional tips, recipes, and FAQs, visit the official Ninja website.
11. Video Demonstrations
Watch this official video for visual guidance on using your Ninja Pod & Grounds Coffee Maker.
Video 11.1: Official product overview and demonstration of key features.


