1. Introduction and Overview
Thank you for choosing the Wiltec 3-Ton Hydraulic Car Jack. This robust and reliable floor jack is designed for safely lifting vehicles such as cars, SUVs, and caravans, with a maximum lifting capacity of 3 tons. Its durable steel construction ensures stability and long-lasting performance for various maintenance tasks. This manual provides essential information for proper setup, operation, maintenance, and troubleshooting to ensure safe and efficient use of your hydraulic jack.
The jack features an adjustable lifting height ranging from 13.5 cm to 40 cm, allowing easy access to the underside of vehicles for tasks like tire changes or brake system inspections. Its compact design (59.2 x 24 x 14.6 cm) and practical mobility with two front and two rear wheels make it easy to store and position accurately under your vehicle.

Image: The Wiltec 3-Ton Hydraulic Car Jack, showcasing its robust design and components.
2. Safety Instructions
WARNING: Failure to follow these safety instructions may result in serious injury or property damage.
- Read the Manual: Always read and understand this entire instruction manual before operating the hydraulic jack.
- Load Capacity: Never exceed the maximum rated load capacity of 3 tons (6,000 lbs).
- Stable Surface: Always use the jack on a hard, level, and stable surface. Avoid uneven ground, soft surfaces, or inclines.
- Vehicle Stability: Ensure the vehicle is in park (P) or a low gear, with the parking brake engaged. Block the wheels that are not being lifted.
- Jack Stands: After lifting the vehicle, always support it immediately with appropriate jack stands before performing any work underneath. Never rely solely on the hydraulic jack for support.
- Lifting Points: Lift the vehicle only at the manufacturer's recommended lifting points. Refer to your vehicle's owner's manual.
- Clearance: Keep hands, feet, and other body parts clear of the jack's moving parts and the vehicle during lifting and lowering.
- Personal Protective Equipment: Wear appropriate safety gear, including safety glasses and gloves.
- Fluid Leaks: Do not use the jack if there are any signs of hydraulic fluid leaks.
- Modifications: Do not modify the jack in any way. Use only original replacement parts.

Image: A person safely operating the Wiltec hydraulic jack to lift a vehicle, demonstrating proper usage.
3. Product Components
Familiarize yourself with the main components of your Wiltec Hydraulic Car Jack:
- Lifting Saddle: The contact point with the vehicle's lifting point. Features a non-slip rubber pad.
- Lifting Arm: The movable arm that raises and lowers the vehicle.
- Hydraulic Cylinder: The core mechanism for lifting.
- Operating Handle: Used to pump the jack and activate the release valve. Consists of two parts for easy assembly.
- Release Valve: Controls the lowering of the jack. Operated by turning the handle.
- Wheels: Two fixed front wheels and two swivel rear wheels for easy maneuverability.
- Carry Handle: Integrated handle for convenient transport.

Image: Detailed view of the jack's practical handle, smooth-rolling wheels, and non-slip lifting pad.
4. Setup
- Unpacking: Carefully remove the jack and all components from the packaging. Check for any shipping damage.
- Handle Assembly: Insert the upper part of the operating handle into the lower part and secure it. Then, insert the assembled handle into the handle socket on the jack.
- Bleeding the Hydraulic System: Before first use, it is recommended to bleed any air from the hydraulic system. To do this:
- Turn the release valve counter-clockwise to fully open it.
- Pump the handle vigorously 10-15 times without a load.
- Turn the release valve clockwise to close it.
- The jack should now operate smoothly. Repeat if necessary.
5. Operating Instructions
5.1. Lifting the Vehicle
- Prepare the Vehicle: Park the vehicle on a hard, level surface. Engage the parking brake and place the transmission in park (automatic) or a low gear (manual). Block the wheels that will remain on the ground.
- Position the Jack: Locate the vehicle manufacturer's recommended lifting point. Slide the jack under the vehicle so that the lifting saddle is directly beneath the lifting point. Ensure the jack is centered and stable.
- Close Release Valve: Turn the operating handle clockwise until the release valve is fully closed. Do not overtighten.
- Lift Vehicle: Pump the operating handle up and down to raise the lifting arm. Continue pumping until the vehicle is raised to the desired height.
- Secure with Jack Stands: Immediately place appropriately rated jack stands under the vehicle's frame at the manufacturer's recommended support points. Slowly lower the vehicle onto the jack stands (see 5.2). Never work under a vehicle supported only by the hydraulic jack.
5.2. Lowering the Vehicle
- Raise Slightly: If the vehicle is on jack stands, pump the jack handle a few times to slightly raise the vehicle off the jack stands.
- Remove Jack Stands: Carefully remove the jack stands from under the vehicle.
- Open Release Valve: Slowly turn the operating handle counter-clockwise to open the release valve. The vehicle will begin to lower. Control the lowering speed by adjusting how much you open the valve.
- Fully Lower: Continue to lower the vehicle until it is fully on the ground.
- Remove Jack: Once the vehicle is fully lowered, remove the hydraulic jack from under the vehicle.
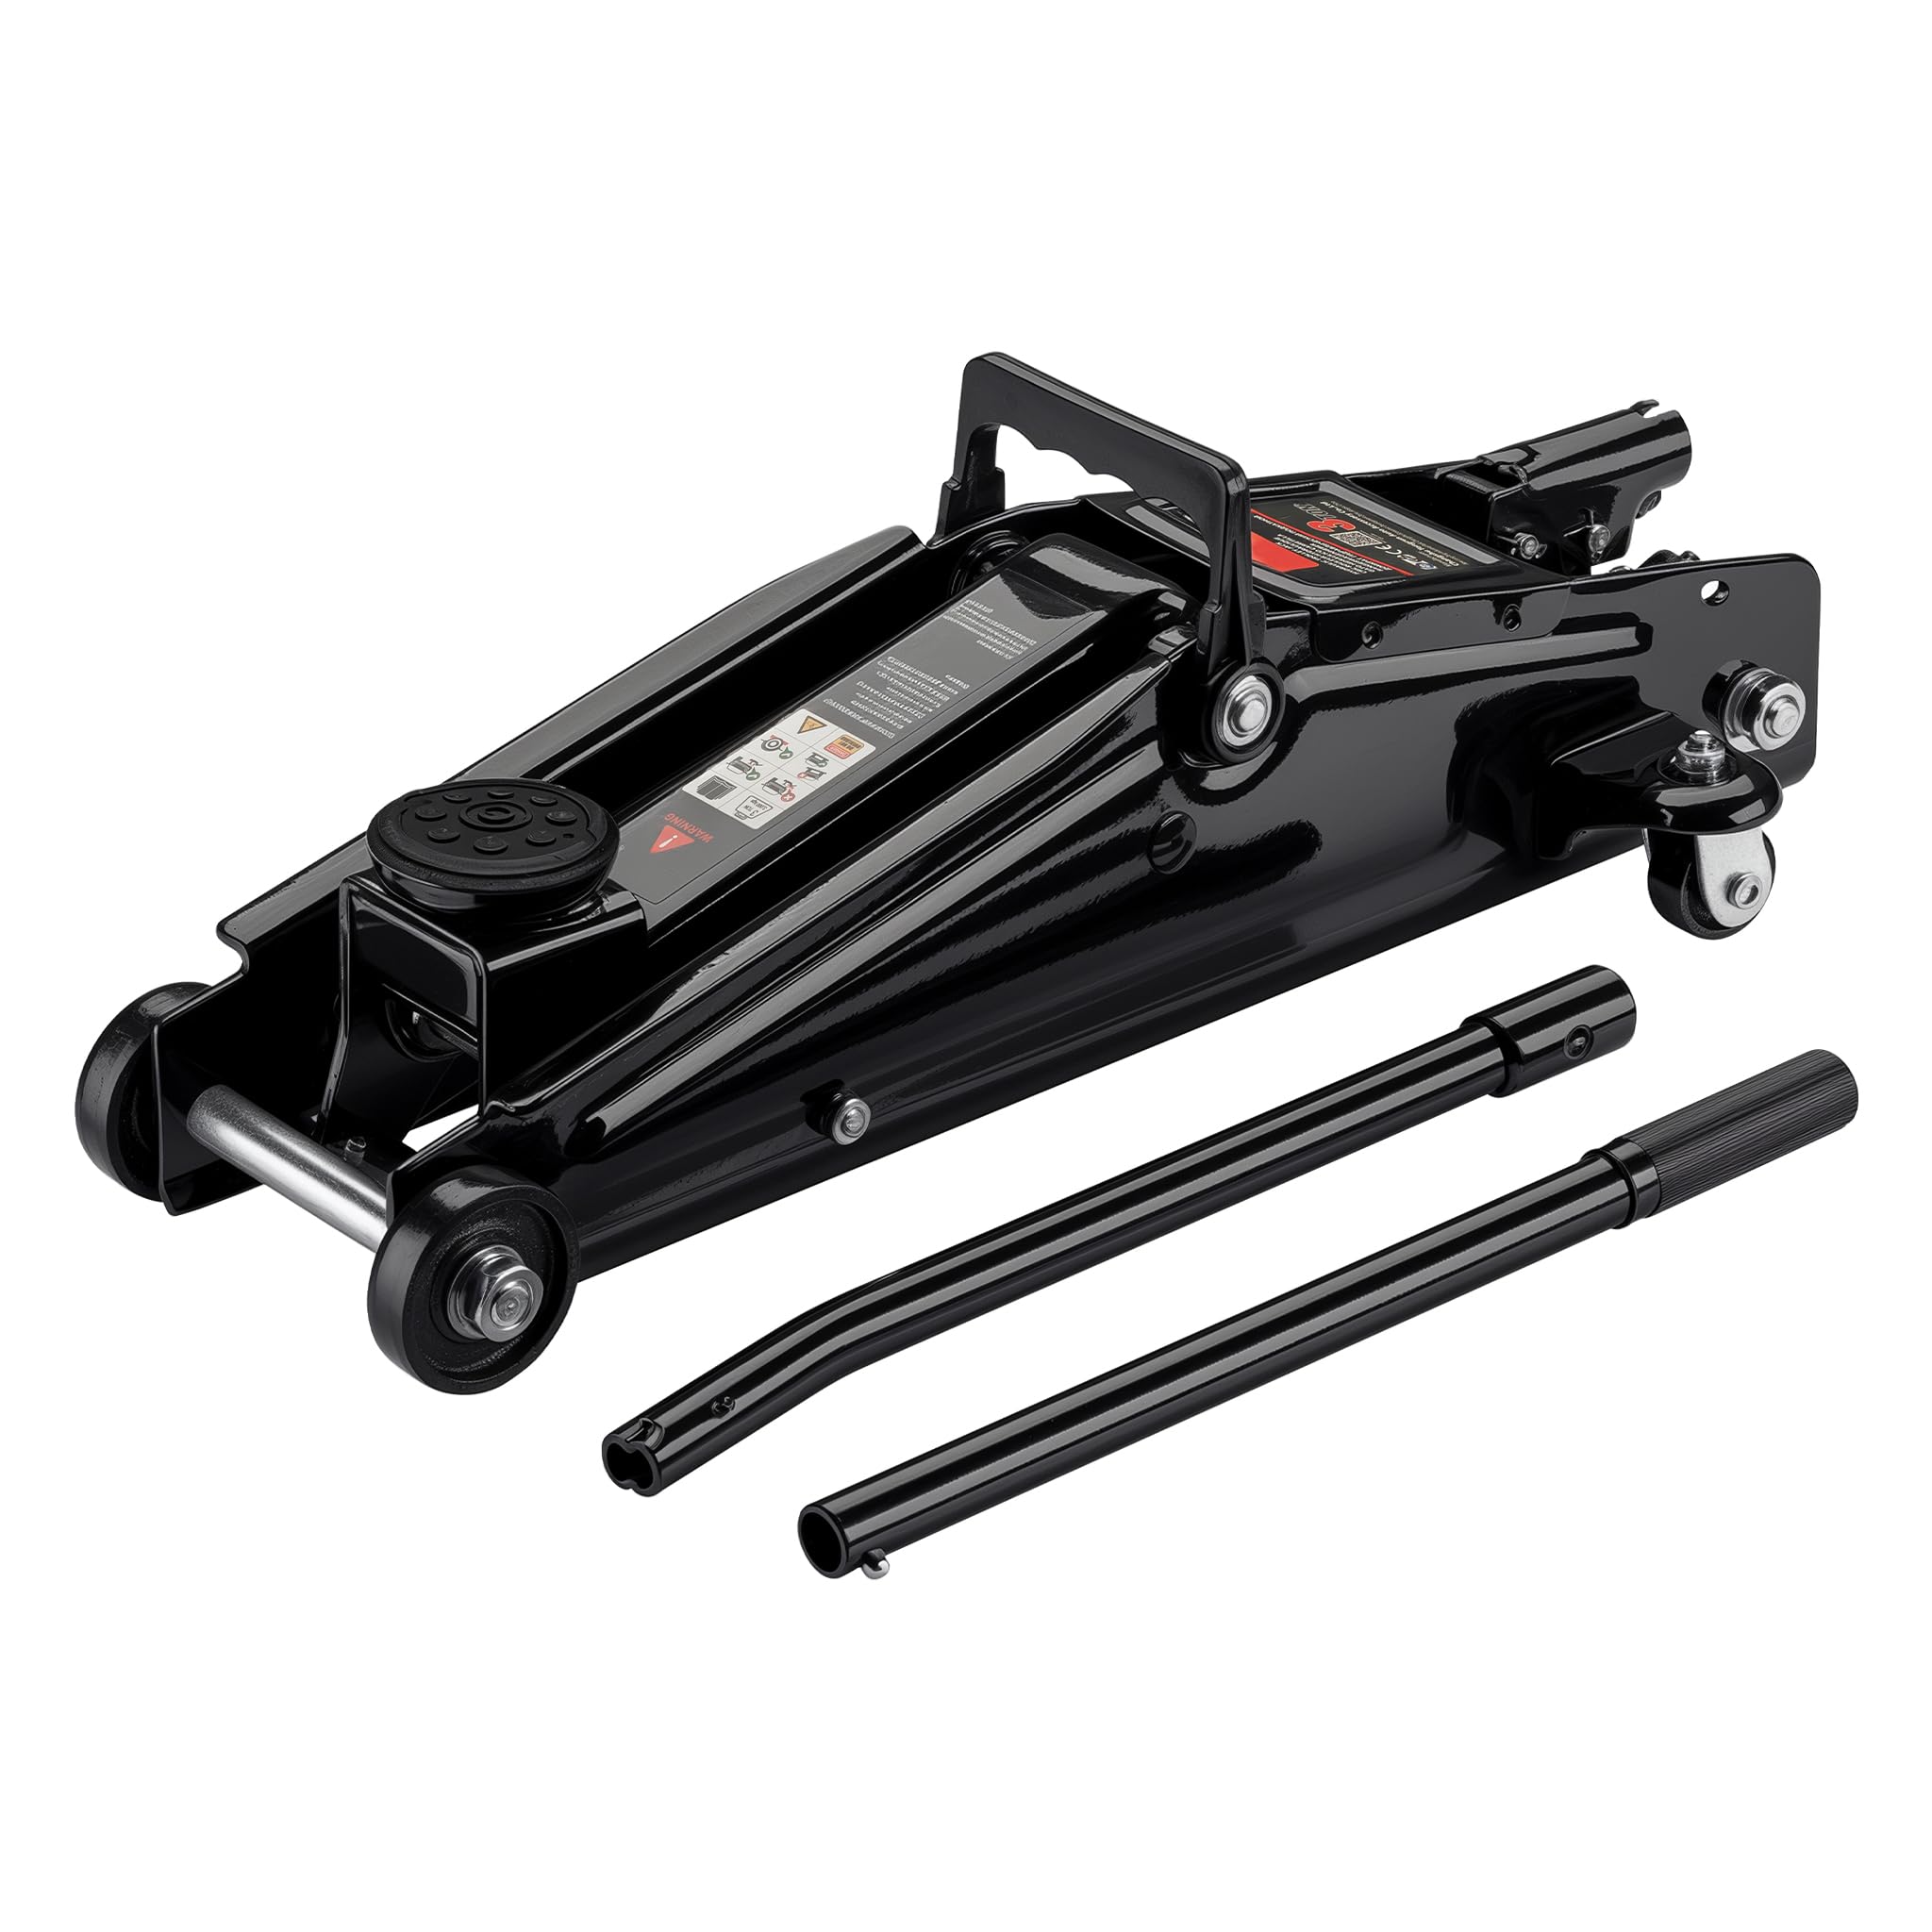
Image: A user demonstrating the operation of the Wiltec hydraulic jack, positioning it under a vehicle for lifting.
6. Maintenance
Regular maintenance ensures the longevity and safe operation of your Wiltec Hydraulic Car Jack.
- Lubrication: Periodically lubricate all moving parts, including the wheels, pivot points, and handle mechanism, with light machine oil.
- Hydraulic Fluid: Check the hydraulic fluid level every three months or after heavy use. To check, lower the jack completely, remove the oil filler plug, and ensure the fluid is just below the filler hole. Use only high-quality hydraulic jack oil. Do not use brake fluid or motor oil.
- Cleaning: Keep the jack clean and free of dirt, grease, and debris. Wipe down the piston rod to prevent corrosion.
- Inspection: Before each use, inspect the jack for any signs of damage, wear, or leaks. Check for bent or cracked components, loose fasteners, or damaged seals. Do not use a damaged jack.
- Storage: Store the jack in a clean, dry place with the lifting arm fully lowered.
7. Troubleshooting
| Problem | Possible Cause | Solution |
|---|---|---|
| Jack will not lift load. | Release valve open; Low hydraulic fluid; Air in system; Overload. | Close release valve; Add hydraulic fluid; Bleed air from system; Reduce load. |
| Jack lifts slowly or only partially. | Low hydraulic fluid; Air in system; Worn seals. | Add hydraulic fluid; Bleed air from system; Contact service for seal replacement. |
| Jack lowers under load. | Release valve not fully closed; Leaking seals; Overload. | Ensure release valve is fully closed; Contact service for seal replacement; Reduce load. |
| Jack does not lower. | Release valve stuck or blocked. | Check for obstructions; Gently tap valve to free it; If problem persists, contact service. |
8. Specifications
- Model: 65009
- Brand: Wiltec
- Capacity: 3 tons (6,000 lbs)
- Minimum Lifting Height: 13.5 cm (5.3 inches)
- Maximum Lifting Height: 40 cm (15.7 inches)
- Product Dimensions (L x W x H): 59.2 x 24 x 14.6 cm (23.3 x 9.4 x 5.7 inches)
- Item Weight: 16.44 kg (36.24 lbs)
- Material: Robust Steel
- Color: Black
- Vehicle Service Type: Automobile, Trailer, SUV

Image: The Wiltec hydraulic jack with key dimensions indicated, including length, width, and height.
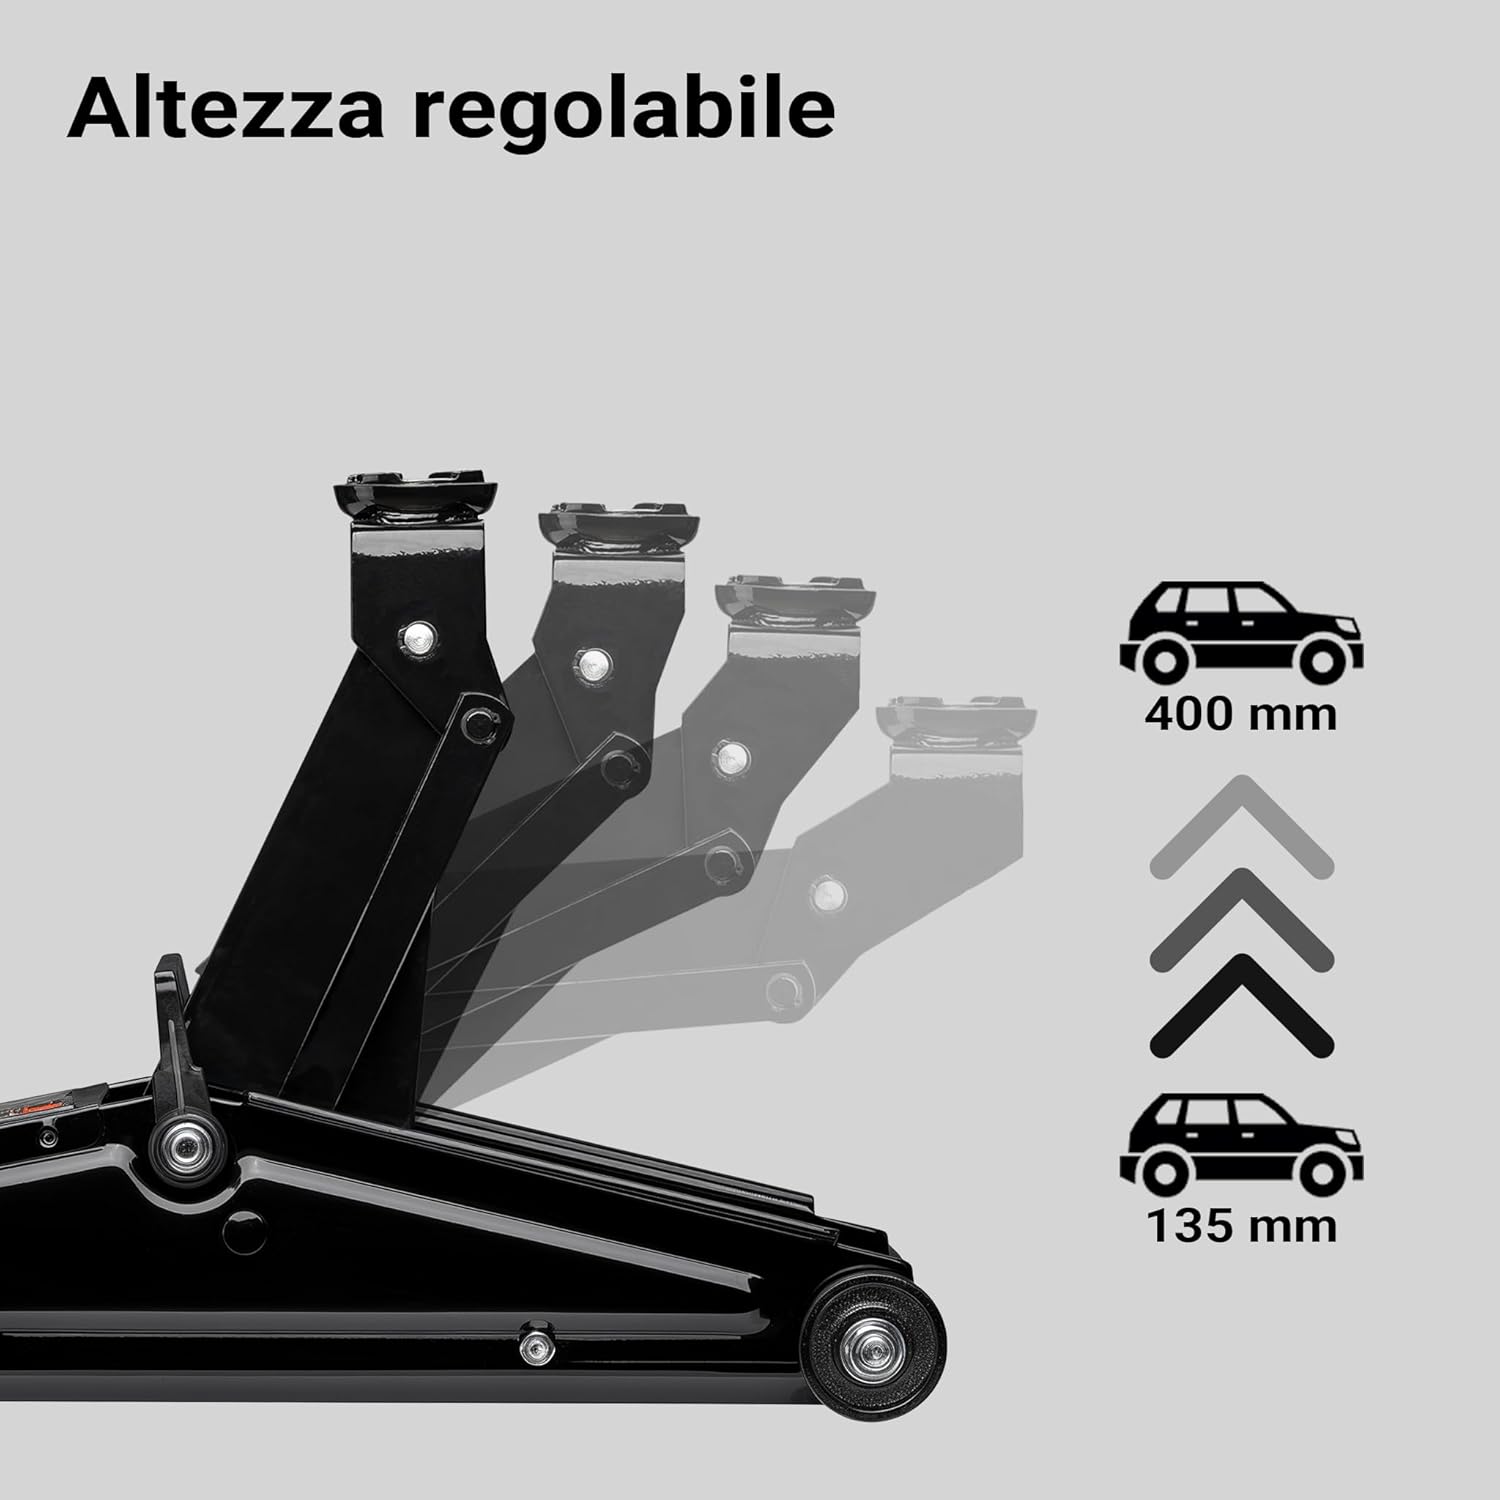
Image: A visual representation of the jack's adjustable lifting height, from 135 mm to 400 mm.
9. Warranty and Support
Wiltec products are manufactured to high-quality standards. In the unlikely event of a defect or malfunction, please refer to your purchase documentation for warranty details. For technical assistance, spare parts, or further inquiries, please contact Wiltec customer service through the retailer where the product was purchased or visit the official Wiltec website.
Please retain your proof of purchase for any warranty claims.


