1. Introduction
Thank you for choosing the RCA RC-CAF4 Automatic Coffee Maker with Integrated Grinder. This manual provides essential information for the safe and efficient operation, maintenance, and troubleshooting of your new appliance. Please read it thoroughly before first use and keep it for future reference.
Important Safety Instructions
- Always unplug the coffee maker from the power outlet before cleaning or when not in use.
- Do not immerse the appliance, power cord, or plug in water or any other liquid.
- Keep the appliance out of reach of children.
- Do not operate the appliance with a damaged cord or plug, or after the appliance malfunctions or has been damaged in any manner.
- Use only cold, fresh water in the water tank.
- Ensure the lid of the grinding chamber is securely closed before operating the grinder.
2. Product Overview
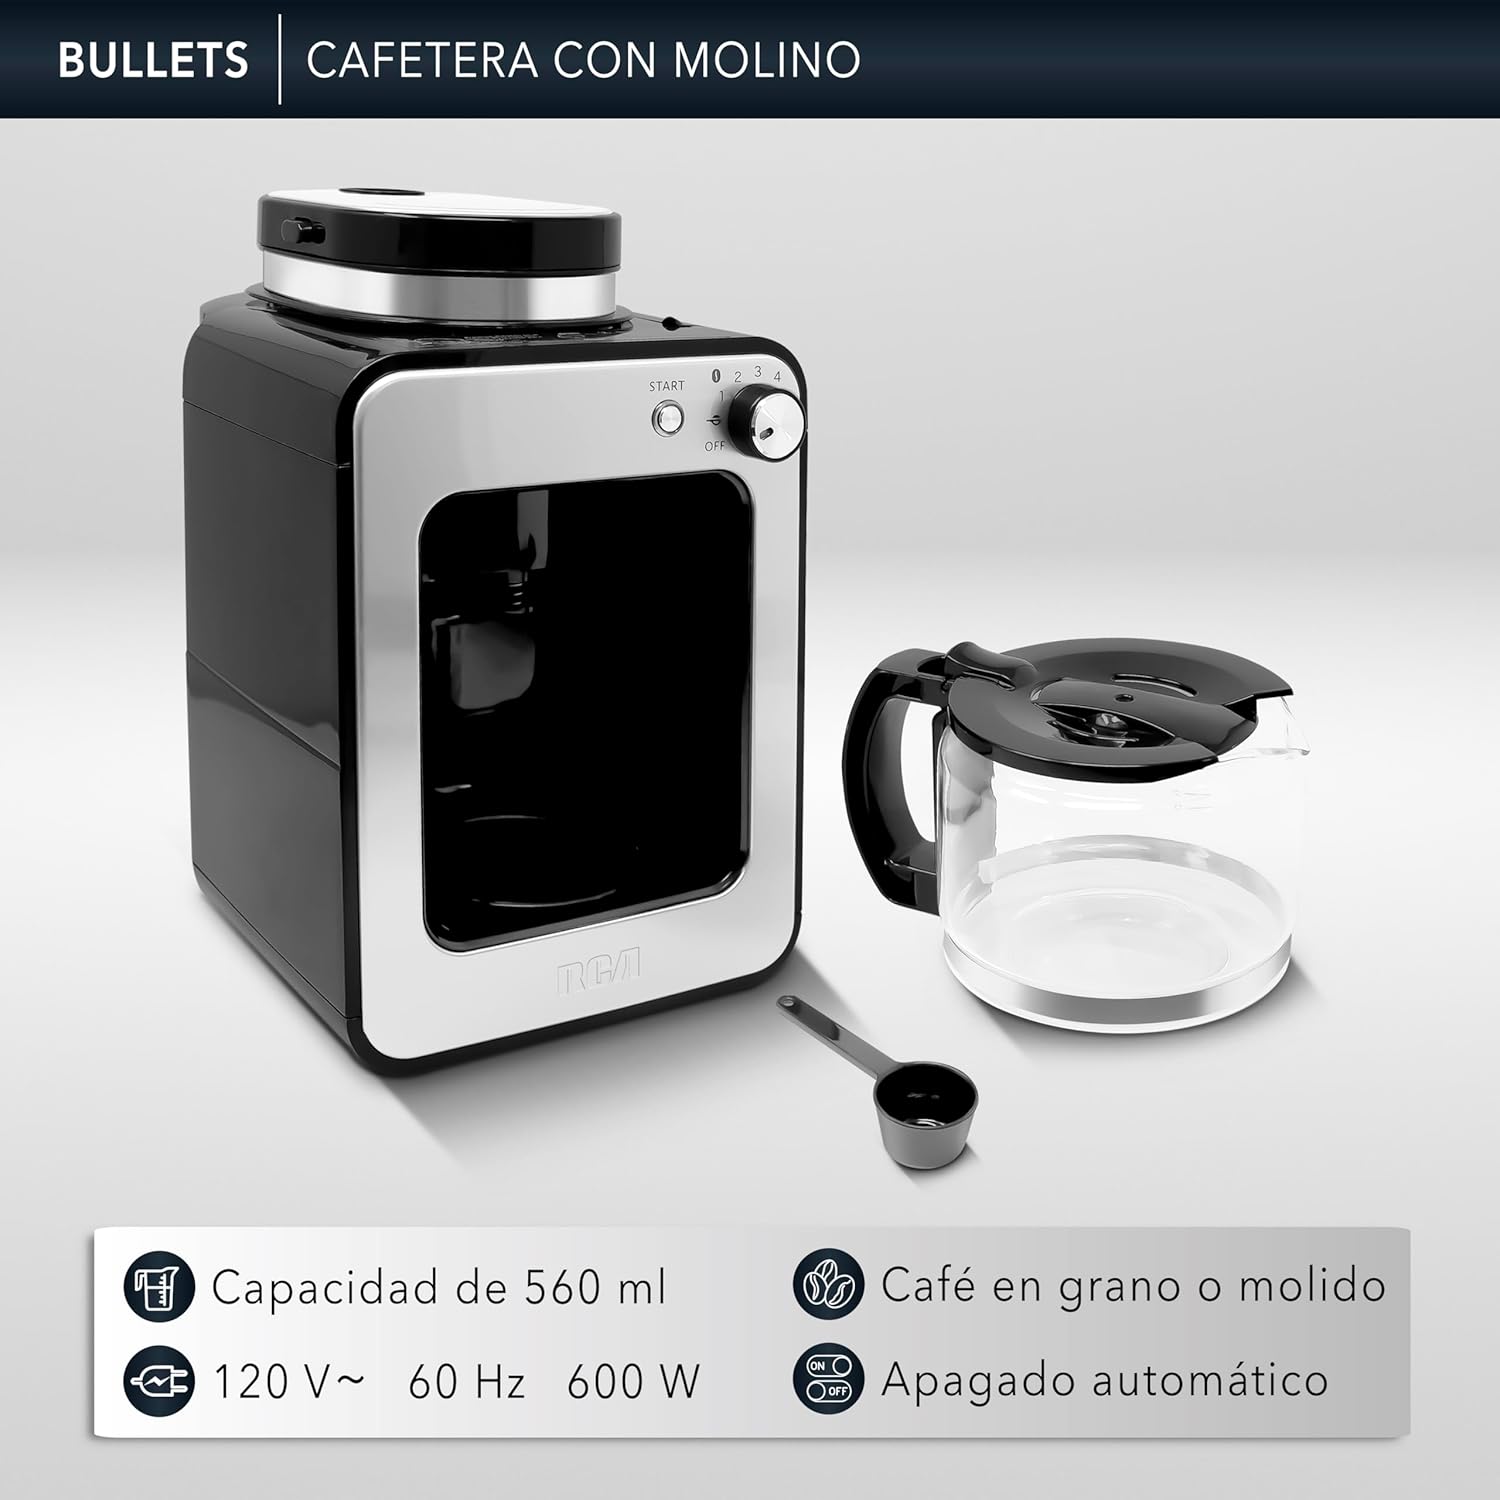
The RCA RC-CAF4 is a compact and versatile coffee maker designed to brew up to 4 cups of coffee using either whole beans or pre-ground coffee. It features an integrated grinder, automatic shut-off, anti-drip system, and a thermal plate to keep your coffee warm.
Components
- Main Unit with Control Panel
- Glass Carafe (560 ml capacity)
- Integrated Grinder
- Reusable Filter
- Water Tank with Level Indicator
- Measuring Spoon
- Thermal Plate
- Steam Vent
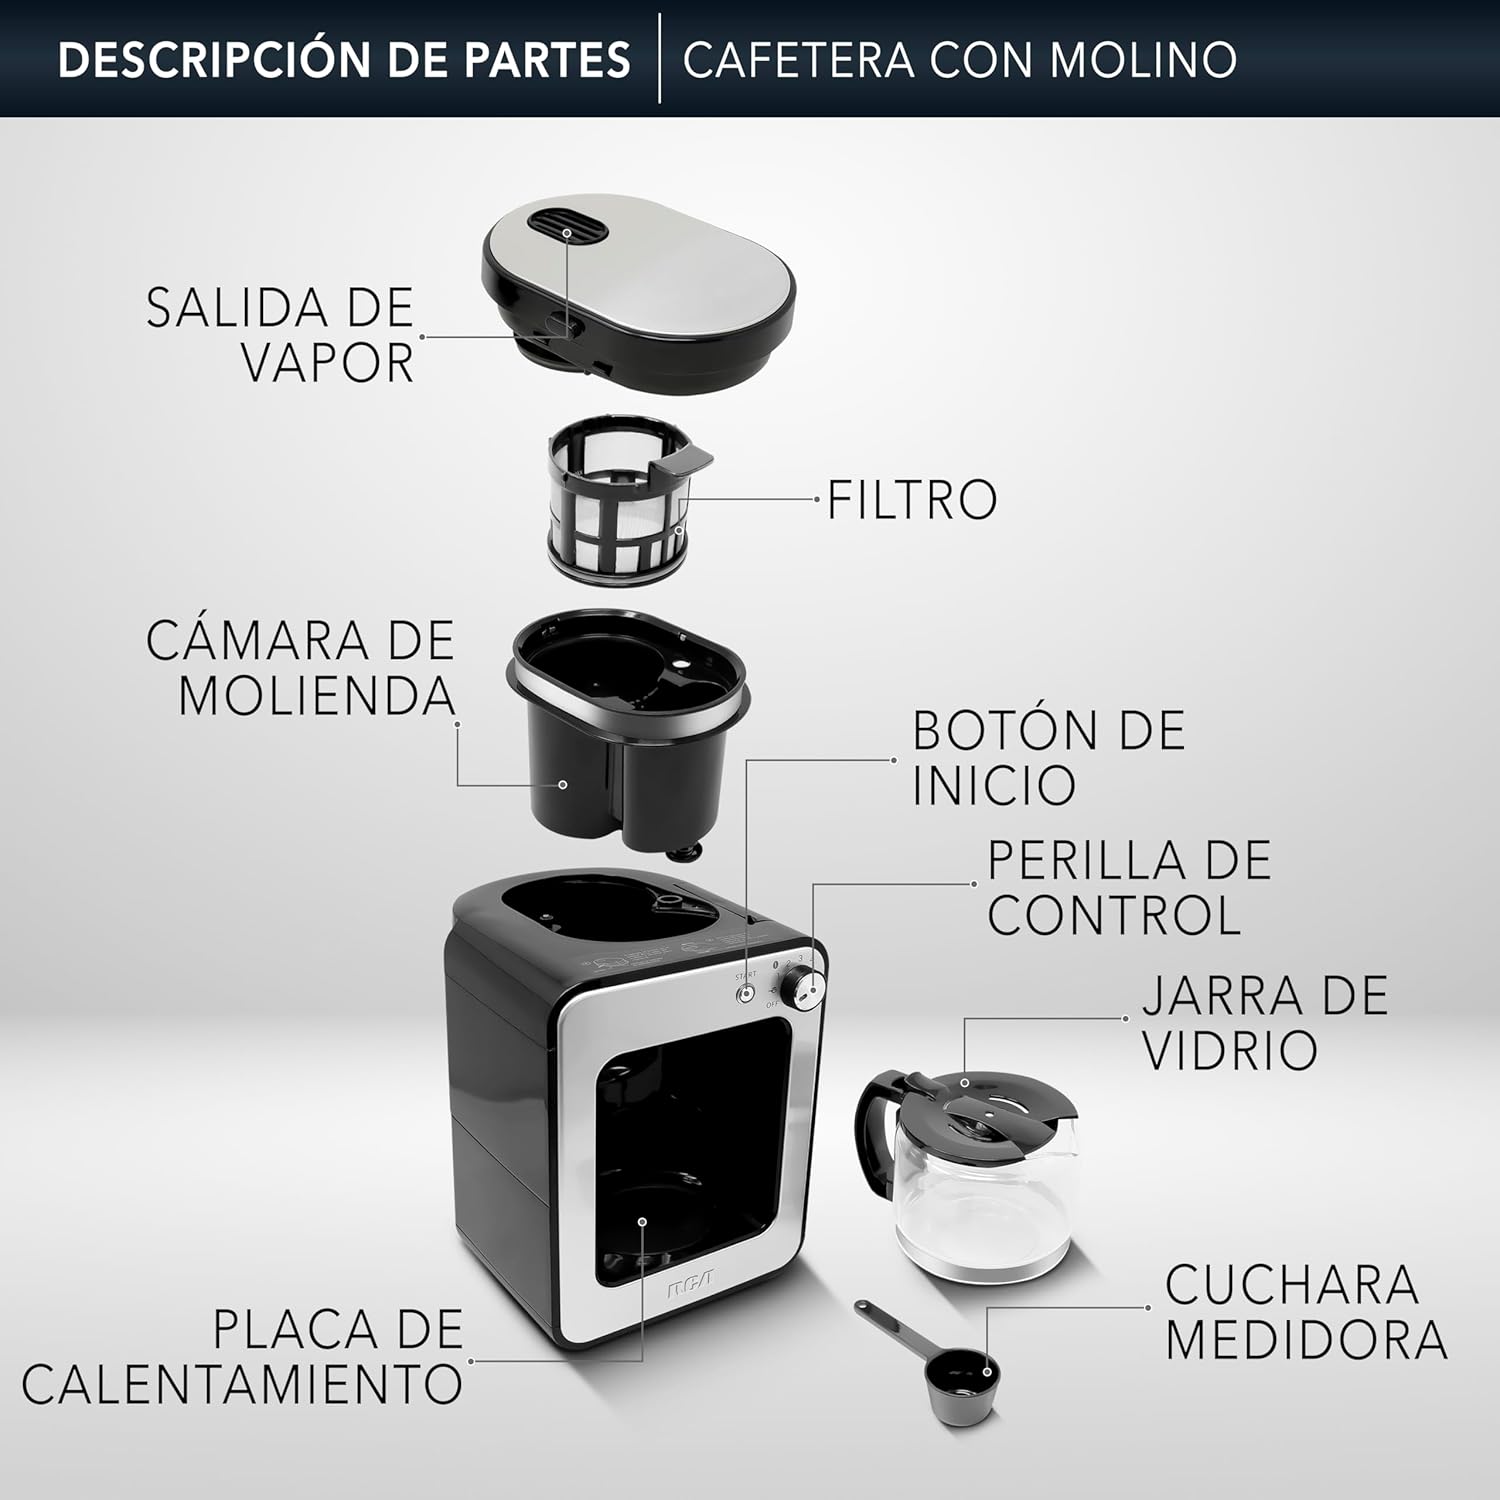
Figure 1: Description of Parts - RCA RC-CAF4 Coffee Maker with Grinder.


3. Setup
Initial Cleaning
- Before first use, wash the glass carafe, reusable filter, and measuring spoon in warm, soapy water. Rinse thoroughly and dry.
- Wipe the exterior of the coffee maker with a damp cloth.
- Run a full cycle with only water to clean the internal components. Discard the water.
Assembly
- Place the coffee maker on a stable, flat surface.
- Ensure the reusable filter is correctly seated in the grinding chamber.
- Place the glass carafe on the thermal plate.

Figure 2: Grinding Chamber with Reusable Filter.

Figure 3: Water Tank Capacity.
Video: Unboxing and Setup
This video demonstrates the unboxing and initial setup of a similar coffee maker, including placing components and adding water.
4. Operating Instructions
Brewing with Whole Beans
- Open the lid of the grinding chamber.
- Add the desired amount of whole coffee beans to the grinding chamber. Use the included measuring spoon (1 spoon per cup, adjust to taste). Do not exceed the MAX fill line.
- Close the lid securely. The coffee maker has a safety sensor that prevents operation if the lid is not properly sealed.
- Fill the water tank with fresh, cold water up to the desired number of cups (max 4 cups).
- Plug the coffee maker into a power outlet.
- Use the control knob to select the number of cups (1-4) for grinding. The numbers indicate the amount of coffee beans to be ground.
- Press the START button. The coffee maker will grind the beans, then automatically proceed to brew the coffee. The indicator light will blink during brewing and remain steady when finished.
Brewing with Ground Coffee
- Ensure the reusable filter is in place.
- Add the desired amount of ground coffee directly into the reusable filter. (1 spoon per cup, adjust to taste).
- Close the lid.
- Fill the water tank with fresh, cold water up to the desired number of cups (max 4 cups).
- Plug the coffee maker into a power outlet.
- Press the START button. The coffee maker will immediately begin brewing. The indicator light will blink during brewing and remain steady when finished.

Figure 4: Control Knob Functions.

Figure 5: Start Button with Indicator Light.
Video: Operation Demonstration
This video illustrates the process of using the coffee maker, including adding coffee beans, water, and starting the brewing cycle.
5. Maintenance and Cleaning
Regular cleaning ensures optimal performance and extends the lifespan of your coffee maker.
Daily Cleaning
- Always unplug the appliance and allow it to cool completely before cleaning.
- Remove the glass carafe, reusable filter, and grinding chamber lid. Wash them in warm, soapy water. Rinse thoroughly and dry.
- Wipe the exterior of the coffee maker with a soft, damp cloth. Do not use abrasive cleaners or scouring pads.
- Clean the thermal plate with a damp cloth. Do not use harsh chemicals.
Descaling
Mineral deposits from water can affect the performance of your coffee maker. Descale your appliance every 2-3 months, or more frequently if you have hard water.
- Fill the water tank with a mixture of white vinegar and water (1:2 ratio).
- Place the carafe on the thermal plate.
- Run a brewing cycle without coffee.
- After the cycle, let the solution sit in the carafe for 15-20 minutes.
- Discard the solution and run 2-3 cycles with fresh water to rinse thoroughly.
Video: Cleaning Tips
This video provides additional details and tips for maintaining your coffee maker.
6. Troubleshooting
If you encounter any issues with your coffee maker, please refer to the following common problems and solutions:
| Problem | Possible Cause | Solution |
|---|---|---|
| Coffee does not brew. | No water in the tank, appliance not plugged in, lid not closed properly. | Fill water tank, check power connection, ensure grinding chamber lid is securely closed. |
| Weak coffee. | Not enough coffee, coffee too coarsely ground, clogged filter. | Add more coffee, use finer grind setting (if applicable), clean the filter. |
| Coffee overflows. | Too much coffee, clogged filter, carafe not placed correctly. | Reduce coffee amount, clean the filter, ensure carafe is centered on the thermal plate. |
| Grinder not working. | Lid not closed properly, no beans, grinder jammed. | Ensure lid is securely closed, add beans, clear any obstructions. |
If the problem persists, please contact customer support.
7. Specifications
- Brand: RCA
- Model Number: RC-CAF4
- Color: Black / Stainless Steel
- Product Dimensions: 47 x 52 x 34 cm
- Capacity: 4 Cups (560 ml)
- Voltage: 125 Volts
- Material: Stainless Steel
- Special Features: Integrated Coffee Grinder, Automatic Shut-off, Anti-drip System, Thermal Plate
- Product Weight: 2 Kilograms
8. Warranty and Support
Your RCA RC-CAF4 Coffee Maker is covered by a 1-year warranty against manufacturing defects and damage during shipping. Please retain your proof of purchase for warranty claims.

Figure 6: Warranty and Invoicing Information.
For technical support, warranty claims, or any questions regarding your product, please refer to the contact information provided with your purchase or visit the official RCA website.


