1. Introduction
Thank you for choosing the GarveeHome Rattan Shoe Cabinet. This manual provides essential information for the safe assembly, operation, and maintenance of your new shoe cabinet. Please read these instructions carefully before beginning assembly and retain them for future reference.

Image 1.1: Front view of the GarveeHome Rattan Shoe Cabinet, showcasing its two doors with rattan panels and a top surface for display.
2. Safety Information
Your safety is paramount. Please adhere to the following safety guidelines:
- Wall Mounting: It is strongly recommended to secure the cabinet to the wall using the provided anti-tip device. This prevents accidental tipping, especially in households with children or pets.
- Clearance: Ensure the area around the cabinet is clear of obstacles to prevent accidents and allow for proper door operation.
- Weight Distribution: Distribute items evenly across shelves to maintain stability. Avoid placing excessively heavy items on the top surface or shelves.
- Assembly: Follow all assembly instructions precisely. Do not skip steps or use unauthorized parts.
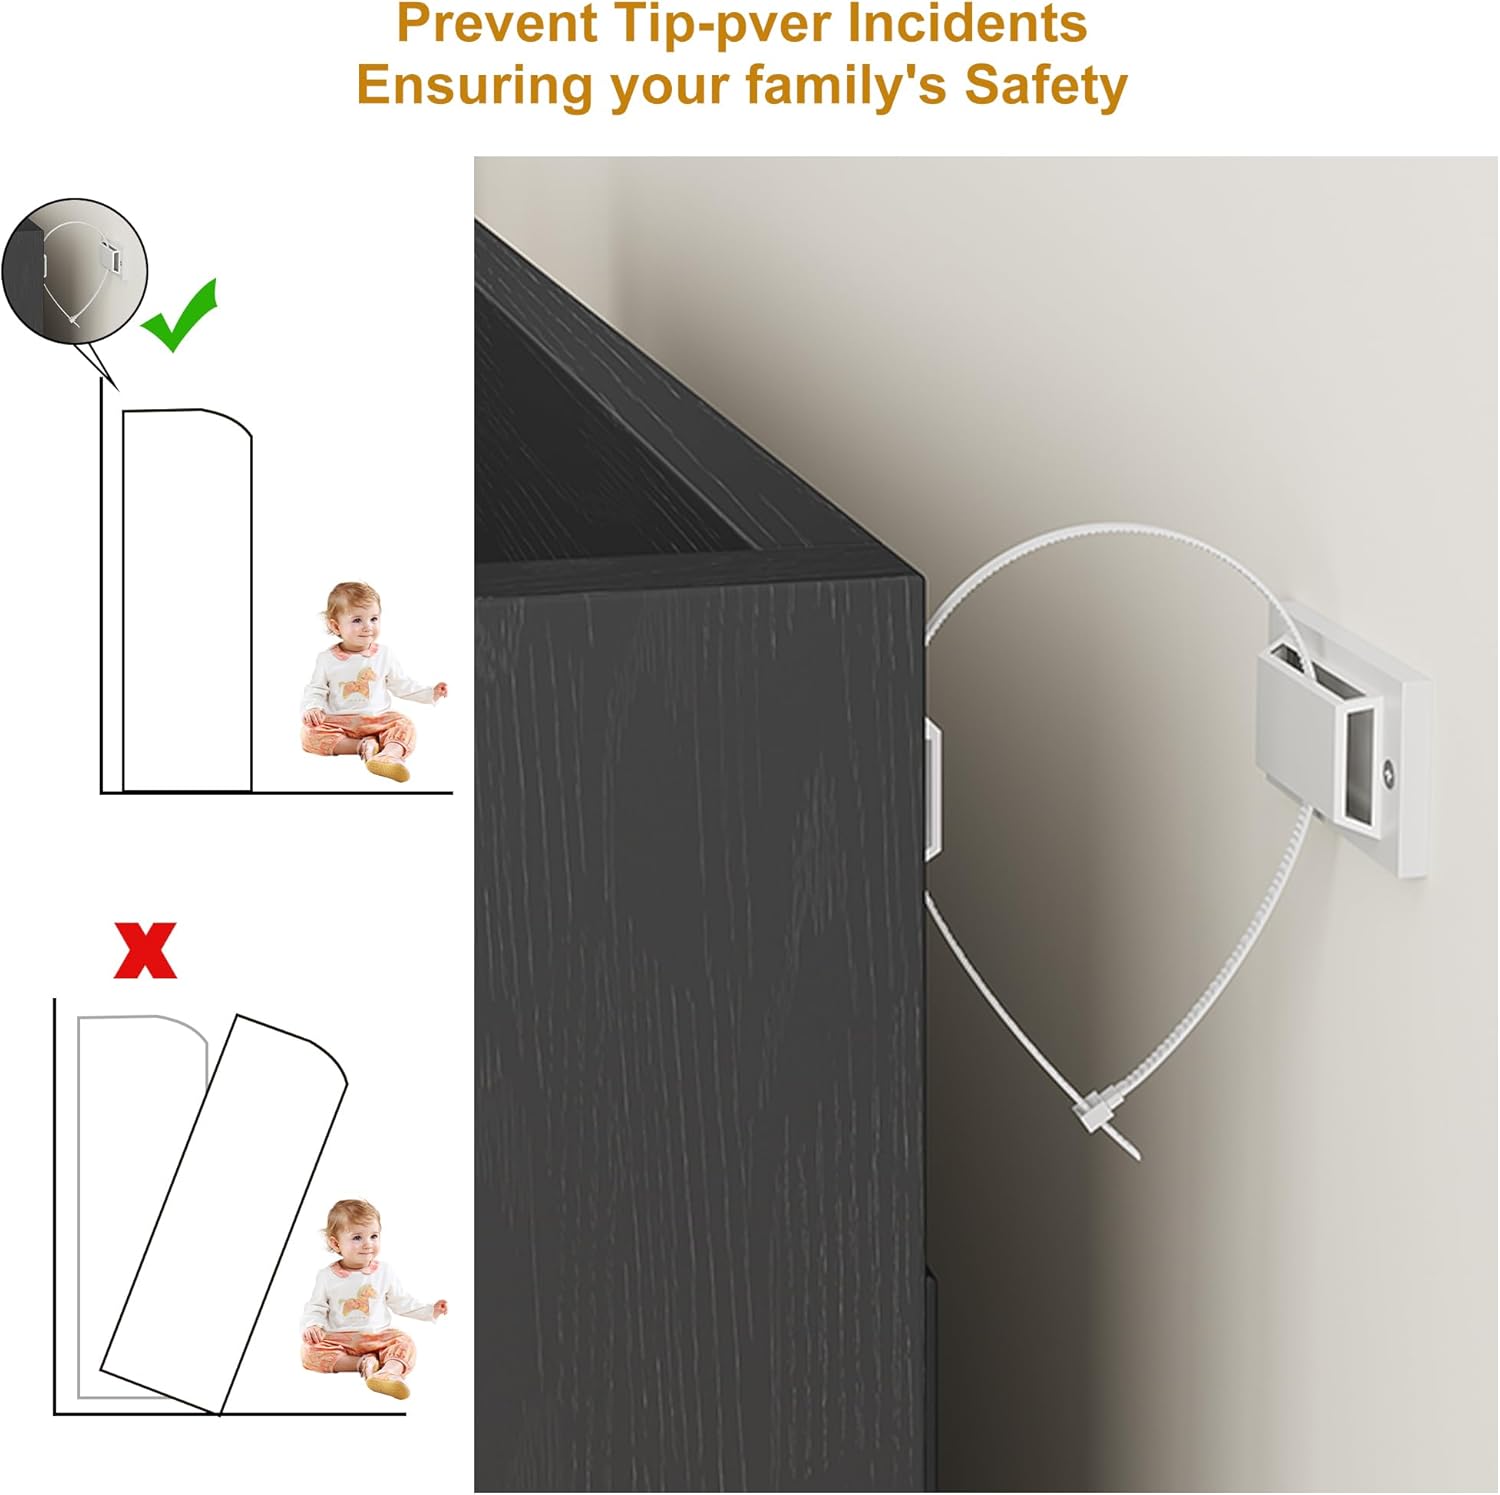
Image 2.1: Illustration demonstrating the correct installation of the anti-tip device to prevent the cabinet from tipping over, ensuring safety.
3. Setup (Assembly Instructions)
The GarveeHome Rattan Shoe Cabinet is designed for straightforward assembly. All necessary hardware and components are included and labeled for your convenience. Please ensure you have sufficient space and the appropriate tools (e.g., screwdriver) before beginning.
3.1. Before You Begin
- Unpack all components and verify against the parts list (not provided in this document, refer to packaging insert).
- Inspect all parts for any damage. If any parts are missing or damaged, contact customer support immediately.
- Lay out all parts on a clean, soft surface (e.g., a blanket or cardboard) to prevent scratches.
3.2. Assembly Steps
Follow the step-by-step instructions provided in the separate installation manual included with your product. Pay close attention to diagrams and ensure all screws are tightened securely, but do not overtighten.
3.3. Installing the Anti-Tip Device
After assembling the cabinet, it is crucial to install the anti-tip device. Refer to Image 2.1 for a visual guide. Secure the device to the back of the cabinet and firmly attach it to a wall stud using appropriate hardware. This step significantly enhances the stability and safety of the cabinet.

Image 3.1: Dimensional diagram of the GarveeHome Rattan Shoe Cabinet, indicating its height, width, and depth for planning placement.
4. Operating Instructions
Your GarveeHome Rattan Shoe Cabinet is designed for efficient and stylish shoe storage.
4.1. Shoe Storage
- The cabinet features multiple tiers capable of accommodating approximately 24-28 pairs of shoes, depending on shoe size and style.
- The interior shelves are adjustable, allowing you to customize the storage space for various shoe types, including boots, heels, and flats.
- Utilize the bottom open compartment for frequently used shoes or additional display.

Image 4.1: The shoe cabinet with its doors open, revealing multiple shelves neatly organized with various types of footwear.
4.2. Top Surface Usage
The sturdy top surface of the cabinet can be used to display decorative items, store keys, or hold small bags, adding functionality to your entryway or living space.

Image 4.2: A visual comparison illustrating the increased storage capacity achieved with the adjustable 4-tier shelf configuration compared to a smaller 2-tier shelf.
5. Maintenance
Proper care will ensure the longevity and appearance of your GarveeHome Rattan Shoe Cabinet.
- Cleaning: Wipe surfaces with a soft, damp cloth. Avoid harsh chemicals or abrasive cleaners, which can damage the finish.
- Rattan Care: Gently dust the rattan panels with a soft brush or cloth to prevent dust buildup.
- Spills: Immediately wipe up any spills, especially on the waterproof desktop, to prevent staining or damage.
- Inspection: Periodically check all screws and connections to ensure they remain tight. Retighten if necessary.
6. Troubleshooting
If you encounter issues with your shoe cabinet, refer to the following common solutions:
- Problem: Parts do not align during assembly.
Solution: Double-check the part numbers against the assembly diagram. Ensure components are oriented correctly. If holes still do not align, contact customer support for assistance. Do not force parts together. - Problem: Missing or damaged parts.
Solution: Before assembly, verify all parts against the included list. If any are missing or damaged upon arrival, contact GarveeHome customer support with your purchase details and the specific part numbers required. - Problem: Cabinet feels unstable.
Solution: Ensure all screws are fully tightened. Verify that the cabinet is placed on a level surface. Confirm the anti-tip device is correctly installed and securely anchored to the wall. - Problem: Doors do not close properly.
Solution: Check the hinge alignment and adjust if necessary. Ensure no items inside the cabinet are obstructing the doors.
7. Specifications
| Brand | GarveeHome |
| Model Name | Rattan Shoe Cabinet |
| Color | Black |
| Product Dimensions (D x W x H) | 15.75" x 31.5" x 41" |
| Material | Engineered Wood, Rattan |
| Special Feature | Adjustable Shelf |
| Number of Shelves | 5 |
| Mounting Type | Floor Mount (with wall anchor recommended) |
| Assembly Required | Yes |
| Item Weight | 65 pounds |
8. Warranty and Support
For warranty information, please refer to the documentation included with your purchase or contact the retailer where the product was purchased. GarveeHome is committed to customer satisfaction.
If you require further assistance, have questions about assembly, or need to report missing/damaged parts, please contact GarveeHome customer support through the retailer's platform or the official GarveeHome website.


