Introduction
This manual provides detailed instructions for the installation, operation, and maintenance of your Carro Smart Ceiling Fan. The Tilbury 52-inch smart ceiling fan is designed to provide efficient cooling and lighting for large indoor and outdoor living spaces. It features a modern design with a white finish, elegant plywood blades, and an integrated 4000K LED cool light. This fan incorporates remote control, Wi-Fi app control, Siri Shortcut, and voice control technology, compatible with Amazon Alexa and Google Home Assistant, to customize your fan preferences.
Safety Information
Please read all safety instructions carefully before installation and use. Failure to follow these instructions may result in electric shock, fire, or personal injury.
- Ensure the power is turned off at the circuit breaker before installation or servicing.
- All wiring must be in accordance with national and local electrical codes.
- Consult a qualified electrician if you are unsure about wiring procedures.
- Mount the fan to a structurally sound ceiling capable of supporting the fan's weight.
- Keep hands, hair, and clothing clear of the fan blades during operation.
- Do not attempt to repair or modify the fan yourself. Contact customer support for assistance.
Setup and Installation
The Carro Smart Ceiling Fan is designed for straightforward installation. The process typically takes about 20 minutes to replace your current ceiling fan.
- Unpack Components: Carefully remove all parts from the packaging. Verify all components are present according to the packing list.
- Power Disconnection: Before beginning installation, ensure the power supply to the fan location is turned off at the main circuit breaker.
- Mounting Bracket Installation: Securely attach the mounting bracket to the ceiling junction box. Ensure the junction box is rated for ceiling fan support.
- Wiring Connections: Connect the fan's electrical wires to the household wiring according to the provided wiring diagram. Ensure all connections are secure and properly insulated.
- Fan Assembly: Attach the fan motor assembly to the mounting bracket. Install the fan blades and light kit as per the instructions.
- Power Restoration: Once installation is complete, restore power at the circuit breaker and test the fan's operation.

Image: Overview of Carro Smart Ceiling Fan components and general installation steps.
Operating Instructions
Your Carro Smart Ceiling Fan offers multiple control methods for convenience and customization.
1. Control Methods
The fan can be controlled via the included remote, a mobile app, or voice commands through smart home assistants.
- Remote Control: Use the dedicated remote to adjust fan speed, light settings, and turn the fan on/off. This ensures control even without a Wi-Fi connection.
- Mobile App: Download the Carro Home app to customize settings remotely. The app allows for advanced control and scheduling.
- Voice Control: The fan is compatible with Amazon Alexa, Siri, and Google Assistant. Use voice commands such as "Alexa, set the white ceiling fan in the bedroom to speed 8, turn the yellow light to 75%, and adjust the white light to 36%."

Image: Remote control and mobile phone app interface for fan operation.

Image: Demonstrates voice control functionality with Amazon Alexa, Google Assistant, and Siri Shortcuts.
2. Fan Operation (DC Motor)
The fan is equipped with an efficient DC motor, offering quiet operation and energy savings.
- Speed Settings: Choose from 10 adjustable wind speeds, ranging from a maximum airflow of 4500 CFM to a minimum of 980 CFM.
- Reversible Airflow: The reversible function allows you to change the direction of airflow. Use the downward airflow for cooling in summer and upward airflow to circulate warm air in winter.
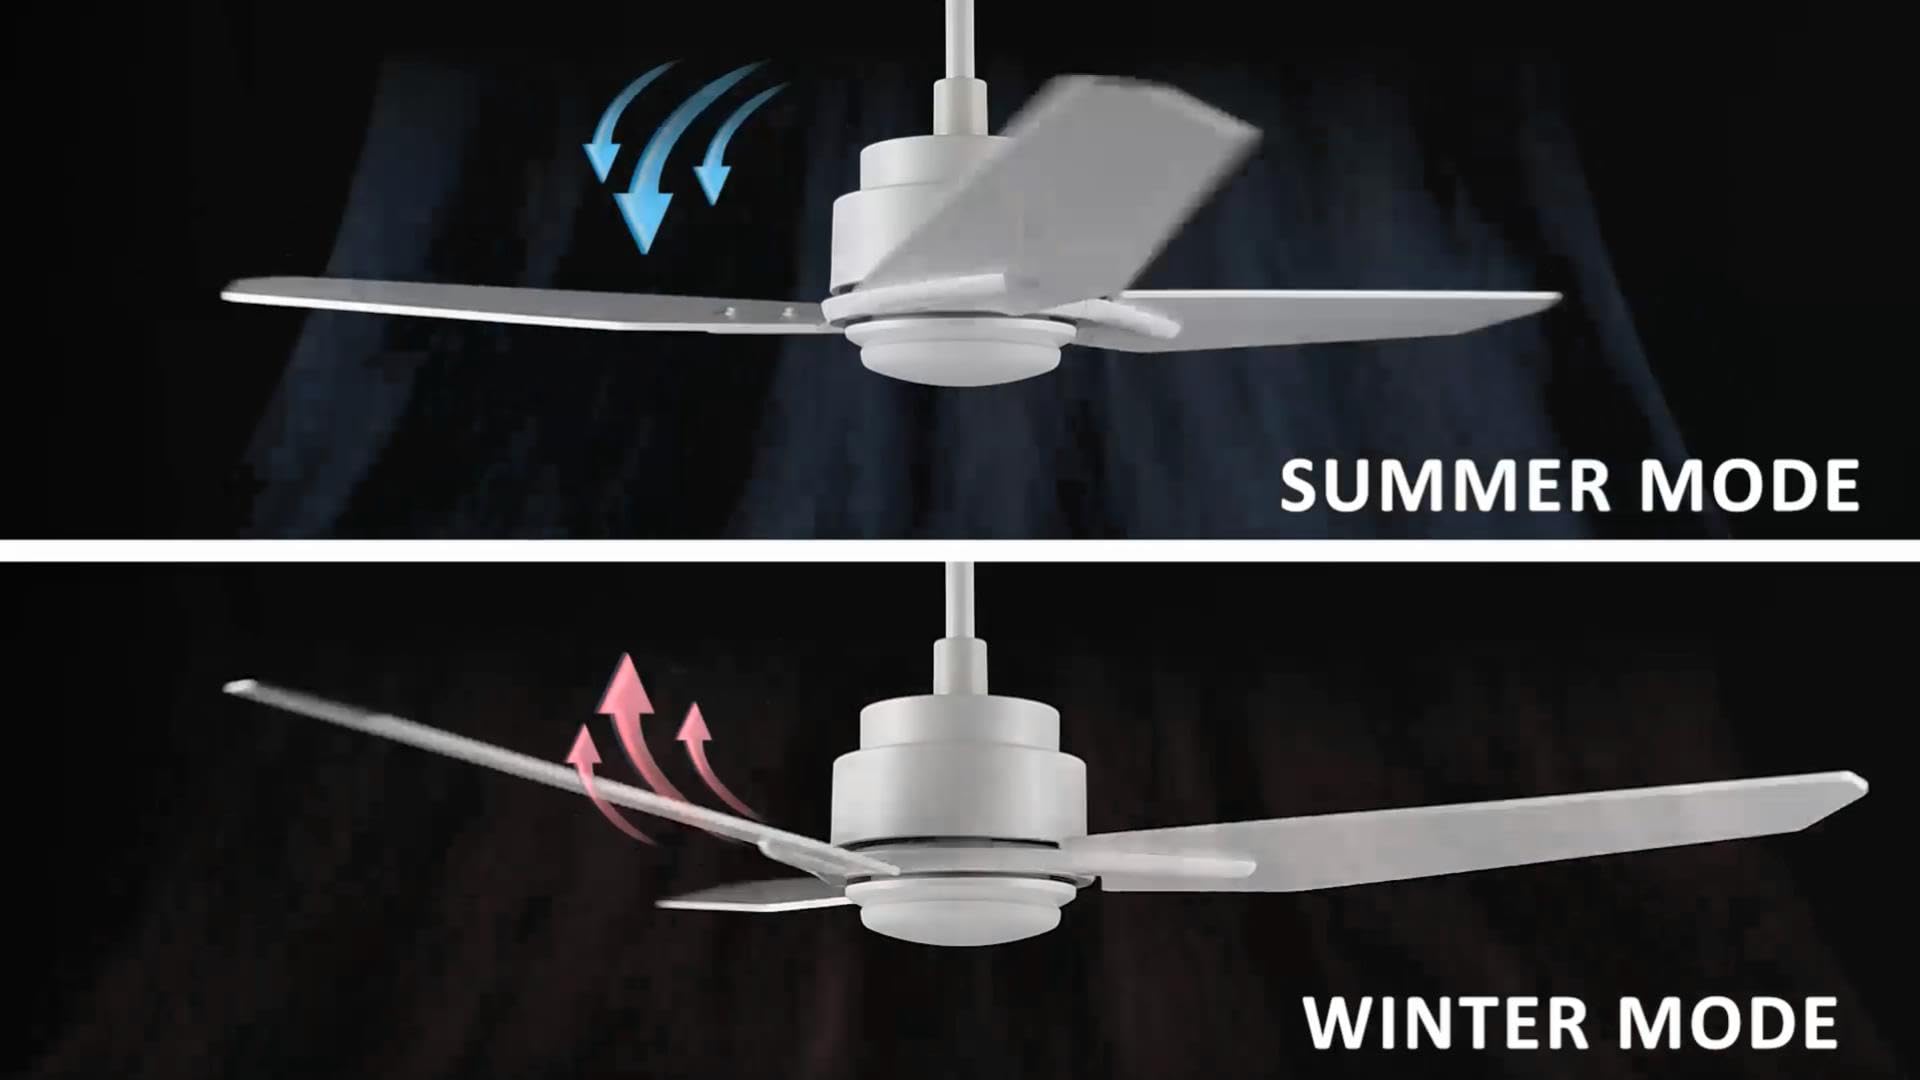
Image: Illustration of summer mode (downward airflow) and winter mode (upward airflow) for optimal air circulation.
3. Adjustable Dimmable LED Lights
Control the fan's lighting independently with ease.
- Color Temperature Options: Select from three light colors: 4000K (cool light), 3000K (bright light), and 2700K (warm light).
- Dimmable Function: The LED lights are dimmable from 1% to 100%, allowing you to adjust brightness for any situation.
- Smart Grouping: Group the LED lights with the fan or other smart devices for unified control via the app or voice commands.

Image: Visual representation of the three dimmable light color options: Cool Light (4000K), Natural Light (3000K), and Warm Light (2700K).
4. Timer and Scheduling Options
Utilize the scheduling feature through the mobile app to automate fan and light operations.
- Set Routines: Program the fan to activate at specific times, with desired light and fan settings, for different areas of your home.
- Example: Program the living room fan to turn on daily at 18:00 with both yellow and white lights. Set the study fan to turn on at 21:00 from Monday to Friday, illuminating only the yellow light.
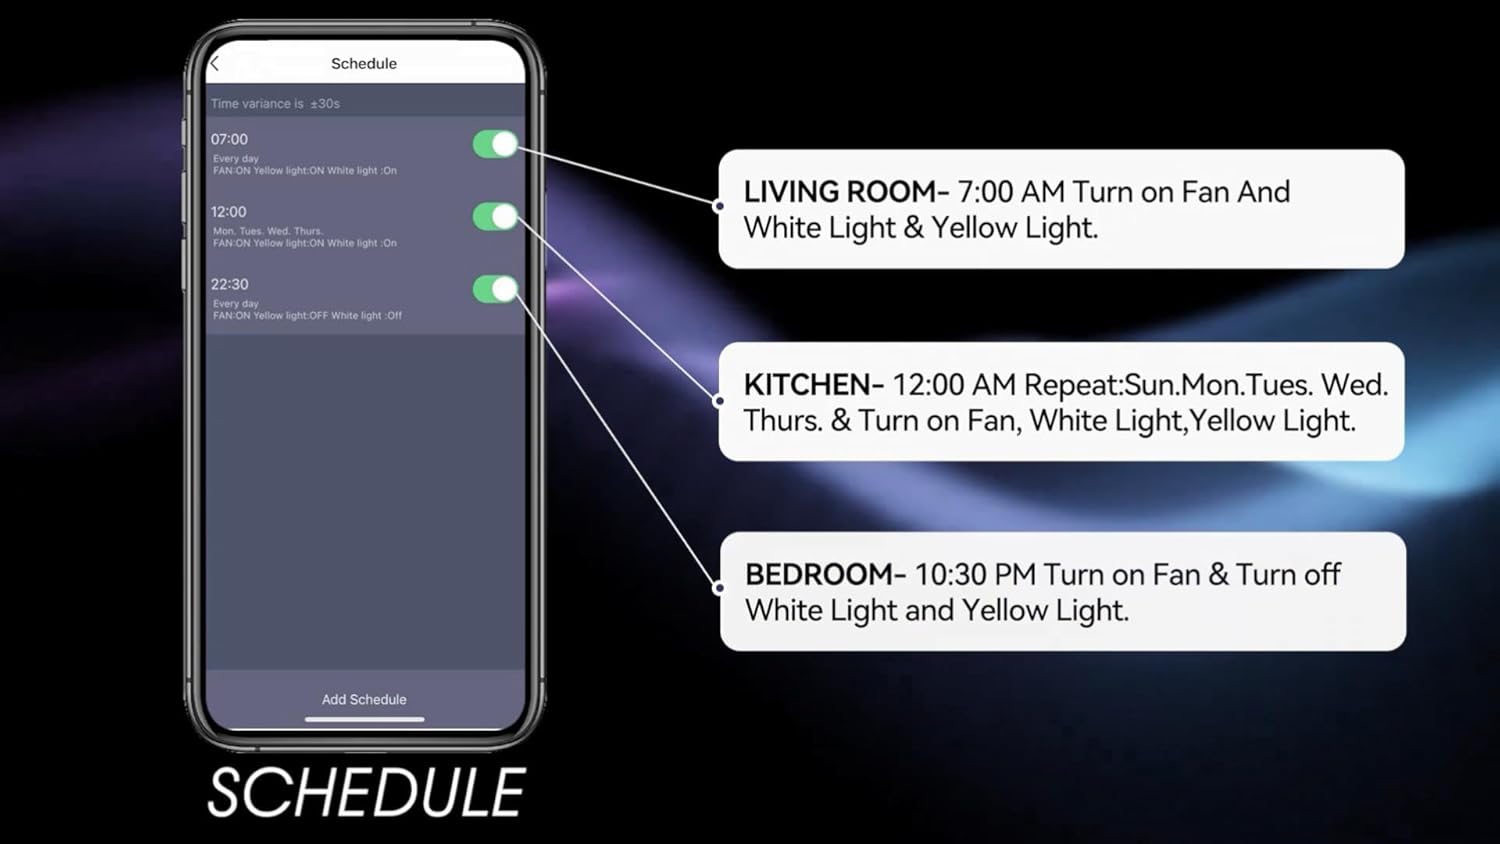
Image: Screenshot of the mobile app's scheduling interface, demonstrating how to set routines for different rooms.
Maintenance
Regular maintenance ensures optimal performance and longevity of your ceiling fan.
- Cleaning: Dust the fan blades and motor housing periodically with a soft, damp cloth. Do not use abrasive cleaners or solvents.
- Blade Tightness: Check blade screws annually to ensure they are secure. Loose blades can cause wobbling and noise.
- Light Kit: The integrated LED light source is designed for long life and typically does not require replacement. If issues arise, contact customer support.
- Power Off: Always turn off the power at the circuit breaker before performing any cleaning or maintenance.
Troubleshooting
If you encounter issues with your Carro Smart Ceiling Fan, refer to the following common problems and solutions:
| Problem | Possible Cause | Solution |
|---|---|---|
| Fan does not start | No power to the fan; Loose wire connections; Remote control battery low. | Check circuit breaker; Verify all wire connections are secure; Replace remote control battery. |
| Fan wobbles | Loose blade screws; Improperly balanced blades; Loose mounting bracket. | Tighten all blade screws; Use a balancing kit (not included) to balance blades; Ensure mounting bracket is securely fastened. |
| Light does not work | No power to the light kit; Loose wire connections; Light setting off. | Check power supply; Verify light kit wiring; Ensure light is turned on via remote, app, or voice control. |
| Remote control not working | Low battery; Remote not paired. | Replace remote battery; Refer to pairing instructions in the full manual (if applicable). |
| Cannot connect to Wi-Fi/App | Incorrect Wi-Fi password; Router too far; App not updated. | Verify Wi-Fi password; Move router closer or use a Wi-Fi extender; Update the Carro Home app to the latest version. |
Product Specifications
| Feature | Specification |
|---|---|
| Brand | Carro |
| Model | 52" White |
| Color | White |
| Electric Fan Design | Ceiling Fan |
| Power Source | AC/DC |
| Style | Modern |
| Product Dimensions | 52"D x 52"W x 13.4"H |
| Room Type | Bedroom, Dining Room, Home Office, Living Rooms, Study Room |
| Special Feature | Programmable |
| Recommended Uses | Air Circulation |
| Number of Blades | 3 |
| Air Flow Capacity | 4500 Cubic Feet Per Minute |
| Blade Length | 22.7 Inches |
| Voltage | 120 Volts |
| Included Components | Ceiling fan X1 |
| Specification Met | ETL |
| Control Method | Voice, Remote, App |
| Item Weight | 15.7 pounds |
| Mounting Type | Downrod Mount |
Warranty Information
Carro products are manufactured to the highest quality standards. This product comes with a limited warranty against defects in materials and workmanship. Please refer to the warranty card included in your product packaging or visit the official Carro website for detailed warranty terms and conditions.
Customer Support
For technical assistance, troubleshooting, or warranty claims, please contact Carro customer support:
- Website: Visit the official Carro website for FAQs and support resources.
- Email: Refer to your product packaging for customer service email.
- Phone: Refer to your product packaging for customer service phone number.
Please have your model number (52" White) and purchase date ready when contacting support.


