1. Introduction
Welcome to the ETOE Starfish 720P Projector user manual. This guide provides essential information for setting up, operating, and maintaining your projector. The ETOE Starfish projector offers a native 720P resolution with 300 ANSI lumens, a built-in Google Android system for streaming, and features like 140-degree rotation, auto keystone correction, and dual-band Wi-Fi connectivity. Please read this manual thoroughly before using your device to ensure optimal performance and longevity.
2. What's in the Box
Carefully unpack your ETOE Starfish projector and ensure all items are present:
- Projector
- Adaptor
- User Manual
- Remote Control
- Power Cord
3. Product Overview
Familiarize yourself with the main components and features of your ETOE Starfish projector.

Image: Front view of the ETOE Starfish Projector, showcasing its compact and modern design.
3.1. Ports and Connections
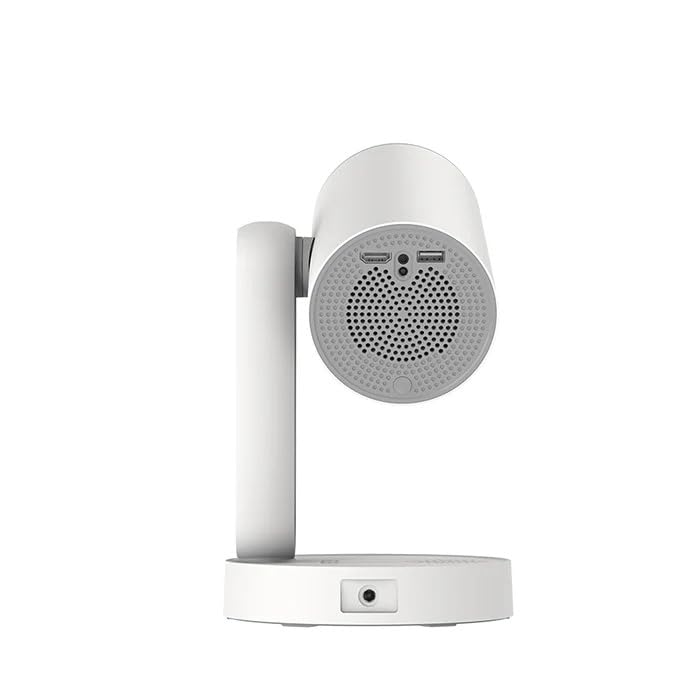
Image: Side view of the ETOE Starfish Projector, highlighting its connectivity ports including USB and HDMI.
The projector includes various ports for connectivity:
- HDMI Port: For connecting external devices like gaming consoles, Blu-ray players, or laptops.
- USB Port: For connecting USB storage devices to play media files.
- Power Input: For connecting the power adapter.
3.2. Key Features
- 140° Rotation: The projector head can be rotated up to 140 degrees for flexible projection angles, including ceiling projection.
- Touch-controlled Ambient Light: A customizable seven-color night light feature with adjustable brightness and color temperature.
- Built-in Google Android System: Access popular streaming services like Netflix, YouTube, and Prime Video directly.
- Auto Keystone Correction: Automatically adjusts the image for a perfectly rectangular display.
- Dual-Band Wi-Fi: Supports 2.4G and 5G Wi-Fi for stable wireless connectivity.
- Low Noise Operation: Designed for quiet performance, operating at approximately 24.5 dB.
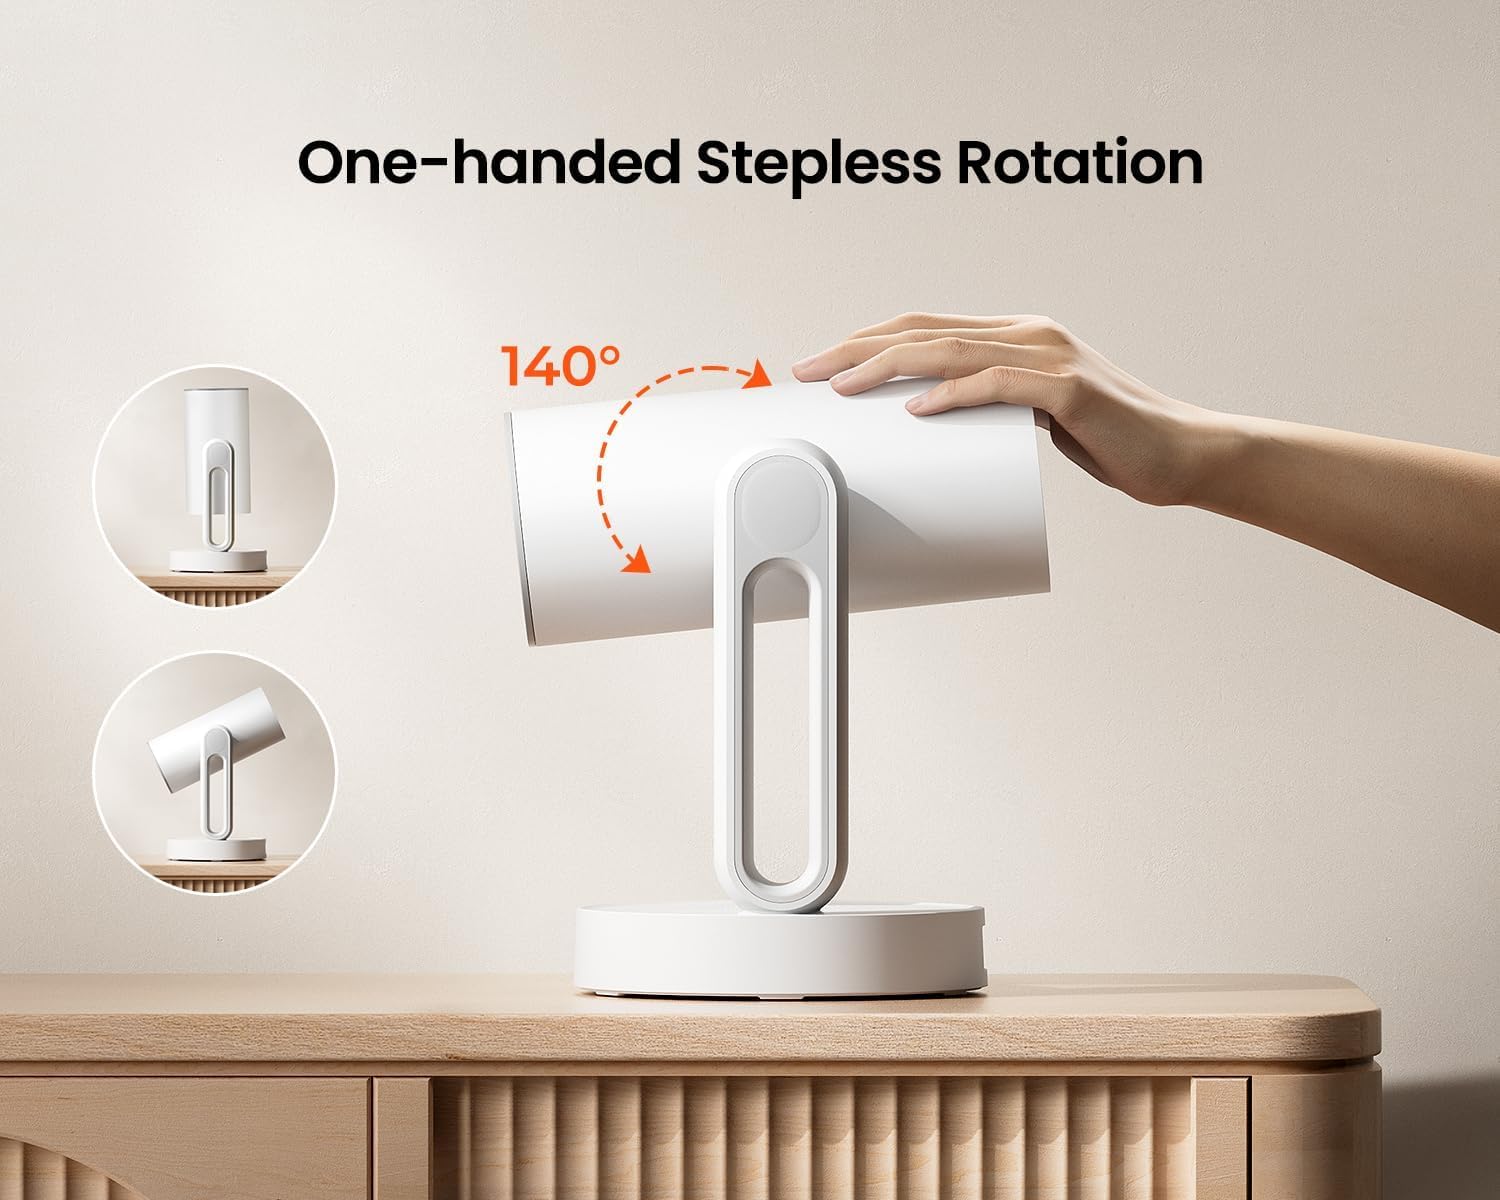
Image: The ETOE Starfish Projector shown rotating 140 degrees, illustrating its flexible projection capabilities.

Image: The ETOE Starfish Projector displaying its touch-controlled ambient light feature with various color options.

Image: The ETOE Starfish Projector displaying the Android TV interface, showing various streaming applications like Netflix, YouTube, and Prime Video.

Image: The ETOE Starfish Projector automatically correcting a distorted image to a perfect rectangle.

Image: Illustration comparing the low noise level of the ETOE Starfish Projector (24.5 dB) to common sounds.
4. Setup
4.1. Power Connection
- Connect the power cord to the adaptor.
- Plug the adaptor into the projector's power input port.
- Plug the other end of the power cord into a wall outlet.
4.2. Initial Placement
Place the projector on a stable, flat surface. For optimal viewing, ensure the projection surface (wall or screen) is clean and smooth. The 140° rotation feature allows for flexible positioning, including ceiling projection.
4.3. Remote Control Setup
Insert two AAA batteries (not included) into the remote control, observing the correct polarity.
4.4. First Boot and Network Connection
- Press the power button on the projector or remote control to turn it on.
- Follow the on-screen instructions for the initial Google Android system setup. This will include language selection and connecting to a Wi-Fi network.
- Select your preferred 2.4G or 5G Wi-Fi network and enter the password.
5. Operating Instructions
5.1. Basic Operation
- Power On/Off: Press the power button on the remote or projector.
- Navigation: Use the directional buttons on the remote to navigate the Android interface.
- Volume Control: Use the volume buttons on the remote.
5.2. Image Adjustment
- Digital Focus: Adjust the image clarity using the focus controls on the remote or through the settings menu.
- Auto Keystone Correction: The projector automatically corrects trapezoidal distortion. If manual adjustment is needed, access it via the settings.
- Digital Zoom: Adjust the image size from 50% to 100% without moving the projector, accessible in the settings menu.
- 140° Rotation: Physically rotate the projector head to project onto different surfaces, including ceilings. The auto keystone will adjust the image accordingly.

Image: The ETOE Starfish Projector projecting content onto a ceiling, demonstrating its versatility for different viewing angles, with a smartphone mirroring content.
5.3. Smart System Features
- Streaming Applications: Access pre-installed apps like Netflix, YouTube, and Prime Video. Ensure you are logged into your respective accounts.
- Google Assistant: Use voice commands via the remote control for navigation, content search, and system control.
- Chromecast Built-in: Cast content directly from compatible Android, iOS, and PC devices to the projector. Ensure both devices are on the same Wi-Fi network.
5.4. Ambient Light Function
The projector features a touch-controlled ambient light. Touch the designated area on the projector to cycle through seven colors, adjust brightness, and change color temperature to create your desired atmosphere.
6. Maintenance
Proper maintenance ensures the longevity and optimal performance of your projector.
- Lens Cleaning: Use a soft, lint-free cloth specifically designed for optical lenses to gently wipe the projector lens. Avoid abrasive materials or harsh chemicals.
- Dust Protection: The ETOE Starfish features a fully sealed optical engine designed to protect against dust ingress, minimizing the need for internal cleaning.
- General Cleaning: Wipe the exterior of the projector with a soft, dry cloth. Do not use liquid cleaners directly on the device.
- Storage: When not in use for extended periods, store the projector in a cool, dry place, away from direct sunlight and extreme temperatures.
7. Troubleshooting
If you encounter issues with your projector, refer to the following common problems and solutions:
| Problem | Possible Cause | Solution |
|---|---|---|
| Projector does not power on. | Power cord not connected properly; power outlet issue. | Ensure power cord is securely connected to both projector and outlet. Test outlet with another device. |
| No image displayed. | Input source incorrect; external device not connected; projector in standby. | Check input source settings. Ensure HDMI/USB devices are connected and powered on. Wake projector from standby. |
| Image is blurry. | Focus not adjusted; projector too close/far from screen. | Adjust digital focus using the remote. Ensure optimal projection distance. |
| Image is distorted (not rectangular). | Keystone correction needed. | The projector has auto keystone. If manual adjustment is required, access it in the settings menu. |
| No sound. | Volume too low; external audio device issue; mute enabled. | Increase volume. Check external audio connections. Disable mute. |
| Wi-Fi connection issues. | Incorrect password; router too far; network interference. | Re-enter Wi-Fi password. Move projector closer to router. Restart router. |
| Remote control not working. | Batteries low/dead; line of sight blocked. | Replace batteries. Ensure no obstructions between remote and projector. |
8. Specifications
Detailed technical specifications for the ETOE Starfish 720P Projector (Model A1222).
| Brand | ETOE |
| Model | A1222 |
| Manufacturer | JVDN International |
| Product Dimensions | 61 x 48 x 43 cm |
| Item Weight | 3 kg |
| Display Type | LCD |
| Image Brightness | 300 ANSI Lumens |
| Image Contrast Ratio | 3000:1 |
| Aspect Ratio | 16:9 |
| Native Resolution | 1280 x 720 |
| Voltage | 240 Volts |
| Wattage | 5 Watts |
| Refresh Rate | 60 Hz |
| Connectivity Technology | Wi-Fi (2.4G & 5G) |
| Hardware Interface | HDMI, USB |
| Compatible Devices | Smartphones (Android & iOS), Gaming Consoles, Blu-ray Players, Media Players |
| Special Features | Digital Focus, Portable, Wireless, Auto Keystone, 140° Rotation, Built-in Android System, Ambient Light |
| Mounting Type | Tabletop Mount |
9. Warranty and Support
9.1. Warranty Information
The ETOE Starfish Projector is manufactured by JVDN International. For specific warranty terms and conditions, please refer to the warranty card included with your product or contact the manufacturer directly. Keep your purchase receipt as proof of purchase for warranty claims.
9.2. Customer Support
For technical assistance, troubleshooting not covered in this manual, or warranty inquiries, please contact JVDN International customer support:
- Contact Person: JAYESH KUMAR JAGETIYA
- Phone: +91 91361 87951
- Email: jayesh@jvdninternational.com
- Address: B-1122 Sun Westbank, Ashram Road, Ahmedabad, Gujarat, India, 380009


