
WILLAB HSB012
Contents
HSB012 Universal HD Night Vision Car Reversing Camera User Manual
Model: HSB012 | Brand: WILLAB
1. Introduction
Thank you for choosing the WILLAB HSB012 Universal HD Night Vision Car Reversing Camera. This manual provides essential information for the proper installation, operation, and maintenance of your new camera. Please read it thoroughly before use to ensure optimal performance and safety.
Key Features:
- HSB012 Car Front/Rear Reversing Camera: Designed for universal application, providing clear visibility for both front and rear parking assistance.
- Compact and Durable Design: Features a compact structure for easy integration and a long service life.
- Enhanced Water Resistance: Engineered with a fully sealed adhesive process to improve water repellency and prevent fogging, ensuring reliable operation in various weather conditions.
- High Definition Imaging: Delivers high-definition video output with shockproof and anti-jamming capabilities for a stable and clear image.
- Improved Driving Safety: Effectively eliminates visual blind spots, providing a safer driving and parking experience.
- All-Weather Performance: Resistant to extreme temperatures, ensuring consistent performance throughout the year, even in rain, fog, or mud.

Figure 1.1: Front view of the HSB012 Universal HD Night Vision Car Reversing Camera. This image shows the compact, black camera unit with its lens, designed for discreet installation.
2. Package Contents
Please check the package contents carefully upon unboxing. If any items are missing or damaged, please contact your retailer.
- 1 x HSB012 Car Reversing Camera
- 1 x 6-meter Video Cable
- 1 x 1-meter Power Cable
- 1 x User Manual (this document)
- 1 x 22.5mm Drill Bit (for installation)
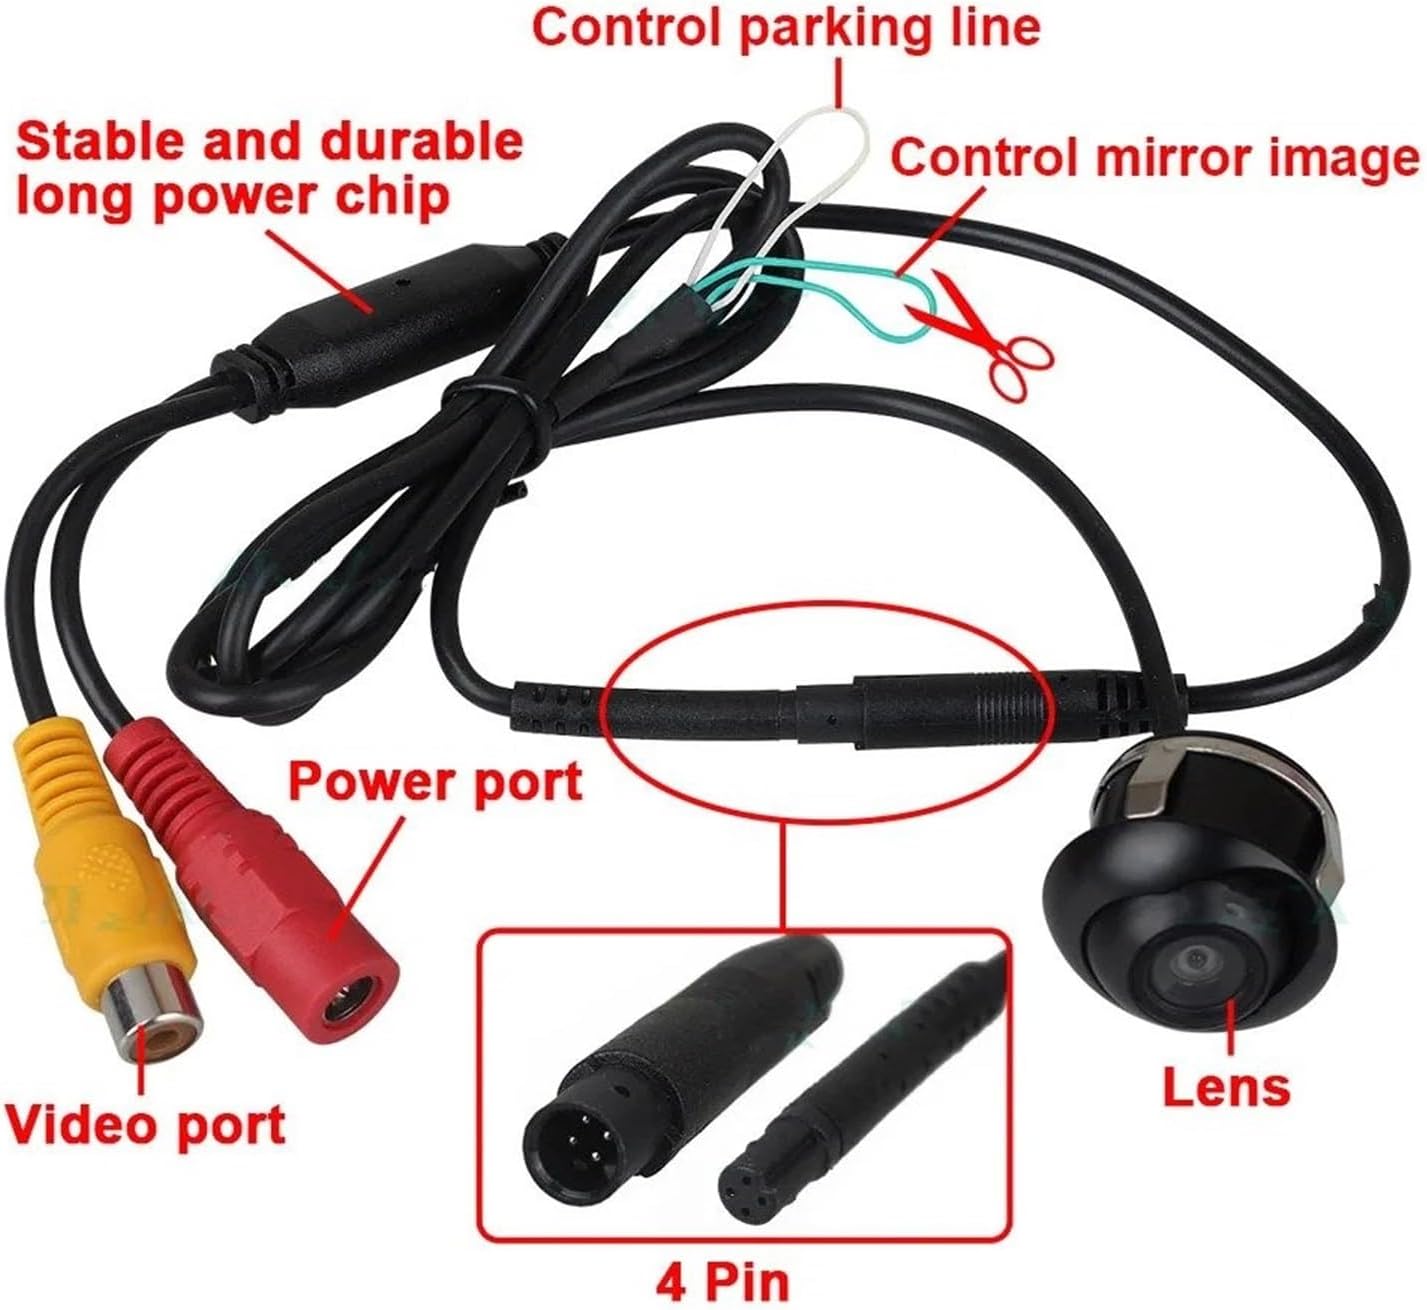
Figure 2.1: Overview of the HSB012 camera and its connecting cables. This image illustrates the camera unit, the video port (yellow RCA), the power port (red RCA), the 4-pin connector, and control wires for parking lines and mirror image adjustment.
3. Specifications
| Feature | Specification |
|---|---|
| Brand | MAMEFVBB |
| Manufacturer | WILLAB |
| Model Number | WILLAB (HSB012) |
| Signal Mode | CVBS |
| Image Sensor | CMOS |
| Video Format | NTSC |
| Viewing Angle | Diagonal 170°, Flat 140° |
| Pixels | 728 x 512 |
| Clarity | 500 TV Lines |
| Signal-to-Noise Ratio | > 48 dB |
| Operating Voltage | DC 12V |
| Waterproof Level | IP68 |
| Operating Temperature | -30°C to +80°C |
| Product Dimensions | 1 x 1 x 1 cm (approx.) |
| Product Weight | 300 g (approx.) |
4. Installation Guide
Professional installation is recommended. Ensure the vehicle's power is off before beginning installation.
4.1 Choosing an Installation Location
For rear view, the camera is typically installed above the license plate or near the trunk handle. For front view, it can be mounted on the front bumper or grille. Choose a location that provides a clear, unobstructed view and allows for easy cable routing.

Figure 4.1: Side view of the HSB012 camera showing its integrated mounting bracket. This bracket is designed for flush mounting into a drilled hole.
4.2 Drilling the Mounting Hole
- Carefully mark the desired installation spot.
- Use the provided 22.5mm drill bit to create a precise hole for the camera. Ensure no vital wires or components are behind the drilling area.
- Clean any debris from the drilled hole.
4.3 Wiring Connections
- Camera Power Connection: Connect the camera's power cable (red wire) to the vehicle's 12V power source. For rear view, this is typically the reverse light power wire, so the camera activates when reversing. For front view, it can be connected to an accessory power source that turns on with the ignition. Connect the ground wire (black wire) to a suitable chassis ground point.
- Video Signal Connection: Connect the 6-meter video cable (yellow RCA connector) from the camera to your car's display unit (e.g., car stereo with a video input, dedicated monitor).
- Optional Control Wires: The camera may have small control wires (e.g., white/green) near the video cable.
- One wire (often white) may control the parking lines. Cutting or connecting this wire can enable or disable the parking guidelines on the display.
- Another wire (often green) may control the mirror image. Cutting or connecting this wire can switch between normal and mirror image, useful for front or rear camera applications. Refer to Figure 2.1 for visual reference.
- Secure Cables: Route all cables neatly and securely, away from moving parts or heat sources, using cable ties or clips.
4.4 Testing the Installation
After all connections are made, turn on the vehicle's ignition and test the camera. For a rear camera, engage reverse gear to check if the image appears on your display. For a front camera, ensure it activates as intended.
5. Operation
The HSB012 camera is designed for simple, automatic operation once correctly installed.
5.1 Rear View Camera Operation
When connected to the vehicle's reverse light power, the camera will automatically activate and display the rear view on your connected monitor as soon as you shift the vehicle into reverse gear. The parking guidelines (if enabled via the control wire) will assist you in judging distance and alignment.
5.2 Front View Camera Operation
If installed as a front camera and connected to an ignition-switched power source, the camera will provide a continuous front view or activate based on your display unit's settings (e.g., manual activation, speed-based activation). Ensure the mirror image setting is correct for front view (usually normal image).
5.3 Night Vision
The camera features HD night vision capabilities, providing clear images even in low-light conditions. This enhances safety during nighttime parking and maneuvering.

Figure 5.1: Examples of camera views. This composite image shows typical views from the camera: Front View, Side View, Rear View (with parking lines), and Night Vision, demonstrating its versatility and clarity in different scenarios.
6. Maintenance
Regular maintenance ensures the longevity and optimal performance of your camera.
- Cleaning the Lens: Periodically clean the camera lens with a soft, damp cloth. Avoid abrasive cleaners or materials that could scratch the lens.
- Checking Connections: Occasionally inspect all cable connections to ensure they are secure and free from corrosion or damage.
- Environmental Protection: While the camera is IP68 waterproof, avoid directing high-pressure water jets directly at the camera during car washes.
7. Troubleshooting
If you encounter issues with your camera, refer to the following common problems and solutions:
| Problem | Possible Cause | Solution |
|---|---|---|
| No image on display | Loose power or video connection; incorrect power source; faulty camera/display. | Check all cable connections. Ensure the camera is receiving 12V power. Verify the display unit is set to the correct video input. Test with another display if possible. |
| Image is blurry or distorted | Dirty lens; damaged video cable; interference. | Clean the camera lens. Inspect the video cable for kinks or damage. Ensure proper grounding to reduce interference. |
| Image flickers or cuts out | Unstable power supply; loose connection; electrical interference. | Verify stable 12V power. Re-secure all connections. Check for strong electrical fields nearby. |
| Parking lines are missing/incorrect | Control wire for parking lines is cut/connected incorrectly. | Refer to Section 4.3 (Optional Control Wires) and adjust the relevant wire to enable/disable parking lines. |
| Image is mirrored/upside down | Control wire for mirror image is cut/connected incorrectly. | Refer to Section 4.3 (Optional Control Wires) and adjust the relevant wire to switch between normal and mirror image. |
If the problem persists after trying these solutions, please contact customer support.
8. Warranty and Support
8.1 Warranty Information
Specific warranty details for the HSB012 camera are typically provided by your retailer at the time of purchase. Please retain your proof of purchase for any warranty claims. The standard return policy is 30 days for refund/replacement as per Amazon's policy.
8.2 Customer Support
For technical assistance, troubleshooting beyond this manual, or warranty inquiries, please contact the retailer or manufacturer directly. You can often find contact information on the product packaging or the retailer's website.
Manufacturer: WILLAB
Seller: mengchuyao (as per Amazon listing)
Ask a question about this manual
Ask about setup, troubleshooting, compatibility, parts, safety, or missing instructions. Manuals+ will review the question and use this page’s manual context to help answer it.