1. Introduction
This manual provides detailed instructions for the installation, operation, and maintenance of your camgeet 10 Port HDMI KVM Switch. This device allows you to control up to ten computers from a single monitor, keyboard, and mouse, while also sharing four USB 3.0 peripheral devices. Please read this manual thoroughly before use to ensure proper functionality and to maximize your product experience.
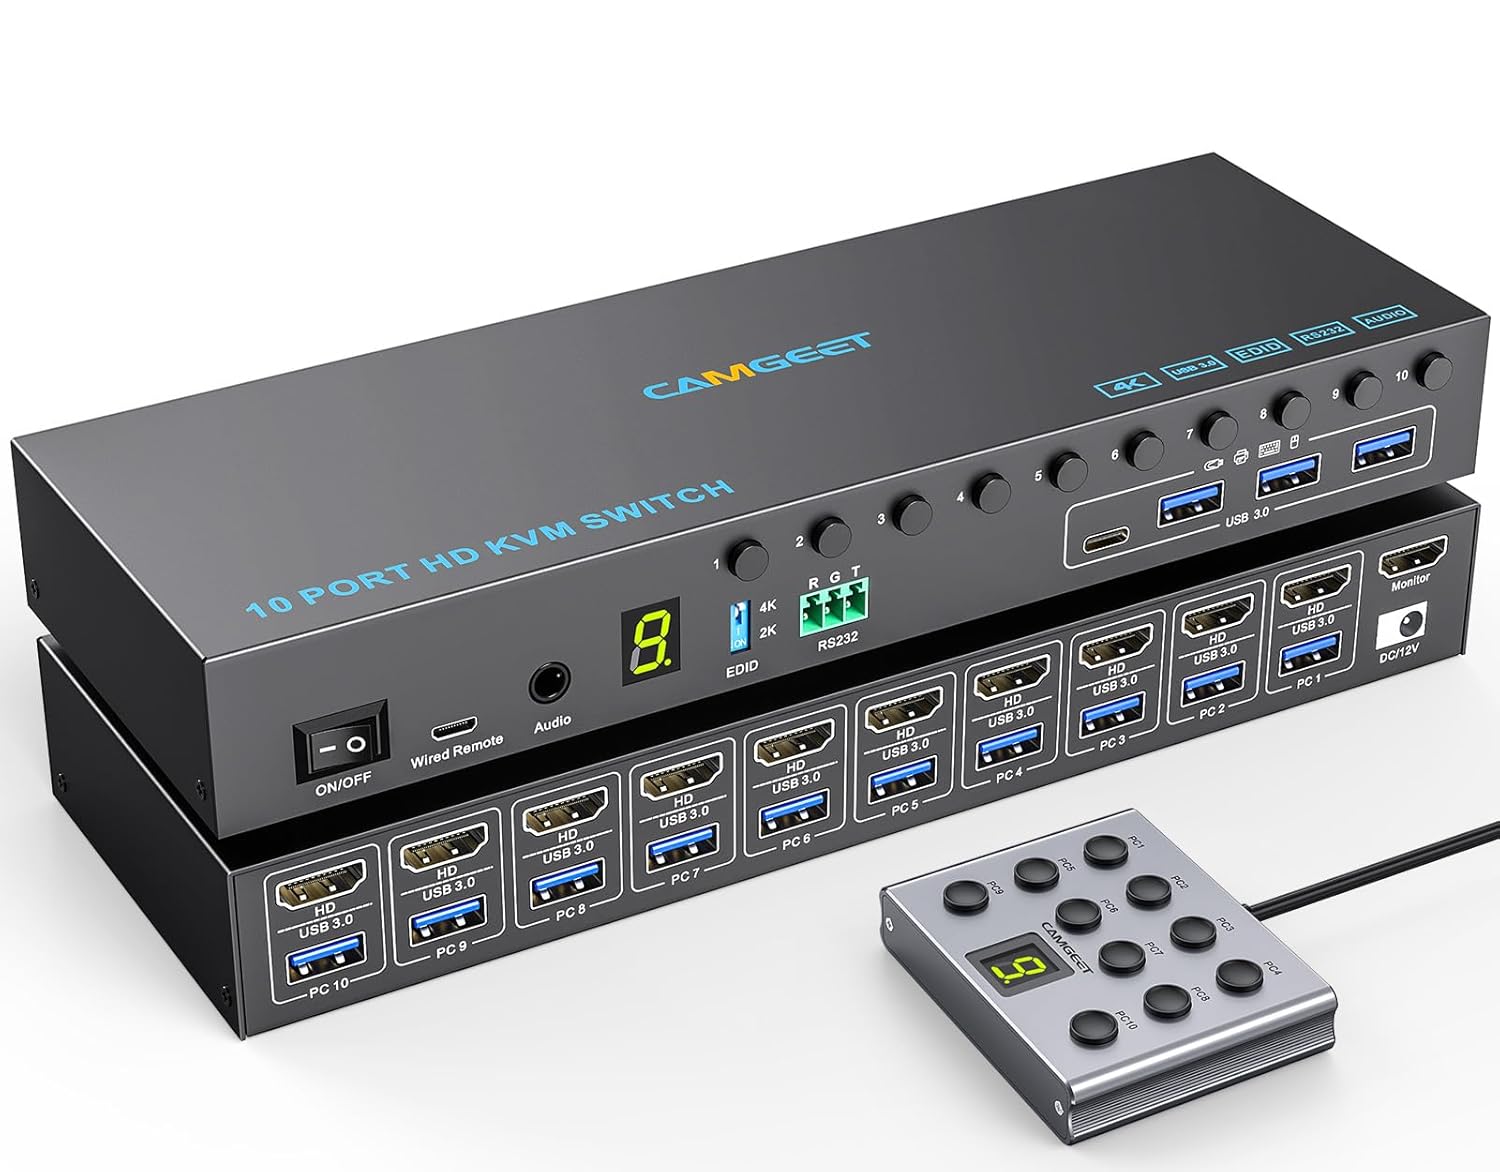
Image 1.1: The camgeet 10 Port HDMI KVM Switch with its wired remote control.
2. Product Features
- 10-Port HDMI KVM Switch: Control up to 10 computers using one monitor and a single set of USB peripherals.
- 4K@60Hz Ultra HD Resolution: Supports resolutions up to 4K@60Hz, backward compatible with 4K@30Hz and 2560*1440@120Hz. Compatible with ultrawide monitors.
- EDID Simulation: Simulates the display's EDID to prevent changes in window position when switching between computers.
- USB 3.0 Connectivity: Features 4 USB 3.0 ports (1 USB-C, 3 USB-A) for keyboard, mouse, printer, U disk, and other USB devices. Offers data transfer speeds up to 5Gbps, 10 times faster than USB 2.0.
- Multiple Switching Modes: Supports switching via front panel buttons, a wired remote control (1.5m length with digital display), and RS232 commands.
- Broad Compatibility: Plug and play, driver-free for Windows, Mac OS, Linux, and Chrome OS. Compatible with various HDMI devices including Desktops, Laptops, PS5, PS4, and TV Boxes.
- Dedicated Power Adapter: Includes a 12V/2A power adapter for stable operation and reliable recognition of high-power USB devices.
- ON/OFF Switch: Allows the KVM to be powered off without unplugging cables.
3. Package Contents
Please verify that all items are present in the package:
- 1x camgeet 10 Port HDMI KVM Switch
- 10x USB 3.0 Cable (1.5M)
- 1x Wired Remote Control (1.5M)
- 1x 12V/2A Power Adapter
- 1x User Manual (this document)

Image 3.1: Visual representation of the items included in the package.
4. Setup Instructions
Follow these steps to connect your camgeet 10 Port HDMI KVM Switch:
- Power Off Devices: Ensure all computers, the monitor, and the KVM switch are powered off before making any connections.
- Connect Monitor: Connect your monitor to the HDMI OUT port on the KVM switch using an HDMI cable (not included).
- Connect Computers (HDMI): For each computer (up to 10), connect an HDMI cable from the computer's HDMI output to an available HDMI IN port (PC1-PC10) on the KVM switch.
- Connect Computers (USB): For each computer, connect one of the provided USB 3.0 cables from a USB port on your computer to the corresponding USB 3.0 IN port (PC1-PC10) on the KVM switch. Each computer requires both an HDMI and a USB 3.0 connection to the KVM.
- Connect USB Peripherals: Connect your keyboard, mouse, and other USB 3.0 peripheral devices (e.g., printer, U disk) to the USB 3.0 OUT ports on the front panel of the KVM switch.
- Connect Audio (Optional): If desired, connect headphones or speakers to the Audio Out port on the front panel.
- Connect Wired Remote (Optional): Plug the wired remote control into the 'Wired Remote' port on the front panel.
- Connect Power: Plug the 12V/2A power adapter into the DC/12V port on the KVM switch, then plug the adapter into a power outlet.
- Power On: Turn on the KVM switch using the ON/OFF switch, then power on your monitor and connected computers.

Image 4.1: Detailed connection diagram showing how to link computers, monitor, and USB devices to the KVM switch.

Image 4.2: An illustration of a typical setup with 10 computers connected to the KVM switch, sharing a single monitor and USB peripherals.
5. Operating Instructions
The camgeet KVM switch offers three methods for switching between connected computers:
5.1. Front Panel Buttons
Press the numbered buttons (1-10) on the front panel of the KVM switch to directly select the corresponding PC. The LED indicator will show the active computer.
5.2. Wired Remote Control
Use the included wired remote control to switch between computers. The remote features numbered buttons (1-10) and a digital display indicating the currently active PC. This provides convenient switching from your desktop.
5.3. RS232 Control
For advanced users and automated environments, the KVM switch supports RS232 serial control. Connect an RS232 serial cable (not included) to the RS232 port on the KVM. Use a baud rate of 115200. You can send specific commands to switch between PCs:
| Command | Function |
|---|---|
| X1,1$ | Switch to PC 1 |
| X2,1$ | Switch to PC 2 |
| X3,1$ | Switch to PC 3 |
| X4,1$ | Switch to PC 4 |
| X5,1$ | Switch to PC 5 |
| X6,1$ | Switch to PC 6 |
| X7,1$ | Switch to PC 7 |
| X8,1$ | Switch to PC 8 |
| X9,1$ | Switch to PC 9 |
| XA,1$ | Switch to PC 10 |

Image 5.1: The KVM switch illustrating the front panel buttons and the wired remote control for switching between computers.

Image 5.2: Detail of the RS232 port and a table of RS232 switching commands.
6. EDID Simulation
The KVM switch features EDID (Extended Display Identification Data) simulation. This function ensures that when you switch between computers, the display's EDID information is maintained, preventing the operating system from detecting a display disconnection. This helps to keep your windows and icons in their original positions, avoiding screen rearrangement.
6.1. Enabling/Disabling EDID Emulation
To toggle the EDID emulation function, press and hold the switch button labeled "1" on the front panel for 3 seconds. The KVM will indicate whether the function is active or inactive.
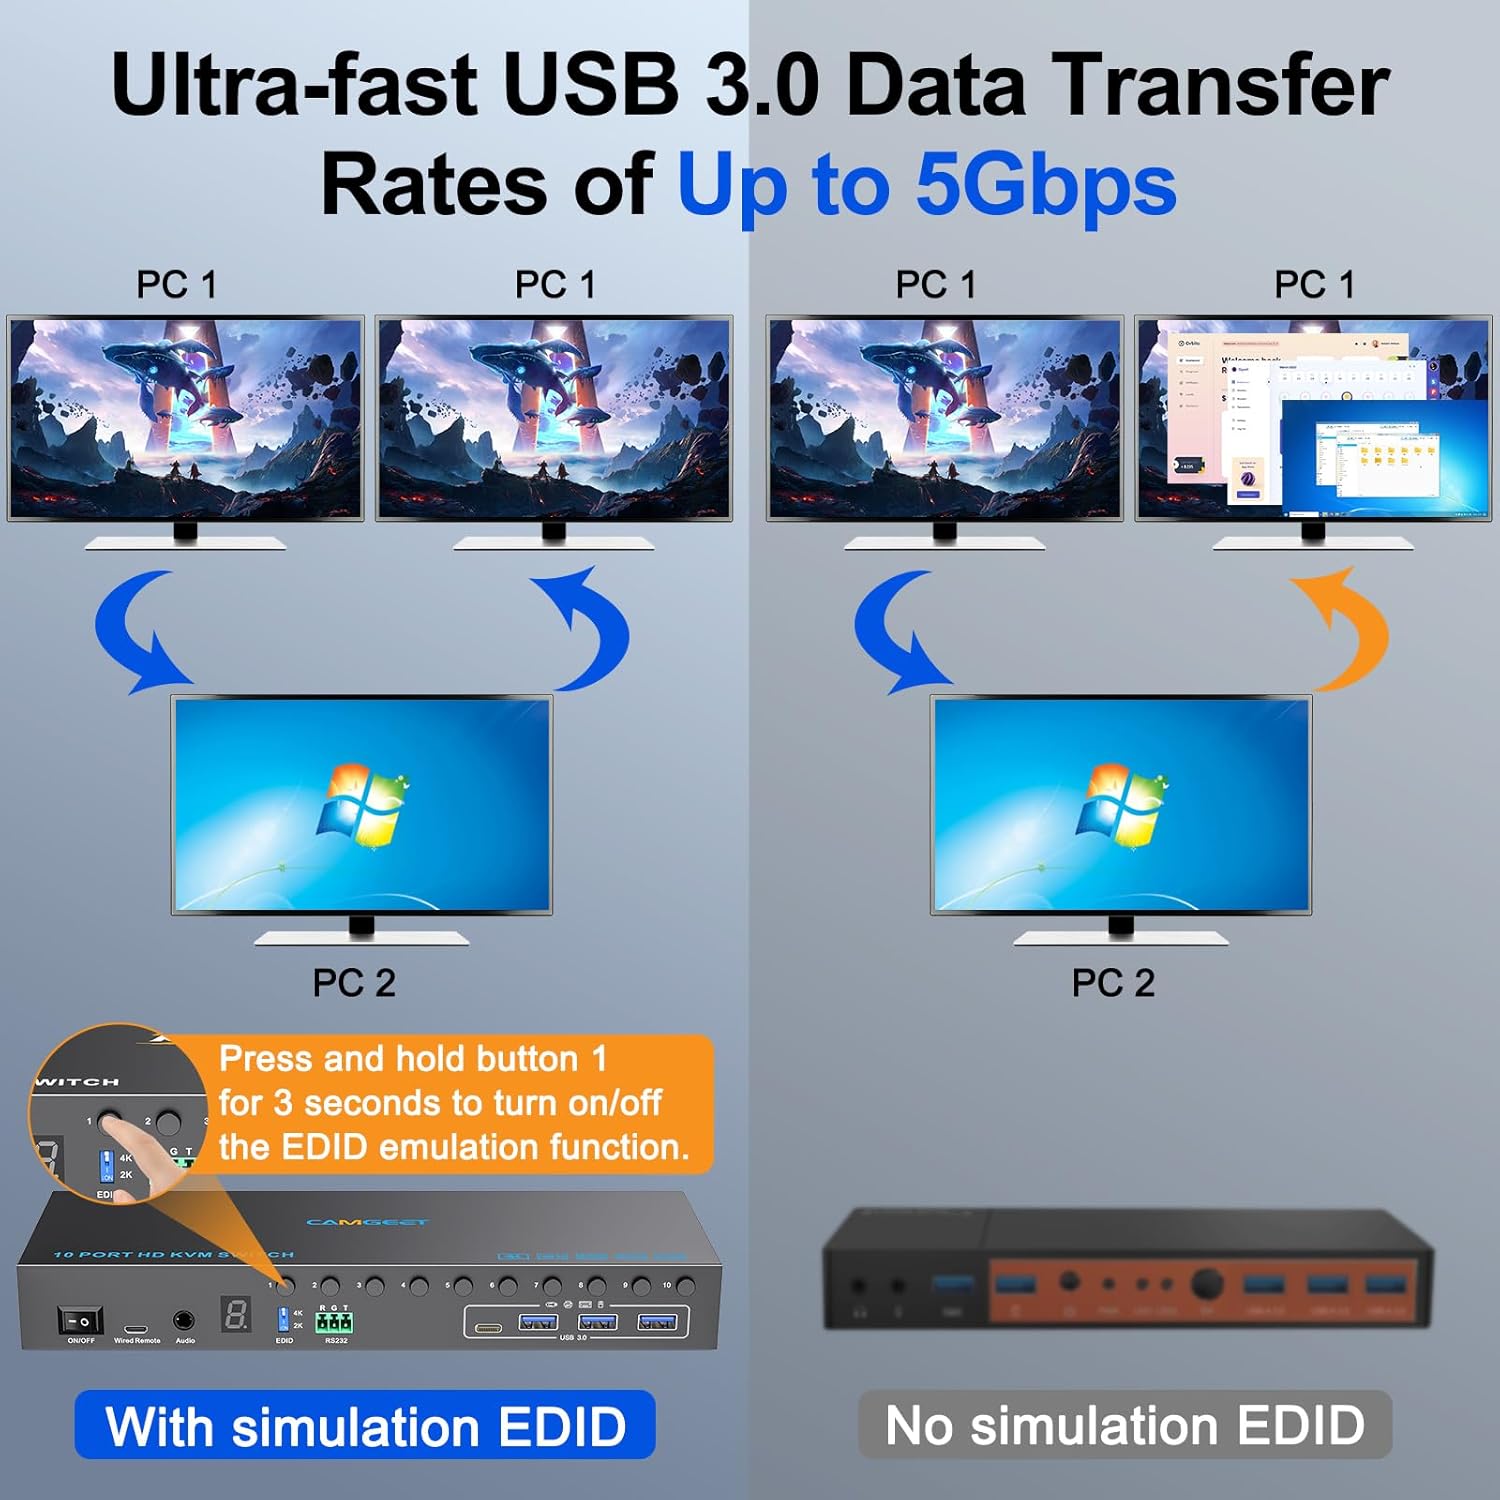
Image 6.1: Comparison of display behavior with and without EDID simulation, highlighting its benefit for maintaining window positions.
7. USB 3.0 Connectivity
The KVM switch is equipped with four USB 3.0 ports (one USB-C and three USB-A) on the front panel. These ports allow you to share various USB peripheral devices, such as keyboards, mice, printers, and USB flash drives, among all connected computers. The USB 3.0 standard provides ultra-fast data transfer rates of up to 5Gbps, significantly faster than USB 2.0, enabling quick file transfers and responsive peripheral performance.

Image 7.1: Close-up of the USB 3.0 ports on the KVM switch, illustrating the high data transfer speeds compared to USB 2.0.
8. Maintenance
To ensure the longevity and optimal performance of your camgeet KVM switch, please follow these maintenance guidelines:
- Cleaning: Use a soft, dry cloth to clean the exterior of the KVM switch. Avoid using liquid cleaners, aerosols, or abrasive materials, as these can damage the device.
- Ventilation: Ensure the KVM switch is placed in a well-ventilated area to prevent overheating. Do not block any ventilation openings.
- Power Management: Always use the provided 12V/2A power adapter. When not in use for extended periods, you can power off the KVM switch using its ON/OFF button without disconnecting cables.
- Cable Management: Keep cables organized and free from kinks or excessive bending to prevent damage and ensure stable connections.
- Environmental Conditions: Avoid exposing the device to extreme temperatures, humidity, or direct sunlight.
9. Troubleshooting
If you encounter issues with your KVM switch, refer to the following common problems and solutions:
- No Display or Flickering Screen:
- Ensure all HDMI cables are securely connected to both the KVM switch and the computers/monitor.
- Verify that the HDMI cables used support 4K@60Hz if you are using a 4K display. Using lower quality or older HDMI cables can cause display issues.
- Try restarting the KVM switch and the connected computers.
- Check if the EDID emulation function is enabled (refer to Section 6).
- Keyboard/Mouse Not Responding:
- Ensure the USB 3.0 cables from the computers to the KVM are securely connected.
- Verify that your keyboard and mouse are connected to the correct USB 3.0 OUT ports on the KVM.
- Try connecting the keyboard/mouse directly to a computer to confirm they are functional.
- Some specialized gaming keyboards/mice may require direct connection or specific drivers not supported by KVM emulation.
- USB Devices Not Recognized:
- Ensure the USB device is properly connected to one of the USB 3.0 OUT ports.
- Confirm the KVM switch is receiving adequate power from the 12V/2A power adapter. High-power USB devices may require stable power.
- Try connecting the USB device to a different USB 3.0 OUT port or directly to a computer.
- Switching Issues:
- Ensure the KVM switch is powered on.
- If using the wired remote, check its connection to the KVM.
- For RS232 control, verify the cable connection and ensure the correct commands and baud rate (115200) are being used.
- Audio Problems:
- Check the audio cable connection to the KVM and your speakers/headphones.
- Ensure the audio output is correctly selected on the active computer.
10. Specifications
| Feature | Specification |
|---|---|
| Model Number | 10 port KVM Switch |
| Brand | camgeet |
| Product Dimensions (L x W x H) | 24 x 8 x 3 cm (9.45 x 3.15 x 1.26 inches) |
| Item Weight | 580 g |
| Material | Metal |
| Max Resolution | 4K@60Hz |
| USB Standard | USB 3.0 (up to 5Gbps) |
| USB Ports | 4 (1x USB-C, 3x USB-A) |
| Switching Modes | Panel Buttons, Wired Remote, RS232 |
| Power Adapter | DC 12V/2A |
| Operating Voltage | 5 Volts |
| Current Rating | 2 Amps |
| Operation Mode | ON-OFF |
| Switch Type | Push Button |
| Connector Type | Plug In |
| Contact Type | Normally Open |
| Circuit Type | 10-way |
| Compatibility | Windows, Mac OS, Linux, Chrome OS, PS5, PS4, TV Box, etc. |
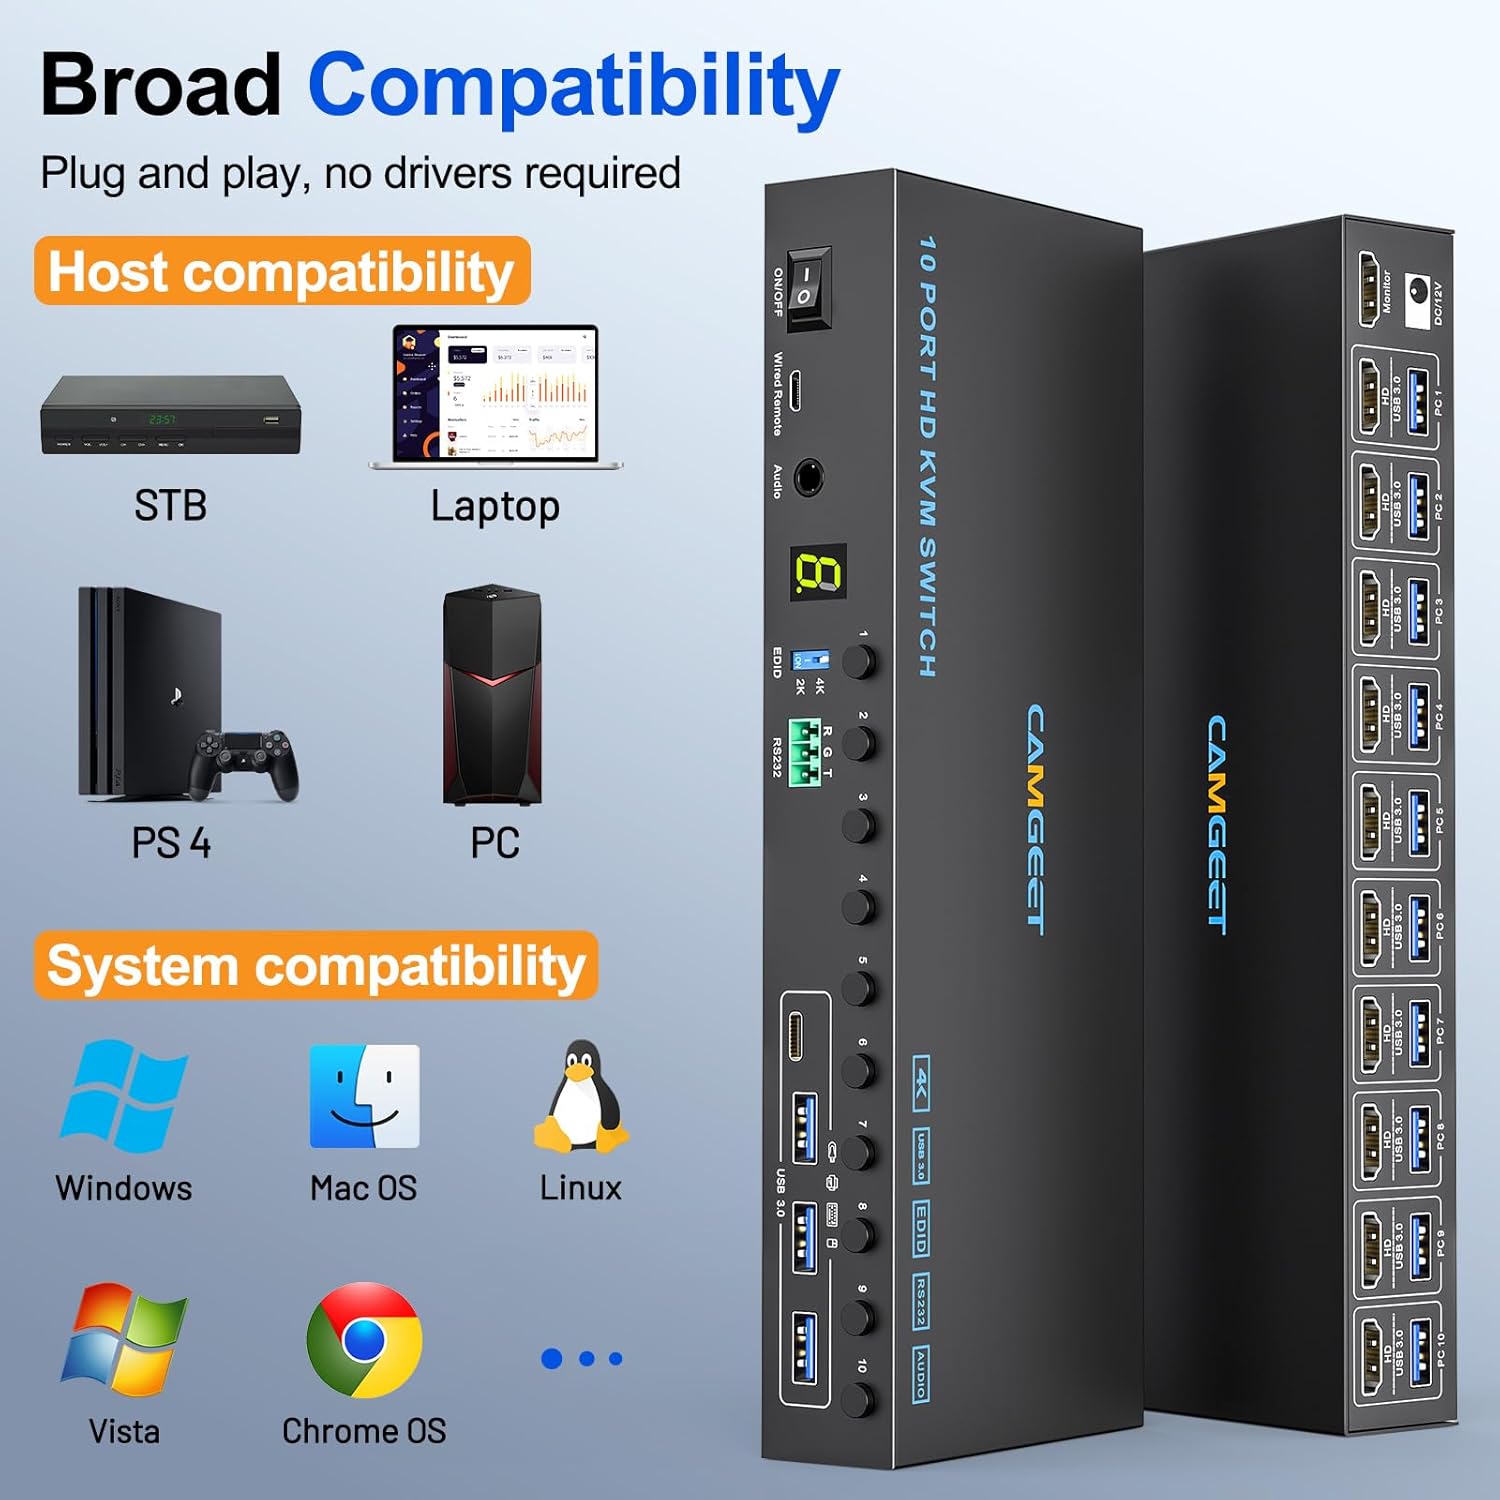
Image 10.1: The KVM switch demonstrating its broad compatibility with different host devices and operating systems.
11. Warranty and Support
camgeet provides a 1-year warranty for this USB 3.0 KVM Switcher. Additionally, lifetime technical support is available. For any problems or inquiries, please contact camgeet customer service. Professional customer service is available 24 hours a day.


