Introduction
Thank you for purchasing the Sunbuck Mini Audio Interface and Small Amplifier bundle. This comprehensive system is designed to enhance your audio experience, whether for home entertainment, music playback, or professional recording. The bundle includes the AS-35BU Stereo Amplifier and a 24Bit/192kHz USB-C Audio Interface, offering versatility and high-fidelity sound.
Please read this manual carefully before operating the devices to ensure proper usage, optimal performance, and safety.
Safety Information
- Power Supply: Use only the specified power adapter for each device. Ensure the voltage matches the requirements.
- Ventilation: Do not block ventilation openings. Ensure adequate airflow around the units to prevent overheating.
- Water and Moisture: Keep the devices away from water, moisture, and high humidity. Do not operate with wet hands.
- Cleaning: Disconnect power before cleaning. Use a soft, dry cloth. Do not use liquid cleaners or aerosols.
- Servicing: Do not attempt to service these devices yourself. Refer all servicing to qualified service personnel.
- Placement: Place the devices on a stable, flat surface. Avoid placing them near heat sources or in direct sunlight.
- 48V Phantom Power: When using the audio interface's 48V phantom power, ensure your microphone is compatible to avoid damage.
What's in the Box

Image: The contents of the Sunbuck product box, including the AS-35BU Stereo Amplifier, its remote control, an FM antenna, and an AC power plug.
- 1 x Sunbuck AS-35BU Stereo Amplifier (110V)
- 1 x Remote Control
- 1 x FM Antenna
- 1 x AC Power Plug
- 1 x Sunbuck USB-C Audio Interface
- 1 x USB-C to USB-A Cable
Product Overview
Sunbuck AS-35BU Stereo Amplifier
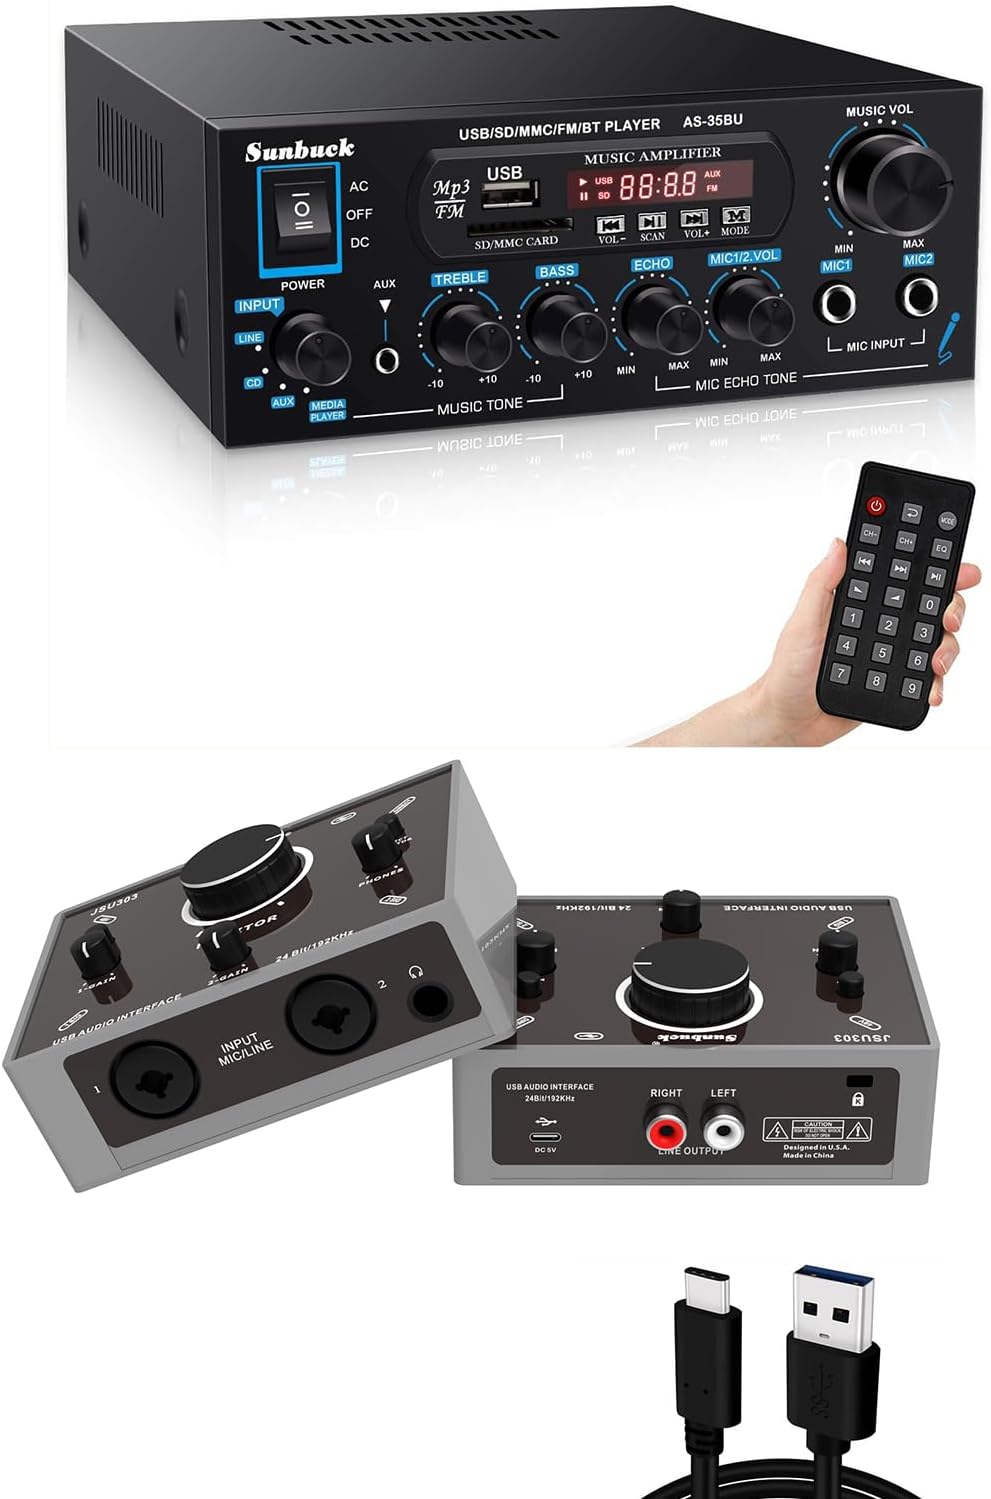
Image: The Sunbuck AS-35BU Stereo Amplifier (top) and the USB-C Audio Interface (bottom), illustrating their compact size and various controls.
The AS-35BU is a compact yet powerful stereo amplifier designed for home audio systems. It delivers a maximum output of 400W x 2 (RMS 60W x 2), making it suitable for various environments such as offices, small apartments, basements, and garages. It features upgraded audio processing chips for high fidelity, low distortion, and low noise.
Key Features:
- Diverse Input Methods: Supports Bluetooth, SD card, USB, AUX, FM radio, and microphone inputs.
- Multiple Audio Sources: Connects to iPhones, Android devices, iPads, PCs/Laptops (Windows/Mac), and CD/Media players.
- Speaker Compatibility: Compatible with various speaker types including outdoor/bookshelf speakers, computer/home speakers, ceiling speakers, and car/motorcycle speakers.
- Tone and Echo Control: Independent controls for Treble, Bass, and Microphone Echo.

Image: Visual representation of the flexible and diverse input methods supported by the Sunbuck amplifier, including Bluetooth, SD card, USB, AUX, microphones, FM radio, and CD/DVD players.

Image: The rear panel of the Sunbuck AS-35BU amplifier, detailing its RCA audio input, 2-channel speaker outputs, FM antenna connection, and power input. Examples of compatible audio sources and speaker types are also shown.
Sunbuck USB-C Audio Interface
The Sunbuck USB-C Audio Interface is a portable and handy device designed for high-quality recording. It supports up to 24-bit/192kHz audio conversion, making it ideal for home recording studios, musicians, and podcasters. Its plug-and-play design ensures ease of use without requiring additional drivers.
Key Features:
- 24Bit/192kHz Recording: Provides professional-grade audio resolution for clear and detailed recordings.
- 48V Phantom Power: Supplies necessary power for condenser microphones, ensuring pure sound signal.
- Ultra-Low Latency & Direct Monitor: Enables real-time monitoring without delay, crucial for recording.
- Combo Inputs: Features XLR/TRS combo jacks for connecting microphones and instruments (guitar, keyboard).
- Plug and Play: Driver-free operation for quick setup on PC/Mac.

Image: The Sunbuck USB-C Audio Interface connected to a laptop, demonstrating its use in a professional recording environment with cables plugged into its input jacks.

Image: A detailed diagram showcasing the versatile combo inputs and outputs of the Sunbuck USB-C Audio Interface, illustrating how various audio devices like guitars, microphones, keyboards, headphones, PCs/MACs, speakers, and mixers can be connected.
Setup
Setting up the AS-35BU Stereo Amplifier
- Connect Speakers: Connect your passive speakers to the speaker output terminals on the rear of the amplifier. Ensure correct polarity (+ to + and - to -).
- Connect Audio Sources:
- RCA Input: Use RCA cables to connect audio devices (e.g., CD player, TV, DVD player) to the "AUDIO INPUT" jacks on the rear panel.
- AUX Input: Use a 3.5mm audio cable to connect devices to the front panel AUX input.
- USB/SD Card: Insert a USB drive or SD card into the respective slots on the front panel for media playback.
- Bluetooth: Power on the amplifier, select Bluetooth mode. On your device, search for "AS-35BU" and pair.
- Microphones: Connect microphones to the MIC1 or MIC2 input jacks on the front panel.
- FM Antenna: Connect the included FM antenna to the "FM ANT" terminal on the rear for radio reception.
- Connect Power: Plug the AC power cord into the amplifier's power input and then into a wall outlet.
Setting up the USB-C Audio Interface
- Connect to Computer: Use the provided USB-C to USB-A cable to connect the audio interface to a USB port on your PC or Mac. The device is plug-and-play and typically does not require driver installation.
- Connect Microphones/Instruments:
- Microphones: Connect XLR microphones to the combo input jacks (1 or 2). If using a condenser microphone requiring phantom power, activate the 48V switch.
- Instruments: Connect instruments (e.g., guitar, keyboard) using a 1/4" TRS cable to the combo input jacks.
- Connect Output Devices:
- Headphones: Connect headphones to the 1/4" headphone jack for direct monitoring.
- Speakers/Mixer: Connect studio monitors or a mixer to the "LINE OUTPUT" RCA jacks.
- System Audio Settings: On your computer, select the Sunbuck Audio Interface as the default input and output device in your sound settings or Digital Audio Workstation (DAW) software.
Operating Instructions
Operating the AS-35BU Stereo Amplifier
- Power On/Off: Use the "POWER" switch on the front panel to turn the amplifier on or off.
- Input Selection: Press the "INPUT" button or use the remote control to cycle through input sources (CD, AUX, MEDIA PLAYER). For Bluetooth, USB, SD, and FM, use the "MODE" button on the media player section.
- Music Volume: Adjust the "MUSIC VOL" knob to control the overall output volume.
- Tone Control: Use the "TREBLE" and "BASS" knobs to adjust the high and low frequencies of the music.
- Microphone Controls:
- MIC1/MIC2 Volume: Adjust individual microphone volumes using the "MIC1 VOL" and "MIC2 VOL" knobs.
- MIC ECHO: Use the "ECHO" knob to add or remove echo effect to the microphone sound.
- Media Player Operation:
- USB/SD Playback: Insert a USB drive or SD card. The amplifier will automatically detect and play supported audio files. Use the playback controls (Play/Pause, Next, Previous) on the front panel or remote.
- FM Radio: Select FM mode. Use the "SCAN" button to auto-scan and save stations. Use "PREV" and "NEXT" to navigate saved stations.
- Bluetooth: Once paired, play audio from your Bluetooth device.

Image: The Sunbuck AS-35BU amplifier positioned in a living room setup with speakers, illustrating its capability to provide sufficient power for enjoying music in a home environment.
Operating the USB-C Audio Interface
- Input Gain Control: Adjust the "GAIN" knobs for each input channel to set the appropriate input level for your microphone or instrument. Monitor the input level indicators in your DAW to avoid clipping.
- 48V Phantom Power: If using a condenser microphone, press the "48V" button to supply phantom power. Ensure the microphone is connected before activating.
- Direct Monitoring: Use the "MONITOR" knob to blend between the direct input signal and the playback from your computer. This allows for zero-latency monitoring during recording.
- Headphone Volume: Adjust the "PHONES" knob to control the volume of your connected headphones.
- Main Output Volume: Adjust the "OUTPUT" knob to control the volume sent to your connected speakers or mixer.
- Recording: Open your preferred Digital Audio Workstation (DAW) software (e.g., Audacity, GarageBand, Ableton Live, Logic Pro, Pro Tools). Select the Sunbuck Audio Interface as your input device and begin recording.

Image: A person singing into a microphone that is connected to the Sunbuck USB-C Audio Interface, highlighting the device's capability to provide an outstanding mic preamplifier for clear vocal recording.

Image: A person playing an acoustic guitar while connected to the Sunbuck USB-C Audio Interface, illustrating the device's plug-and-play design and ease of use for musicians.
Maintenance
- Cleaning: Wipe the exterior surfaces of both devices with a soft, dry, lint-free cloth. Do not use abrasive cleaners, waxes, or solvents.
- Dust: Keep the devices free from dust. Use a soft brush or compressed air to clean vents and ports periodically.
- Storage: When not in use for extended periods, store the devices in a cool, dry place, away from direct sunlight and extreme temperatures.
- Cable Care: Handle cables carefully. Avoid sharp bends or kinks that can damage the internal wires.
Troubleshooting
AS-35BU Stereo Amplifier
| Problem | Possible Cause / Solution |
|---|---|
| No power | Check if the power cord is securely connected to the amplifier and the wall outlet. Ensure the power switch is in the "ON" position. |
| No sound output |
|
| Bluetooth not connecting |
|
| Microphone not working |
|
USB-C Audio Interface
| Problem | Possible Cause / Solution |
|---|---|
| No sound from interface |
|
| Microphone not detected / No phantom power |
|
| Latency during recording |
|
Specifications
Sunbuck AS-35BU Stereo Amplifier
- Power Output: Max 400W x 2 (RMS 60W x 2)
- Audio Processing: Upgraded audio processing chips for high fidelity
- Inputs: RCA (CD, Line), AUX (3.5mm), USB, SD/MMC, Bluetooth, FM, 2 x Microphone (1/4" TS)
- Outputs: 2-Channel Speaker Output
- Controls: Music Volume, Treble, Bass, Echo, Mic1 Volume, Mic2 Volume, Input Selector, Media Player Controls
- Power Supply: AC 110V
Sunbuck USB-C Audio Interface
- Audio Resolution: Up to 24-bit/192kHz
- Inputs: 2 x Combo XLR/TRS (Mic/Line/Instrument)
- Outputs: RCA Line Output (L/R), 1/4" Headphone Output
- Phantom Power: +48V switchable
- Monitoring: Direct Monitor function
- Connectivity: USB-C (USB 2.0 compatible)
- Compatibility: Windows, macOS (Driver-free)
Warranty and Support
Specific warranty information and detailed support contacts are not available in the provided product data. For warranty claims, technical support, or service inquiries, please refer to the documentation included with your purchase or contact Sunbuck customer service directly through their official website or the retailer where the product was purchased.
Please retain your proof of purchase for warranty purposes.


