
Introduction
Thank you for choosing the TARSHYRY Electric Milk Frother. This manual provides essential information for the safe and efficient operation of your new appliance. Please read it thoroughly before first use and keep it for future reference.
Safety Instructions
- Read all instructions before use.
- Do not immerse the base unit in water or other liquids.
- Ensure the power supply matches the voltage specified on the appliance.
- Keep out of reach of children.
- Do not operate if the power cord or plug is damaged.
- Always unplug the frother when not in use and before cleaning.
- Do not fill above the maximum fill lines to prevent overflow.
- Use only with the provided accessories.
Product Overview
Components
- 1 x Milk Frother
- 1 x Mixer (Whisk)
- 1 x Lid
- 1 x Power Cable
- 1 x Manual
Key Features
- 4-in-1 Working Modes: Offers options for cappuccino foam, latte frothed milk, heating milk/chocolate, and cold milk froth.
- 350ML Large Capacity: 450W power with a 350ml capacity for milk warming and 150ml for milk foaming.
- Easy to Clean: Features a non-stick interior and a detachable blender for simple cleaning.
- Quiet & Anti-Slip Base: Operates quietly and has an anti-slip base for stability.
- Auto Shut-Off Function: Automatically turns off when the desired temperature is reached.
Visual Guide to Features

Figure 1: The 4-in-1 Multi-Functional Milk Frother modes.
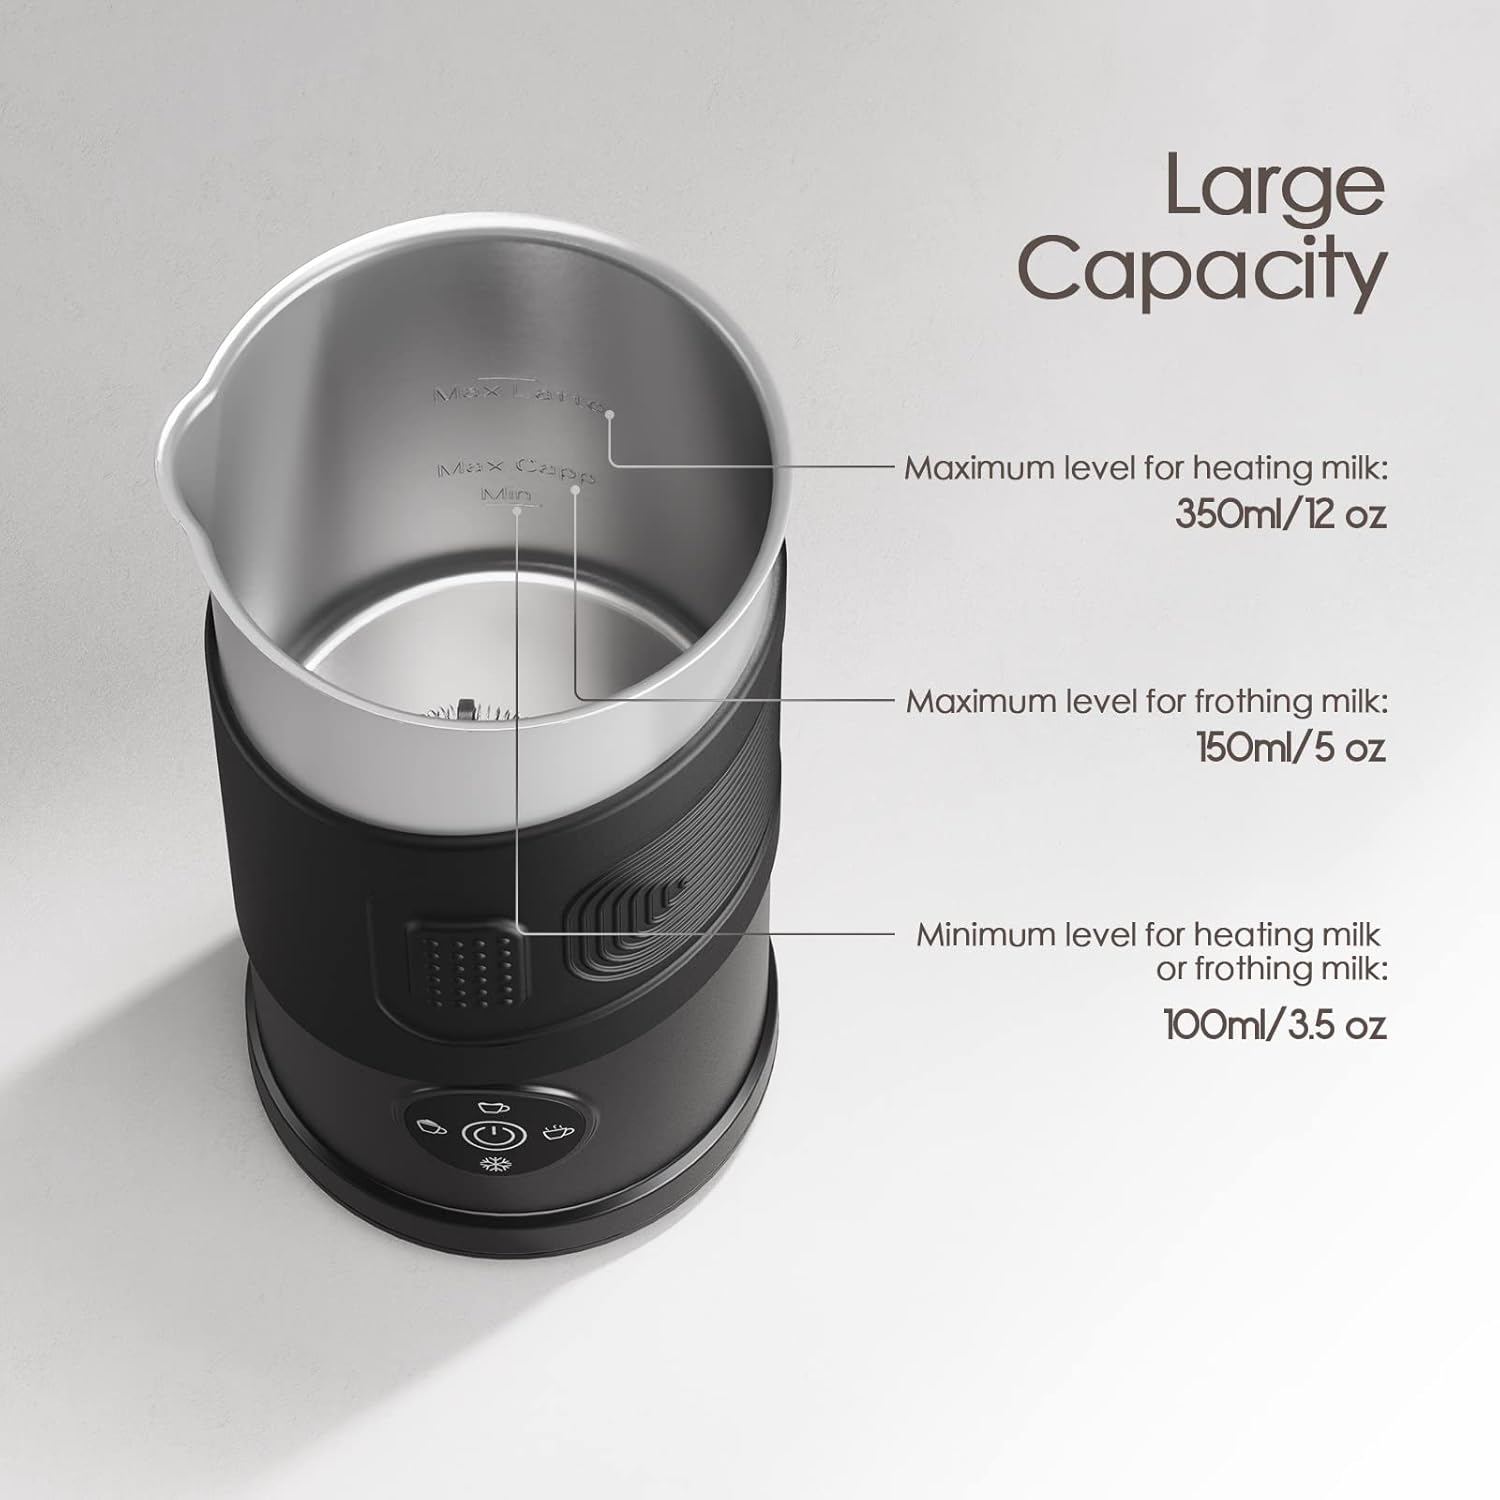
Figure 2: Internal capacity markings for heating and frothing milk.

Figure 3: Detailed view of the frother's design elements.
Specifications
| Attribute | Value |
|---|---|
| Brand | TARSHYRY |
| Power | 450W |
| Maximum Milk Warming Capacity | 350ML |
| Maximum Milk Foaming Capacity | 150ML |
| Minimum Capacity | 100ML |
| Product Size | 192 x 100mm / 7.55 x 3.93in |
| Product Weight | 0.64kg / 22.57oz |
| Material | Stainless Steel |
| Model Name | TARSHYRYrifpm52xku-US |
Setup
- Unpack: Carefully remove all components from the packaging.
- Clean: Wash the frother jug interior, lid, and whisk with warm soapy water before first use. Rinse thoroughly and dry.
- Placement: Place the frother base on a stable, flat, and dry surface away from water sources.
- Power Connection: Plug the power cable into a suitable electrical outlet. The frother will emit a beep, indicating it is ready for use.
Operating Instructions
Your TARSHYRY Electric Milk Frother offers four distinct modes for various milk preparations. Ensure the correct whisk attachment is in place for frothing or heating.
Video 1: Demonstration of the 4-in-1 Milk Frother functions, including frothing and heating milk.
General Operation:
- Ensure the frother is clean and dry before adding milk.
- Pour milk into the frother jug, observing the MIN and MAX fill lines for your desired function.
- Place the lid securely on the frother.
- Press the power button to cycle through the modes until the desired indicator light is illuminated.
- The frother will automatically stop when the process is complete.
Mode Selection:
- Cappuccino Foam (Hot Froth): For rich, dense foam. Fill milk between MIN and MAX frothing line (150ml max). Press the button until the cappuccino icon lights up.
- Latte Frothed Milk (Hot Froth): For lighter, creamy foam. Fill milk between MIN and MAX frothing line (150ml max). Press the button until the latte icon lights up.
- Heating Milk / Hot Chocolate: For warming milk without frothing, or preparing hot chocolate. Remove the frothing whisk and use the heating whisk. Fill milk between MIN and MAX heating line (350ml max). Press the button until the heating icon lights up.
- Cold Milk Froth: For cold frothed milk. Fill milk between MIN and MAX frothing line (150ml max). Press the button until the cold froth icon lights up.
Note: For best frothing results, use cold milk (around 4-6°C / 39-43°F) and ensure the frothing whisk is properly installed.
Maintenance and Cleaning
Regular cleaning ensures optimal performance and longevity of your frother.
- Unplug: Always unplug the frother from the power outlet and allow it to cool down completely before cleaning.
- Disassemble: Remove the lid and the whisk from the frother jug.
- Clean Jug: The non-stick interior of the frother jug can be cleaned with a soft, damp cloth or sponge and mild dish soap. Avoid abrasive materials that could scratch the surface.
- Clean Whisk & Lid: The whisk and lid can be washed with warm soapy water. Rinse thoroughly.
- Clean Base: Wipe the exterior of the frother base with a damp cloth. Never immerse the base in water.
- Dry: Ensure all parts are completely dry before reassembling and storing.
Troubleshooting
| Problem | Possible Cause | Solution |
|---|---|---|
| Frother does not turn on | Not plugged in or loose connection | Ensure the power cable is securely plugged into the outlet and the frother base. |
| Milk not frothing or heating properly | Incorrect milk level, wrong whisk, or milk type | Check milk levels against MIN/MAX lines. Ensure the correct whisk is installed. Use fresh, cold milk (dairy or suitable plant-based). |
| Overflow during operation | Milk filled above MAX line | Always observe the MAX fill lines for frothing (150ml) and heating (350ml). |
| Unusual noise | Whisk not properly seated or foreign object | Ensure the whisk is correctly placed on the spindle. Check for any obstructions in the jug. |
Warranty and Support
This product is covered by a standard manufacturer's warranty. For specific warranty details, please refer to the documentation included in your product packaging or contact TARSHYRY customer support. If you encounter any issues or have questions not addressed in this manual, please reach out to our customer service team for assistance.
Customer Support: Please refer to your purchase receipt or the manufacturer's website for contact information.