1. Introduction
This manual provides detailed instructions for the safe operation, setup, and maintenance of your OBEST LM19-D Chinook RC Helicopter. Please read this manual thoroughly before operating the helicopter to ensure proper function and to prevent damage.
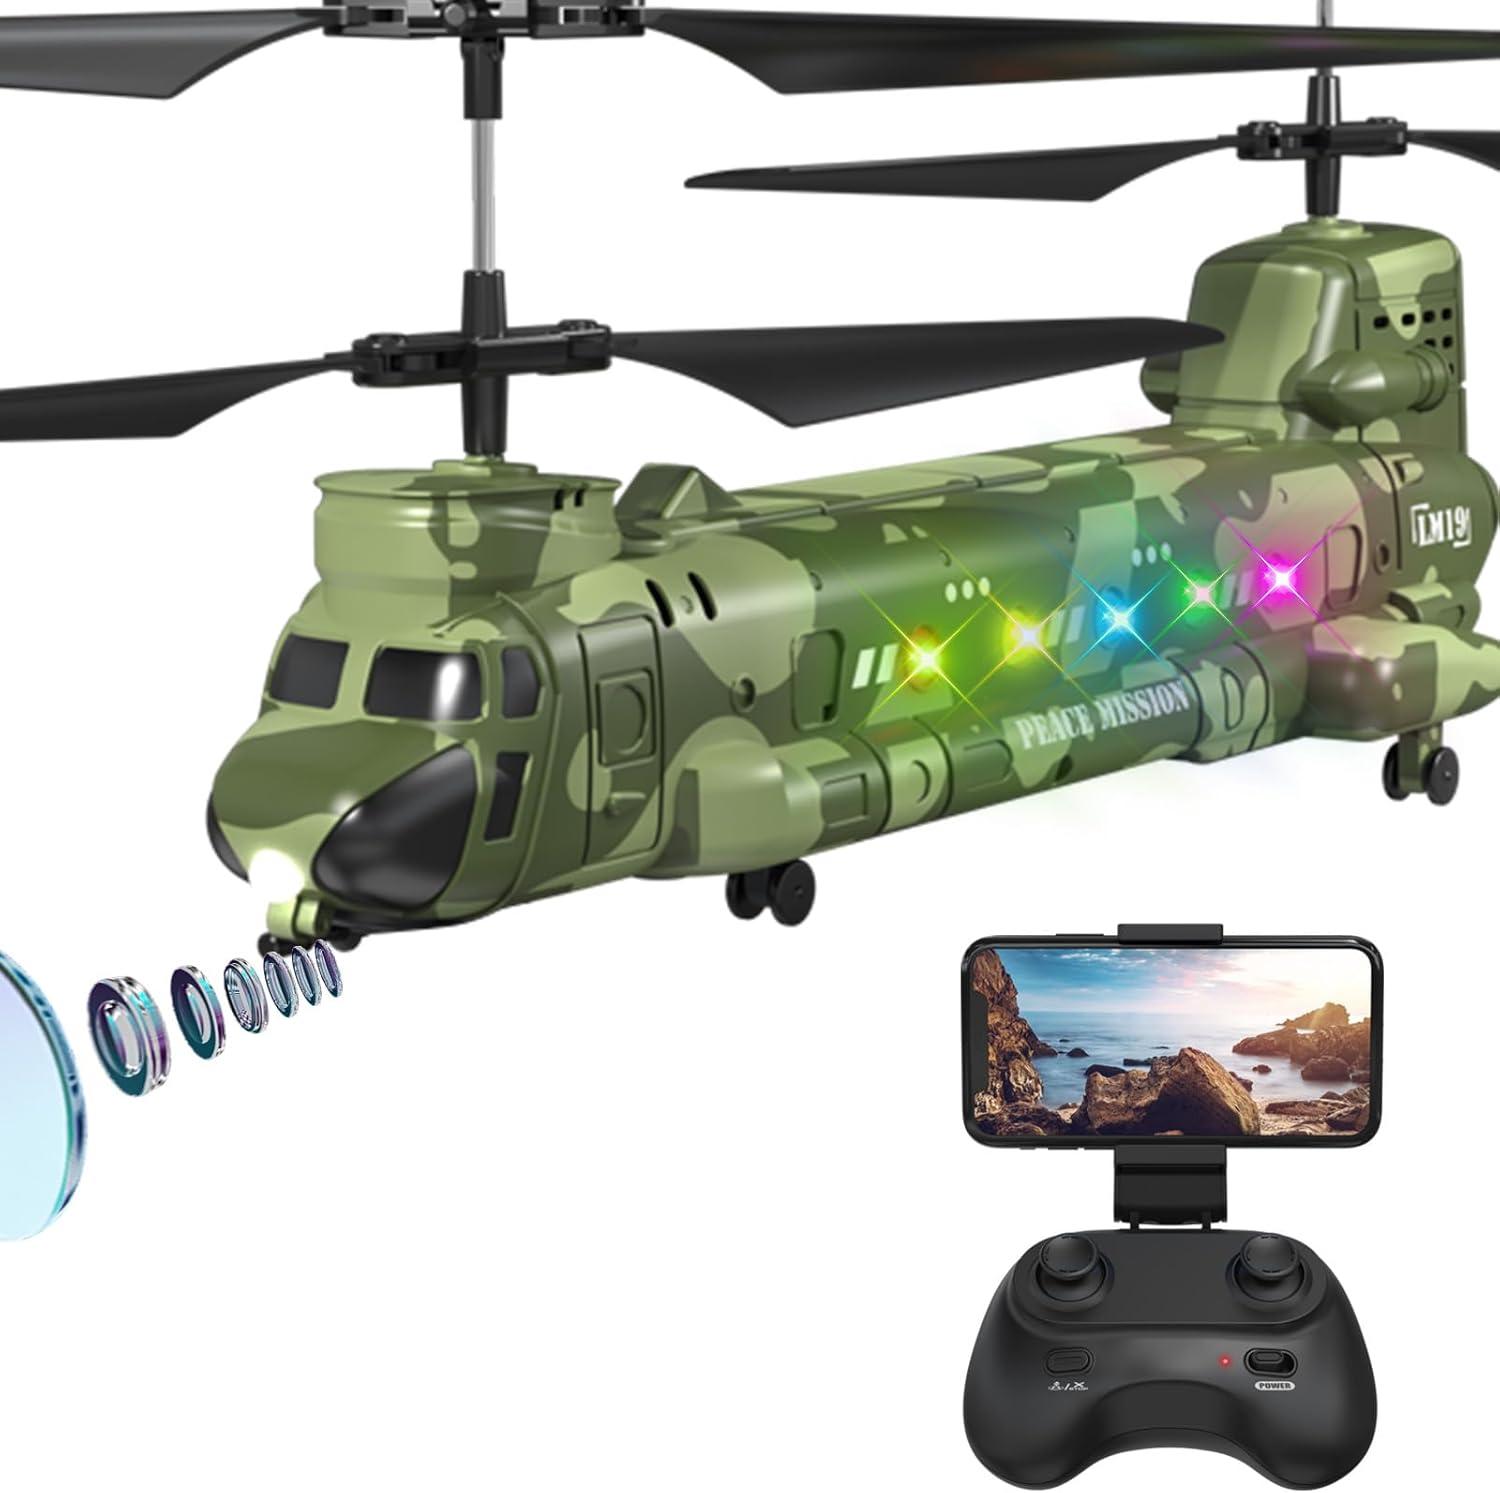
Image 1.1: The OBEST LM19-D Chinook RC Helicopter, remote control, and smartphone holder for FPV viewing.
2. Safety Information
For safe operation, this product is recommended for users aged 12 years and above. Adult supervision is advised for younger users. Always operate the helicopter in an open, clear area, away from people, animals, and obstacles. Do not fly near power lines, roads, or water. Ensure the battery is fully charged before each flight and inspect the helicopter for any damage prior to use.
3. Package Contents
Verify that all items are present in your package:
- OBEST LM19-D Chinook RC Helicopter
- Remote Control
- 2 x Lithium Polymer Batteries (800mAh each)
- USB Charging Cable
- Screwdriver
- Spare Propeller Blades
- Display Rack
- Product Manual (this document)

Image 3.1: All components included in the OBEST LM19-D Chinook RC Helicopter package.
4. Product Features
The OBEST LM19-D Chinook RC Helicopter offers a range of features for an engaging flight experience:
- Realistic Design: 1:100 scale LM19-D Chinook military helicopter with rotating blades and authentic camouflage.
- 720P HD Camera: Integrated camera for capturing high-quality aerial videos and photos.
- FPV Real-Time Transmission: View live images and videos on your mobile device via the dedicated app.
- 2.4GHz Remote Controller: Provides stable signal transmission and reduced interference for easier control.
- Altitude Hold Function: Automatically locks the helicopter at a set height for stable hovering.
- One Key Take-Off/Landing: Simplifies flight initiation and termination with a single button press.
- Dual Batteries: Two 800mAh modular batteries provide up to 20 minutes of flight time.
- LED Lights: Equipped with navigation lights for enhanced visibility and realism.
- Emergency Stop: A safety feature for immediate shutdown.

Image 4.1: Overview of the helicopter's main features including 2.4GHz control, 3.5 channels, dual batteries, one-button functions, altitude hold, low battery reminder, emergency stop, and LED lights.
5. Setup Guide
5.1 Battery Installation and Charging
- Ensure the helicopter and remote control are powered off.
- Locate the battery compartment on the helicopter and insert a charged 800mAh Lithium Polymer battery. Secure the compartment cover.
- For charging, connect the modular battery to the provided USB charging cable. Connect the USB cable to a compatible USB power source (e.g., computer USB port, USB wall adapter).
- The charging indicator light will show the charging status. Once fully charged, disconnect the battery. Charging typically takes approximately 7 minutes for a full flight cycle.
- The modular design allows for easy battery replacement, and the system includes overcharge, discharge, short circuit, and over-current protection.

Image 5.1: The helicopter with its dual battery system and USB charging cable, highlighting extended flight time.
5.2 Remote Control Pairing
- Install 3 AAA batteries (not included) into the remote control.
- Place the helicopter on a flat surface.
- Turn on the helicopter's power switch. The indicator lights will flash.
- Turn on the remote control's power switch.
- Push the left joystick (throttle) all the way up, then all the way down. The remote control will beep, and the helicopter's lights will become solid, indicating successful pairing.
5.3 Camera Setup (FPV Function)
- Download the dedicated FPV application to your smartphone (refer to the QR code in the quick start guide or search for the app name in your app store).
- Mount your smartphone onto the remote control's holder.
- Ensure the helicopter is powered on.
- On your smartphone, connect to the helicopter's Wi-Fi network (usually named 'OBEST-XXXX' or similar).
- Open the FPV application. You should now see the live video feed from the helicopter's camera.
6. Operating Instructions
6.1 Basic Flight Controls
- Left Joystick (Throttle): Push up to ascend, pull down to descend.
- Right Joystick (Directional): Push up for forward flight, pull down for backward flight. Push left to fly left, push right to fly right.
- Trim Buttons: Use the trim buttons to fine-tune the helicopter's stability if it drifts in any direction during hover.
6.2 One-Key Takeoff and Landing
After pairing, press the 'One Key Take-Off' button on the remote control. The helicopter will automatically ascend and hover at a stable altitude. To land, press the 'One Key Landing' button, and the helicopter will slowly descend and land.
6.3 Altitude Hold Function
The advanced air pressure technology allows the helicopter to maintain a specific altitude when the throttle joystick is released. This feature enhances stability and makes flying easier, especially for beginners.
6.4 Speed Modes
The helicopter features multiple speed modes (e.g., 3 speed modes) to accommodate different skill levels and flying environments. Refer to your remote control for the specific button to cycle through speed settings.
6.5 Aerial Photography and Video Recording
With the FPV app connected, you can capture photos and record videos directly from the helicopter's camera. Use the designated buttons within the app or on the remote control (if available) to activate these functions. Ensure sufficient storage space on your mobile device.

Image 6.1: Visual representation of One Key Takeoff/Landing, Bright Navigation Lights, and Altitude Hold in action.
Video 6.2: Demonstration of the OBEST Chinook RC Helicopter's flight capabilities, including stable hovering, speed regulation, and one-click landing.
7. Maintenance
7.1 Propeller Replacement
If a propeller blade is damaged, use the provided screwdriver to carefully remove the damaged blade and replace it with a spare. Ensure the new blade is securely fastened and oriented correctly.
7.2 Cleaning and Storage
Wipe the helicopter with a soft, dry cloth after use. Avoid using water or chemical cleaners. Store the helicopter and remote control in a cool, dry place, away from direct sunlight and extreme temperatures. Remove batteries from the remote control if storing for extended periods.
8. Troubleshooting
- Helicopter does not respond: Ensure both the helicopter and remote control are powered on and successfully paired. Check battery levels in both devices.
- Helicopter drifts during flight: Use the trim buttons on the remote control to adjust for stable hovering.
- Poor camera feed/connection: Ensure your smartphone is connected to the helicopter's Wi-Fi network and the FPV app is open. Check for interference from other Wi-Fi devices.
- Short flight time: Ensure batteries are fully charged before each flight. Consider using the second battery for extended play.
- Helicopter crashes frequently: Practice in an open area. Ensure propellers are not damaged and are installed correctly.
9. Specifications
| Feature | Detail |
|---|---|
| Product Dimensions | 2.95 x 6.54 x 18.31 inches |
| Item Weight | 6.2 ounces |
| Model Number | LM19-D |
| Manufacturer Recommended Age | 6 years and up (12+ recommended for optimal experience) |
| Batteries | 2 x 800mAh Lithium Polymer (included) |
| Control Frequency | 2.4 GHz |
| Camera Resolution | 720P HD |

Image 9.1: Detailed dimensions of the helicopter model.
10. Customer Support
For technical assistance, warranty information, or any questions regarding your OBEST LM19-D Chinook RC Helicopter, please contact OBEST customer service. Refer to the contact information provided on the product packaging or visit the official OBEST website for support resources.
You can also visit the OBEST Store on Amazon for more product information.


