
1. Introduction and Overview
The Douk Audio VU3 PRO is a versatile audio device designed to enhance your home audio system. It functions as a dual analog VU meter, a 2-way amplifier switch, and a speaker selector. This unit allows for flexible switching and comparison between two amplifiers and two pairs of speakers without the need for repeated cable connections, thereby preventing wear on the contact points. It features custom-made large VU meters with adjustable backlight colors, brightness, gain, and sensitivity, providing a dynamic visual representation of your audio signals.

Image 1.1: The Douk Audio VU3 PRO unit shown with its remote control, highlighting its compact design and dual VU meters.
2. What's in the Box
Please check the package contents to ensure all items are present:
- 1x Douk Audio VU3 PRO Amplifier Speaker Switch
- 1x Power Adapter (US/AUS/UK/EU type, depending on region)
- 1x Remote Control (battery not included, requires CR2032)
- 1x USB Cable (Type-C)

Image 2.1: Contents of the Douk Audio VU3 PRO package, including the main unit, remote control, USB cable, and power adapter.
3. Product Features
- 2-IN-2-OUT Amplifier/Speaker Selector: Allows simultaneous output to two groups of speaker jacks, enabling flexible switching and comparison between two amplifiers and two pairs of speakers. This eliminates the need for frequent cable plugging and unplugging.
- High Power Transmission: Supports a maximum pass-through of 350W, compatible with various high-power digital and tube amplifiers (BTL, Class A, Class B, Class AB, Class D, etc.), including 300W TPA3255 amps and floorstanding speakers.
- Custom-made Large VU Meters: Features dual 85*45mm VU meters with 35 backlight colors and 5 brightness levels. Offers 20 levels of gain and 30 levels of sensitivity adjustments for precise alignment with different audio signals.
- Wired/Wireless Inputs and Dual Controls: Includes a built-in microphone for wireless audio pickup, allowing VU meters to react to ambient sound. Control settings via front panel buttons or the included remote control. All settings are saved after shutdown.
- Premium Components: Integrates AC 250V 5A large current relays, isolated and high-precision HL current sensors, and built-in high-power load resistors to protect Class A tube amplifiers from damage when no load is present. Constructed with a solid CNC aluminum alloy panel and metal chassis, and large pure copper speaker jacks for minimal sound quality impact.

Image 3.1: Detail of the speaker terminals and the 350W maximum power transmission capability, indicating compatibility with various amplifier types.


Image 3.2: Internal components including high-current relays and load resistors, contributing to sound quality and amplifier protection.
4. Product Diagram and Controls
Familiarize yourself with the front and rear panel controls and connections.
Front Panel

Image 4.1: Detailed view of the front panel controls, including Gain and Sensitivity knobs, A/B and 1/2 switching buttons, and the MIC mode button.
- GAIN Knob: Adjusts the sensitivity of the VU meters to match the input signal level.
- SENS (Sensitivity) Knob: Fine-tunes the responsiveness of the VU meters.
- A/B Button: Switches between Amplifier A and Amplifier B inputs.
- MIC Button: Activates microphone pickup mode for VU meter display.
- 1/2 Button: Switches between Speaker Output 1 and Speaker Output 2.
- Power Button: Turns the unit on or off.
Rear Panel

Image 4.2: Rear panel connection diagram illustrating Amplifier A/B inputs and Speaker 1/2 outputs, along with the DC 5V power input and MIC pickup.
- AMPLIFIER A/B Inputs: Connect your two amplifiers here.
- SPEAKER 1/2 Outputs: Connect your two pairs of speakers here.
- DC 5V IN (Type-C): Power input for the unit.
- MIC: Built-in microphone for ambient sound detection.
5. Setup Instructions
Follow these steps to set up your Douk Audio VU3 PRO:
- Power Connection: Connect the provided USB cable to the DC 5V IN (Type-C) port on the rear panel of the VU3 PRO. Plug the other end into the power adapter, and then into a wall outlet.
- Amplifier Connection: Connect the speaker outputs of your first amplifier to the AMPLIFIER A input terminals on the rear panel. Ensure correct polarity (+ to + and - to -). Repeat this step for your second amplifier, connecting its speaker outputs to the AMPLIFIER B input terminals.
- Speaker Connection: Connect your first pair of speakers to the SPEAKER 1 output terminals on the rear panel. Maintain correct polarity. Repeat this step for your second pair of speakers, connecting them to the SPEAKER 2 output terminals.
- Remote Control Battery: Open the battery compartment of the remote control and insert a CR2032 battery (not included), ensuring correct polarity.
- Initial Power On: Press the power button on the front panel or the remote control to turn on the unit.

Image 5.1: Visual representation of the 2-IN-2-OUT connection setup, demonstrating how to connect two amplifiers and two pairs of speakers to the VU3 PRO.
6. Operating Instructions
Power On/Off
- Press the power button on the front panel or the remote control to turn the unit on or off.
Switching Amplifiers and Speakers
- Amplifier Selection: Press the 'A/B' button on the front panel or remote to switch between Amplifier A and Amplifier B.
- Speaker Selection: Press the '1/2' button on the front panel or remote to switch between Speaker Output 1 and Speaker Output 2.
- Simultaneous Output: The VU3 PRO supports simultaneous output to both speaker groups (1 and 2).
MIC Pickup Mode
- Press the 'MIC' button on the front panel or remote to activate the microphone pickup mode. In this mode, the VU meters will react to ambient sound, providing a visual display without direct audio signal input.

Image 6.1: The VU3 PRO integrated into an audio system, demonstrating its wired input capabilities and the wireless MIC pickup feature.
7. Adjusting VU Meters
The VU3 PRO offers extensive customization for its dual analog VU meters:
Gain Adjustment
- Use the 'GAIN' knob on the front panel or the corresponding button on the remote control to adjust the gain (20 levels). This controls the overall sensitivity of the meter needles to the audio signal.

Image 7.1: Visual guide to the 20-level gain adjustment, allowing users to fine-tune the meter's response to different audio levels.
Sensitivity Adjustment
- Use the 'SENS' knob on the front panel or the corresponding button on the remote control to adjust the sensitivity (30 levels). This allows for precise calibration of the meter's movement to match your audio source characteristics.

Image 7.2: Visual guide to the 30-level sensitivity adjustment, enabling users to customize the meter's responsiveness for optimal visual feedback.
Backlight Brightness and Color
- Use the 'LIGHT' button on the remote control to cycle through 5 levels of backlight brightness (0%, 30%, 50%, 80%, 100%).
- Use the 'COLOR' button on the remote control to select from 35 different backlight colors to match your aesthetic preference.
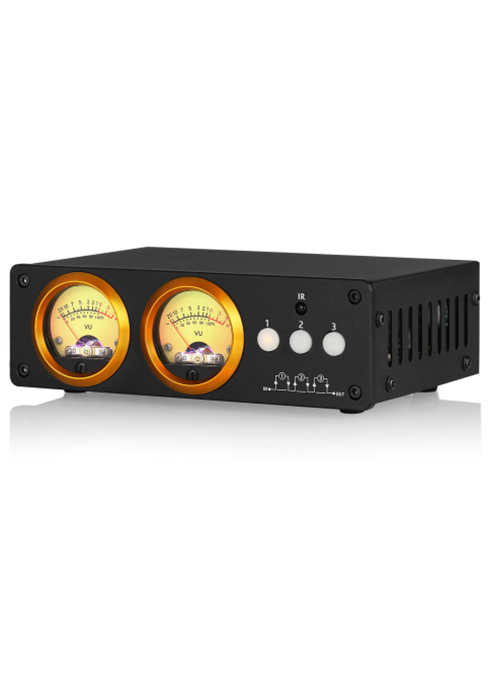
Image 7.3: Visual guide to the 5-level backlight brightness adjustment, allowing users to set the illumination intensity of the VU meters.

Image 7.4: Visual guide to the 35 backlight color options, offering extensive customization for the VU meter display.
8. Maintenance
- Cleaning: Use a soft, dry cloth to clean the exterior of the unit. Avoid using harsh chemicals or abrasive cleaners.
- Ventilation: Ensure the unit is placed in a well-ventilated area to prevent overheating. Do not block any ventilation openings.
- Storage: When not in use for extended periods, store the unit in a cool, dry place away from direct sunlight and extreme temperatures.
9. Troubleshooting
- No Power:
- Check if the power adapter is securely connected to the unit and the wall outlet.
- Ensure the power outlet is functional.
- Verify the USB cable is not damaged.
- No Sound Output:
- Check all speaker and amplifier connections for correct polarity and secure fit.
- Ensure the correct amplifier (A or B) and speaker output (1 or 2) are selected.
- Verify that your amplifiers and speakers are powered on and functioning correctly.
- VU Meters Not Moving:
- Adjust the 'GAIN' and 'SENS' knobs to increase sensitivity.
- Ensure there is an active audio signal passing through the unit.
- If using MIC pickup mode, ensure the 'MIC' button is activated and there is ambient sound.
- Remote Control Not Working:
- Check if the CR2032 battery is installed correctly and has sufficient charge.
- Ensure there are no obstructions between the remote and the unit's IR receiver.
10. Specifications
| Feature | Specification |
|---|---|
| Model Number | VU3 PRO |
| Package Dimensions | 14.61 x 8.86 x 4.13 inches |
| Item Weight | 4.39 Pounds |
| Max. Pass-through Power | 350W |
| Voltage | 5 Volts (DC) |
| VU Meter Size | 85*45mm / 3.35*1.77 inches |
| Chassis Dimensions | 268*155*75mm / 10.55*6.10*2.95 inches |
| Gain Adjustment | 20 levels |
| Sensitivity Adjustment | 30 levels |
| Backlight Colors | 35 kinds |
| Backlight Brightness | 5 levels |
| Mounting Type | Freestanding |

Image 10.1: A detailed comparison table outlining the specifications and improvements of the VU3 PRO model over its predecessor, the VU3.
11. Warranty and Support
Douk Audio products are designed for reliability and performance. For warranty information, technical support, or service inquiries, please refer to the official Douk Audio website or contact your authorized dealer. Keep your purchase receipt as proof of purchase for warranty claims.
For further assistance, you may visit the Douk Audio Store on Amazon: Douk Audio Store