1. Product Overview
The Mistmo 3X5FT Outdoor Steel Storage Shed is designed to provide secure and weather-resistant storage for your garden, backyard, or patio. Constructed from durable metal panels, it offers a compact solution for organizing outdoor essentials. Key features include lockable doors for enhanced security, a single window for natural light, and an all-weather design to protect contents from various environmental conditions.

Image 1.1: The Mistmo 3X5FT Outdoor Steel Storage Shed, featuring open doors revealing organized garden tools and equipment inside. This shed is designed for efficient outdoor storage.
Key Features:
- Sturdy Metal Build: Crafted from robust metal panels for exceptional strength and durability, ensuring lasting reliability and protection for your possessions.
- Lockable Doors: Equipped with lockable doors and a frame floor for enhanced security, ideal for safeguarding tools and equipment.
- All-Weather Construction: Built with weather-resistant materials to withstand various weather conditions, protecting stored items.
- Integrated Window: Includes one window to allow natural light into the shed interior.
- Compact Design: Optimized dimensions for efficient use of outdoor space while providing ample storage capacity.
2. Safety Information
Please read and understand all safety instructions before assembly and use of the storage shed. Failure to follow these instructions may result in injury or damage to the product.
- Always follow assembly instructions carefully to avoid injury.
- Ensure the shed is assembled on a level and stable surface.
- Wear appropriate personal protective equipment (PPE) during assembly, such as gloves and eye protection.
- Keep children and pets away from the assembly area.
- Do not climb on the shed roof or walls.
- Secure the shed to the ground using appropriate anchoring methods to prevent wind damage.
- Keep valuable items secure and out of sight to prevent theft.
- Periodically check all bolts and fasteners to ensure they remain tight.
3. Package Contents
Before beginning assembly, verify that all components listed below are present and undamaged. If any parts are missing or damaged, please contact customer support.
- Metal Wall Panels
- Roof Panels
- Door Panels (with pre-installed hinges)
- Frame Components (base, roof supports)
- Hardware Kit (screws, bolts, nuts, washers)
- Locking Mechanism Components
- Window Panel
- Assembly Instructions Manual
- Bonus: 2 pairs of gloves for assembly assistance.
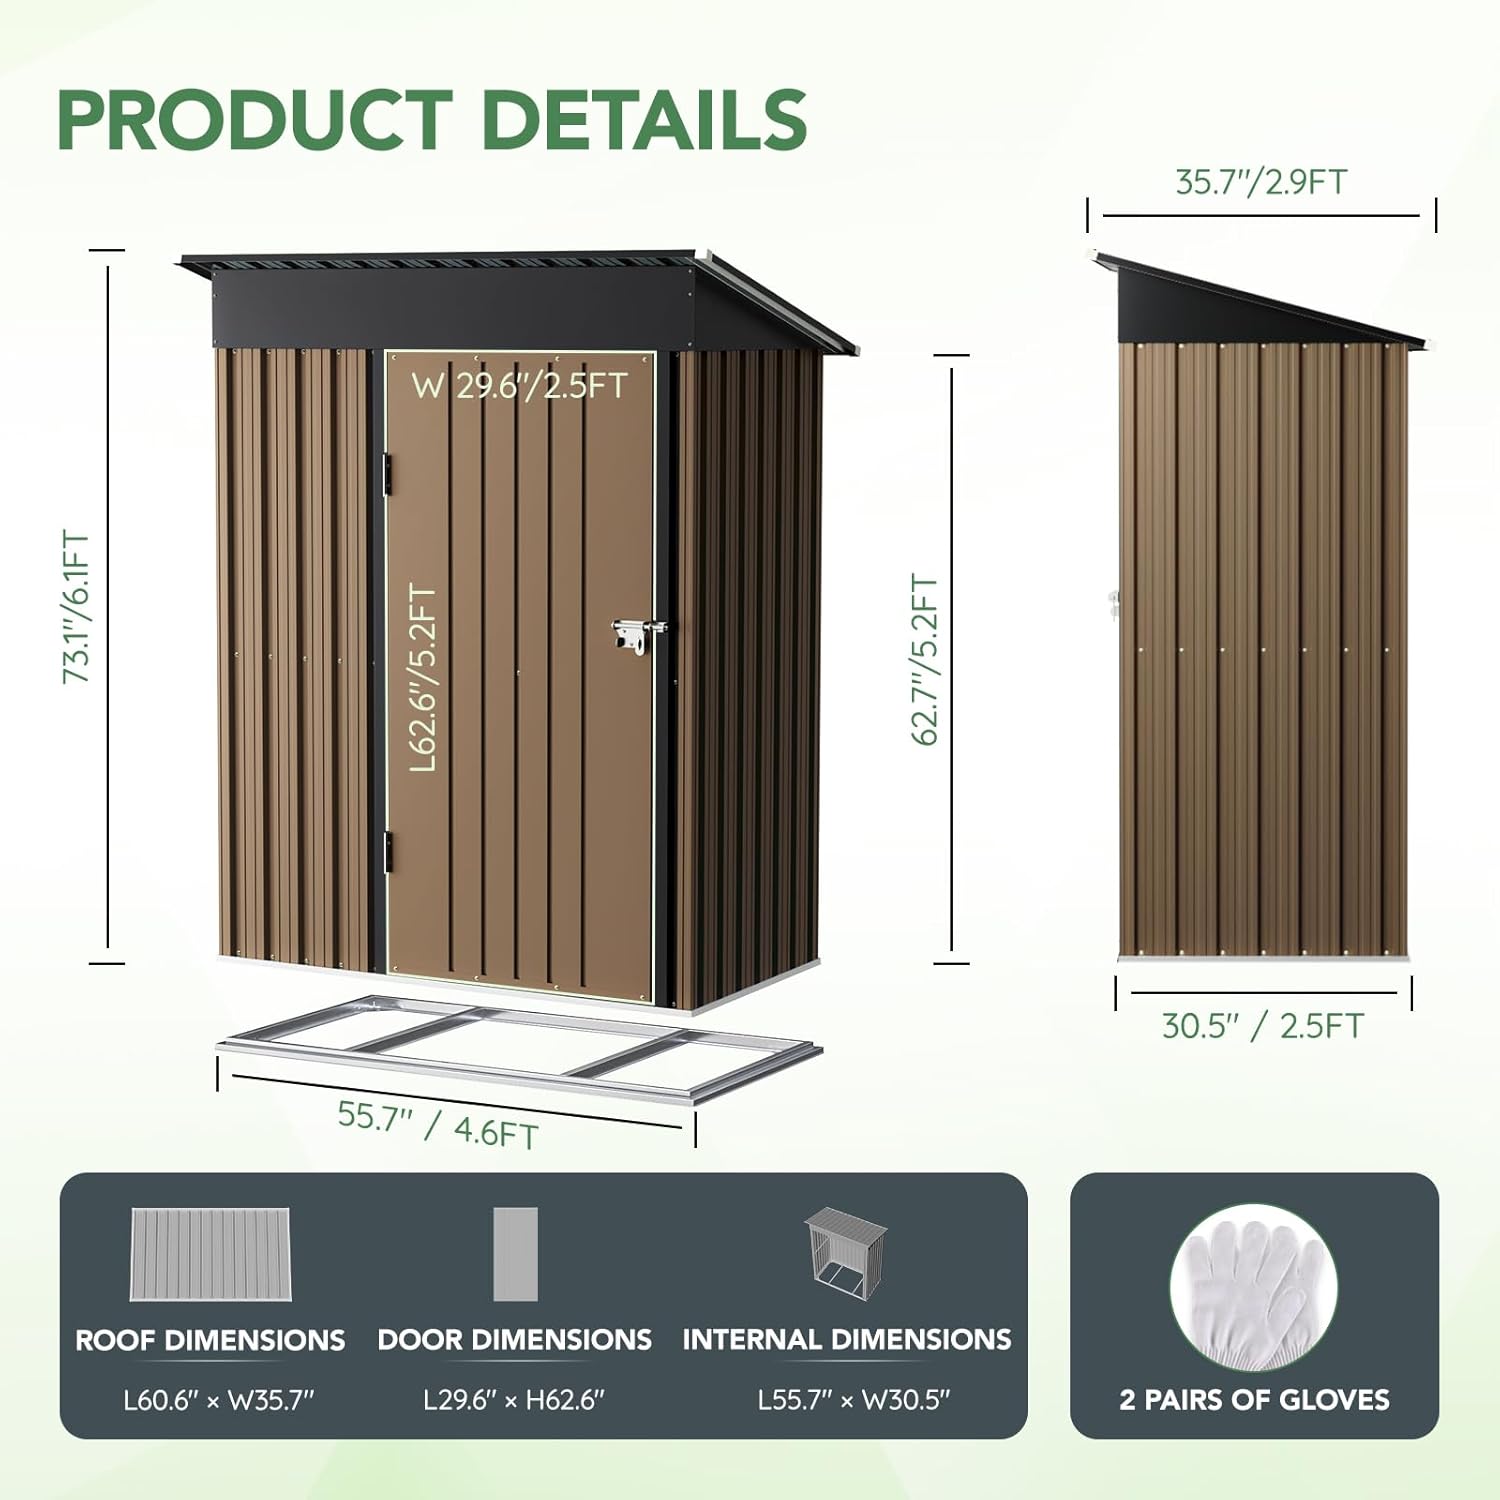
Image 3.1: Product details diagram, illustrating the shed's dimensions and highlighting the inclusion of two pairs of gloves for assembly.
4. Setup and Assembly
The Mistmo storage shed features a pre-cut and pre-drilled design for simplified assembly. While designed for ease, assembly can be time-consuming and may require assistance.
Recommended Tools (Not Included):
- Phillips Head Screwdriver
- Adjustable Wrench or Socket Set
- Utility Knife or Box Cutter (for protective film)
- Drill (optional, for minor adjustments or anchoring)
- Level
- Measuring Tape
Assembly Tips:
- Review Instructions: Carefully read the entire instruction manual before starting.
- Prepare the Area: Choose a level, stable surface for assembly. Clear any obstructions.
- Unpack and Organize: Lay out all parts and hardware. Identify each component using the provided diagrams.
- Remove Protective Film: All metal panels are covered with a protective plastic film. This film should be removed from each panel before assembly. A utility knife or box cutter can assist in peeling.
- Team Assembly: While possible for one person, assembly is significantly easier and faster with 2-3 people. Plan for at least one full day of assembly time.
- Do Not Overtighten: Initially, hand-tighten fasteners. Fully tighten all connections only after sections are properly aligned.
- Panel Alignment: Ensure all holes align correctly before fastening. If minor misalignment occurs, gently adjust panels.
- Base Frame: Assemble the base frame first on a level surface. The frame floor fits seamlessly.
- Wall Panels: Attach wall panels to the base. Secure corners to maintain stability during construction.
- Roof Assembly: Follow the roof assembly steps precisely to ensure proper waterproofing and structural integrity.

Image 4.1: Visual reminder that shed assembly requires time and potentially assistance. It shows a person using a drill for installation.
5. Operation
Once assembled, the Mistmo storage shed is ready for use. Its design allows for versatile storage of various outdoor items.
Using the Doors:
- The shed features hinged doors. Open by pulling the handle outwards.
- To secure, close the doors and engage the locking mechanism. A padlock (not included) can be used with the integrated hasp for additional security.
- Ensure doors are fully closed and locked when not in use to protect contents from weather and unauthorized access.
Storage Recommendations:
- Utilize the internal space efficiently. Consider adding shelving or hooks for better organization.
- Store gardening tools, lawn equipment, patio cushions, and other outdoor items.
- Avoid storing flammable liquids or hazardous materials unless properly contained and ventilated according to local regulations.

Image 5.1: The shed interior, demonstrating potential for organized storage with shelves and hooks for tools and equipment.


Image 5.2: Examples illustrating the shed's versatility as a general storage room and a dedicated tool shed.
6. Maintenance
Regular maintenance will ensure the longevity and optimal performance of your Mistmo storage shed.
- Cleaning: Clean the exterior surfaces periodically with mild soap and water. Avoid abrasive cleaners or harsh chemicals that could damage the finish.
- Fastener Check: Annually, inspect all bolts, screws, and fasteners. Tighten any that have become loose due to vibration or weather changes.
- Drainage: Ensure the area around the shed is clear of debris to allow for proper water drainage from the sloping roof.
- Rust Prevention: Although made from galvanized steel, inspect for any signs of rust, especially in areas where the finish might be scratched. Touch up with appropriate rust-inhibiting paint if necessary.
- Door Operation: Lubricate door hinges if they become stiff or squeaky. Ensure the locking mechanism operates smoothly.

Image 6.1: The shed's roof demonstrating its waterproofing capabilities during rainfall, designed to protect stored items.


Image 6.2: Details of the shed's construction, showing galvanized steel panels and the sloping roof designed for water runoff.
7. Troubleshooting
This section addresses common issues that may arise during assembly or use.
- Issue: Holes do not align during assembly.
Solution: Ensure the base frame is perfectly level. Loosen adjacent fasteners to allow for slight adjustments, then re-tighten once aligned. Do not force parts together. - Issue: Difficulty removing protective plastic film.
Solution: Use a utility knife or box cutter to carefully score the film along the edges of the panels, then peel slowly. Warm temperatures can sometimes make removal easier. - Issue: Water leakage inside the shed.
Solution: Verify that all roof panels are correctly installed and all fasteners are tight. Check for any gaps or damage to the roof or wall seams. Ensure the shed is on a level surface to prevent water pooling around the base. - Issue: Doors do not close or lock properly.
Solution: Check if the shed is level. Adjust hinges if necessary. Ensure no debris is obstructing the door path or locking mechanism.
If you encounter issues not covered here, please contact Mistmo customer support for assistance.
8. Specifications
| Feature | Detail |
|---|---|
| Brand | Mistmo |
| Model | 3X5FT Outdoor Steel Storage Shed |
| Color | Brown |
| Material | Metal (Alloy Steel) |
| Item Weight | 67.7 Pounds |
| Style | Compact |
| Water Resistance Level | Water Repellent |
| Door Style | Single Hinged, Double Hinged (depending on configuration) |
| Assembly Required | Yes |

Image 8.1: The shed in a backyard, emphasizing its compact capacity for outdoor storage.
9. Warranty and Support
Mistmo stands behind the quality of its products. For specific warranty details, please refer to the documentation included with your purchase or contact Mistmo customer support directly.
For technical assistance, missing parts, or warranty claims, please contact:
- Mistmo Customer Support: Refer to the contact information provided in your product packaging.
- Online Resources: Visit the official Mistmo store on Amazon for additional product information and support: Mistmo Store