1. Introduction
This user manual provides detailed instructions for the installation, operation, maintenance, and troubleshooting of your VASTEND VE-7A RV Backup Camera Wireless System. Please read this manual thoroughly before using the product to ensure proper functionality and safety. Keep this manual for future reference.

Image 1.1: The VASTEND RV Backup Camera Wireless System, featuring a 7-inch monitor and a robust camera unit.
2. Package Contents
Please verify that all items listed below are included in your package. If any items are missing or damaged, please contact customer support.
- 1x 7-inch Wireless Monitor
- 1x Wireless Backup Camera
- 1x Car Charger (for monitor power)
- 1x Butterfly Bracket
- 1x U-shaped Bracket
- 1x Sunshade for Monitor
- 1x User Manual
- 1x Installing Parts Set (screws, tools)
- 2x Power Cables (for camera and monitor)
- 3x Antennas
- 1x Suction Cup Bracket

Image 2.1: Visual representation of all components included in the VASTEND VE-7A package.
3. Product Features
- 1080P HD Clear Image: Equipped with a 1/2.9-inch AHD sensor for vivid and clear images on a 7-inch IPS HD screen.
- Stable Digital Signal: Utilizes 2.4GHz digital radio transmission technology for stable, interference-free video up to 300M in open terrain.
- IP69 Waterproof & Super Night Vision: Camera is IP69 rated for harsh weather conditions and features an IR CUT filter for enhanced night brightness.
- 170° Wide Angle & Multi-Camera Support: Provides a wide viewing angle and supports up to 4 cameras with split-screen modes for comprehensive coverage.
- Loop Recording: Supports continuous video recording, automatically overwriting old files, with support for up to 128 GB TF card (not included).

Image 3.1: The system provides ultra-stable digital signal transmission, minimizing delay and flicker.
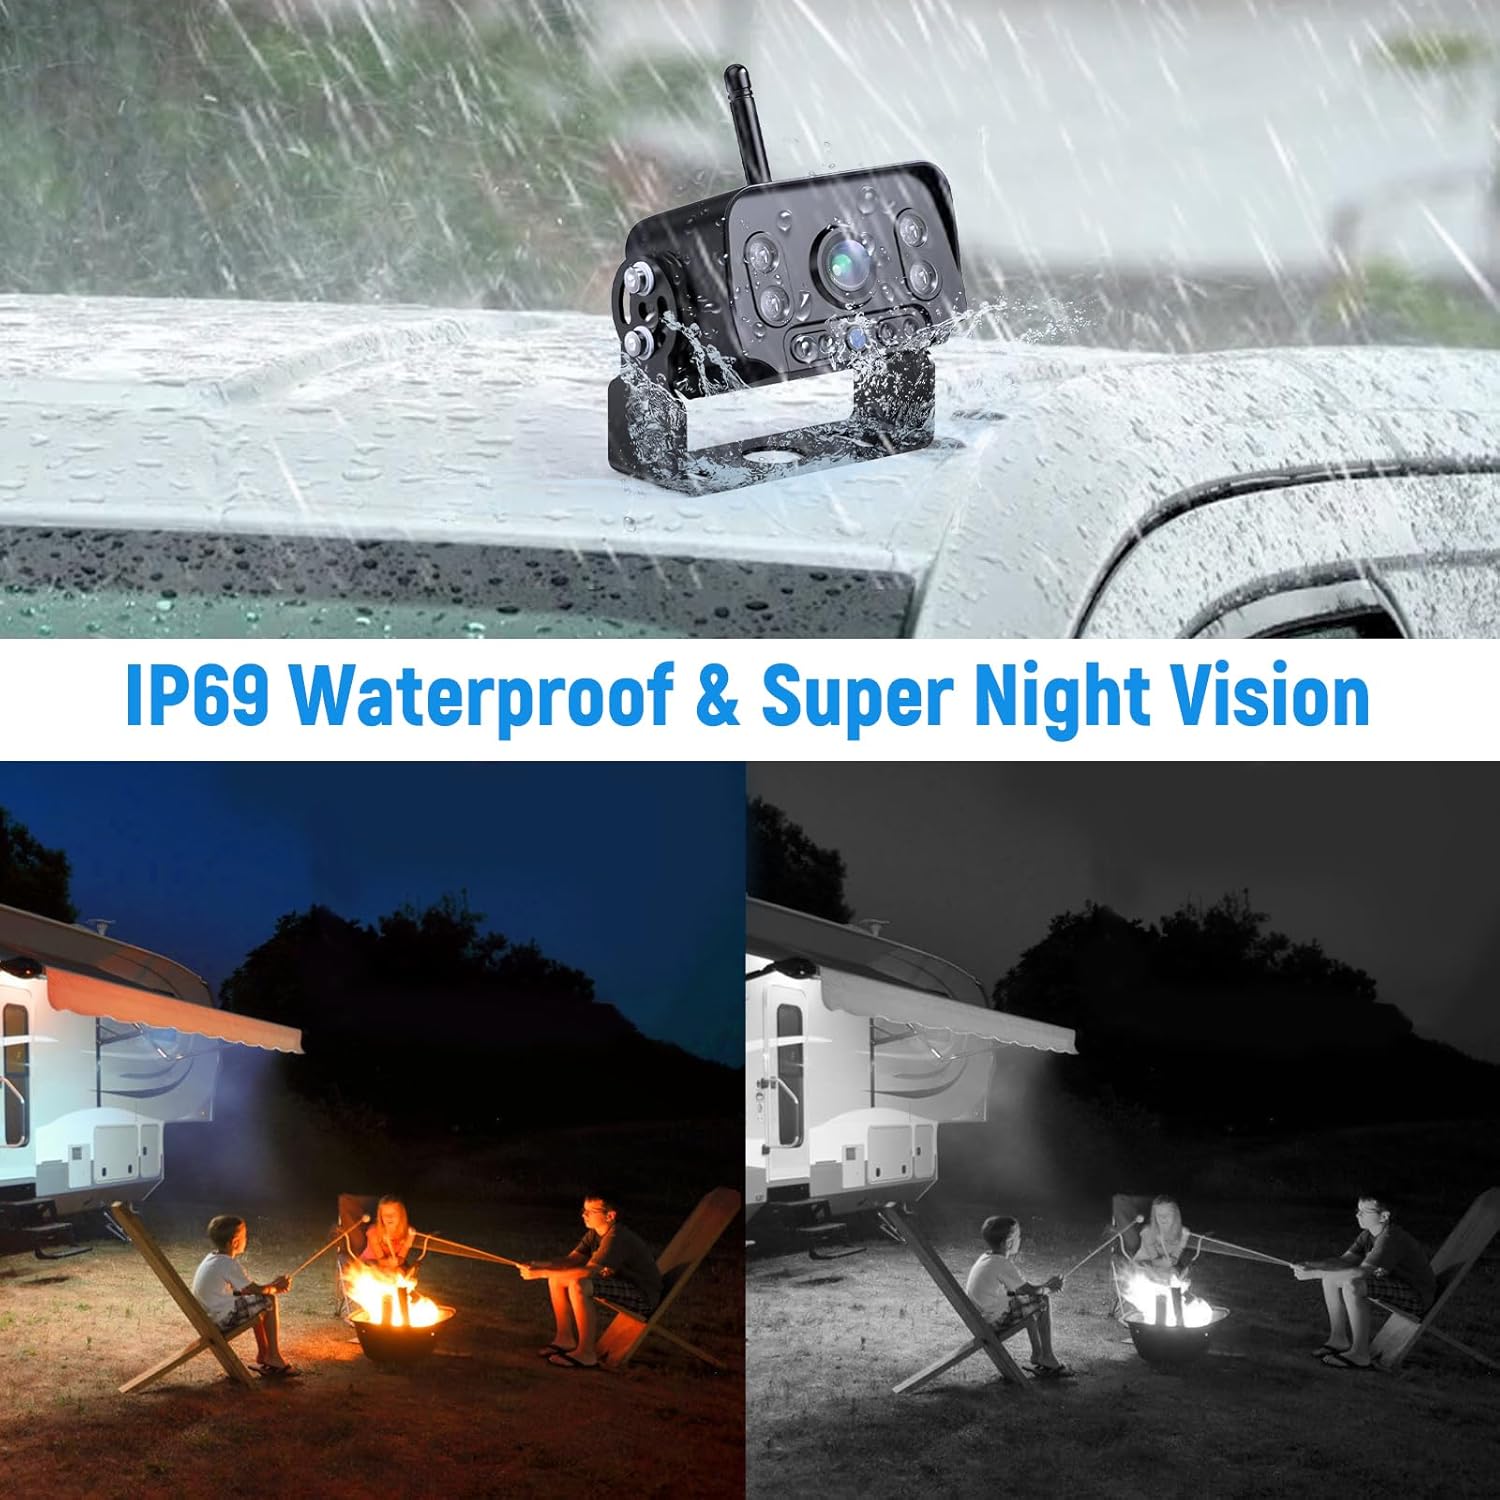
Image 3.2: The system supports up to four cameras for comprehensive vehicle monitoring.
4. Installation Guide
The VASTEND VE-7A system is designed for easy, plug-and-play installation with wireless transmission between the camera and monitor.
4.1 Power Connection
- Monitor Power: Connect the monitor to a continuous power source using the provided car charger. This can be the auxiliary switch, fuse box, cigarette lighter, or ignition switch.
- Camera Power: Connect the camera to a continuous power source at the rear of your vehicle, such as the rear lights or reversing lights. This ensures the camera receives power when needed.
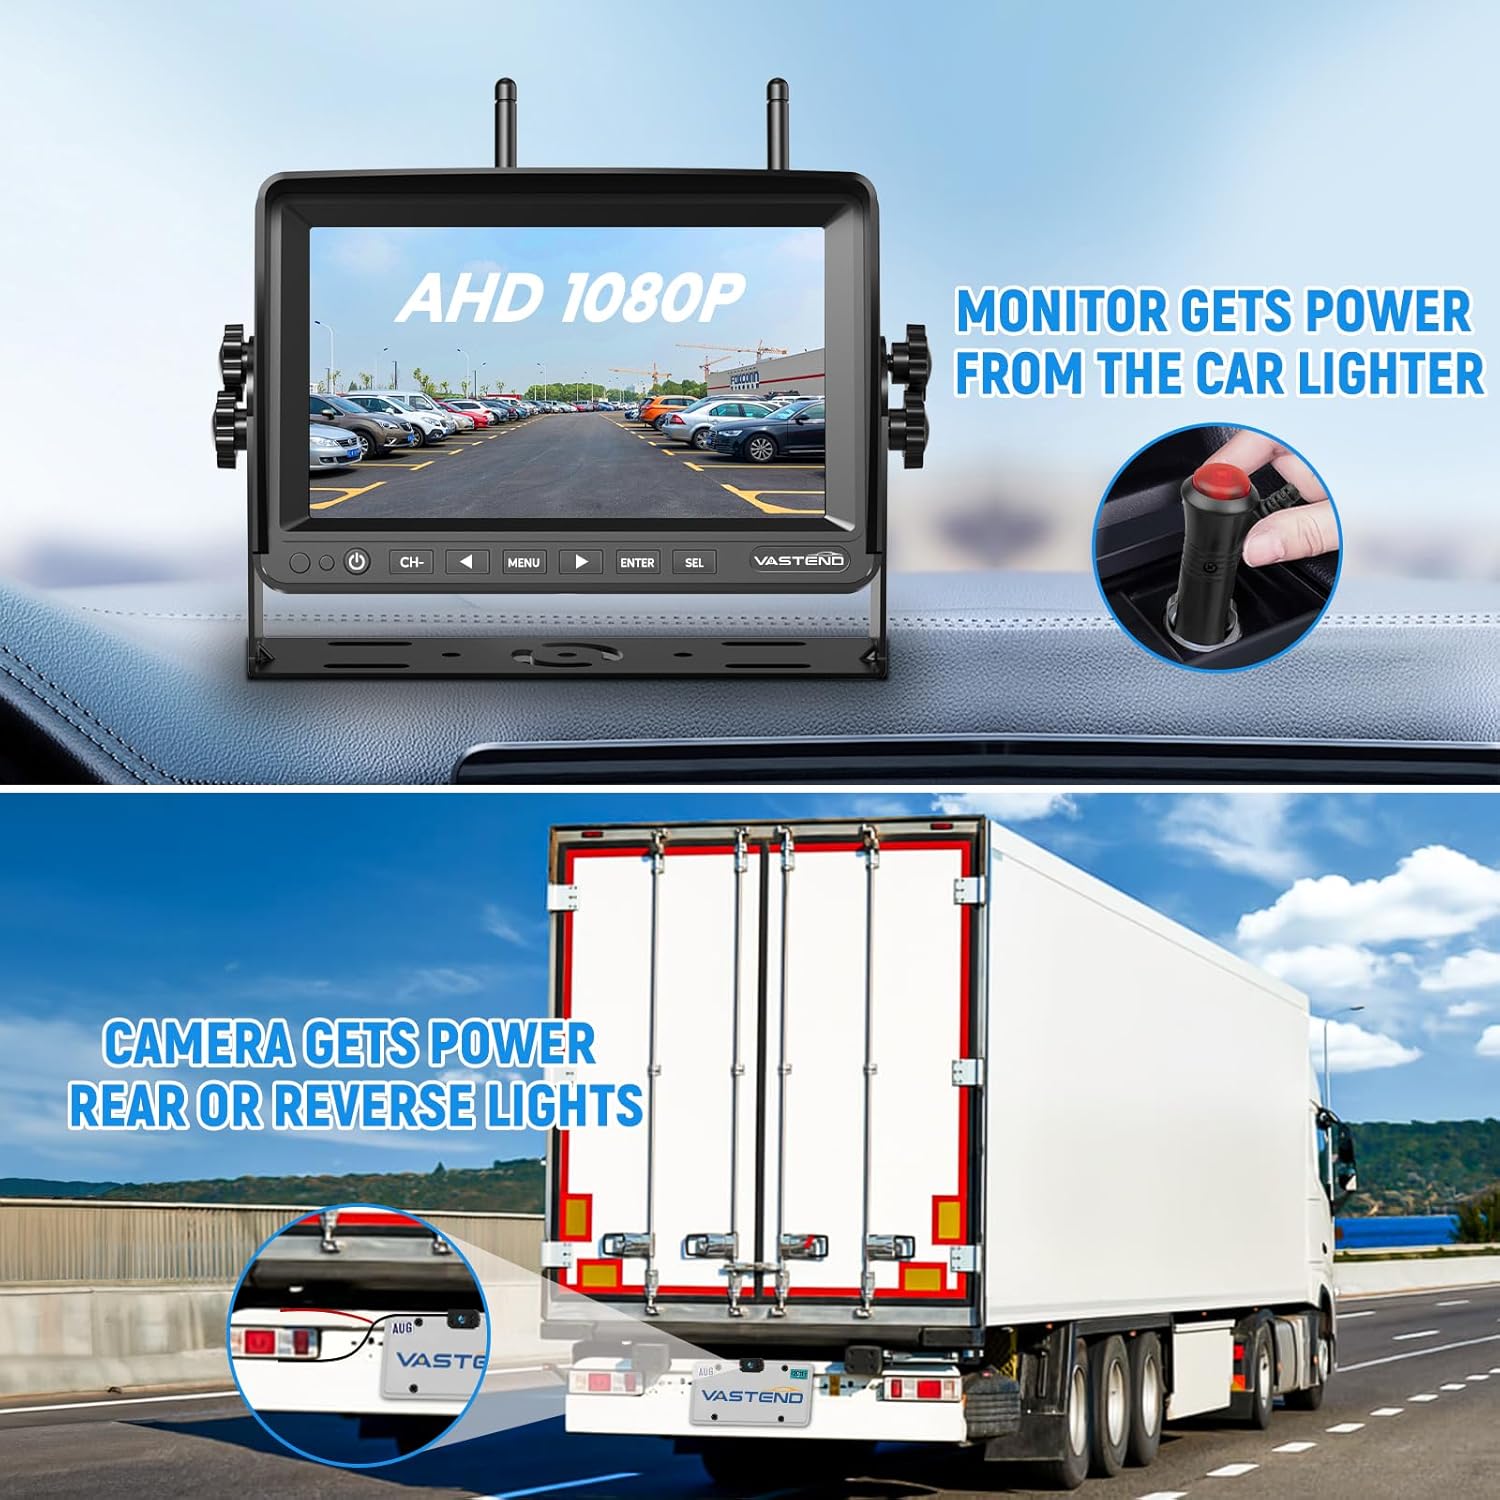
Image 4.1: Power connection points for the monitor and camera.

Image 4.2: Simplified wiring diagram for easy installation.
4.2 Mounting Options
The monitor and camera come with various mounting accessories to suit different vehicle types and preferences:
- Monitor: Use the U-shaped bracket or suction cup bracket to mount the monitor securely on your dashboard or windshield.
- Camera: The camera can be mounted using the butterfly bracket, typically above the license plate or on a flat surface at the rear of the vehicle. Ensure the camera has a clear line of sight.
5. Operation Instructions
5.1 Basic Functions
- Power On/Off: Press the power button on the monitor to turn the system on or off.
- Channel Selection (CH-): If multiple cameras are connected, use the 'CH-' button to switch between camera views.
- Menu: Press the 'MENU' button to access system settings.
- Navigation (ENTER, SEL, Arrows): Use the arrow buttons to navigate through menu options and 'ENTER' or 'SEL' to confirm selections.
5.2 Image Adjustment
The monitor allows for various image adjustments to optimize your viewing experience:
- Image Mirroring: Adjust the image to be mirrored (as seen in a rearview mirror) or non-mirrored.
- Image Flip: Flip the image vertically or horizontally to correct orientation based on camera mounting.
- Reversing Lines: Enable or disable parking guidelines on the screen for easier reversing.

Image 5.1: Options for enabling/disabling reversing lines and various image flip orientations.
5.3 Loop Recording
The system supports loop recording, which continuously records video footage. When the storage card (TF card, not included) is full, the oldest files will be automatically overwritten by new recordings.
- Insert a TF card (up to 128 GB) into the designated slot on the monitor.
- Access the menu to enable or configure loop recording settings.

Image 5.2: The loop recording function ensures continuous video capture.
6. Maintenance and Care
To ensure the longevity and optimal performance of your VASTEND RV Backup Camera system, follow these maintenance guidelines:
- Cleaning: Use a soft, dry cloth to clean the monitor screen and camera lens. For stubborn dirt, a slightly damp cloth can be used, but avoid excessive moisture. Do not use abrasive cleaners or solvents.
- Environmental Conditions: The camera is IP69 waterproof, designed to withstand various weather conditions. However, avoid submerging the camera or monitor in water. The system operates effectively in temperatures ranging from -10°C to 70°C.
- Cable Inspection: Periodically check all cables and connections for any signs of wear, fraying, or damage. Ensure connections remain secure.

Image 6.1: The camera's IP69 waterproof rating and super night vision capabilities.

Image 6.2: The camera is built to resist all inclement weather conditions.
7. Troubleshooting
If you encounter issues with your VASTEND RV Backup Camera system, please refer to the following common problems and solutions:
| Problem | Possible Cause | Solution |
|---|---|---|
| No image on monitor | No power to monitor or camera; signal interference; camera/monitor not paired. | Check power connections. Ensure antennas are securely attached. Re-pair the camera and monitor (refer to pairing instructions in full manual if needed). |
| Image flickering or unstable | Weak signal; interference from other devices; distance too great. | Ensure clear line of sight between camera and monitor. Reduce distance if possible. Avoid placing near strong electromagnetic sources. |
| Poor night vision | Camera lens dirty; IR LEDs obstructed. | Clean the camera lens. Ensure nothing is blocking the IR LEDs on the camera. |
| Loop recording not working | TF card not inserted or full; card format issue; recording function disabled. | Insert a compatible TF card. Format the TF card via the monitor's menu. Ensure loop recording is enabled in settings. |
If the problem persists after attempting these solutions, please contact VASTEND customer support for further assistance.
8. Product Specifications
- Model: VE-7A
- Screen Size: 7 Inches
- Display Technology: LCD or LED
- Video Capture Resolution: 1080p
- Voltage: 12 Volts (DC)
- Actual Viewing Angle: 170 Degrees
- Lens Type: Wide Angle
- Optical Sensor Technology: CMOS
- Waterproof Rating: IP69 (Camera)
- Operating Temperature: -10°C to 70°C
- Wireless Transmission: 2.4GHz Digital
- Wireless Range: Up to 300M (open terrain)
- Storage Support: Up to 128 GB TF card (not included)
- Product Dimensions: Monitor: 25.4 x 17.78 x 5.08 cm; Camera: (Refer to diagram for detailed dimensions)

Image 8.1: Detailed product dimensions for the monitor and camera.
9. Warranty and Customer Support
VASTEND provides a two-year warranty service for the VE-7A RV Backup Camera Wireless System, covering manufacturing defects and malfunctions under normal use. Additionally, lifetime technical service support is available to assist you with any questions or concerns you may have regarding the product.
For warranty claims, technical assistance, or any other inquiries, please contact VASTEND customer support via the email address provided in your product packaging or on the official VASTEND website. When contacting support, please have your product model number (VE-7A) and purchase details ready.