1. Introduction
This manual provides detailed instructions for the installation, setup, and operation of your Zomolither Android 15 Car Radio. Designed specifically for Chevrolet Cruze J300 models from 2009 to 2014, this unit enhances your driving experience with advanced features like wireless CarPlay, Android Auto, GPS navigation, and a 9.7-inch touchscreen display.

Image: Zomolither Android 15 Car Radio seamlessly integrated into a Chevrolet Cruze dashboard.
2. Product Overview
Key Features:
- Applicable Car Models: Exclusively for Chevrolet Cruze J300 (2009-2014).
- Hardware Configuration: 2GB RAM and 64GB ROM for smooth performance.
- Wireless Connectivity: Built-in Wireless CarPlay and Android Auto via Bluetooth and Wi-Fi.
- Mirror Link: Supports mirroring for both iOS (Wi-Fi) and Android (Wi-Fi/USB) devices.
- Audio Features: Built-in Bluetooth with microphone for hands-free calling, FM/RDS Radio (87.50-108.0 MHz) with 18 preset stations, EQ settings for superior sound.
- Navigation: GPS function with pre-installed offline map APK "Here We GO" for North America. Supports online navigation via Wi-Fi/hotspot.
- Safety & Control: Steering Wheel Control (SWC) compatibility, AHD backup camera support for safe parking.
3. What's in the Box
Your Zomolither Android 15 Car Radio package includes the following components:
- 1 x Car Stereo Unit
- 1 x Power Cable
- 1 x Camera Input Cable
- 1 x CANBUS box
- 1 x GPS Antenna
- 1 x RCA Cable
- 2 x USB Cables
- 1 x Radio Antenna
- 1 x USB Adapter
- 1 x Small Horn
- 1 x Instruction Manual
- 1 x Microphone
- 1 x Rear Camera

Image: All components included in the Zomolither Android 15 Car Radio package, including cables, antennas, and the main unit.
4. Installation
Professional installation is recommended. Ensure the vehicle's power is disconnected before beginning installation. Refer to the wiring diagrams and videos for detailed steps.
Installation Steps Overview:
- Remove the original car stereo unit and trim panels.
- Connect the power cable to the car's harness.
- Connect the CANBUS box to the power cable and the unit.
- Attach the GPS antenna, 4G antenna (if applicable), and radio antenna.
- Connect USB cables, RCA cables, and the microphone.
- Install the rear camera (if included) and connect its signal wire.
- Secure the new head unit and reassemble the trim panels.
Installation Videos:
Video: General Installation Guide for the car radio unit. This video demonstrates the process of connecting various cables and components to the head unit.
Video: Wiring Guide for 8-core Car Radio Installation. This video provides specific instructions for wiring an 8-core version of the car radio, which may share similarities with this model's wiring.
Video: How to connect CANBUS. This video details the connection process for the CANBUS system, crucial for integrating with vehicle controls.
Video: About our product installation. This video offers a general overview of the installation process for the product.
Video: Install for Cruze Radio. This video provides specific installation guidance for a Cruze radio, which is relevant to this product.
Video: Wiring Guide for 4-core Car Radio Installation. This video provides specific instructions for wiring a 4-core version of the car radio, which may share similarities with this model's wiring.
5. Setup
After installation, power on the unit. The initial setup may involve selecting language, time zone, and connecting to Wi-Fi. Follow the on-screen prompts.
CANBUS Configuration:
To ensure proper integration with your vehicle's systems (like steering wheel controls), configure the CANBUS settings:
- Go to 'Factory Settings' (password usually 1234 or 8888).
- Navigate to 'CAN Set' or 'Car Choice'.
- Select 'GM' as the car brand.
- Choose 'Old Cruze' or the appropriate Cruze model/year from the list.
- Confirm your selection and restart the unit if prompted.
6. Operating Instructions
6.1. Wireless CarPlay / Android Auto / Mirror Link
Connect your smartphone wirelessly via Bluetooth and Wi-Fi, or use a USB cable for a wired connection. This allows access to navigation, music, calls, and other apps directly on the car stereo display.

Image: The car radio display showing the Wireless CarPlay and Android Auto interfaces, along with Mirror Link functionality.
Video: Wireless CarPlay Connection for Chevrolet Chevy Cruze. This video demonstrates how to connect your smartphone to the car radio using wireless CarPlay.
6.2. Bluetooth & FM/RDS Radio
The unit features built-in Bluetooth for hands-free calling and audio streaming. The FM/RDS radio allows you to tune into your favorite stations with clear reception.

Image: The car radio display illustrating Bluetooth call functionality, FM/RDS radio interface, and sound equalizer settings.
6.3. GPS Navigation & Wi-Fi Connection
Utilize the integrated GPS for navigation with offline maps or connect to Wi-Fi/hotspot for online maps and app downloads.

Image: The car radio display showing Wi-Fi connection options and a detailed GPS navigation map.
6.4. Steering Wheel Control & Backup Camera
The unit supports your vehicle's steering wheel controls for convenient operation. The AHD backup camera automatically activates when reversing, providing a clear view for enhanced safety.
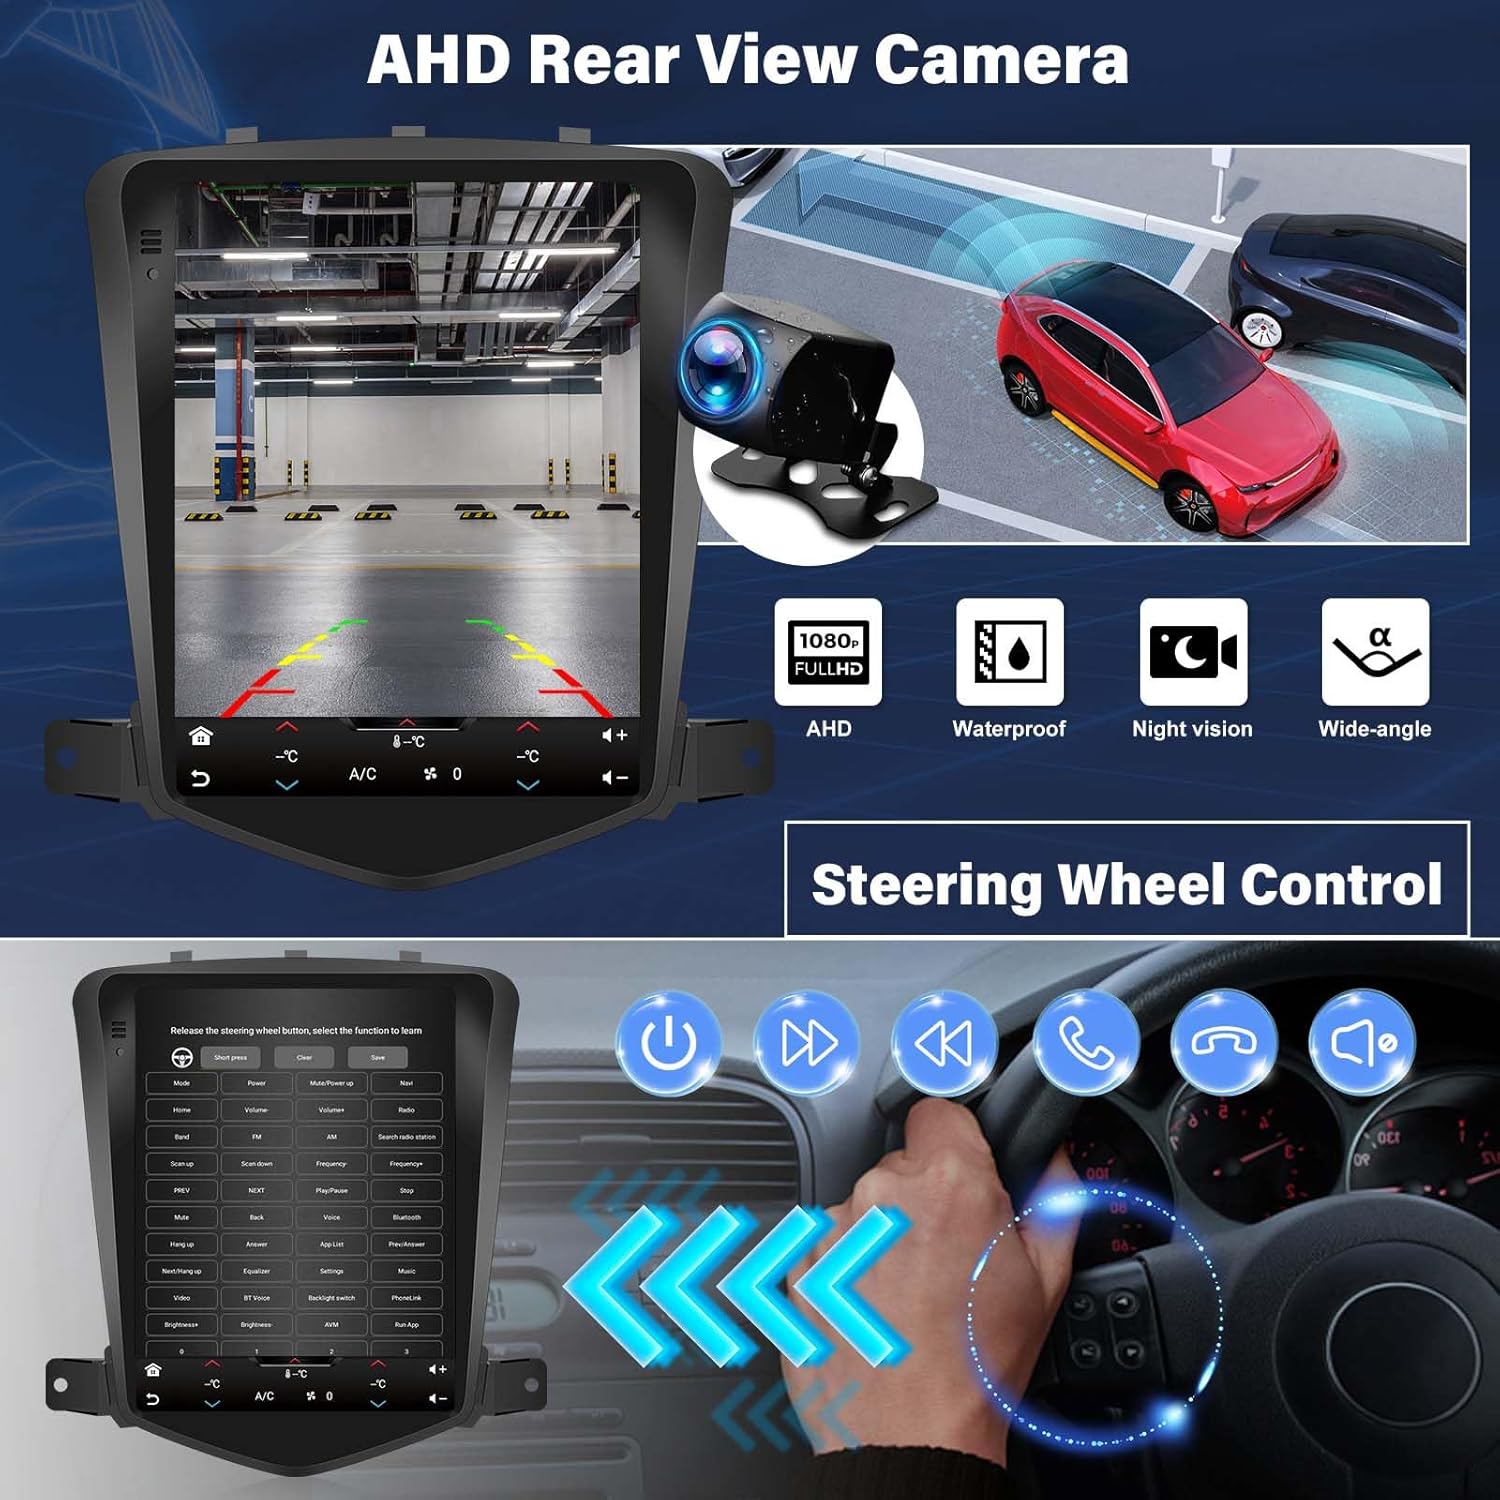
Image: The car radio display showing the rear view from the backup camera and an overlay of steering wheel control functions.
7. Maintenance
To ensure the longevity and optimal performance of your Zomolither Android 15 Car Radio, follow these maintenance guidelines:
- Screen Cleaning: Use a soft, lint-free cloth to gently wipe the touchscreen. Avoid abrasive cleaners or harsh chemicals.
- Software Updates: Periodically check for software updates to ensure you have the latest features and bug fixes. Follow the instructions provided with the update.
- Temperature Control: Avoid exposing the unit to extreme temperatures for extended periods.
- Cable Connections: Ensure all cables are securely connected. Loose connections can lead to intermittent issues.
8. Troubleshooting
If you encounter any issues with your car radio, refer to the following common troubleshooting steps:
| Problem | Possible Cause | Solution |
|---|---|---|
| Unit does not power on | Loose power connection, blown fuse | Check power cables and vehicle fuses. Ensure proper connection. |
| No sound output | Incorrect wiring, volume too low, mute activated | Verify speaker wiring, adjust volume, check mute settings. |
| CarPlay/Android Auto not connecting | Bluetooth/Wi-Fi issues, incorrect settings, phone compatibility | Ensure phone's Bluetooth/Wi-Fi is on, check car radio settings, restart phone and unit. |
| Steering Wheel Controls not working | CANBUS not configured, incorrect wiring | Check CANBUS connections and configuration in Factory Settings. |
| GPS signal weak or inaccurate | GPS antenna placement, environmental interference | Ensure GPS antenna has a clear view of the sky, away from metal obstructions. |
9. Specifications
| Feature | Detail |
|---|---|
| Operating System | Android |
| Display Size | 9.7 Inches |
| Memory (RAM) | 2GB |
| Storage (ROM) | 64GB |
| Connectivity Technology | Bluetooth, Wi-Fi |
| Special Features | Bluetooth, Split Screen, CarPlay, Android Auto, Mirror Link, FM/RDS/EQ, GPS Navigation, HD Touchscreen |
| Audio Output Mode | Stereo |
| Map Type | Worldwide (Offline North America map included) |
| Mounting Type | Dashboard Mount |
| Item Weight | 3.74 pounds |
| Package Dimensions | 11.3 x 10.98 x 3.74 inches |
10. Warranty and Support
Your Zomolither Android 15 Car Radio comes with a 1-Year Warranty. In addition, Zomolither offers:
- 30-Day Refund: For eligible returns.
- 24/7 After-Sale Support: Assistance available around the clock.
- Lifetime Tech-Support: Ongoing technical assistance for the product's lifespan.
For any inquiries or support, please refer to the contact information provided in your product packaging or visit the official Zomolither store.


