
1. Introduction
This manual provides detailed instructions for the installation, operation, and maintenance of the FelRelWel K-Type Heat Press Control Box. This control box is designed as a replacement part for compatible 15x15 K-Type heat presses, offering precise temperature and time control for various heat transfer applications.

Image 1.1: Overview of the FelRelWel K-Type Heat Press Control Box, showing the main unit, power cord, and a spare fuse.
2. Safety Information
- Ensure the power supply meets the rated voltage of 110V-120V.
- Always use a reliable grounding wire for safety.
- The working power of the machine should be below 1400W.
- Disconnect power before performing any maintenance or installation.
- Keep hands clear of heating elements during operation.
3. Compatibility
This control box is specifically designed for K-Type Heat Press machines. It is a replacement part only for 15x15 K-Type Heat Presses. Most compatible K-type controllers feature C (Celsius) and F (Fahrenheit) display marks on the control panel.
Important Reminder:
This control box is not suitable for Thermal Sensitive Heat Press machines. Thermal sensitive machines typically have a red reset switch. Using this control box with an incompatible heat press may lead to improper function, such as the heating plate not heating up or uncontrolled temperature increase, potentially damaging materials.
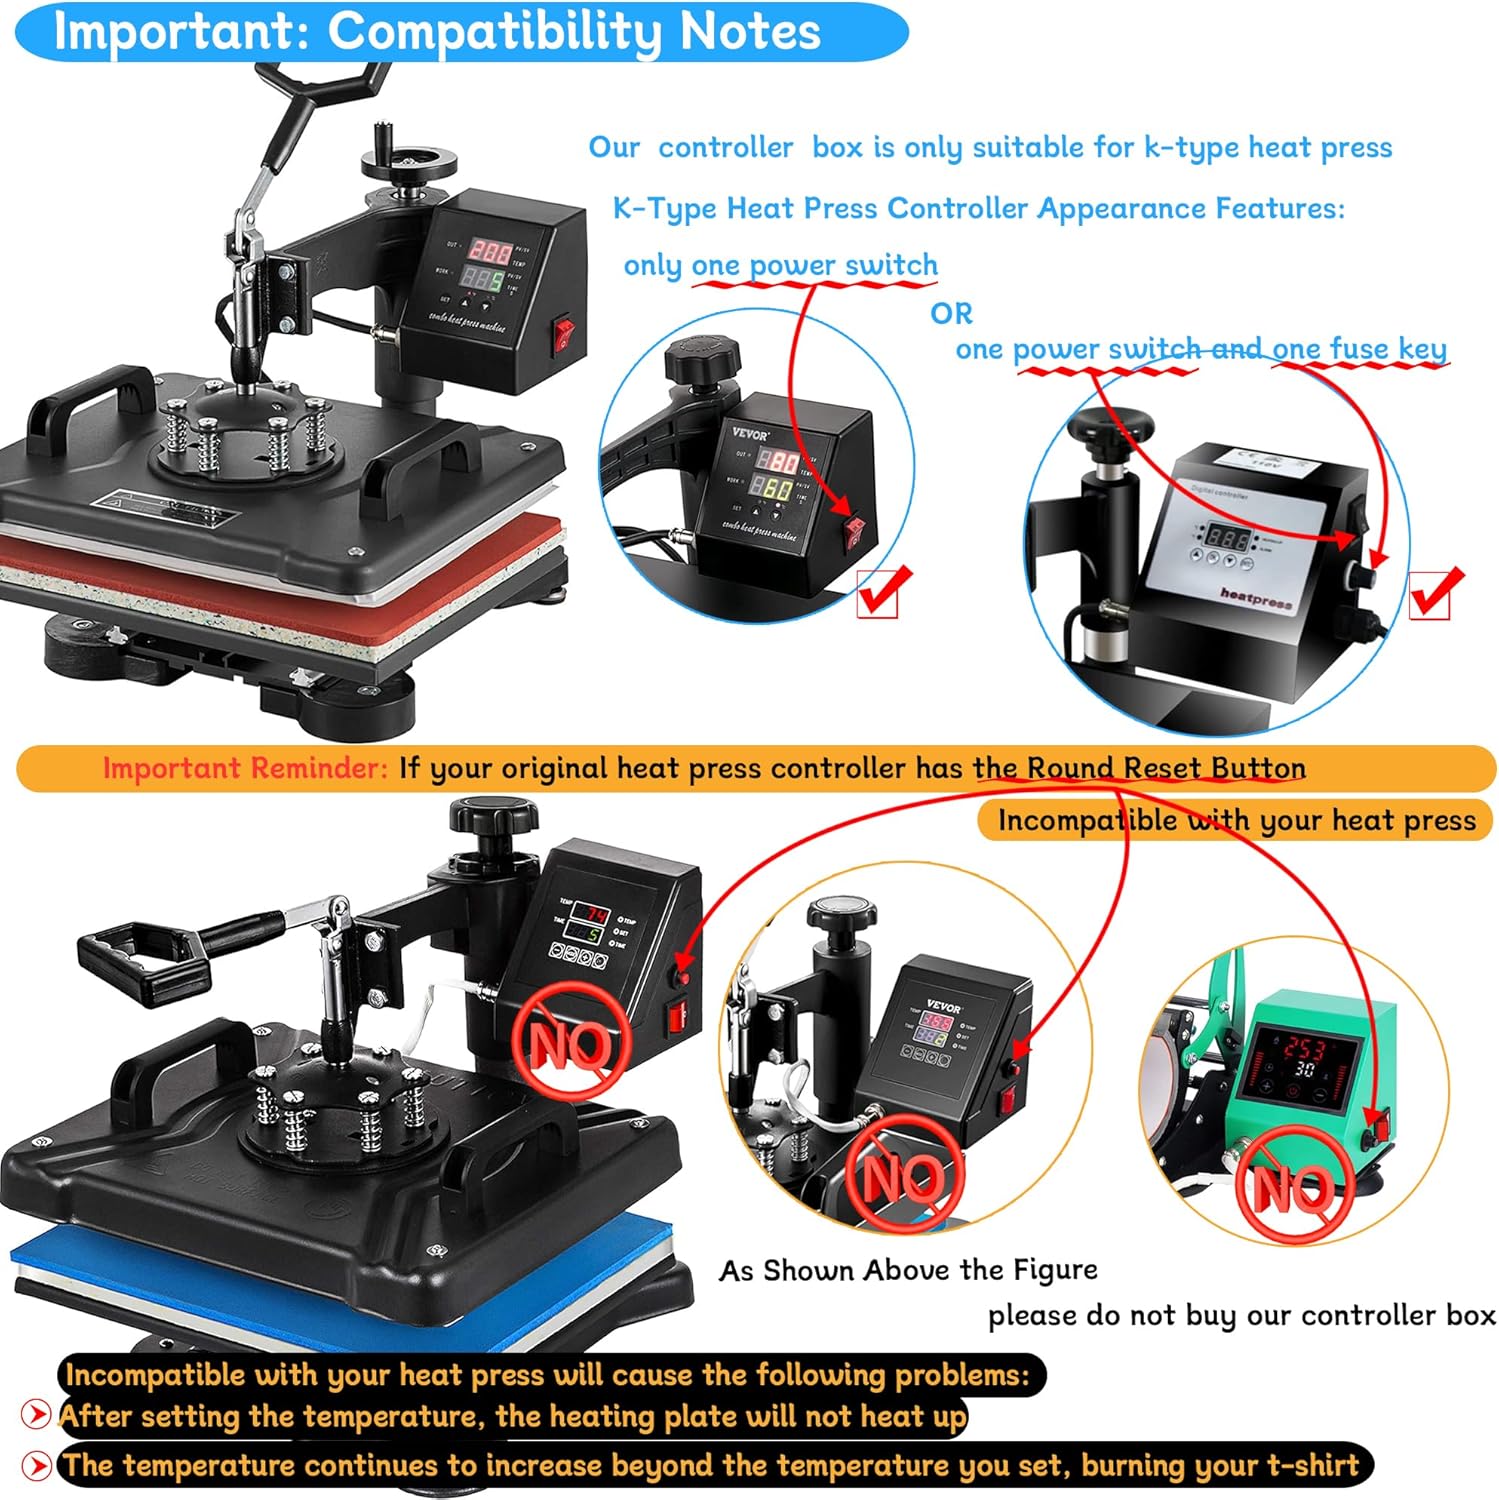
Image 3.1: Visual guide for identifying compatible and incompatible heat press machines based on control panel features.
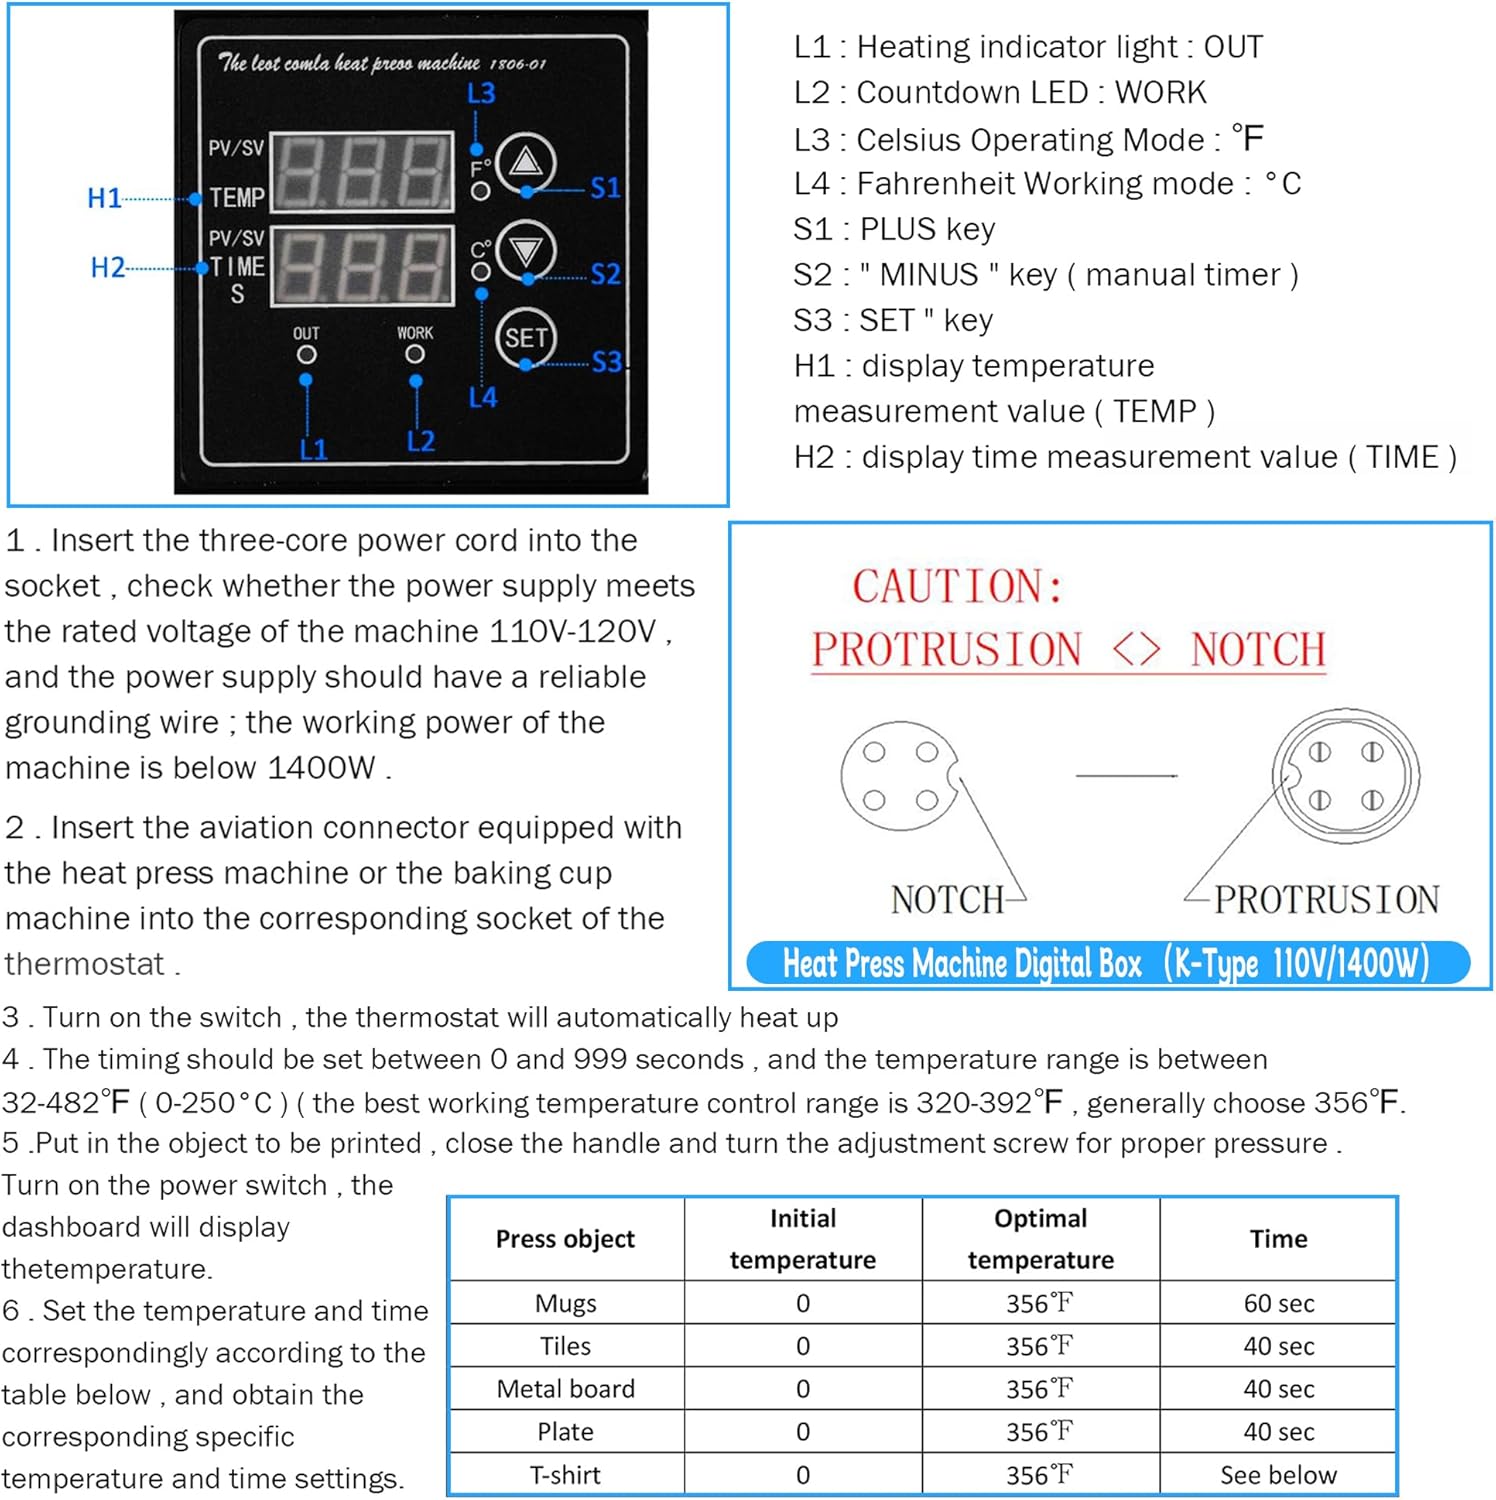
Image 3.2: Illustration of the 4-pin aviation plug interface, emphasizing the need for matching configuration with the heat press machine.
4. Product Overview
The FelRelWel K-Type Heat Press Control Box features a dual LED display for temperature and time, a touch-type control panel, and various connection ports.

Image 4.1: Exploded view showing the control box slide, aviation plugs, switch button, fuse, and internal wiring with ground wire connection.

Image 4.2: Diagram illustrating the functions of the control panel buttons and indicators, including Increase/Decrease Time/Temperature, Function Setting (SET), Work Indicator, and Heating Indicator.
4.1. Components
- Dual LED Display: Shows current temperature (PV/SV TEMP) and time (PV/SV TIME S).
- Control Buttons:
- ▲ (Up Arrow): Increase temperature/time.
- ▼ (Down Arrow): Decrease temperature/time, or initiate/stop countdown.
- SET: Function setting button for temperature unit, temperature, and time.
- Indicator Lights:
- C° / F°: Indicates Celsius or Fahrenheit operating mode.
- OUT: Heating indicator light.
- WORK: Countdown LED indicator.
- Power Switch: Red rocker switch to turn the unit on/off.
- Fuse: Replaceable fuse for circuit protection.
- Aviation Plugs: Connectors for the heat press machine's heating plate and printing limit switch line.
- Control Box Slide: Mechanism to adjust the height of the control box.
5. Setup and Installation
- Power Connection: Insert the three-core power cord into a grounded socket. Ensure the power supply meets 110V-120V and the machine's working power is below 1400W.
- Connect Heat Press: Insert the aviation connector from your heat press machine (or baking cup machine) into the corresponding socket of the thermostat. Ensure the 4-pin configuration matches.
- Mounting (Optional): If applicable, use the control box slide to adjust and secure the control box to your heat press frame.
6. Operating Instructions
6.1. Power On
Turn on the machine using the red power switch. The thermostat will automatically heat up to the last set temperature.
6.2. Switching Temperature Units (Celsius/Fahrenheit)

Image 6.1: Visual guide for switching between Celsius and Fahrenheit temperature units on the control panel.
- Turn on the control box.
- Press and hold the "SET" button for 5 seconds until a "beep" sound is heard.
- Use the ▲ (up) and ▼ (down) keys to adjust between C (Celsius) and F (Fahrenheit).
- Press and hold the "SET" button for 5 seconds again to confirm the setting. The corresponding C° or F° indicator light on the instrument panel will illuminate.
6.3. Setting Heating Temperature and Time

Image 6.2: Visual guide for setting the heating temperature and time values on the control panel.
- Press the "SET" button once. The display will show "SP" (Set Point) for temperature.
- Use the ▲ (up) and ▼ (down) keys to adjust the desired temperature. The adjustable temperature range is 33°F to 482°F (0°C to 250°C). The optimal working temperature range is generally 320°F to 392°F (160°C to 200°C), with 356°F (180°C) being a common setting.
- Press the "SET" button again. The display will show the time setting.
- Use the ▲ (up) and ▼ (down) keys to adjust the desired heating time. The adjustable time range is 0 to 999 seconds.
- Press the "SET" button a third time to return to the standby heating state.
- Countdown Function: If your heat press has a countdown function, press the ▼ (down) button to automatically start the countdown. Press the ▼ (down) button again to stop the countdown.
6.4. Recommended Settings for Common Objects
The following table provides general guidelines for initial temperature and time settings. Actual settings may vary based on material and transfer paper specifications.
| Press Object | Initial Temperature | Optimal Temperature | Time |
|---|---|---|---|
| Mugs | 0 | 356°F | 60 sec |
| Tiles | 0 | 356°F | 40 sec |
| Metal board | 0 | 356°F | 40 sec |
| Plate | 0 | 356°F | 40 sec |
| T-shirt | 0 | 356°F | See below |
Note: For T-shirts, specific time settings depend on the material and transfer type. Always refer to the transfer material manufacturer's recommendations.
7. Maintenance
7.1. Fuse Replacement
The control box is equipped with a replaceable fuse (30mm*6mm specification) for circuit protection. A spare fuse is included with the control box.

Image 7.1: Diagram showing the fuse installation location and the machine switch button.
- Disconnect Power: Ensure the control box is turned off and unplugged from the power outlet.
- Locate Fuse: The fuse is typically located near the power input or switch, often with a screw-in cap.
- Remove Old Fuse: Unscrew the fuse cap and carefully remove the old fuse.
- Insert New Fuse: Place the new fuse (30mm*6mm) into the cap and screw it back into place.
- Test: Reconnect power and turn on the control box to verify functionality.
Caution:
Always replace the fuse with one of the same type and rating to prevent damage to the unit or fire hazards.
8. Troubleshooting
| Problem | Possible Cause | Solution |
|---|---|---|
| Control box does not power on. | No power supply, faulty power cord, blown fuse. | Check power outlet. Inspect power cord. Replace fuse (refer to Section 7.1). |
| Heating plate does not heat up or heats improperly. | Incompatible heat press, loose aviation plug connection, faulty heating element (on heat press). | Verify heat press compatibility (K-Type only). Ensure aviation plug is securely connected. If issues persist, the heating element of the heat press may be faulty. |
| Temperature display is inaccurate or unstable. | Loose thermocouple connection, environmental factors. | Check all connections. Ensure the control box is not exposed to extreme temperatures or drafts. |
| Cannot switch between Celsius and Fahrenheit. | Incorrect button sequence. | Follow the instructions in Section 6.2 precisely. Ensure "SET" button is held for 5 seconds. |
| Countdown function not working. | Heat press does not support countdown, incorrect button press. | Not all heat presses are equipped with a countdown switch interface. Ensure you are pressing the ▼ (down) button after setting time. |
If problems persist after attempting these solutions, please contact customer support.
9. Specifications
- Model: K-Type Heat Press Controller Box
- Voltage: 110 Volts
- Frequency: 60Hz
- Power: 1400W
- Adjustable Temperature Range: 33°F to 482°F (0°C to 250°C)
- Adjustable Time Range: 0 to 999 seconds
- Material: ABS, Iron
- Package Dimensions: 6.69 x 5.59 x 5.51 inches
- Item Weight: 1.61 pounds
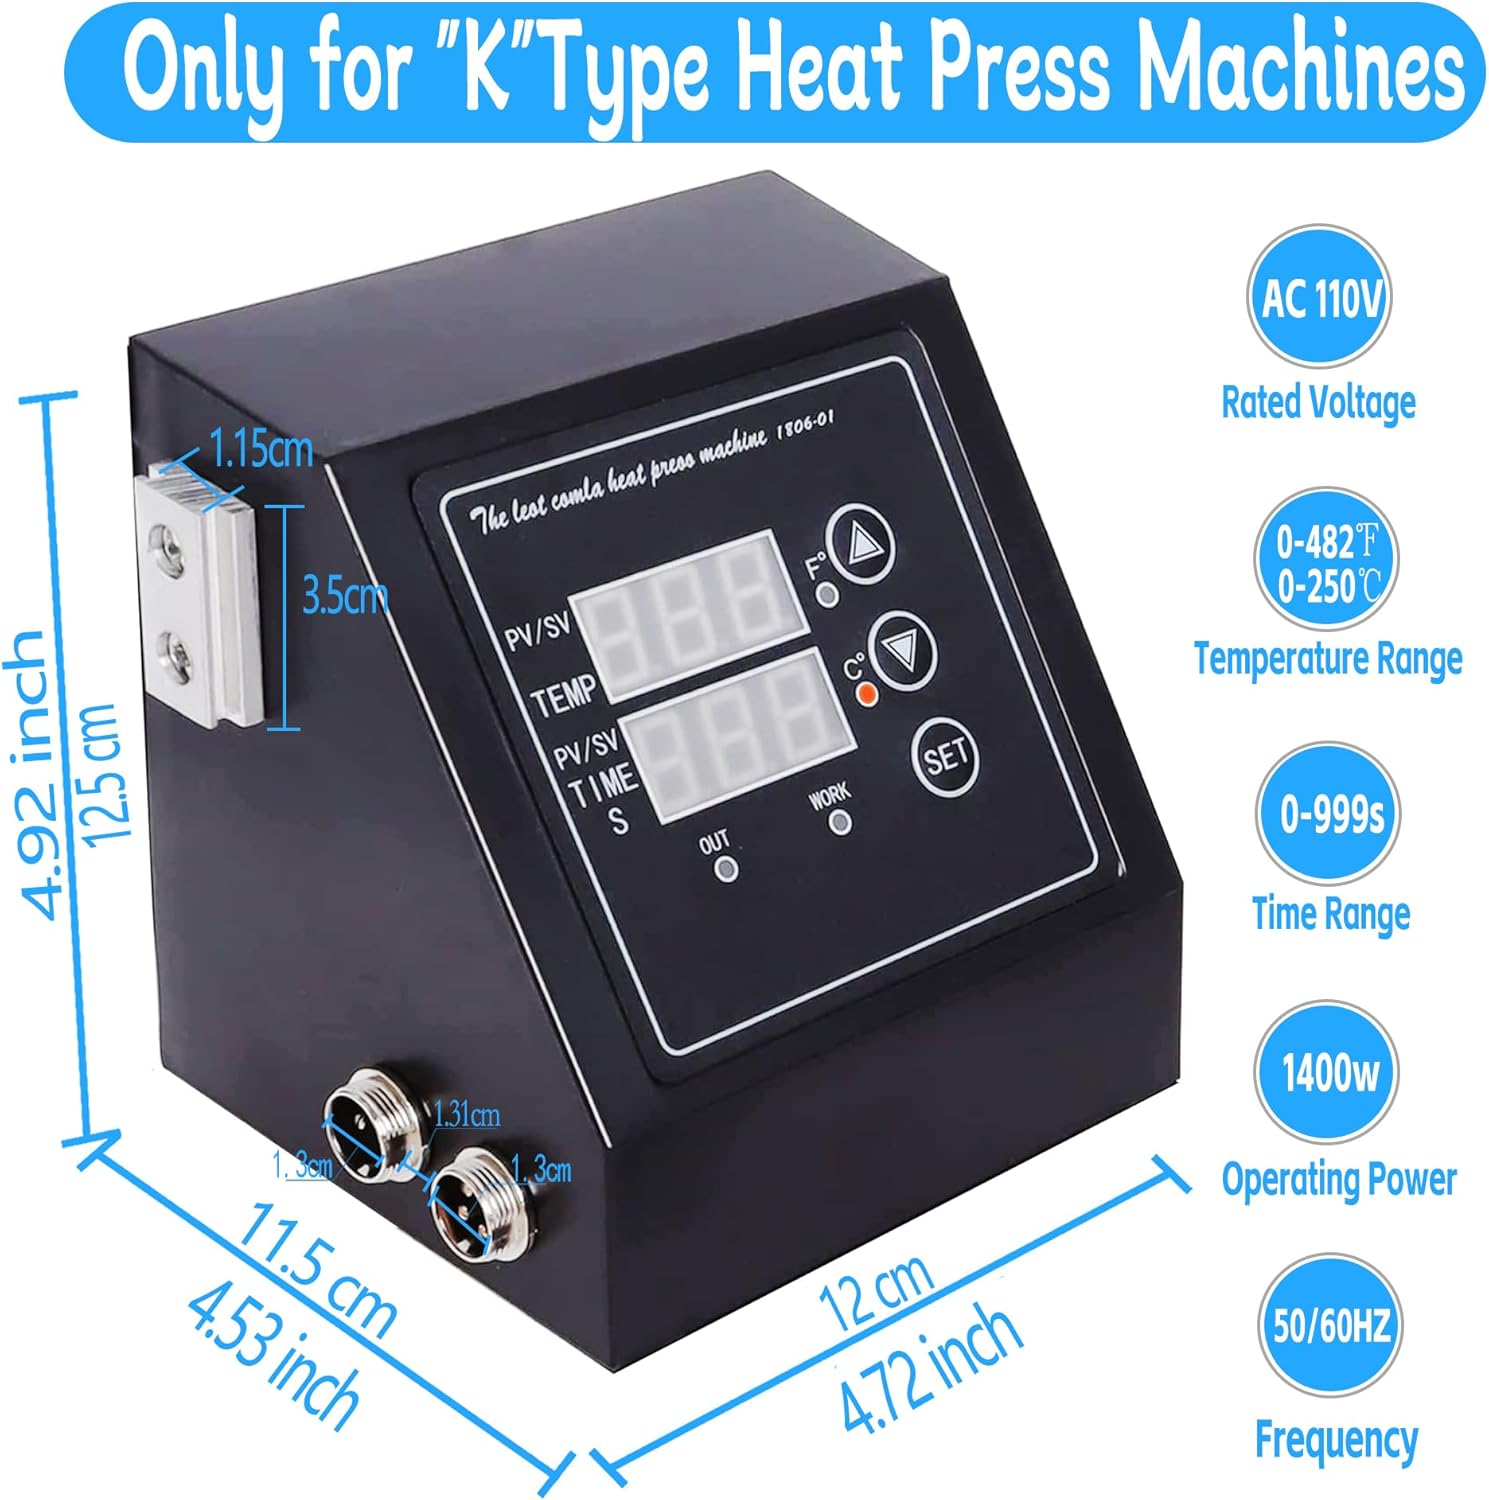
Image 9.1: Diagram showing the physical dimensions and key technical specifications of the control box.
10. Warranty and Support
For warranty information or technical support, please refer to the product packaging or contact the manufacturer, FelRelWel, directly through their official channels. Please have your product model number (K-Type Heat Press Controller Box) and purchase details available when contacting support.