beday IC206S-BL
beday Automatic Plant Waterer Indoor Drip Irrigation System
Model: IC206S-BL User Manual
Introduction
This manual provides detailed instructions for the setup, operation, and maintenance of your beday Automatic Plant Waterer Indoor Drip Irrigation System, Model IC206S-BL. This system is designed to automatically water up to 15 potted plants, offering programmable timing and smart humidity detection to ensure optimal plant hydration.
Safety Information
Important Safety Instructions:
- Always ensure the water source is turned off before connecting the kit.
- Regularly inspect the system for any leaks or damage.
- Keep the kit away from heat sources and electrical appliances.
- Do not use the kit with water that is not intended for drinking or plants.
Package Contents
Please verify that all components are present in your package:
- Watering System (Controller Unit) x1
- Tubing (33 feet) x1
- Type-C Cable x1
- T-joints x15
- Droppers (Water Spikes) x15
- Filter x1
- Anti-Siphon Components x1
- User Manual x1
Product Overview
The beday Automatic Plant Waterer features a central control unit with a clear display and intuitive buttons for programming. It includes a pump, tubing, and drippers to deliver water to individual plants.
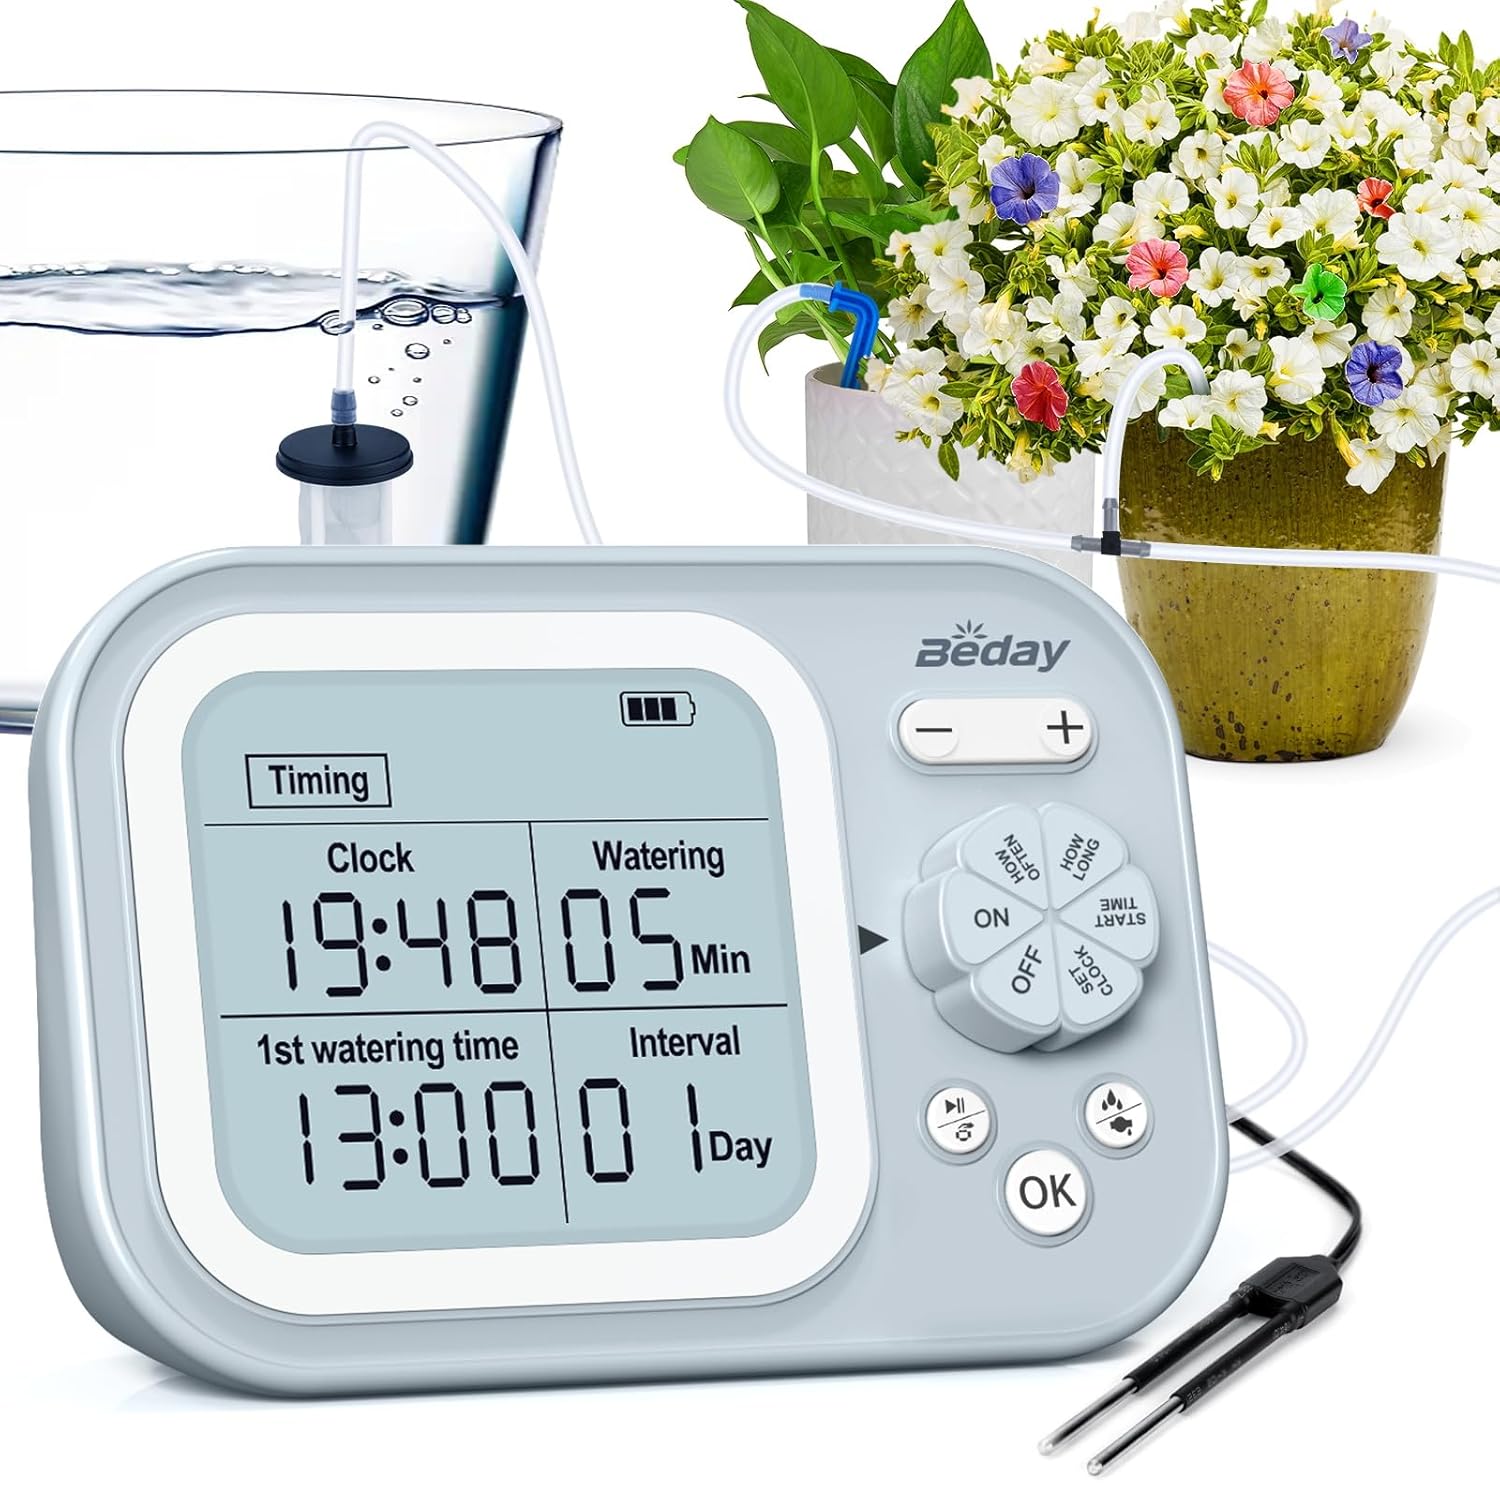
Image Description: A close-up view of the beday automatic plant waterer's control unit, showing its digital display and control buttons. Surrounding it are clear tubes connected to a water source (glass of water) and several potted plants with drippers inserted into their soil. This image illustrates the main components and how they connect.
The control unit features a 2.46" x 2.26" large screen for easy viewing of settings and current status.
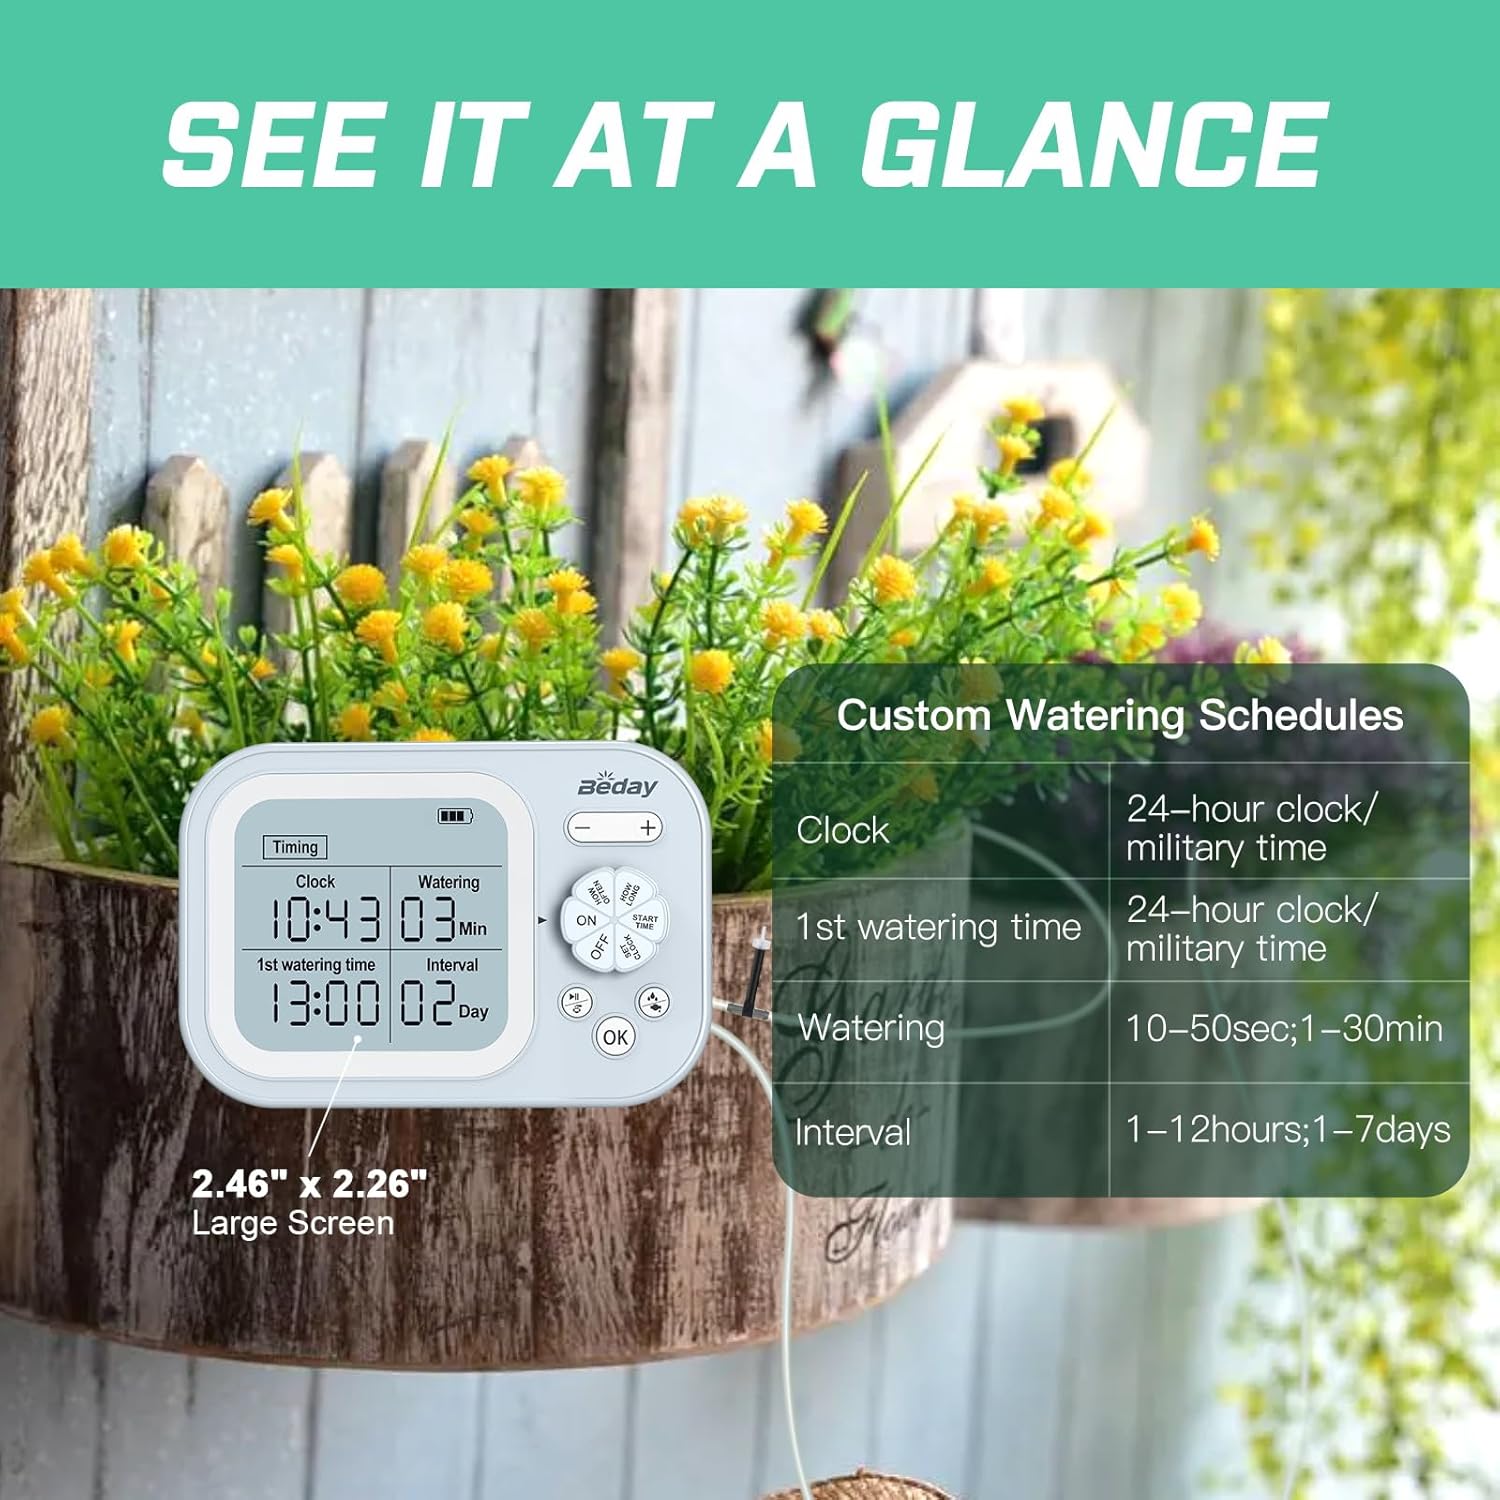
Image Description: A detailed view of the beday plant waterer's display, highlighting its size and readability. An overlay shows a table detailing custom watering schedules, including clock format (24-hour/military time), first watering time, watering duration (10-50 seconds, 1-30 minutes), and interval (1-12 hours, 1-7 days).
Setup Instructions
- Prepare the Tubing: Cut the 33-foot tubing into appropriate lengths for each plant, considering the distance from the control unit and between plants.
- Connect the Filter: Attach the filter to one end of the tubing. This end will be placed in your water reservoir.
- Install Anti-Siphon Component: The anti-siphon component should be installed at the water outlet of the control unit. Ensure the watering system and anti-siphon accessory are positioned above the water surface in your reservoir to prevent continuous siphoning.
- Assemble the Drip System: Use the T-joints to create branches in the tubing for each plant. Connect a dropper (water spike) to the end of each branch.
- Position Drippers: Insert the droppers into the soil of each potted plant. Ensure they are securely placed near the plant's base.
- Place Water Reservoir: Position a water reservoir (e.g., a bucket or large container) near your plants. Place the filtered end of the tubing into the reservoir.
- Connect Power: Connect the Type-C cable to the control unit for power. The unit contains a rechargeable Lithium Ion battery.

Image Description: An illustration demonstrating the easy setup of the beday automatic plant waterer. The image shows the control unit connected to tubing that leads to multiple potted plants. A crucial detail highlighted is the anti-siphon component, which must be installed at the water outlet and positioned above the water surface to prevent unintended continuous flow.
Operating Instructions
Setting the Clock
- Press the SET CLOCK button.
- Use the + and - buttons to adjust the hour and minute.
- Press OK to confirm.
Timed Automatic Watering Mode
This mode allows you to set a specific watering schedule based on time and frequency.
- Press the SET TIME button to enter programming mode.
- Set First Watering Time: Use + and - to set the desired start time for watering (e.g., 13:00). Press OK.
- Set Watering Duration: Use + and - to set how many minutes the system will water (e.g., 05 minutes). Press OK.
- Set Watering Interval: Use + and - to set the frequency (e.g., 1 day). This determines how often the cycle repeats. Press OK.
- Ensure the system is set to ON using the ON/OFF button.

Image Description: A visual representation of the timed automatic watering feature. The image shows the control unit's display with "Timing" and "Watering" settings. An accompanying graphic illustrates a watering schedule over several days, showing consistent watering times and durations (e.g., 11:00 am / 10 min / 1.06 gal) for each day.
Smart Humidity Detection Mode
This intelligent mode automatically adjusts watering based on soil humidity levels, preventing over or under-watering.
- Connect the humidity sensor probe to the control unit and insert it into the soil of a representative plant.
- Switch the system to "humidity" mode (refer to the specific button or menu option on your device, typically indicated by a humidity icon or text).
- The system will automatically detect humidity. If the humidity is lower than 30%, it will start watering until it reaches 70%.
- If the humidity is not lower than 30% during a detection process, watering will be skipped for that cycle and tested again in the next scheduled cycle.

Image Description: This image illustrates the smart humidity detection feature. It shows a humidity sensor probe inserted into soil next to a small plant. The control unit's display shows "Clock," "1st watering time," "Watering," and "Interval" settings. A schedule graphic explains that watering occurs when humidity is detected below 30% and continues until 70%, skipping cycles if the soil is already moist.
Maintenance
- Clean the Filter: Periodically check and clean the water filter to prevent blockages and ensure consistent water flow.
- Inspect Tubing and Drippers: Regularly inspect all tubing and drippers for kinks, blockages, or damage. Clear any debris from the drippers.
- Water Reservoir: Keep the water reservoir clean to prevent algae growth, which can clog the system.
- Battery Charging: Ensure the internal Lithium Ion battery is charged using the provided Type-C cable. A low battery can affect system performance.
- Winter Storage: If storing the system for an extended period, especially in cold climates, drain all water from the system to prevent freezing and damage.
Troubleshooting
| Problem | Possible Cause | Solution |
|---|---|---|
| No water flow or weak flow |
|
|
| System continuously siphons water | Anti-siphon component not installed or incorrectly positioned. | Ensure the anti-siphon component is installed at the water outlet and is above the water surface in the reservoir. |
| Display is blank or unit won't turn on | Depleted battery. | Connect the Type-C cable and charge the unit. Allow some time for the battery to regain charge before attempting to power on. |
| Plants are overwatered in humidity mode | Humidity sensor malfunction or incorrect placement. | Check sensor connection and ensure it's properly inserted into the soil. Clean the sensor if dirty. |
Specifications
| Feature | Detail |
|---|---|
| Model Number | IC206S-BL |
| Brand | beday |
| Power Source | Battery Powered (1 Lithium Ion battery included) |
| Material | Plastic |
| Hose Length | 33 Feet |
| Number of Pieces (Drippers/T-joints) | 15 |
| Special Features | Automatic Watering, Digital Timer, Leak Resistant, Programmable, Rechargeable Battery, Smart Humidity Detection |
| Item Weight | 0.66 Kilograms |
| Parcel Dimensions | 21.31 x 18.21 x 5.79 cm |
Warranty and Support
For warranty information or technical support, please refer to the contact details provided with your purchase documentation or visit the official beday website. Please retain your proof of purchase for warranty claims.
Related Documents - IC206S-BL
 |
SOLEM BL-IP 9V Bluetooth Irrigation Controller - Smart Watering Solution Discover the SOLEM BL-IP, a battery-powered, waterproof 9V Bluetooth irrigation controller for efficient and automated watering. Features include 5-year battery life, water consumption monitoring, and easy installation. |
 |
SOLEM BL-NR Bluetooth Watering Controller Association Guide Step-by-step guide to associate and install the SOLEM BL-NR Bluetooth watering controller using the MySOLEM app. Covers app download, battery installation, device configuration, pairing, and security. |
 |
Panasonic Network Camera BL-VT164/BL-VP100 Series Operating Instructions Detailed operating instructions for Panasonic BL-VT164 Series and BL-VP100 Series network cameras. Covers setup, configuration, monitoring, and maintenance. |
 |
K-Rain TC-KR Bluetooth Hose-End Timer and Misting Controller Instructions User manual providing step-by-step instructions for installing and operating the K-Rain TC-KR Bluetooth Hose-End Timer and Misting Controller, including app setup, battery installation, device association, and programming modes. |
 |
ThermoPro Dual Digital Kitchen Timer Instruction Manual User manual for the ThermoPro Dual Digital Kitchen Timer (TM02). Learn how to use its dual timers, clock functions, set alarms, and understand specifications and warranty information. |
 |
HIOS Brushless Driver BL Series Operation Manual Comprehensive operation manual for HIOS BL Series Brushless Drivers, covering specifications, parts identification, accessories, operating procedures, torque adjustment, and troubleshooting for models like BL-2000, BL-3000, BL-5000, and BL-7000. |