
Introduction
This manual provides detailed instructions for the installation, operation, and maintenance of your MekedeTech DUDUAUTO DUDU7 Car Radio Stereo. This intelligent navigation head unit is designed for the Toyota Highlander 3 XU50 models manufactured between 2013 and 2018. Please read this manual thoroughly before installation and use to ensure proper function and longevity of the device.

Image: The MekedeTech DUDUAUTO DUDU7 Car Radio Stereo Head Unit, featuring a large 10.36-inch IPS touch screen display.
Package Contents
Verify that all items listed below are present in your product packaging. If any components are missing or damaged, please contact customer support.
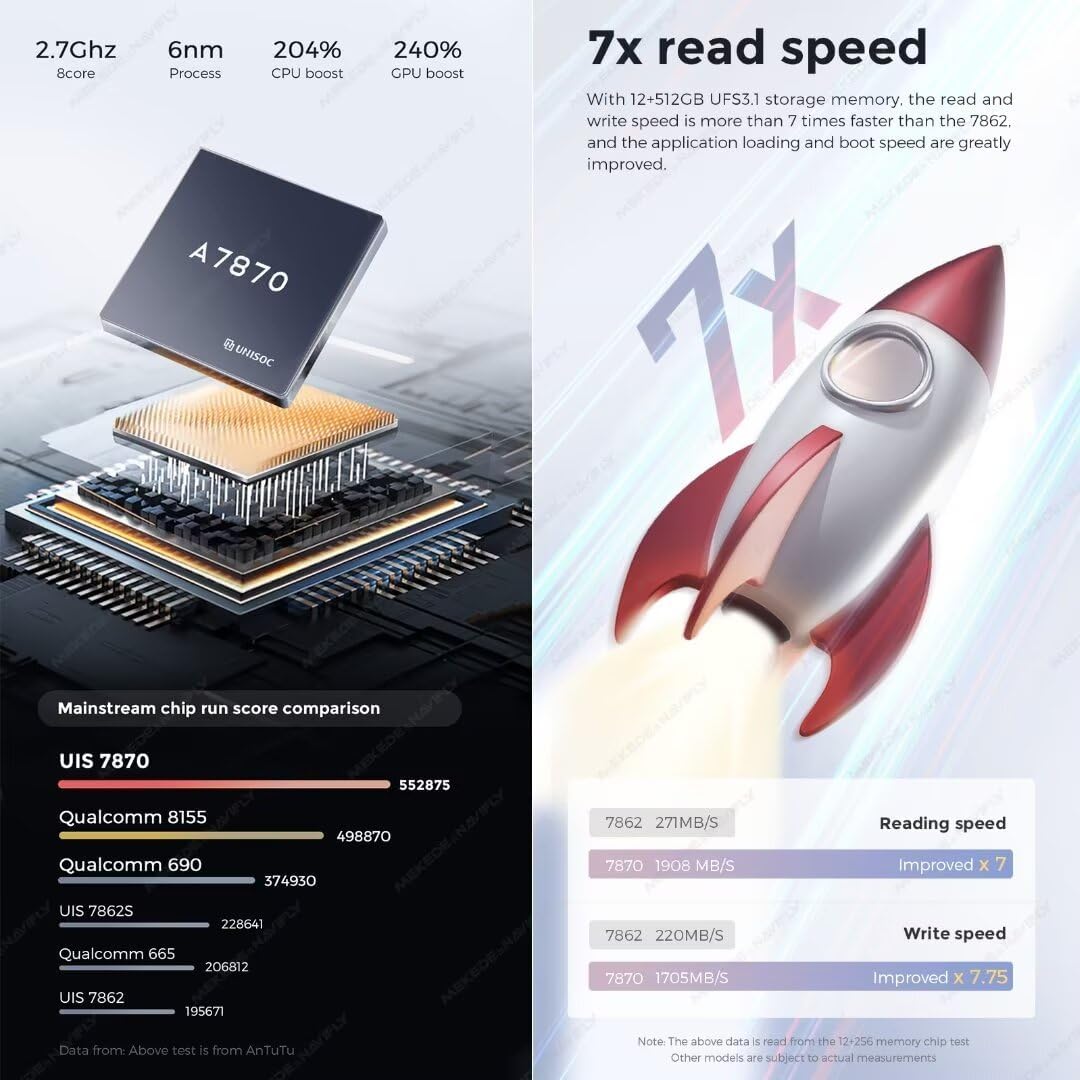
Image: Visual representation of the components included in the DUDUAUTO DUDU7 package.
- Main Head Unit (Machine)
- Power Cable (Type A without CANBUS, Type B with CANBUS - specific to vehicle configuration)
- Microphone (MIC)
- RCA Cable Set
- Reversing Camera (Optional, may require separate purchase)
- USB Plug x3
- Fakra 4G Antenna
- Fakra GPS Antenna (for DUDU7 models)
Setup and Installation
Professional installation is recommended for this device. Incorrect installation may lead to damage to the unit or vehicle. Ensure the vehicle's battery is disconnected before beginning installation.
Vehicle Compatibility
This head unit is specifically designed for Toyota Highlander 3 XU50 models from 2013 to 2018. The included dash kit ensures a seamless fit into the vehicle's dashboard.
Pre-Installation Check
- Confirm all package contents are present.
- Identify the correct wiring harness for your vehicle. If your Toyota Highlander has a Harmon Sound System, a specific power cable with CANBUS (ASIN B0CTJRJVMQ) is required to ensure audio functionality.
General Installation Steps
- Carefully remove the existing factory radio and trim panels from the dashboard. Refer to your vehicle's service manual for specific removal procedures.
- Connect the appropriate wiring harness from the vehicle to the new head unit. Ensure all connections are secure.
- Connect the GPS antenna, 4G antenna, microphone, and any other peripheral cables (e.g., USB, RCA, reversing camera) to the designated ports on the head unit. Position antennas for optimal signal reception.
- Carefully mount the new head unit into the dashboard opening, ensuring it is securely fastened.
- Reinstall all trim panels.
- Reconnect the vehicle's battery and perform an initial power-on test.

Image: Comparison showing the vehicle's dashboard before and after the installation of the DUDUAUTO DUDU7 head unit.

Image: The DUDUAUTO DUDU7 head unit fully installed in the dashboard of a Toyota Highlander.
Operating Instructions
Power On/Off and Basic Interface
Press and hold the power button (if physical) or touch the power icon on the screen to turn the unit on or off. The DUDUAUTO DUDU7 operates on Android 13 with the DUDU OS 3.0 interface, offering a responsive 10.36-inch 2000x1200 QLED touchscreen display. Navigate through applications and settings by tapping and swiping.

Image: Screenshots of the DUDU OS 3.0 user interface, showcasing various applications and customizable dynamic wallpapers for day and night modes.
Navigation (GPS)
The unit features a built-in Dual Band 6-mode GPS positioning chip (L1 + L5 joint positioning) for enhanced accuracy and speed. This supports lane-level navigation. Access navigation applications via the main menu. Ensure the GPS antenna is properly installed and has a clear view of the sky for optimal signal reception.

Image: Illustration of Dual Band GPS (L1+L5) for improved positioning and a description of the Digital Noise Cancelling Microphone technology.
Connectivity (CarPlay, Android Auto, Bluetooth, Wi-Fi)
- Wireless & Wired CarPlay/Android Auto: Connect your smartphone wirelessly or via USB to access compatible apps, navigation, calls, and messages directly on the head unit display.
- Bluetooth 5.0: The Qualcomm 3031 Bluetooth chip supports aptX HD protocol, providing high-quality audio streaming and stable hands-free calling. Pair your device through the Bluetooth settings menu.
- Wi-Fi: Supports 802.11a/b/g/n/ac and 5G Wi-Fi for internet access, app downloads, and online services. Connect to a mobile hotspot or available Wi-Fi network via the settings.
Audio System
The DUDUAUTO DUDU7 integrates an AKM7739 DSP with Velvet Audio Technology and a TDA7808 Digital AB type power amplifier for enhanced sound quality. It offers Optical + Coaxial and RCA 5.1 Channel Audio Outputs for flexible audio system configurations.

Image: Internal components highlighting the AKM7739 DSP and TDA7808 amplifier, emphasizing the audio technology.
Microphone
Equipped with a Digital Noise Cancellation Microphone, the unit ensures clear voice transmission even in noisy environments or at high speeds. This is achieved through HD digital signal transmission and an audio noise reduction algorithm.
USB Ports
The unit includes one USB 3.2 GEN1 (Type-C) port and three USB 2.0 ports for connecting external devices such as USB drives for media playback, or for wired CarPlay/Android Auto connections.
Technical Specifications
Below are the detailed technical specifications for the MekedeTech DUDUAUTO DUDU7 head unit:
| Feature | Specification |
|---|---|
| Model Name | MKD-DUDU7-12-256-10.36 |
| Operating System | Android 13 |
| CPU | 8 Core UIS7870 Customized version A76 2.7Ghz 6nm processor |
| Memory (RAM/ROM) | 12GB RAM / 256GB ROM (UFS 3.1) |
| Display Size | 10.36 inches |
| Display Resolution | 2000x1200 QLED |
| Touchscreen | Yes |
| GPS | Dual Band 6 mode (L1 L5 B1 B2a E1 E5a) |
| Microphone | Digital Noise Cancellation Microphone |
| USB Ports | 1x USB 3.2 GEN1 (Type-C), 3x USB 2.0 |
| Power Amplifier | TDA7808 Digital AB type |
| DSP | AKM7739 Velvet Audio Technology |
| Bluetooth Chip | Qualcomm 3031 (Supports aptX HD protocol, BT5.0) |
| Audio Output | Optical + Coaxial, RCA 5.1 Channel Outputs |
| Wi-Fi | 802.11a/b/g/n/ac (Supports 5G WIFI) |
| Radio IC | TDA7708 |
| Operating Voltage | 9V~16V |
| CarPlay/Android Auto | Wired and Wireless support |
| 360 Panorama Support | Yes (requires additional chip and payment) |

Image: Diagram illustrating the UIS7870 8-core CPU architecture and the 7x read speed improvement of UFS 3.1 memory compared to previous generations.
Troubleshooting
This section provides solutions to common issues you might encounter.
- No Power:
Check all power connections and fuses. Ensure the vehicle's battery is charged. If a CANBUS decoder is used, verify its proper connection. - No Sound:
Verify speaker connections. Check volume levels on the unit and ensure the correct audio output source is selected. If your vehicle has a factory amplifier (e.g., Harmon Sound System), confirm you are using the correct CANBUS power cable. - GPS Signal Issues:
Ensure the GPS antenna is securely connected and placed in a location with a clear view of the sky, away from metal obstructions. Allow time for the unit to acquire satellites upon startup. - Bluetooth Connection Problems:
Ensure Bluetooth is enabled on both the head unit and your mobile device. Delete previous pairings and attempt to re-pair. Move your device closer to the head unit. - CarPlay/Android Auto Not Connecting:
For wired connections, try a different USB cable. For wireless, ensure Wi-Fi and Bluetooth are enabled on your phone and the head unit. Check for any software updates for your phone or the head unit. - Touchscreen Unresponsive:
Restart the unit. If the issue persists, a factory reset may be necessary (note: this will erase all user data).
If problems persist after attempting these solutions, please contact customer support for further assistance.
Maintenance
Proper maintenance ensures the longevity and optimal performance of your head unit.
- Cleaning the Screen: Use a soft, lint-free cloth specifically designed for electronic screens. Do not use abrasive cleaners or solvents. Gently wipe the screen to remove dust and fingerprints.
- Software Updates: Periodically check for available software updates to ensure optimal performance, security, and access to new features. Follow the on-screen instructions for any update procedures.
- Environmental Conditions: Avoid exposing the unit to extreme temperatures, direct sunlight for prolonged periods, or excessive moisture.
- Cable Connections: Periodically check all cable connections to ensure they are secure and free from damage.
Warranty and Support
The MekedeTech DUDUAUTO DUDU7 Car Radio Stereo comes with a 1-Year Warranty from the date of purchase. This warranty covers manufacturing defects under normal use.
For warranty claims, technical support, or any inquiries not covered in this manual, please contact MekedeTech customer service through your purchase platform or the official MekedeTech website.