1. Introduction
Thank you for choosing the BRAVA Smart Door Knob, Model 410. This advanced keyless entry system combines convenience with security, offering multiple access methods including fingerprint recognition, Bluetooth app control, and traditional mechanical keys. This manual provides detailed instructions for installation, setup, operation, and maintenance to ensure optimal performance and security.
2. Important Safety Information
- Read all instructions carefully before installation and use.
- Do not attempt to disassemble or repair the lock yourself. Contact customer support for assistance.
- Ensure the door thickness is within the specified range (35-55mm) for proper installation.
- Keep mechanical keys in a safe place, separate from the lock, for emergency access.
- Use only specified battery type (4 AAA batteries). Do not mix old and new batteries or different types of batteries.
- Protect the fingerprint sensor from sharp objects or excessive force.
3. Package Contents
Please verify that all components are present before beginning installation:
- BRAVA Smart Door Knob (Exterior and Interior Knobs)
- Adjustable Latch (60/70mm)
- Mounting Plate
- Strike Plate
- Screws and Installation Hardware
- Mechanical Keys (2)
- User Manual
- AAA Batteries (4)
4. Installation Guide
The BRAVA Smart Door Knob is designed for easy installation on most standard doors. No professional help is typically required. Ensure your door thickness is between 35mm and 55mm.
4.1 Prepare the Door
- If replacing an existing knob, remove it completely.
- Ensure the door hole diameter is approximately 54mm (2-1/8 inches) and the backset (distance from door edge to center of hole) is either 60mm (2-3/8 inches) or 70mm (2-3/4 inches).
4.2 Install the Latch
- Adjust the latch to the correct backset (60mm or 70mm) by twisting the latch mechanism if necessary.
- Insert the latch into the door edge hole, ensuring the "UP" arrow on the latch faces upwards. Secure it with screws.
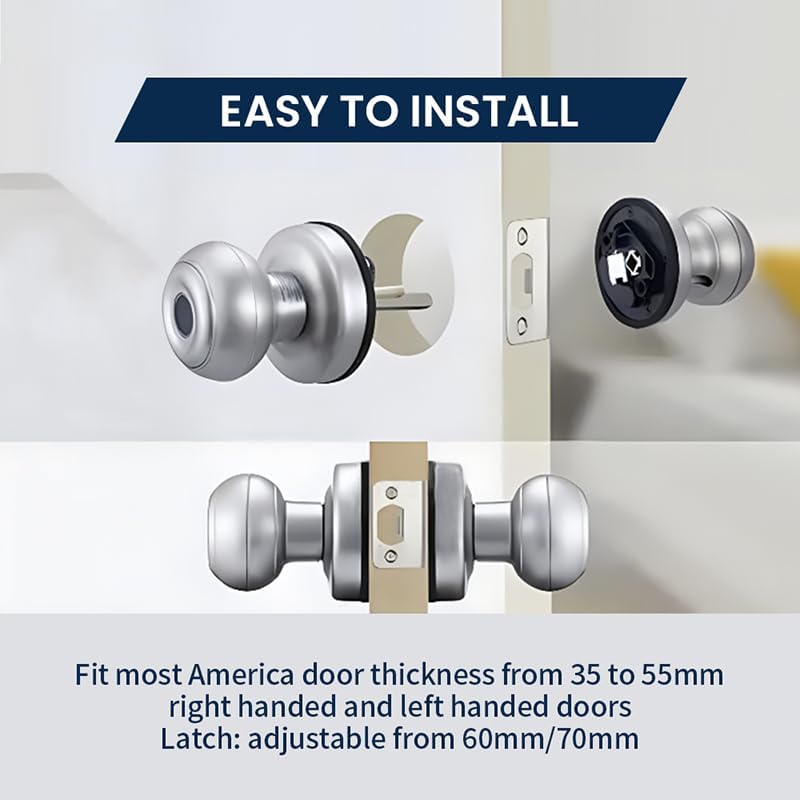
Figure 4.2: Installation of the latch and initial knob placement. The image illustrates how the latch fits into the door edge and the general positioning of the smart door knob components during installation. It highlights the ease of installation for standard door thicknesses and configurations.
4.3 Install the Exterior Knob
- Insert the exterior knob (with fingerprint sensor) through the door hole, ensuring the spindle passes through the latch.
4.4 Install the Interior Knob
- Connect the cable from the exterior knob to the interior knob.
- Align the interior knob with the exterior knob and secure it with the provided screws.
- Insert 4 AAA batteries into the battery compartment of the interior knob.
- Test the knob's operation by turning it and ensuring the latch retracts smoothly.
5. Initial Setup and Programming
5.1 Download the Tuya Smart App
- Search for "Tuya Smart" in your smartphone's app store (Google Play Store for Android or Apple App Store for iOS).
- Download and install the app.
- Register for a new account or log in if you already have one.
5.2 Pair the Door Knob with the App
- Open the Tuya Smart app.
- Tap the "+" icon in the top right corner to add a device.
- Select "Security & Video Surveillance" then "Door Lock (Bluetooth)".
- Follow the on-screen instructions to put the door knob into pairing mode (usually by pressing a button on the interior unit or scanning a QR code).
- Once detected, confirm pairing in the app.
5.3 Register Fingerprints
The BRAVA Smart Door Knob supports up to 20 unique fingerprints.
- In the Tuya Smart app, navigate to your paired door knob's settings.
- Select "Fingerprint Management" or a similar option.
- Tap "Add Fingerprint" and follow the app's prompts to place your finger on the sensor multiple times until registration is complete.
- Assign a name to each registered fingerprint for easy identification.

Figure 5.3: Fingerprint collection process. The image shows that the smart fingerprint collection is designed to be effective for various users, including children, adult females, and older individuals, ensuring broad compatibility and accurate recognition.
5.4 Add Other Users (Optional)
You can grant temporary or permanent access to other users through the Tuya Smart app, allowing them to use their own fingerprints or app access.
6. Operating Instructions
6.1 Unlocking with Fingerprint
- Place your registered finger flat on the fingerprint sensor located on the exterior knob.
- The lock will emit a confirmation sound or light indicator if the fingerprint is recognized.
- Turn the knob to open the door.
6.2 Unlocking with Tuya Smart App
- Open the Tuya Smart app on your smartphone.
- Select your BRAVA Smart Door Knob from the device list.
- Tap the "Unlock" button within the app.
- Turn the knob to open the door.
6.3 Unlocking with Mechanical Key
- Insert the mechanical key into the keyhole on the exterior knob.
- Turn the key to unlock the mechanism.
- Turn the knob to open the door. This method is primarily for emergency backup.
6.4 Locking the Door
The BRAVA Smart Door Knob automatically locks when the door is closed. To manually lock from the inside, turn the thumb-turn on the interior knob to the locked position.
7. Maintenance
7.1 Battery Replacement
The door knob is powered by 4 AAA batteries and has an estimated battery life of up to 8 months. The app will notify you when battery levels are low.
- Locate the battery compartment on the interior knob.
- Remove the cover.
- Replace all four old AAA batteries with new, high-quality AAA batteries.
- Ensure correct polarity (+/-).
- Replace the battery compartment cover.
Note: If batteries completely drain, you can use the mechanical keys for access or connect a USB Type-C power bank to the emergency power port (if available) to temporarily power the lock for fingerprint/app access.
7.2 Cleaning
- Wipe the lock's surface with a soft, damp cloth.
- Do not use abrasive cleaners, solvents, or harsh chemicals, as these can damage the finish and electronic components.
- Keep the fingerprint sensor clean and dry for optimal performance.
8. Troubleshooting
| Problem | Possible Cause | Solution |
|---|---|---|
| Fingerprint not recognized. | Finger is wet, dirty, or improperly placed. Fingerprint not registered. Sensor is dirty. | Ensure finger is clean and dry. Place finger flat and centered on the sensor. Re-register fingerprint if necessary. Clean the sensor with a soft cloth. |
| Lock does not respond. | Batteries are dead or low. Loose connection. | Replace batteries. Check all cable connections during installation. Use mechanical key for emergency access. |
| Cannot pair with Tuya Smart app. | Bluetooth is off. Lock not in pairing mode. App issues. | Ensure Bluetooth is enabled on your phone. Follow app instructions to put lock in pairing mode. Restart app or phone. |
| Knob is stiff or difficult to turn. | Improper installation of latch or knob. Door misalignment. | Recheck installation steps, especially latch and spindle alignment. Ensure door frame and strike plate are aligned. |
9. Specifications

Figure 9.1: Product Parameters. This image provides a summary of key specifications for the BRAVA Smart Door Knob, such as the model number, main material (aluminum alloy), operating temperature range, number of mechanical keys, mortise type, operating voltage, fingerprint capacity, and available colors.
| Feature | Detail |
|---|---|
| Model Number | 410 |
| Material | Aluminum Alloy |
| Color | Silver (also available in Black) |
| Product Dimensions | 7"L x 3"W |
| Exterior Finish | Brushed Silver |
| Lock Type | Fingerprint, Bluetooth App, Mechanical Key |
| Fingerprint Capacity | Up to 20 |
| Battery Type | 4 x AAA batteries (included) |
| Battery Life | Up to 8 months |
| Operating Temperature | -25°C to 70°C (-13°F to 158°F) |
| Door Thickness Compatibility | 35mm to 55mm |
| Latch Backset | Adjustable 60mm/70mm |
| Item Weight | 1.3 pounds |
10. Warranty and Support
BRAVA products are designed for reliability and performance. For warranty information, technical support, or any questions regarding your BRAVA Smart Door Knob, please refer to the contact information provided on the product packaging or visit the official BRAVA website. Please have your model number (410) and purchase details ready when contacting support.


