
1. Introduction
This manual provides essential information for the proper installation, operation, and maintenance of the LTS CMHR9252N-F 5MP Platinum Bullet HD-TVI Camera. Please read this manual thoroughly before using the product to ensure optimal performance and to prevent damage.
2. Safety Information
- Ensure the power supply meets the camera's specifications.
- Do not expose the camera to extreme temperatures, humidity, or corrosive environments.
- Avoid pointing the camera directly at strong light sources for extended periods.
- Installation should be performed by qualified personnel in accordance with local electrical codes.
- Disconnect power before performing any maintenance or installation procedures.
3. Package Contents
Verify that all items are present in the package:
- LTS CMHR9252N-F 5MP Platinum Bullet HD-TVI Camera
- Installation Hardware
- Quick Start Guide (not included in this manual)
4. Product Overview
The LTS CMHR9252N-F is a 5MP bullet-style surveillance camera designed for both indoor and outdoor applications. It features high-resolution imaging, Smart IR for night vision, and versatile video output options.
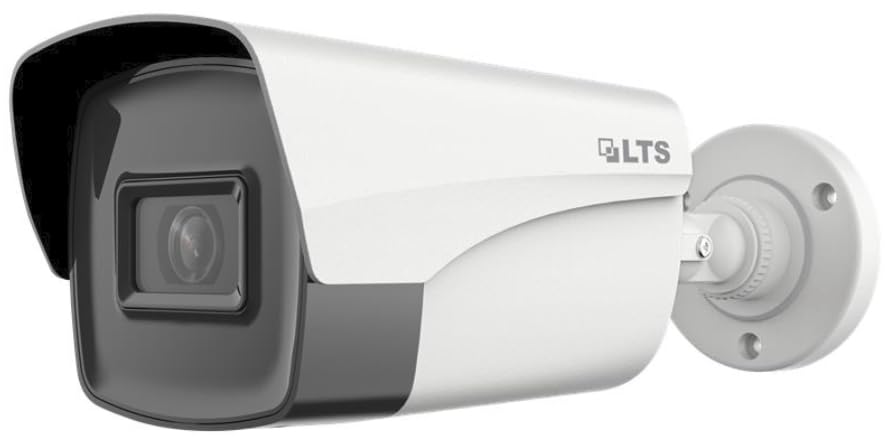
Figure 1: LTS CMHR9252N-F 5MP Platinum Bullet HD-TVI Camera. This image displays the white bullet-style camera with a dark grey front housing for the lens and IR illuminators, featuring a sun shield and a swivel mounting bracket.
Key Features:
- 5 MP Resolution: Delivers clear images at 2560 × 1944 pixels.
- Fixed Focal Lens: Available in 2.8 mm and 3.6 mm options for various monitoring needs.
- Smart IR: Provides up to 131ft (40 m) IR distance for effective night vision.
- 4-in-1 Video Output: Switchable between TVI, AHD, CVI, and CVBS formats.
- IP67 Rated: Dust and water resistant for reliable outdoor performance.
5. Setup
5.1 Mounting
- Choose a Location: Select a suitable indoor or outdoor location, considering the camera's field of view and the desired monitoring area. The IP67 rating ensures durability in various environmental conditions.
- Prepare the Surface: Use the provided installation hardware to mark and drill pilot holes on the mounting surface (wall or ceiling).
- Secure the Camera: Attach the camera's mounting bracket securely to the surface using screws. Adjust the camera's angle for optimal coverage.
5.2 Wiring and Connectivity
- Power Connection: Connect the camera to a compatible power source using a corded electric connection. Ensure the power supply matches the camera's voltage requirements.
- Video Output: Connect the video output cable from the camera to your Digital Video Recorder (DVR) or other compatible video input device. The camera supports wired Ethernet connectivity.
- Video Format Selection: If necessary, switch the video output format (TVI, AHD, CVI, CVBS) to match your DVR system. This is typically done via a switch on the camera cable or through a UTC controller (sold separately). Refer to your DVR's manual for compatible formats.
6. Operating
6.1 Initial Power-Up
Once the camera is securely mounted and connected to power and your DVR, power on your DVR system. The camera should automatically begin transmitting video in the selected format.
6.2 Video Output Switching
The CMHR9252N-F supports four video output formats: TVI, AHD, CVI, and CVBS. To switch between formats:
- Locate the video format switch on the camera's cable (if present).
- Alternatively, use a compatible UTC (Up The Coax) controller to change the format through the coaxial cable connection. Consult your DVR or UTC controller manual for specific instructions.
6.3 Smart IR Functionality
The camera is equipped with Smart IR technology, which automatically adjusts the intensity of the infrared LEDs to prevent overexposure of objects close to the camera, ensuring clear images in low-light conditions up to 131ft (40 m).
7. Maintenance
7.1 Cleaning
- Regularly clean the camera lens with a soft, dry cloth to remove dust and smudges.
- For stubborn dirt, use a mild lens cleaning solution applied to the cloth, not directly to the lens.
- Do not use harsh chemicals or abrasive cleaners.
7.2 Environmental Considerations
Despite its IP67 rating, ensure the camera's mounting and cabling are secure to prevent water ingress or damage from strong winds, especially in outdoor installations.
8. Troubleshooting
- No Image:
- Check power connection to the camera and DVR.
- Verify video cable connection between camera and DVR.
- Ensure the camera's video output format matches the DVR's input format.
- Poor Image Quality:
- Clean the camera lens.
- Check cable integrity for damage or interference.
- Ensure adequate lighting in the monitored area, especially at night.
- Night Vision Not Working:
- Ensure the area is dark enough for IR to activate.
- Check for obstructions blocking the IR LEDs.
9. Specifications
| Feature | Specification |
|---|---|
| Model Name | CMHR9252N-F |
| Video Capture Resolution | 5 MP (2560 × 1944) |
| Lens | Fixed focal lens (2.8 mm or 3.6 mm options) |
| IR Distance | Up to 131ft (40 m) with Smart IR |
| Video Output | TVI, AHD, CVI, CVBS switchable |
| Indoor/Outdoor Usage | Indoor, Outdoor |
| Protection Rating | IP67 |
| Connectivity Technology | Wired |
| Connectivity Protocol | Ethernet |
| Compatible Devices | Digital Video Recorder |
| Power Source | Corded Electric |
| Mounting Type | Ceiling Mount |
| Dimensions (L x W x H) | 5 x 2 x 3 inches |
| Item Weight | 10.6 ounces |
| Included Components | Installation Hardware |
10. Warranty and Support
For warranty information and technical support, please refer to the documentation provided at the time of purchase or contact your authorized LTS dealer or the manufacturer directly. Keep your purchase receipt as proof of purchase.


