1. Introduction
Thank you for choosing the Riworal UHF 2 Channel Wireless Microphone System. This manual provides detailed instructions for the proper setup, operation, and maintenance of your new wireless microphone system. Please read this manual thoroughly before use to ensure optimal performance and longevity of the product. This system is designed for various applications including karaoke, public speaking, meetings, parties, and performances.
2. Product Overview
2.1 Package Contents
The Riworal UHF 2 Channel Wireless Microphone System package includes the following items:
- 2 x Riworal Wireless Microphones
- 1 x Receiver Box
- 1 x Power Adapter
- 1 x 6.35mm to 6.35mm Audio Cable
- 1 x 3.5mm to 3.5mm Audio Cable
- 1 x RCA to RCA Audio Cable
- 2 x Antiskid Rings
- 1 x User Manual
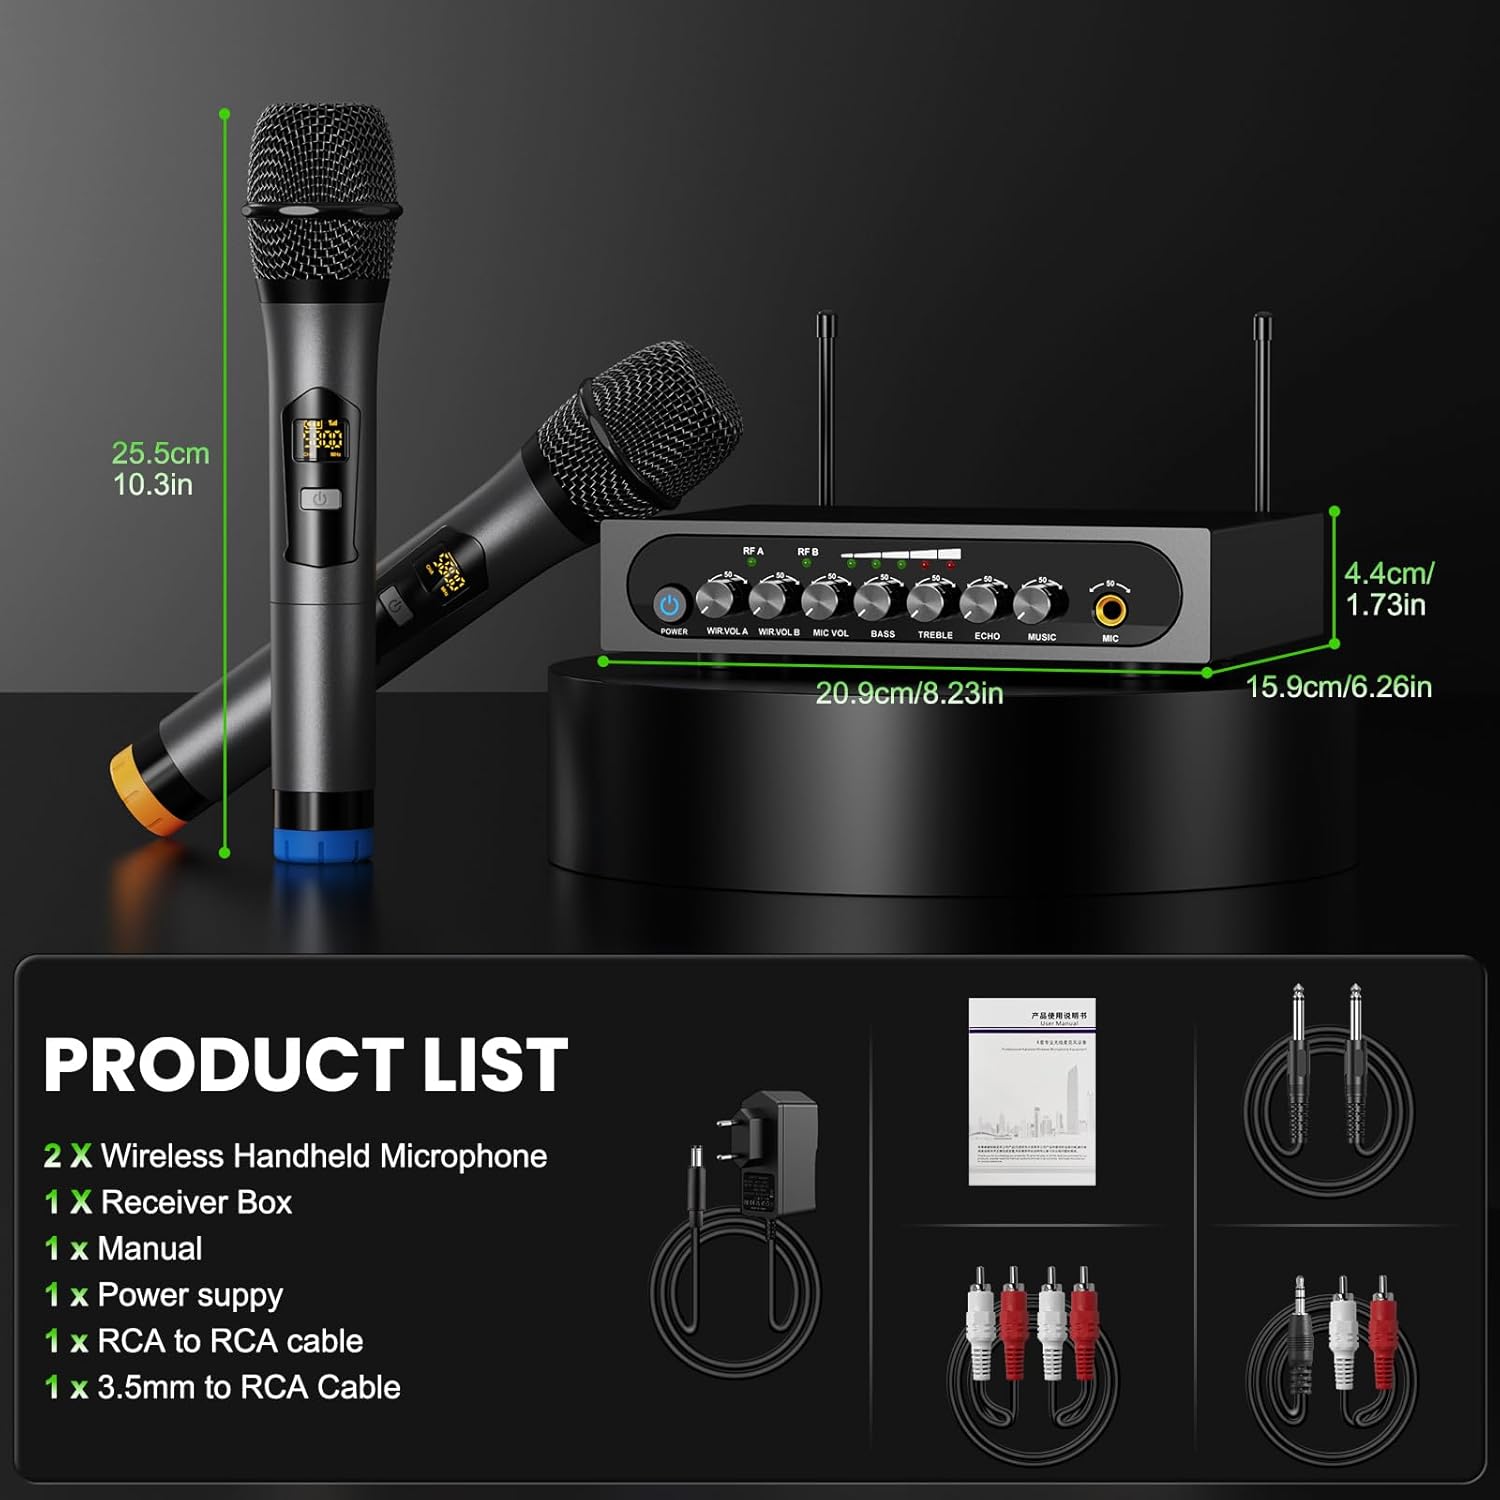
Figure 2.1: Contents of the Riworal Wireless Microphone System package, including two microphones, receiver, power adapter, various audio cables, antiskid rings, and the user manual.
2.2 Key Features
- UHF Dual Channel System: Provides stable and clear wireless transmission.
- Plug and Play Operation: Microphones automatically pair with the receiver upon power-on.
- Multiple Input Methods: Supports Bluetooth connection and 3.5mm wired input for audio sources.
- Adjustable Audio Effects: Features individual volume controls for each microphone, adjustable echo effect, and bass/treble controls.
- Wide Compatibility: Connects to amplifiers, PA systems, speakers, mixers, TVs, computers, and mobile phones.
- Portable Design: Compact receiver for easy transport and storage.

Figure 2.2: The Riworal UHF 2 Channel Wireless Microphone System, showing the two handheld microphones and the receiver unit.
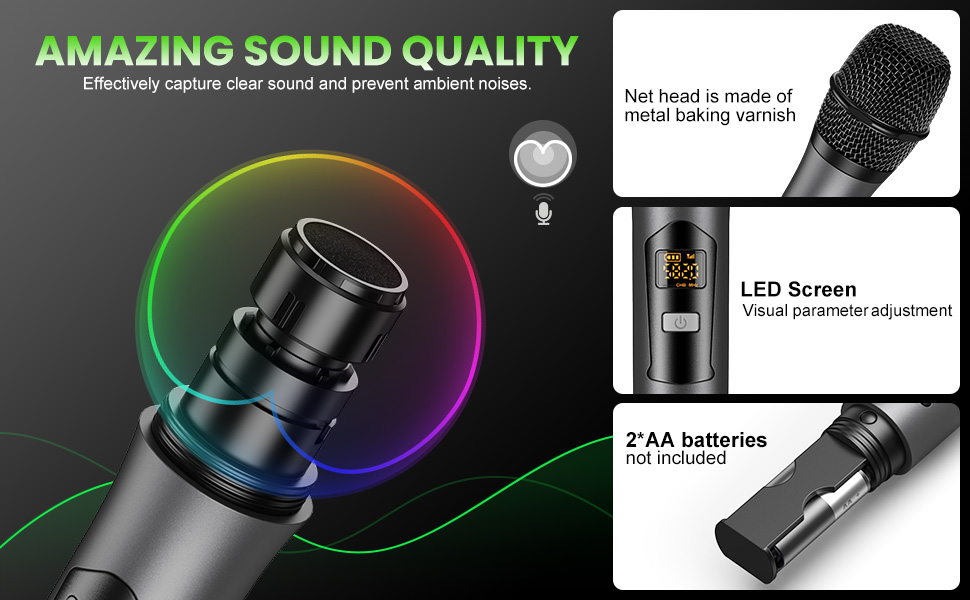
Figure 2.3: Detailed view of the microphone, highlighting its metal mesh head for clear sound, LED screen for visual parameter adjustment, and the AA battery compartment.
3. Setup Instructions
3.1 Connecting the Receiver
- Power Supply: Connect the included power adapter to the receiver's DC 12V input and then to a power outlet. The receiver can also be powered by a power bank.
- Audio Output to Speaker/Amplifier:
- Use the 6.35mm to 6.35mm cable to connect the receiver's 1/4" (6.35mm) Jack Out to your amplifier or mixer.
- Alternatively, use the RCA to RCA cable to connect the receiver's RCA L+R Output to an active speaker or power amplifier.
Important: This system requires an external speaker or sound system to output audio. It does not have a built-in speaker.
- Audio Input (Optional):
- Wired Input: Use the 3.5mm to 3.5mm audio cable to connect your TV, computer, mobile phone, or set-top box to the receiver's "INPUT" jack for background music.
- Bluetooth Input: Power on the receiver. Activate Bluetooth on your mobile device (e.g., smartphone, tablet, computer) and search for the receiver's Bluetooth name (e.g., "X100"). Pair your device to stream background music wirelessly. The Bluetooth range is approximately 32.8 feet (10 meters).

Figure 3.1: Step-by-step connection guide for the Riworal Wireless Microphone System, illustrating power connection, audio output to speakers, and audio input from various devices.

Figure 3.2: Visual reminder that the Riworal system requires an external speaker (supporting 1/4" or 1/8" jack) for sound output.
3.2 Microphone Setup
- Insert Batteries: Each wireless microphone requires 2 AA batteries (not included). Unscrew the bottom part of the microphone to access the battery compartment and insert the batteries, observing correct polarity.
- Power On: Press the power button on each microphone. The microphone will automatically pair with the receiver. The LED display on the microphone will show its status.
Figure 3.3: Close-up of the microphone's battery compartment, indicating where to insert two AA batteries.
3.3 Optimal Boot and Shutdown Order
To prevent unexpected noise or damage, follow these sequences:
Optimum Boot Order:
- Audio Mixer (if used)
- Audio Amplifier (if used)
- Speaker
- Receiver
- Microphone
Optimum Shutdown Order:
- Microphone
- Receiver
- Speaker
- Audio Amplifier (if used)
- Audio Mixer (if used)
4. Operating Instructions
4.1 Receiver Controls
The receiver unit features several controls for managing audio input and output:
- POWER Button: Turns the receiver on or off.
- WIR.VOL A / WIR.VOL B: Individual volume controls for Microphone A and Microphone B.
- MIC VOL: Master volume control for all connected microphones.
- BASS / TREBLE: Adjusts the low and high frequencies of the microphone audio.
- ECHO: Controls the echo effect applied to the microphone audio.
- MUSIC: Adjusts the volume of the background music input (from Bluetooth or 3.5mm wired connection).
- MIC Input (Front Panel): An additional 1/4" (6.35mm) input for a third wired microphone (not included).
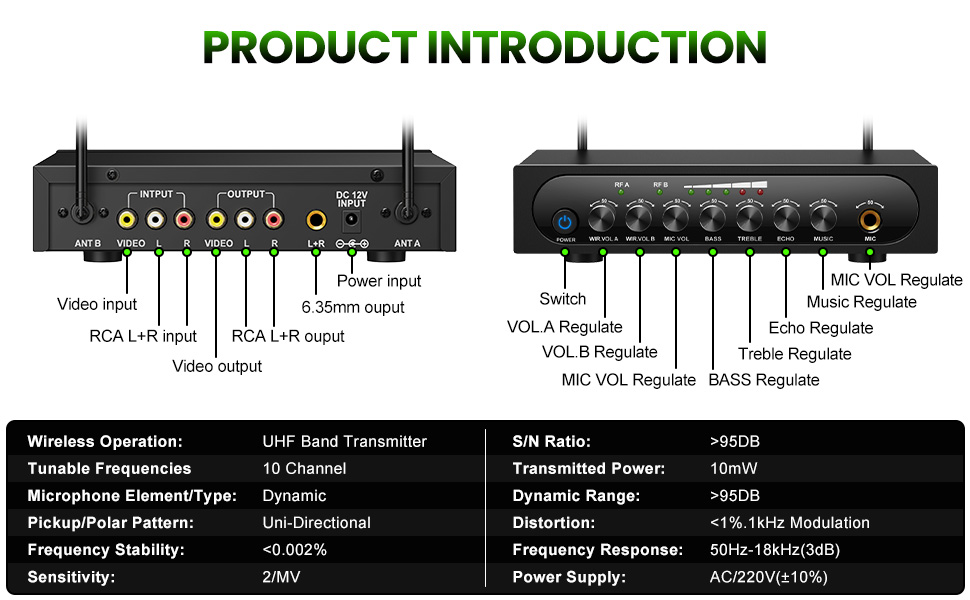
Figure 4.1: Detailed diagram of the receiver's front panel controls (Power, Volume A/B, Mic Vol, Bass, Treble, Echo, Music, Mic Input) and back panel connections (Video, RCA L+R, Power Input).
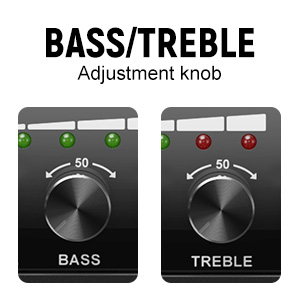
Figure 4.2: Close-up of the Bass and Treble adjustment knobs on the receiver, allowing fine-tuning of microphone audio.
4.2 Microphone Operation
- Power On/Off: Use the ON/OFF switch on the microphone handle.
- Frequency Adjustment: Press the Frequency Button on the microphone to cycle through available UHF frequencies if interference is encountered. The LED display will show the current frequency.
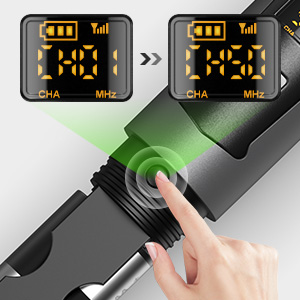
Figure 4.3: Detail of the frequency button on the microphone, used for changing channels to avoid interference.
5. Maintenance
- Battery Replacement: Replace AA batteries in the microphones when the battery indicator on the LED display is low. Always use fresh, good quality batteries for optimal performance and longevity.
- Cleaning: Use a soft, dry cloth to clean the microphones and receiver. Do not use liquid cleaners or abrasive materials.
- Storage: Store the system in a cool, dry place away from direct sunlight and extreme temperatures when not in use. Remove batteries from microphones if storing for extended periods to prevent leakage.
6. Troubleshooting
- No Sound Output:
- Ensure the receiver is powered on and connected to a speaker/amplifier.
- Check that microphones are powered on and have fresh batteries.
- Verify all audio cables are securely connected.
- Adjust the volume controls on both the receiver (WIR.VOL A/B, MIC VOL, MUSIC) and your external speaker/amplifier.
- Interference or Poor Sound Quality:
- Change the frequency on the microphone using the Frequency Button to find a clearer channel.
- Ensure the microphones are within the effective operating range (up to 164ft/50m) of the receiver.
- Minimize obstructions between the microphones and the receiver.
- Check for other wireless devices operating on similar frequencies nearby.
- Bluetooth Connection Issues:
- Ensure the receiver's Bluetooth is active and discoverable.
- Check that your mobile device's Bluetooth is enabled and within range (approx. 32.8ft/10m).
- If connecting to Apple devices, some users have reported compatibility issues. Ensure your device's software is up to date or try an alternative wired connection.
- Microphone Not Pairing:
- Ensure both the microphone and receiver are powered on.
- Check microphone batteries.
- Power cycle both the microphone and receiver.
7. Specifications
| Feature | Specification |
|---|---|
| Wireless Operation | UHF Band Transmitter |
| Tunable Frequencies | 10 Channels (2x10 tunable frequencies) |
| Microphone Element Type | Dynamic |
| Pickup/Polar Pattern | Uni-Directional (Heart-shaped pointing) |
| Frequency Response | 50Hz-18KHz (3dB) |
| Signal-to-Noise Ratio (S/N) | >95dB |
| Dynamic Range | >95dB |
| Transmitted Power | 10mW |
| Distortion | <1%.1KHz Modulation |
| Frequency Stability | <0.002% |
| Sensitivity | 2/MV (30 Decibels) |
| Microphone Power Source | 2 x AA Batteries (per mic) |
| Receiver Power Source | Power Adapter (AC/220V(±10%)) or Power Bank |
| Wireless Range | Up to 164ft (50m) UHF Wireless |
| Bluetooth Range | Up to 32.8ft (10m) |
| Material | Metal aluminum tube (microphones) |
| Item Weight (Microphone) | 0.72 Pounds (approx. 11.5 ounces) |
| Receiver Dimensions | 20.9cm (8.23in) x 15.9cm (6.26in) x 4.4cm (1.73in) |
| Microphone Length | 25.5cm (10.3in) |
Figure 7.1: Overview of the Riworal Wireless Microphone System's technical specifications, including wireless operation, frequency response, and signal-to-noise ratio.
Figure 7.2: Dimensions of the Riworal wireless microphones and receiver unit.
8. Warranty and Support
For warranty information or technical support, please contact Riworal customer service directly. Refer to the contact information provided with your product packaging or visit the official Riworal website.
You can also visit the Riworal Store on Amazon for additional product information and support resources.


