Introduction
Welcome to the user manual for your LERTIN 2500A 150PSI Portable Car Battery Jump Starter with Air Compressor, Model QS003. This device is a versatile tool designed for automotive emergencies and general utility, combining a powerful jump starter, a tire inflator, a portable power bank, and an LED flashlight. Please read this manual thoroughly before use to ensure safe and optimal operation.
What's in the Box
- 1× LERTIN Jump Starter with Air Compressor
- 1× Smart Battery Clip
- 1× USB Charging Cable
- 1× Inflation Hose
- 1× Portable Storage Bag
- 4× Gas Nozzles
- 1× Instruction Manual

Product Overview and Features
Key Features
- Powerful Jump Starter: Delivers up to 2500A peak current, suitable for 12V vehicles (up to 9.0L gas / 8.0L diesel engines). Operates reliably in temperatures from -4℉ to 140℉.
- Integrated Air Compressor: Provides up to 150 PSI with a 35L/Min inflation speed. Features 4 optional units (PSI, BAR, KPA, KG/CM²) and 5 adjustment modes (Cars, Motorcycles, Bicycles, Basketball, Pressure Protection). Automatically stops when target pressure is reached.
- Portable Power Bank: Built-in 8000 mAh battery with a USB output port for charging smartphones, tablets, and other electronic devices.
- Emergency LED Flashlight: Offers 300 lumens of illumination with three modes: continuous white light, strobe (alternating red and blue), and SOS emergency light (red).
- Smart Safety Protections: Equipped with intelligent jumper clamps providing 10 built-in safety features including spark resistance, reverse polarity, over-charge, over-heat, and short-circuit protection.
- Large LCD Display: Provides clear, real-time data for battery status, inflation pressure, and selected modes.
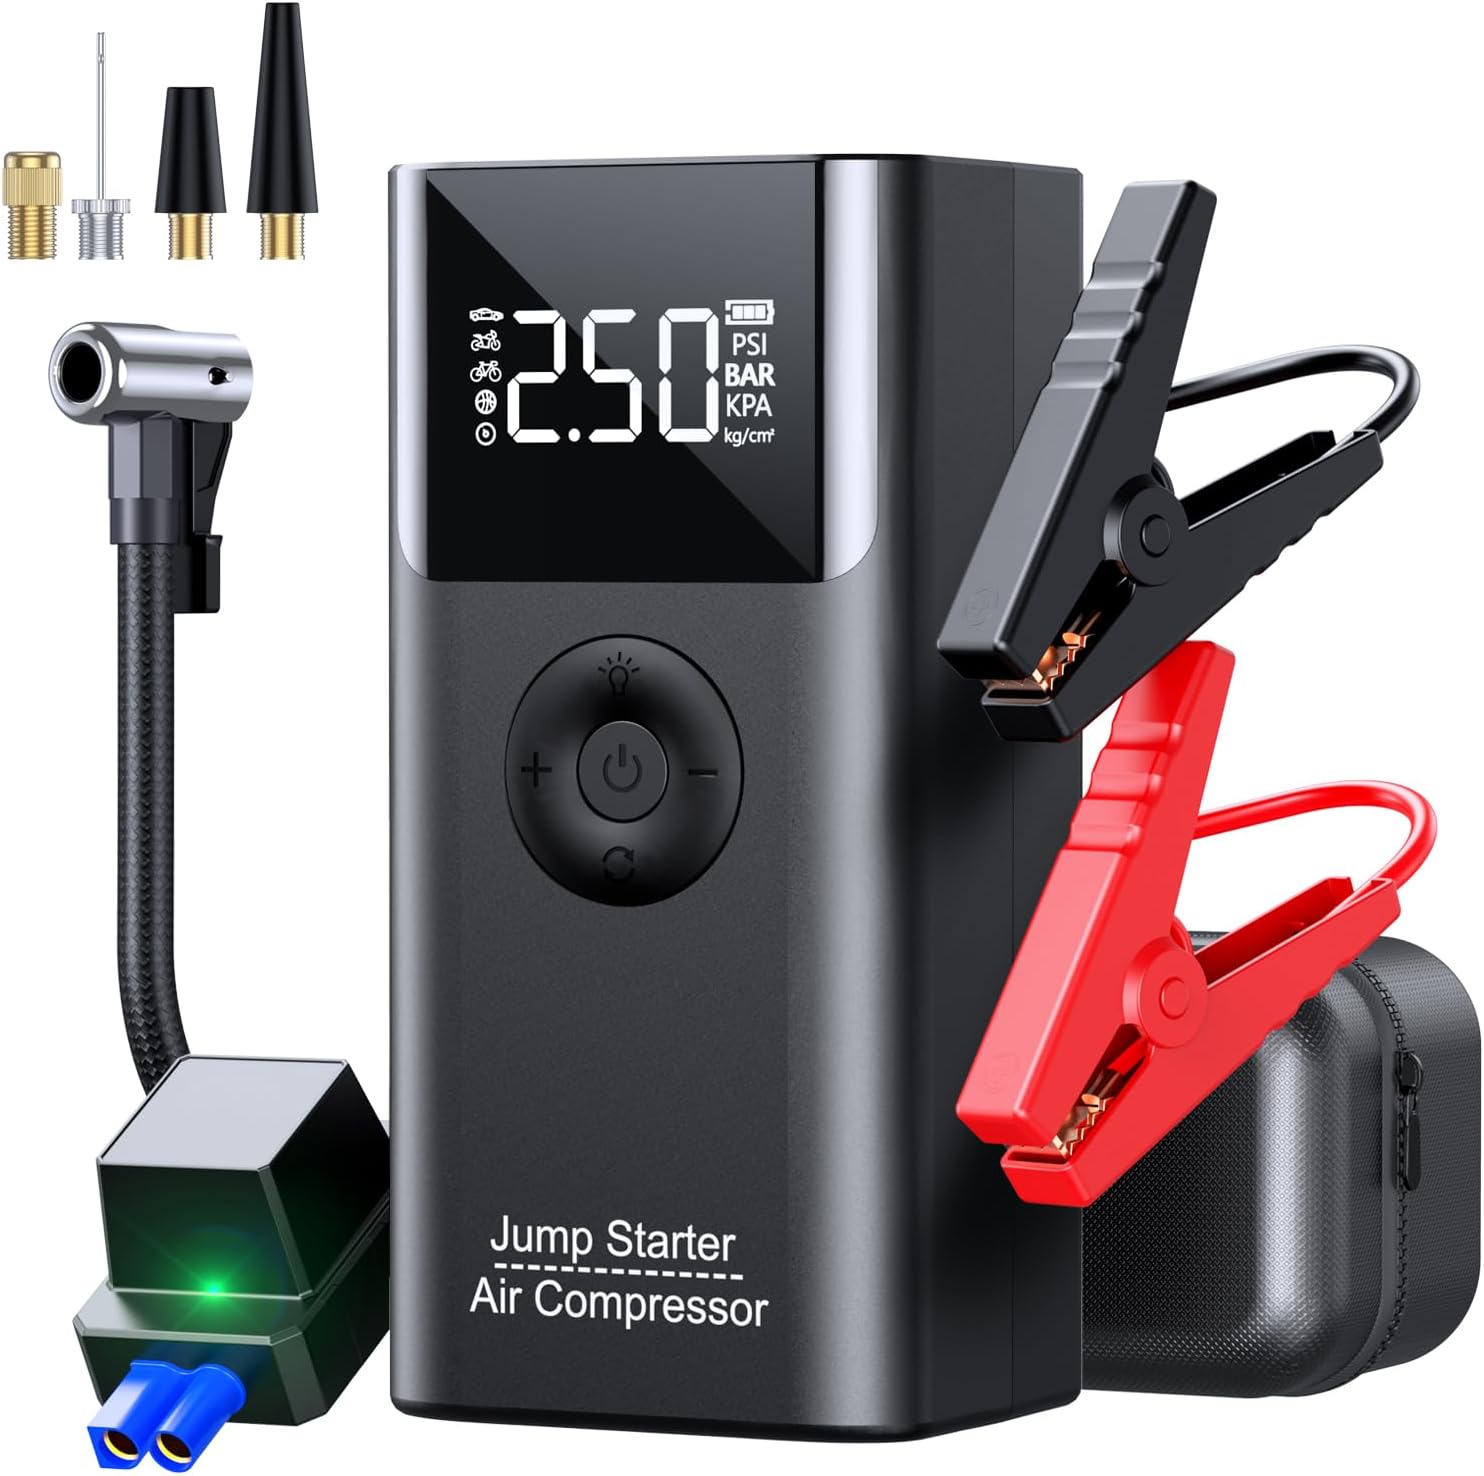
Component Identification

- Type-C Input Port (for charging the device)
- Inflation Hose Jack (for connecting the air hose)
- USB Output (for charging external devices)
- LED Lights (flashlight)
- EC5 Interface (for connecting smart battery clips)
- HD Display (LCD screen)
- Light Adjustment Button (to cycle flashlight modes)
- Air Pressure Decrease Button (-)
- Unit Adjustment Button (to change pressure units)
- Power Switch (On/Off, Start/Stop inflation)
- Air Pressure Increase Button (+)
Important Safety Instructions
Please read and understand all safety information before using this product. Failure to follow these instructions may result in electric shock, fire, or serious injury.
- Always keep the device out of reach of children.
- Do not use the air pump continuously for extended periods. If you notice abnormal noise or the battery becomes excessively hot, allow the device to cool down for a few minutes before continuing.
- For jump starting, it is recommended that the jump starter battery is more than 75% charged.
- If the device will not be used for an extended period, recharge it every 2-3 months to activate the battery and prolong its lifespan.
- Use only the provided smart battery clips. Do not attempt to jump start a vehicle without them.
- Ensure correct polarity when connecting the smart battery clips to the vehicle battery (RED to positive, BLACK to negative). The smart clip indicator light must be steady green before attempting to start the vehicle.
- Do not expose the device to rain, water, or extreme temperatures outside the specified operating range (-4℉ to 140℉).
- Avoid short-circuiting the battery clamps.
- Do not disassemble, modify, or attempt to repair the unit yourself. Contact customer support for assistance.
- Wear eye protection when working with vehicle batteries.

Initial Setup and Charging
Charging the Device
Before first use, fully charge your LERTIN Jump Starter. It is recommended to charge the device after each use to ensure it is ready for the next emergency.
- Connect the provided USB charging cable to the Type-C input port (1) on the device.
- Connect the other end of the USB cable to a suitable USB power adapter (e.g., a phone charger, not included).
- The LCD display will show the charging status.
- Charge until the display indicates a full battery (100%).
Preparing for Use
Ensure all accessories are present and in good condition. Familiarize yourself with the device's ports and buttons as identified in the Product Overview section.
Operating Instructions
1. Jump Starting a Vehicle
This device is designed to jump start 12V vehicles with up to 9.0L gas or 8.0L diesel engines.
- Ensure the jump starter is at least 75% charged.
- Turn off the vehicle's ignition and all accessories (radio, lights, etc.).
- Insert the smart battery clip cable firmly into the EC5 interface (5) on the jump starter. The light on the smart clip should be green.
- Connect the RED (+) clamp to the positive (+) terminal of the vehicle's battery.
- Connect the BLACK (-) clamp to the negative (-) terminal of the vehicle's battery.
- Verify that the indicator light on the smart battery clamp is steady green. If it is flashing or red, check the connections for correct polarity and ensure good contact.
- Start the vehicle's engine.
- Once the engine starts, immediately remove the smart battery clip from the vehicle battery, then disconnect the smart clip cable from the jump starter.

2. Using the Air Compressor
The built-in air compressor can inflate tires and other inflatables up to 150 PSI.
- Connect the inflation hose to the inflation hose jack (2) on the device and tighten it securely.
- Attach the appropriate nozzle (from the included gas nozzles) to the other end of the inflation hose and connect it to the item you wish to inflate (e.g., tire valve, ball).
- Press the Power Switch (10) to turn on the device. The LCD display (6) will show the current pressure.
- Press the Unit Adjustment Button (9) to select the desired pressure unit (PSI, BAR, KPA, KG/CM²).
- Press the Light Adjustment Button (7) to cycle through the preset inflation modes (Car, Motorcycle, Bicycle, Basketball, Pressure Protection).
- Use the Air Pressure Increase (+) (11) and Decrease (-) (8) buttons to set your target pressure.
- Long press the Power Switch (10) to start inflation. The compressor will automatically stop when the target pressure is reached.
- To manually stop inflation at any time, short press the Power Switch (10).
- Disconnect the hose and store the nozzles after use.


3. Portable Power Bank Function
The device features an 8000 mAh battery to charge electronic devices on the go.
- Connect your device's USB charging cable to the USB output port (3) on the jump starter.
- The jump starter will automatically begin charging your device.

4. LED Flashlight
The integrated LED flashlight offers three lighting modes for various situations.
- Short press the Light Adjustment Button (7) to turn on the continuous white light.
- Short press again to activate the strobe mode (alternating red and blue).
- Short press a third time for the SOS emergency light (red).
- Short press a fourth time to turn off the flashlight.


Maintenance and Storage
- Clean the device with a dry, soft cloth. Do not use harsh chemicals or abrasive cleaners.
- Store the device in its portable storage bag in a cool, dry place, away from direct sunlight, moisture, and flammable materials.
- If the device will not be used for an extended period (e.g., more than 3 months), recharge it every 2-3 months to maintain battery health and prevent deep discharge.
- Keep the smart battery clips clean and free of debris to ensure proper electrical contact.
Troubleshooting
| Problem | Possible Cause | Solution |
|---|---|---|
| Device does not turn on. | Low battery. | Charge the device fully. |
| Vehicle does not start after jump attempt. | Jump starter battery too low. Vehicle battery severely damaged. Incorrect connection. | Ensure jump starter is at least 75% charged. If vehicle battery is severely damaged, seek professional assistance. Recheck smart clip connections for correct polarity (steady green light). |
| Air compressor overheats or makes abnormal noise. | Continuous use without cooling. | Allow the device to cool down for several minutes before resuming operation. |
| Inflation stops prematurely. | Target pressure reached. | This is normal operation. Check your target pressure setting. |
| Device not charging external devices via USB. | USB cable faulty. Device battery low. | Try a different USB cable. Charge the jump starter. |
Technical Specifications
| Brand | LERTIN |
| Model | QS003 |
| Peak Output Current | 2500 Amps |
| Amperage | 2500 Amps |
| Product Dimensions (L x W x H) | 7.4" x 2.9" x 3.5" |
| Item Weight | 2.79 pounds |
| Battery Capacity | 8000 mAh |
| Air Compressor Max Pressure | 150 PSI |
| Air Compressor Flow Rate | 35 L/Min |
| Operating Temperature | -4℉ to 140℉ |
| Engine Compatibility | 12V vehicles (up to 9.0L Gas / 8.0L Diesel) |
| LED Light Output | 300 Lumens |
| Manufacturer | Shenzhen Buwei Technology Ltd. |

Warranty and Customer Support
Warranty Information
LERTIN provides the following warranty and support for this product:
- 30-Day Money-Back Guarantee: For any reason.
- 18-Month Worry-Free Warranty: Covers manufacturing defects and malfunctions.
- Lifetime Technical Support: Assistance with product usage and issues.
Customer Support
If you have any questions or require assistance with your LERTIN Jump Starter, please contact our customer support team. We are available 24 hours a day, 7 days a week.
Please refer to the contact information provided with your purchase or visit the official LERTIN website for support details. You can also contact us even 1 YEAR after purchase.