
RowyPoey PDHX8019
RowyPoey Arched Cabinet User Manual
Model: PDHX8019
1. Introduction
Thank you for choosing the RowyPoey Arched Cabinet. This elegant and versatile storage solution is designed to enhance your living space with its classic aesthetic and practical features. Featuring tempered glass doors, adjustable shelves, and a convenient bottom drawer, this cabinet provides ample space for displaying and organizing your cherished items.

Figure 1.1: The RowyPoey Arched Cabinet, showcasing its elegant design and functionality in a home environment.
2. Safety Information
Please read all safety warnings and instructions carefully before assembly and use. Failure to follow these instructions may result in injury or damage to the product.
- Anti-Tipping Device: This cabinet must be securely anchored to a wall using the provided anti-tipping device to prevent serious injury from tipping. Always install the anti-tipping device as instructed.
- Weight Distribution: Distribute weight evenly on shelves. Place heavier items on lower shelves to improve stability. Do not exceed the maximum load capacity for each shelf and drawer.
- Children Safety: Do not allow children to climb on or play with the cabinet. Keep small parts away from children during assembly.
- Glass Care: Handle glass doors with care. In case of breakage, clean up shattered glass immediately and safely.
- Assembly Environment: Assemble the cabinet on a soft, clean surface to prevent scratches. Ensure adequate lighting and space.

Figure 2.1: Illustration of the anti-tipping mechanism installation, crucial for ensuring the cabinet's stability and safety.
3. Components List
Before beginning assembly, verify that all parts and hardware are present and undamaged. Refer to the diagram below for identification.

Figure 3.1: Detailed view of key components such as soft-close hinges, metal ring pull handles, and the adjustable shelf system.
- Arched Top Panel
- Side Panels (Left & Right)
- Back Panel
- Base Panel
- Tempered Glass Doors (2)
- Adjustable Shelves (2)
- Fixed Shelf (1)
- Drawer Components (Front, Back, Sides, Bottom)
- Metal Ring Pull Handles (for doors and drawer)
- Soft-Close Hinges
- Anti-Tipping Device
- Assembly Hardware (screws, dowels, cam locks, etc.)
4. Assembly Instructions
Follow these steps carefully for proper assembly. It is recommended to have two people for assembly.
- Prepare the Area: Clear a spacious, clean, and soft area for assembly to prevent damage to components.
- Identify Components: Unpack all parts and hardware. Match them with the components list and diagrams in your package.
- Assemble the Base: Attach the side panels to the base panel using the provided hardware. Ensure all connections are secure.
- Install Fixed Shelf: Secure the fixed shelf into its designated slots between the side panels.
- Attach Back Panel: Slide or fasten the back panel into the grooves or to the back of the assembled frame.
- Assemble Arched Top: Attach the arched top panel to the main frame.
- Assemble Drawer: Follow the specific instructions for assembling the drawer components (front, back, sides, bottom) and install the drawer slides.
- Install Drawer: Insert the assembled drawer into its designated slot in the cabinet.
- Attach Doors: Mount the soft-close hinges to the glass doors and then attach the doors to the cabinet frame. Adjust hinges for proper alignment.
- Install Handles: Secure the metal ring pull handles to the doors and the drawer.
- Insert Adjustable Shelves: Place the adjustable shelf pins at your desired height and then place the adjustable shelves on top.
- Install Anti-Tipping Device: Crucially, secure the cabinet to a wall using the anti-tipping device. Mark the wall, drill pilot holes, and fasten the strap or bracket as per the detailed instructions provided in your hardware pack.

Figure 4.1: An exploded view highlighting key features and structural elements for assembly, such as hinges, shelves, and drawer mechanism.
5. Operating Instructions
The RowyPoey Arched Cabinet is designed for versatile storage and display.
- Adjustable Shelves: To adjust the height of the shelves, remove any items, lift the shelf, remove the shelf pins, reposition the pins to the desired height, and then place the shelf back on the pins. Ensure pins are securely seated.
- Glass Doors: The tempered glass doors open smoothly. Use the metal ring pull handles to open and close them. The soft-close hinges ensure a gentle and quiet closing action.
- Drawer: The bottom drawer provides concealed storage. Pull the metal ring handle to open and push to close.

Figure 5.1: Demonstration of the adjustable shelves and the functional bottom drawer, highlighting storage versatility.
6. Maintenance
Proper care will ensure the longevity and appearance of your cabinet.
- Cleaning: Wipe surfaces with a soft, damp cloth. Avoid harsh chemicals, abrasive cleaners, or polishes that may damage the finish. For glass, use a standard glass cleaner.
- Spills: Clean spills immediately to prevent staining or damage to the wood finish.
- Sunlight and Heat: Avoid prolonged exposure to direct sunlight or extreme heat, which can cause fading or warping.
- Hardware: Periodically check all screws and fasteners to ensure they are tight. Retighten if necessary.
7. Troubleshooting
If you encounter any issues, refer to the following common problems and solutions.
| Problem | Possible Cause | Solution |
|---|---|---|
| Cabinet is wobbly/unstable. | Uneven floor; loose fasteners; anti-tipping device not installed. | Ensure cabinet is on a level surface. Tighten all assembly fasteners. Install the anti-tipping device securely to the wall. |
| Doors do not close properly or are misaligned. | Hinges are not adjusted correctly; cabinet is not level. | Adjust the screws on the hinges to align the doors. Ensure the cabinet is level. |
| Drawer sticks or does not slide smoothly. | Drawer slides are misaligned or dirty; drawer is overloaded. | Check that drawer slides are properly installed and aligned. Clean any debris from the slides. Reduce the weight in the drawer. |
| Glass appears cloudy or streaky after cleaning. | Residue from cleaner; improper cleaning cloth. | Use a streak-free glass cleaner and a clean, lint-free microfiber cloth. |
8. Specifications
| Feature | Detail |
|---|---|
| Model Number | PDHX8019 |
| Dimensions (H x W x D) | 71 inches x 31.4 inches x 15.7 inches (180.34 cm x 79.76 cm x 39.88 cm) |
| Weight | Approx. 54.43 kg (120 lbs) |
| Material | Engineered Wood (MDF), Tempered Glass |
| Color | Black |
| Max. Load Capacity (Each Shelf) | 45 lbs (20.4 kg) |
| Max. Load Capacity (Drawer) | 25 lbs (11.3 kg) |
| Special Features | Adjustable Shelves, Glass Doors, Arched Design, Drawer, Anti-Tipping Device |
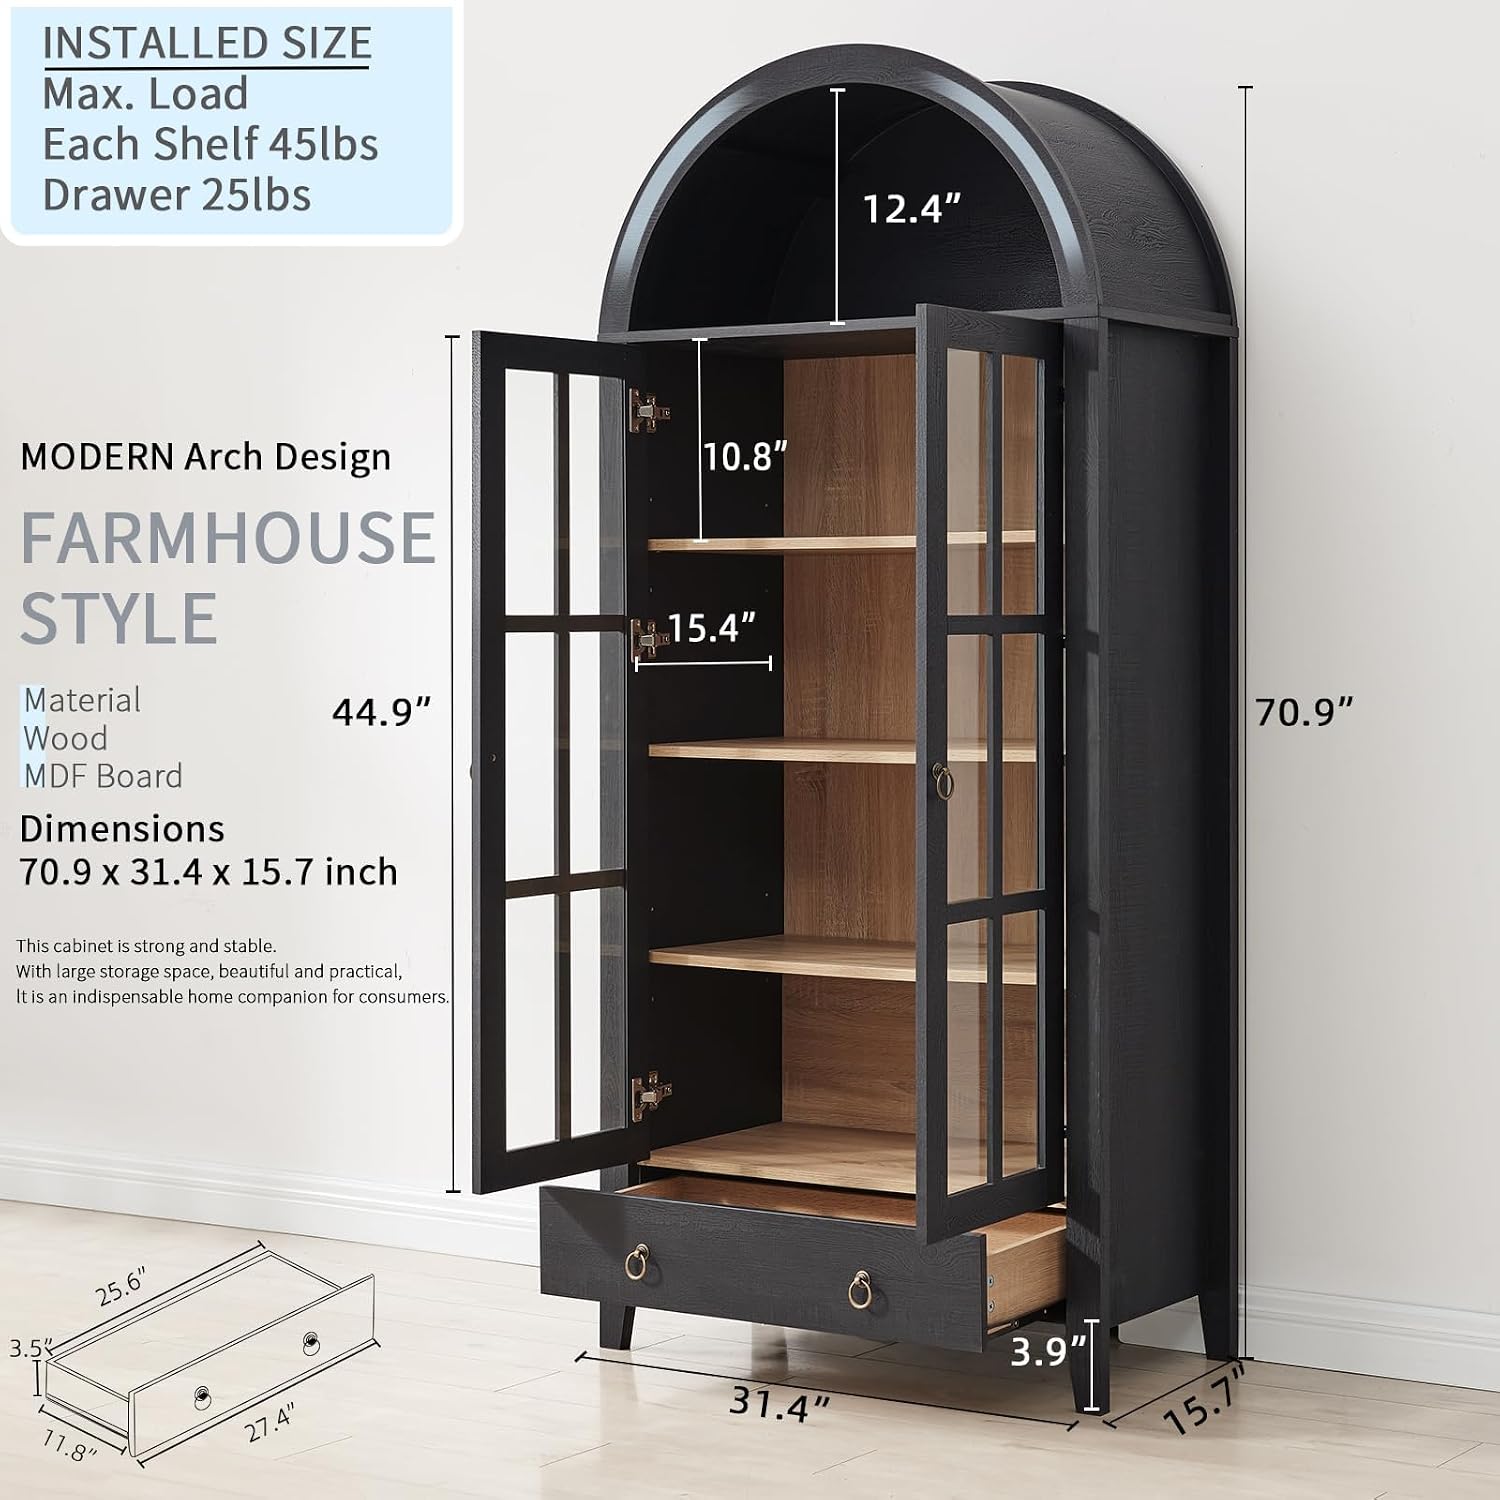
Figure 8.1: Detailed dimensions and maximum load capacities for shelves and drawer.
9. Warranty and Support
RowyPoey stands behind the quality of its products. For any questions regarding assembly, missing parts, or product defects, please contact our customer support team. Please have your model number (PDHX8019) and purchase information ready when contacting support.
Note: Specific warranty details may vary by region and retailer. Please refer to your purchase documentation for precise warranty terms.
Ask a question about this manual
Ask about setup, troubleshooting, compatibility, parts, safety, or missing instructions. Manuals+ will review the question and use this page’s manual context to help answer it.