1. Introduction
This manual provides detailed instructions for the safe and efficient operation, setup, and maintenance of your WEP 982-VI 1 Cordless Soldering Station. Please read this manual thoroughly before using the device and retain it for future reference.

Image 1.1: WEP 982-VI 1 Cordless Soldering Station, showing the main unit, soldering iron, and included tips.
2. Package Contents
Verify that all items listed below are present in your package:
- 1x WEP 982-VI 1 Cordless Soldering Station Kit Main Unit
- 5 x C235 Cartridge Heating Elements (I*2, SI*1, 3C*1, 3.2D*1)
- 1 x Lead-free Solder Wire (0.8mm, 10g)

Image 2.1: The included lead-free solder wire and five C235 cartridge heating elements (soldering tips).
3. Setup
3.1 Power Options
The WEP 982-VI 1 offers dual power options for versatile use:
- Cordless Operation: Compatible with 20V power tool batteries (battery not included).
- Direct DC Power: Supports direct DC power via a 20V laptop adapter (adapter not included).

Image 3.1: Illustration of the two power options: a 20V hand tool battery and a 20V laptop adapter connection.
3.2 Battery and Power Adapter Installation
- To use with a battery, slide a compatible 20V battery into the base of the soldering station until it clicks into place.
- Alternatively, connect a 20V laptop adapter (5.5x2.1x11mm) to the DC input port on the side of the unit.
- Ensure the main power switch on the front of the unit is in the OFF position before connecting any power source.
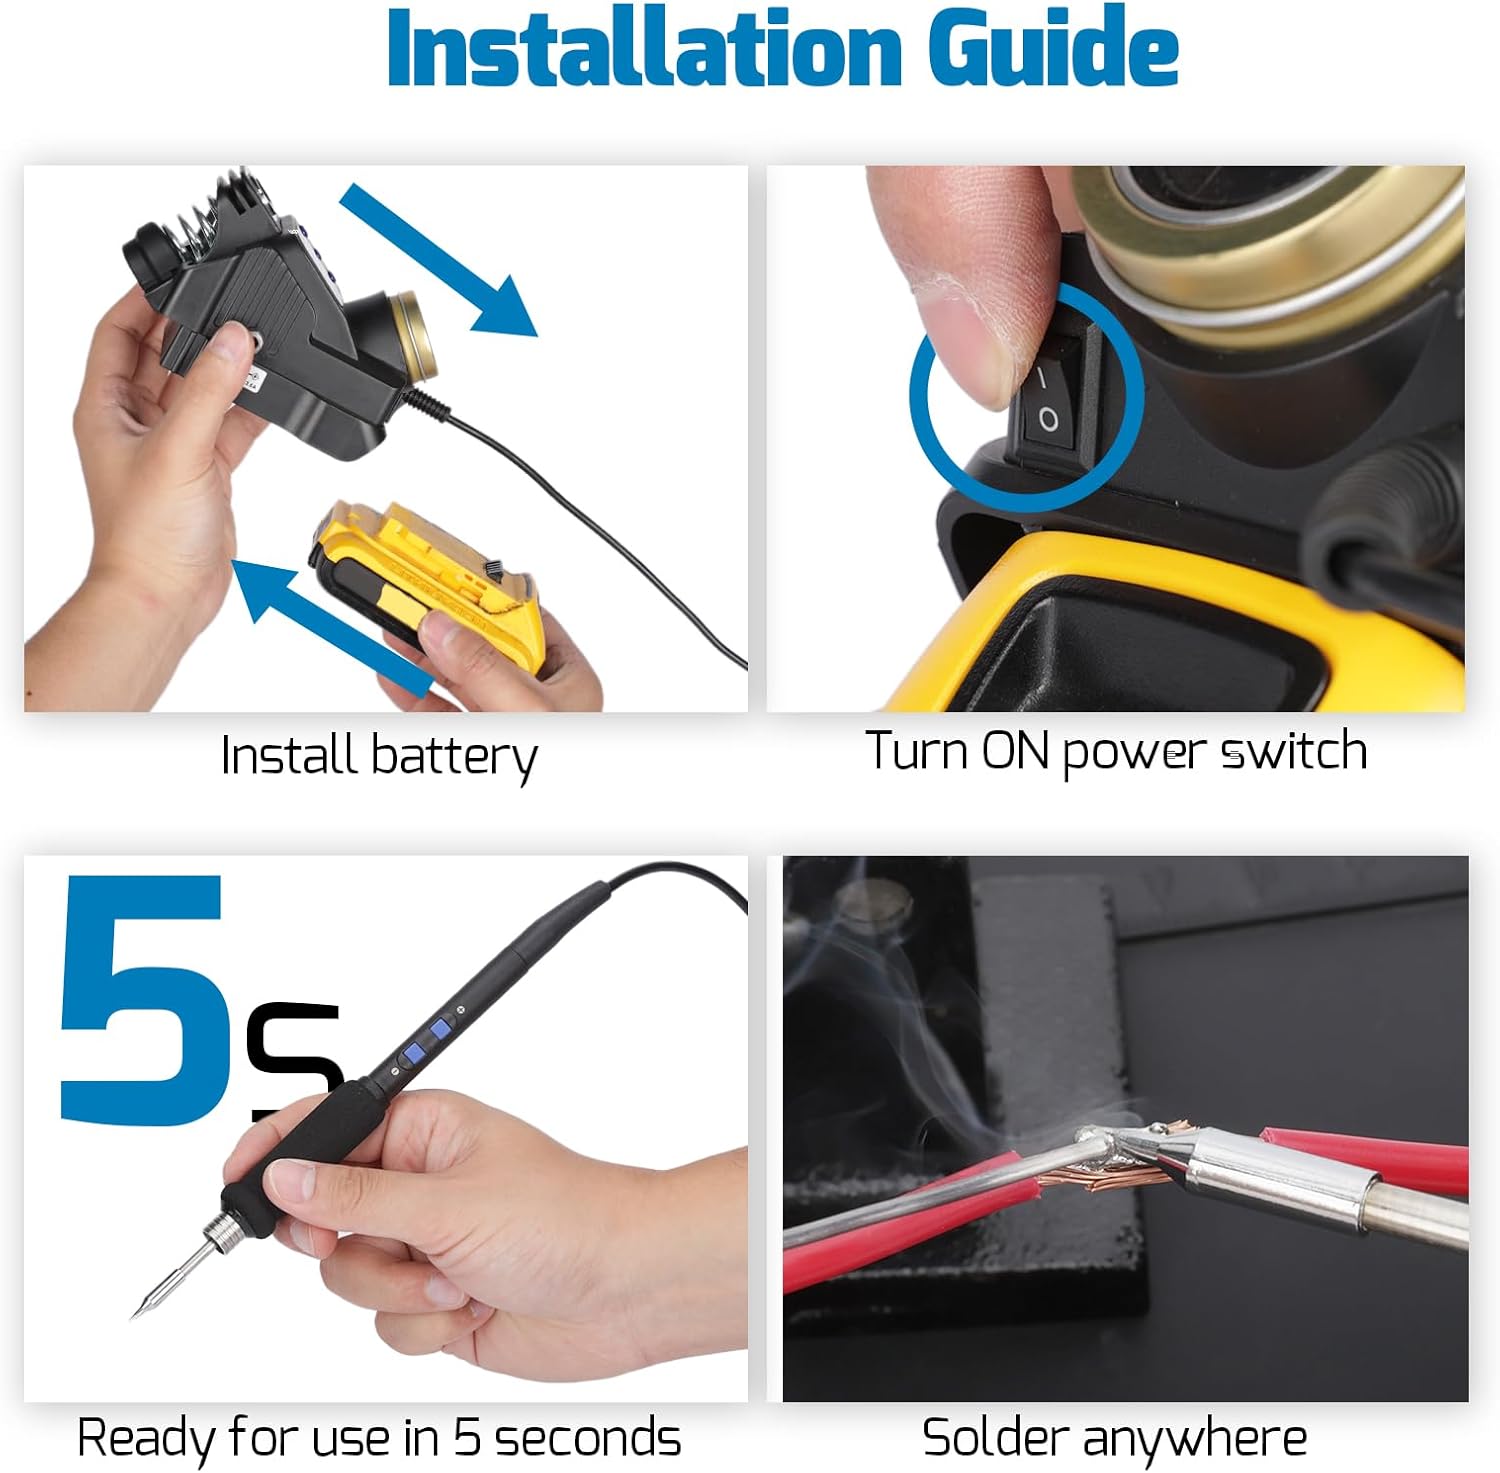
Image 3.2: Step-by-step guide for installing the battery and turning on the power switch.
3.3 Soldering Tip Installation
The WEP 982-VI 1 uses C235 cartridge heating elements. Proper installation is crucial for performance and safety.
- Ensure the soldering iron is cool and disconnected from power.
- Carefully insert the desired C235 tip into the handpiece.
- Push the tip fully to the bottom until the marking line on the heating element reaches the rim of the handpiece's receptacle. Incorrect insertion can lead to poor heating or damage.

Image 3.3: Visual guide for correct soldering tip installation, emphasizing full insertion.
4. Operating Instructions
4.1 Power On/Off
After connecting a power source, flip the built-in power switch on the front of the unit to the 'ON' position. The LCD display will illuminate.
4.2 LCD Full-Color Display
The full-color LCD displays essential information for monitoring and control:
- Set Temperature
- Real-time Temperature
- Battery Level (if using battery power)
- Power Meter
- Heating Indicator

Image 4.1: The full-color LCD display showing temperature, battery, and power information.
4.3 Temperature Adjustment
The soldering station features quick-cut buttons on the handpiece for temperature adjustment. The temperature range is 194°F to 842°F (90°C to 450°C).
- Use the '+' and '-' buttons on the handpiece to increase or decrease the set temperature.
- The C235 cartridge heating element provides rapid heating, typically ready for use in 5 seconds.

Image 4.2: The display showing adjustable temperature settings and the C235 heating element in use.
4.4 Celsius/Fahrenheit Conversion
The unit supports conversion between Celsius (°C) and Fahrenheit (°F) to suit user preferences. Access this setting through the menu on the LCD display.
4.5 Sleep Mode and Auto Shutdown
For enhanced safety and to extend tip lifespan, the soldering iron enters sleep mode when placed in its integrated holder. It will also auto-shutdown after a user-adjustable time (0-8 minutes).
- To adjust the auto-shutdown time, navigate to the 'STAND-BY TIMER' setting in the menu.
- Placing the iron in the holder activates sleep mode, reducing tip temperature.

Image 4.3: The soldering station indicating sleep mode and displaying menu options for temperature units and standby timer.
5. Maintenance
5.1 Tip Cleaning
The soldering station includes a built-in brass wool tip cleaner. Regularly clean the soldering tip to remove excess solder and oxidation, ensuring optimal performance and longevity.
5.2 Tip Replacement
When a tip becomes worn or damaged, replace it with a new C235 compatible tip. Use the designated tip change slot for safe and easy removal and insertion.
5.3 General Care
- Keep the unit clean and free from dust and debris.
- Store the soldering station in a dry environment when not in use.
- Avoid dropping the unit or subjecting it to strong impacts.

Image 5.1: Overview of integrated safety and convenience features, including the tip cleaner and tip change slot.
6. Troubleshooting
If you encounter issues with your WEP 982-VI 1 Soldering Station, refer to the following common problems and solutions:
- Unit does not power on:
Ensure the battery is fully charged and correctly installed, or that the DC power adapter is securely connected and providing power. Check the main power switch is in the 'ON' position. - Soldering iron is not heating or heating slowly:
Verify that the C235 tip is fully inserted into the handpiece as shown in Image 3.3. Check the set temperature on the LCD display. Ensure the power source (battery or adapter) is functioning correctly. - Temperature is unstable:
Ensure the tip is clean and properly seated. Environmental factors like drafts can affect temperature stability. - LCD display is blank or flickering:
Check the power connection. If using a battery, ensure it has sufficient charge. If the issue persists, contact technical support.
7. Specifications
| Feature | Specification |
|---|---|
| Model Number | 982-VI 1 |
| Upper Temperature Rating | 842 Degrees Fahrenheit (450°C) |
| Product Dimensions | 6.1 x 3.3 x 3.8 inches (155 x 85 x 97 mm) |
| Item Weight | 1.01 pounds |
| Power Source | Battery Powered (20V compatible) / DC Adapter (18-20V, 3.5A) |
| Voltage | 110-127 Volts (USA specifications) |
| Display Type | LCD Full-Color |
| Included Components | 1x Soldering Station, 5x C235 Cartridge Heating Elements, 1x Lead-free Solder Wire (0.8mm, 10g) |

Image 7.1: Product dimensions and illustration of the dual power input options.
8. Warranty and Support
8.1 Warranty Information
This WEP soldering station kit is covered by a 1-year USA technical support warranty.
8.2 Technical Support
For any technical assistance or inquiries, please contact our dedicated support team. 24-hour assistance is available. WEP also offers an affordable range of compatible replacement parts.
8.3 Important Safety Notice
This product is rated for 110-127V USA specifications. Do not connect this iron to a 220V power socket, as this may cause damage to the unit and pose a safety risk.


