
Introduction
This manual provides essential information for the installation, operation, and maintenance of your GIGABYTE Z890 AORUS Master Motherboard. Designed for Intel Core Ultra (Series 2) CPUs, this motherboard features advanced power delivery, high-speed memory support, and extensive connectivity options. Please read this manual thoroughly before proceeding with installation to ensure proper setup and optimal performance.

Figure 1: GIGABYTE Z890 AORUS Master Motherboard and retail packaging.
Setup and Installation
1. Pre-Installation Checklist
- Ensure you have all necessary components: CPU, CPU cooler, DDR5 RAM modules, M.2 SSDs, graphics card, power supply, and PC case.
- Prepare a static-free environment. Use an anti-static wrist strap or frequently touch a grounded metal object.
- Refer to your CPU and CPU cooler manuals for specific installation instructions.
2. Motherboard Layout and Component Placement

Figure 2: Top-down view of the Z890 AORUS Master Motherboard, highlighting the LGA 1851 CPU socket, four DDR5 DIMM slots, and multiple PCIe slots.
Familiarize yourself with the motherboard's layout. Key areas include the LGA 1851 CPU socket, four DDR5 DIMM slots, multiple PCIe 5.0 and PCIe 4.0 slots, and M.2 slots with thermal guards.
3. CPU Installation
- Open the CPU socket lever and remove the protective cover.
- Carefully align the CPU (Intel Core Ultra Series 2) with the socket, ensuring the gold triangle on the CPU matches the triangle on the socket.
- Gently place the CPU into the socket. Do not force it.
- Close the socket lever to secure the CPU.
4. RAM Installation (DDR5)
- Open the clips at both ends of the DDR5 DIMM slots.
- Align the notch on the DDR5 memory module with the key in the DIMM slot.
- Press down firmly on both ends of the memory module until the clips snap into place.
- For optimal performance, install memory modules in the recommended dual-channel configuration as per the motherboard manual (refer to the physical manual included with your product for specific slot recommendations).
5. M.2 SSD Installation
The motherboard features PCIe M.2 slots with M.2 EZ-Latch Plus and Thermal Guard designs.
- Locate the M.2 slots and remove the thermal guard screws.
- Carefully insert the M.2 SSD into the slot at an angle.
- Gently push down the M.2 SSD and secure it using the EZ-Latch mechanism or screw.
- Reattach the thermal guard to ensure proper cooling.
6. PCIe Card Installation
The Z890 AORUS Master includes Reinforced PCIe UD Slot X PCIe 5.0 with PCIe EZ-Latch Plus Design.
- Open the latch on the desired PCIe slot.
- Align your graphics card or other PCIe expansion card with the slot and press down firmly until it clicks into place.
- Ensure the card is fully seated and secure it with a screw to your PC case.

Figure 3: Angled view of the motherboard, showcasing the PCIe slots and M.2 heatsinks, designed for efficient cooling and easy installation.
7. Power Connections
- Connect the 24-pin ATX main power connector from your power supply to the motherboard.
- Connect the 8-pin (or 4+4 pin) CPU power connector(s) to the motherboard.
- Connect any necessary PCIe power cables to your graphics card.
8. Front Panel and I/O Connections
Connect your PC case's front panel connectors (power button, reset button, USB ports, audio jacks) to the corresponding headers on the motherboard. Refer to the motherboard's physical manual for detailed pinout diagrams.
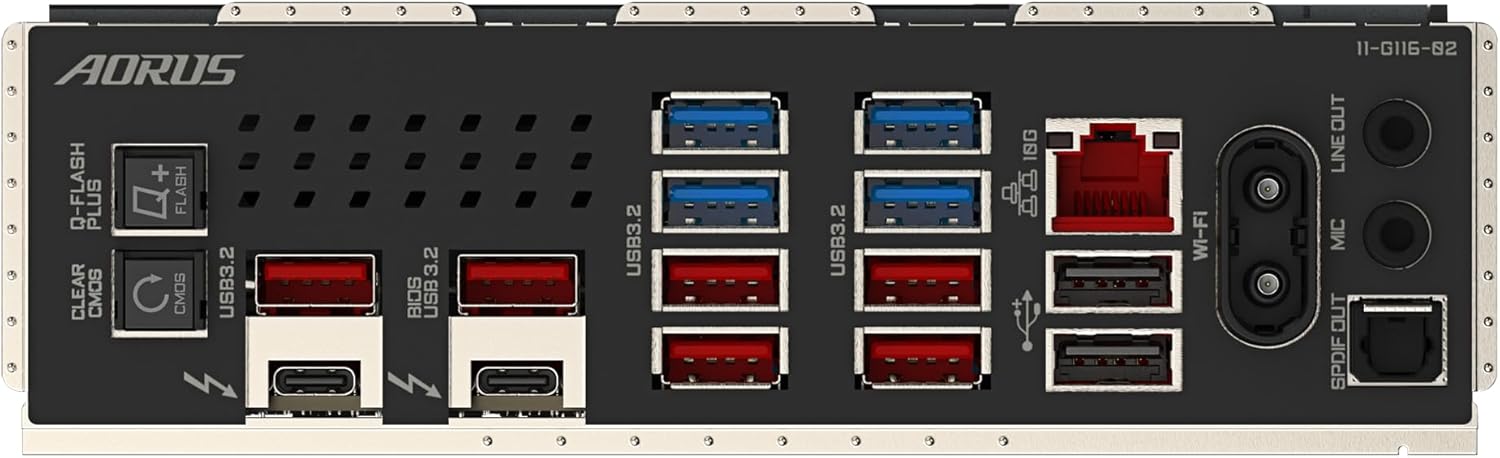
Figure 4: Rear I/O panel of the motherboard, featuring 10GbE LAN, Wi-Fi 7 antenna connectors, Thunderbolt 4 Type-C, and various USB 3.2 ports.
The rear I/O panel includes a variety of ports for external devices, such as 10GbE LAN, Intel 2x2 Wi-Fi 7 BE200 with WIFI EZ-Plug Design, Thunderbolt 4 Type-C, and USB 3.2 Gen2x2 Type-C, along with multiple USB 3.2 ports.
Operating Instructions
1. Initial Boot and BIOS/UEFI Setup
Upon the first boot, the system will typically enter the BIOS/UEFI setup utility. Here you can configure system settings, boot order, and enable features like XMP for memory overclocking. Press the DEL key during startup to enter BIOS setup.
The Q-Code display on the motherboard can show real-time CPU temperature and diagnostic codes during boot. Refer to the physical manual for a complete list of Q-Codes.
2. Driver Installation
After installing your operating system, install the necessary drivers for the motherboard's components. These include chipset drivers, LAN drivers, Wi-Fi drivers, audio drivers, and any other peripheral drivers. Drivers are typically provided on a USB drive included with the motherboard or can be downloaded from the GIGABYTE official website.
Note: While GIGABYTE provides a Control Center utility, some users have reported potential conflicts with other software. It is recommended to install drivers individually from the official GIGABYTE support page for optimal stability.
3. Key Features Overview
- Digital 18+1+2+1 Phases 110A SPS VRM: Provides stable and efficient power delivery to the CPU.
- Reinforced PCIe UD Slot X PCIe 5.0: Ensures durability and high bandwidth for graphics cards and other PCIe 5.0 devices.
- PCIe M.2 Design (Up to 25110) with M.2 EZ-Latch Plus & Thermal Guard: Supports high-speed NVMe SSDs with easy installation and effective cooling.
- Intel 2x2 Wi-Fi 7 BE200 with WIFI EZ-Plug Design: Offers cutting-edge wireless connectivity.
- 10GbE LAN: Provides ultra-fast wired network connectivity.
- THUNDERBOLT 4 Type-C, USB 3.2 Gen2x2 Type-C: Versatile high-speed connectivity for external devices.
- AORUS Exclusive DDR Cooling kit: DDR Wind Blade: Enhances memory stability and performance through improved cooling.
Maintenance
1. Cleaning
Regularly clean your PC to prevent dust buildup, which can lead to overheating and reduced performance. Use compressed air to clear dust from fans, heatsinks, and vents. Ensure the system is powered off and unplugged before cleaning.
2. BIOS Updates
GIGABYTE periodically releases BIOS updates to improve stability, add new features, or support new hardware. Check the official GIGABYTE website for the latest BIOS version for your Z890 AORUS Master motherboard. Follow the instructions provided by GIGABYTE carefully when performing a BIOS update to avoid system instability.
3. Driver Updates
Keep your system drivers updated to ensure compatibility and optimal performance. Regularly check the GIGABYTE support website for the latest chipset, LAN, Wi-Fi, audio, and other relevant drivers.
Troubleshooting
Common Issues and Solutions
- No Display/Boot:
- Check all power connections (24-pin ATX, CPU power, GPU power).
- Reseat RAM modules. Try booting with only one RAM stick.
- Reseat the graphics card.
- Clear CMOS using the dedicated button on the rear I/O panel or by removing the CMOS battery for a few minutes.
- Driver Conflicts/Software Issues:
- If experiencing issues with GIGABYTE Control Center or other utilities, consider uninstalling them and installing drivers manually from the official GIGABYTE website.
- Ensure your operating system is fully updated.
- Q-Code Display Errors:
The Q-Code display provides diagnostic codes during boot. If a code persists, refer to the motherboard's physical manual for its meaning and suggested troubleshooting steps. For example, a code might indicate a CPU, RAM, or GPU issue.
- Overheating:
- Ensure CPU cooler is properly installed and making good contact with the CPU.
- Verify case fan airflow and ensure proper ventilation.
- Clean dust from heatsinks and fans.
Specifications
| Feature | Specification |
|---|---|
| Brand | GIGABYTE |
| Model Name | Z890 AORUS MASTER |
| CPU Socket | LGA 1851 |
| Compatible Processors | Intel Core Ultra (Series 2) CPUs |
| RAM Memory Technology | DDR5 |
| Memory Speed (OC) | Up to 9500 MHz |
| Chipset Type | Intel Z890 |
| PCIe Slots | 2x PCIe 5.0, 3x PCIe 4.0 |
| VRM Phases | Digital 18+1+2+1 Phases 110A SPS |
| Wireless Connectivity | Intel 2x2 Wi-Fi 7 BE200 |
| Wired LAN | 10GbE LAN |
| USB Ports | Thunderbolt 4 Type-C, USB 3.2 Gen2x2 Type-C, various USB 3.2 |
| Dimensions (LxWxH) | 9.61 x 12.01 x 1.38 inches |
| Item Weight | 4.83 pounds |
| Platform | Windows |
Warranty and Support
Warranty Information
GIGABYTE products are covered by a limited warranty. Please refer to the warranty card included with your product or visit the official GIGABYTE website for detailed warranty terms and conditions specific to your region and product model.
Technical Support
For technical assistance, driver downloads, BIOS updates, and FAQs, please visit the official GIGABYTE support website. You can typically find support resources by searching for your specific model number, Z890 AORUS MASTER.
Manufacturer: Gigabyte
For further assistance, you may contact GIGABYTE customer service through their official channels.