Introduction
This manual provides detailed instructions for the operation and maintenance of your EBTOOLS Professional 8-Channel Audio Mixer. This versatile sound board console is designed for various audio applications, including recording, live streaming, podcasting, and home entertainment. It features 8 channels, a digital display, Bluetooth connectivity, USB playback/recording, and 99 built-in DSP effects.
Important Safety Information
- Read all instructions carefully before operating the device.
- Keep this manual for future reference.
- Do not expose the device to rain or moisture.
- Do not block any ventilation openings.
- Use only attachments/accessories specified by the manufacturer.
- Unplug the device during lightning storms or when unused for long periods.
- Refer all servicing to qualified service personnel.
Package Contents
Please check that all items are present and in good condition:
- 1 x EBTOOLS Professional 8-Channel Audio Mixer
- 1 x Power Cable (US Plug)
- 1 x User Manual
Product Overview
Familiarize yourself with the various controls and connections on your audio mixer.
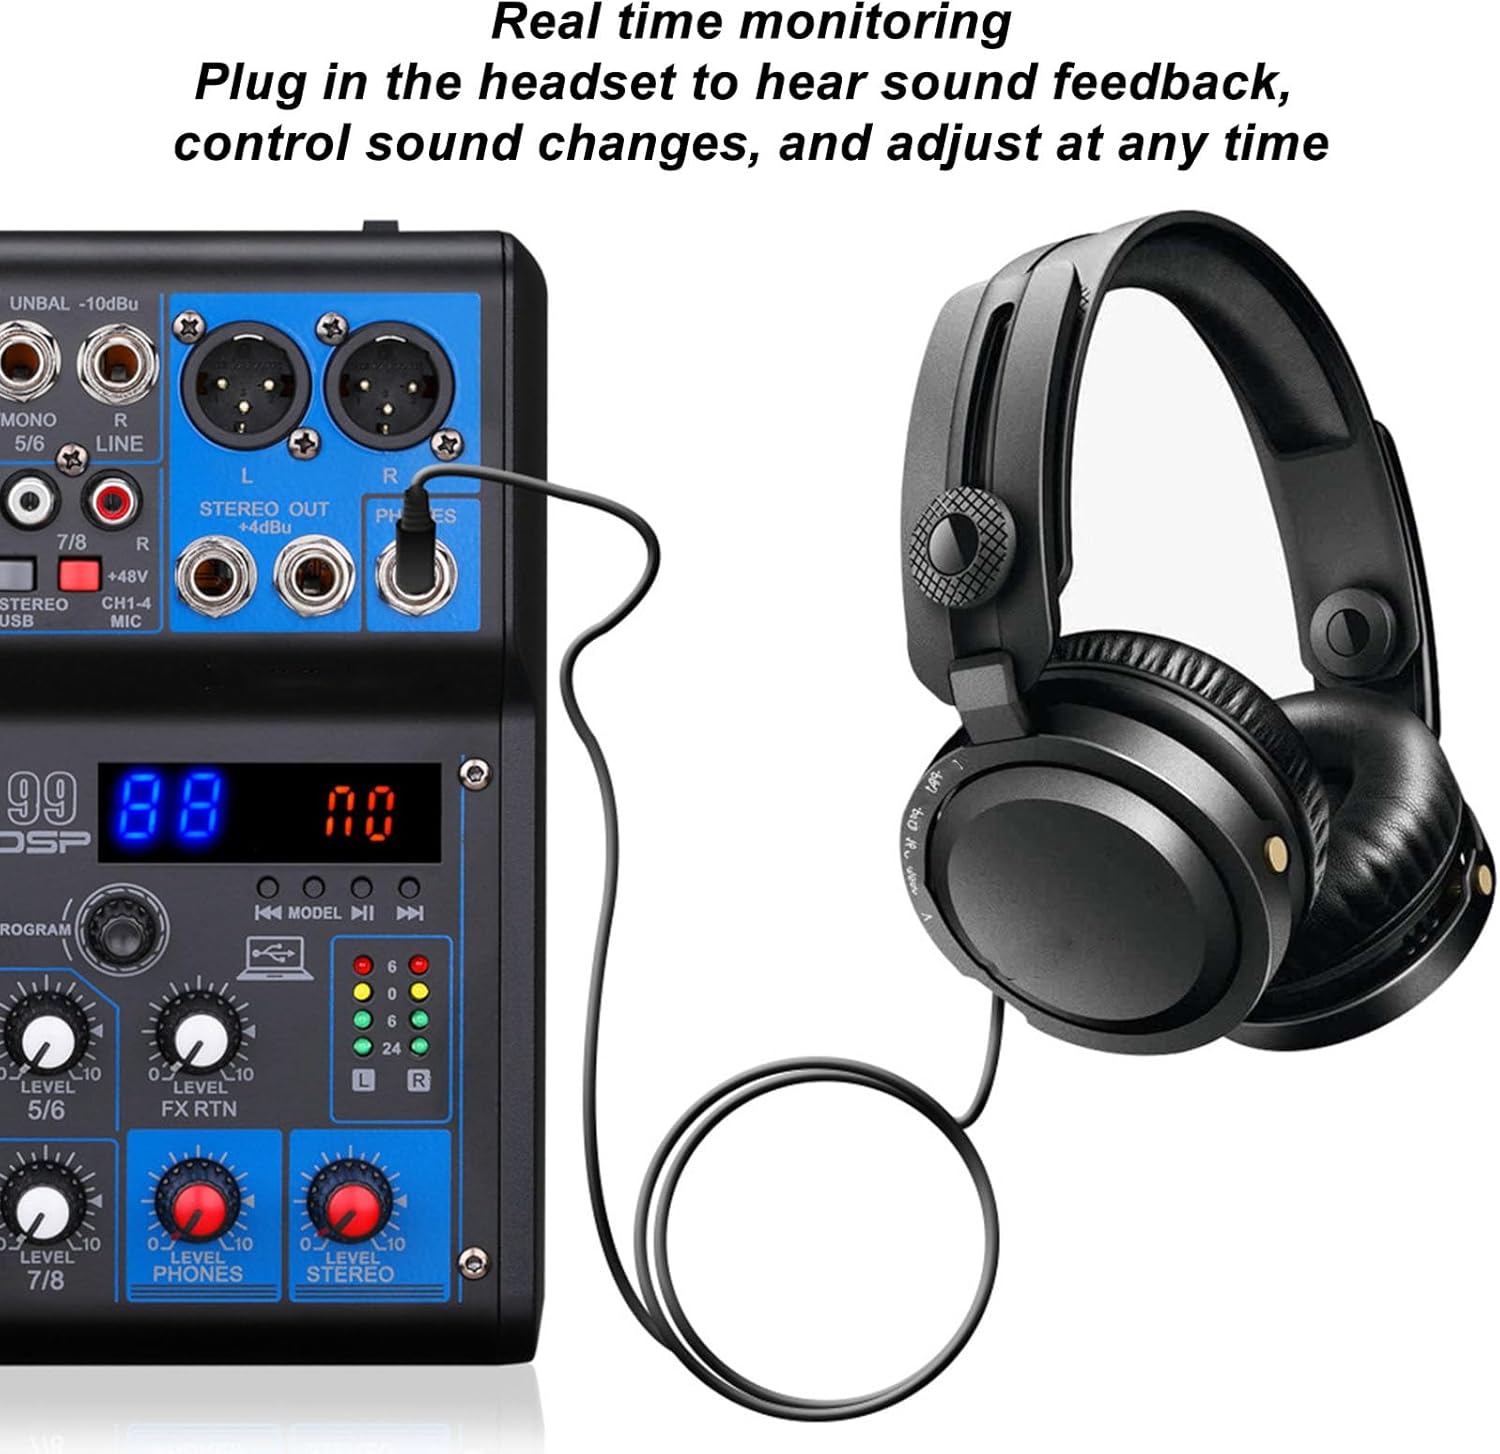
Figure 1: Top-down view of the EBTOOLS 8-Channel Audio Mixer, illustrating the layout of input channels, equalization controls, DSP effects section, and master output controls.
Front Panel Controls and Connections
- MIC/LINE Inputs (Channels 1-4): XLR/TRS combo jacks for microphones or line-level instruments.
- PAD Button: Reduces input signal by 26dB for high-level sources.
- HPF Button: Activates High-Pass Filter to reduce low-frequency noise below 80Hz.
- GAIN Control: Adjusts input sensitivity for each channel.
- HIGH/LOW EQ: Two-band equalizer for adjusting treble and bass frequencies.
- FX Control: Sends signal to the internal DSP effects processor.
- LEVEL Control: Adjusts the output level of each channel.
- STEREO/USB Input (Channels 5/6): TRS inputs for stereo line-level devices or USB audio.
- STEREO Input (Channels 7/8): TRS inputs for additional stereo line-level devices.
- DSP Display and Controls: Digital display for effect selection and parameter adjustment.
- PHONES Output: 1/4" TRS jack for headphone monitoring.
- STEREO OUT: TRS outputs for connecting to main speakers or recording devices.
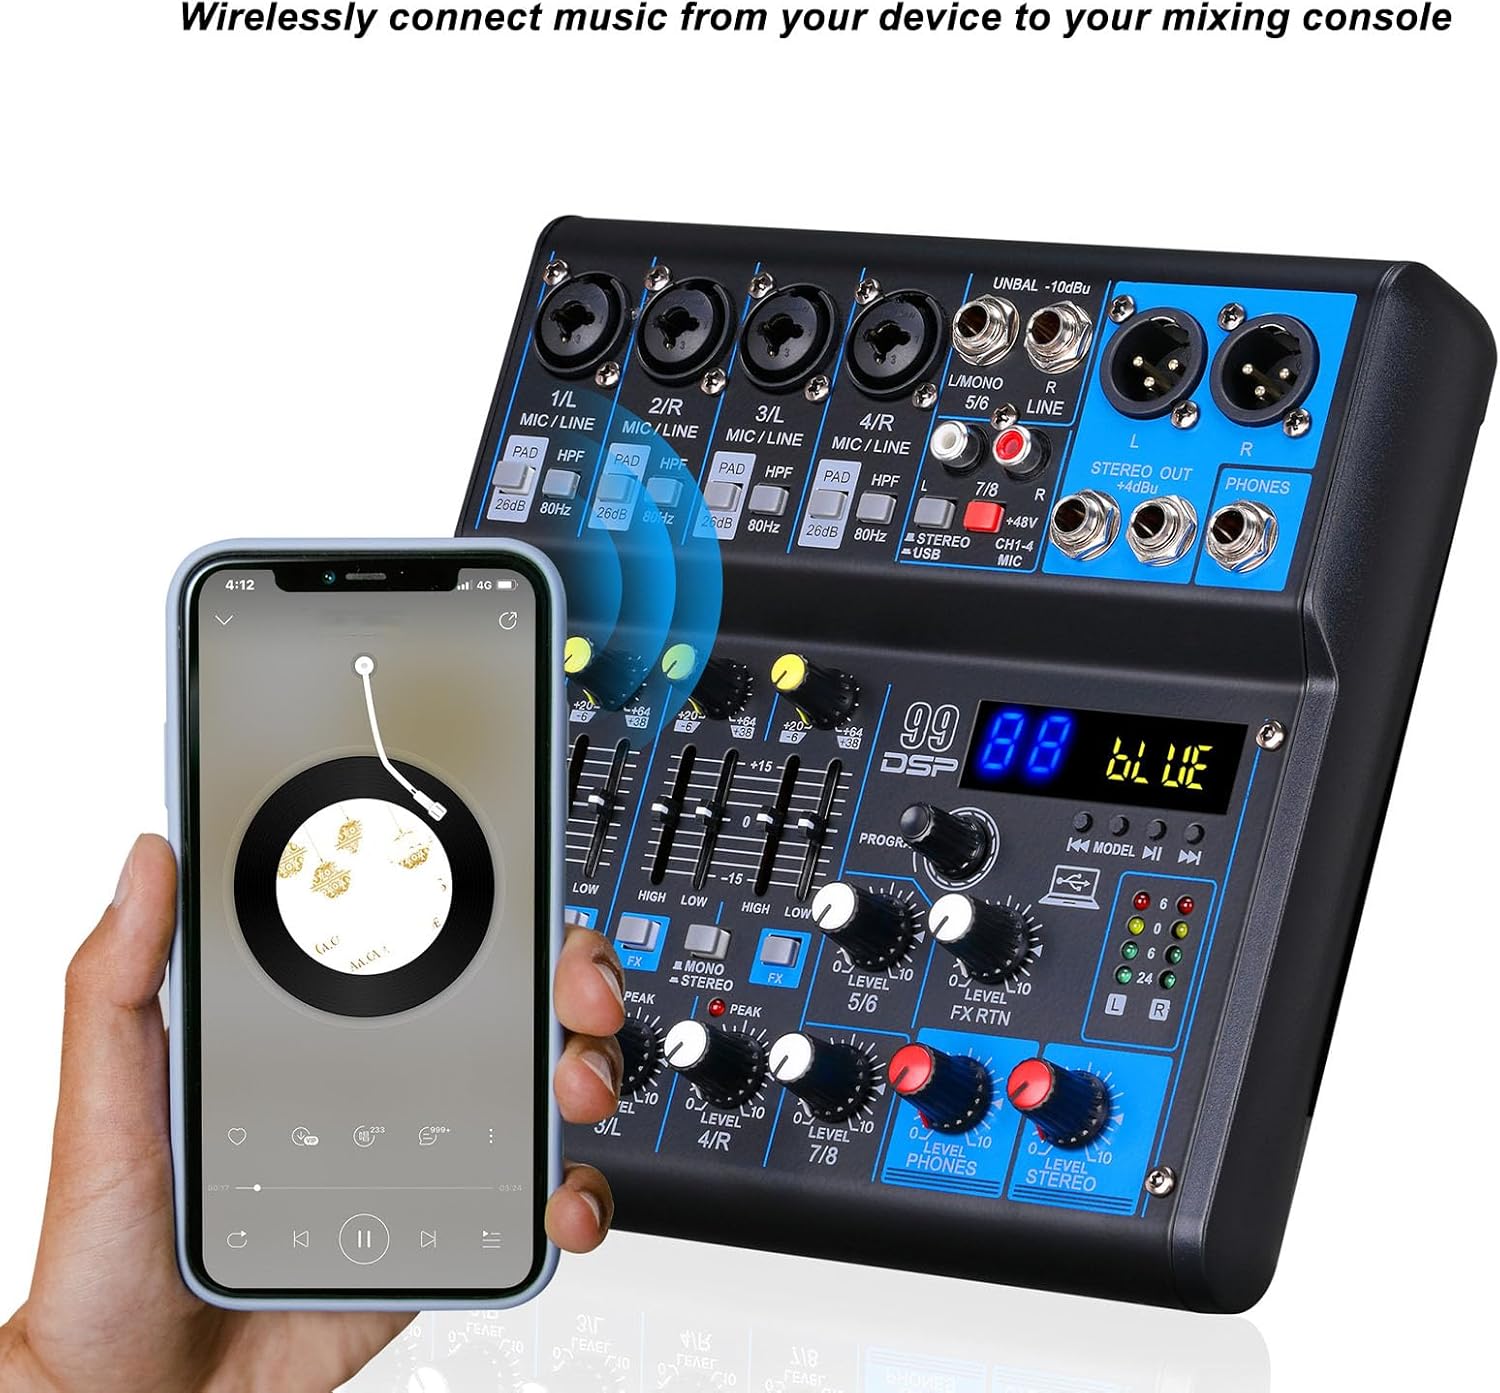
Figure 2: Digital display and DSP effect selection area, indicating the 99 built-in digital effects.
Rear Panel Connections

Figure 3: Rear panel connections, including the POWER switch, DC 5V input, and USB port for computer connection or USB flash drive.
- POWER Switch: Turns the mixer on or off.
- DC 5V Input: Power input for the mixer.
- USB Port: Connects to a computer for audio interface functionality or for inserting a USB flash drive for MP3 playback/recording.
Setup
- Power Connection: Connect the provided power cable to the DC 5V input on the rear panel of the mixer and then to a suitable power outlet. Ensure the POWER switch is in the OFF position before connecting.
- Output Connection: Connect the STEREO OUT (L/R) jacks to your main speakers, amplifier, or recording interface using appropriate TRS cables.
- Input Connections:
- For microphones, connect XLR cables to the MIC/LINE inputs (Channels 1-4).
- For line-level instruments (e.g., keyboards, guitars with preamps), connect 1/4" TRS cables to the MIC/LINE inputs or STEREO/USB (5/6) / STEREO (7/8) inputs.
- Headphone Connection: For monitoring, connect your headphones to the PHONES output jack.
- Power On: Once all connections are secure, switch the POWER button to the ON position.
Operating Instructions
1. Basic Audio Mixing
- Set GAIN: For each active input channel, adjust the GAIN control until the PEAK LED flashes only occasionally during the loudest parts of the signal. Avoid constant illumination of the PEAK LED.
- Adjust EQ: Use the HIGH and LOW EQ controls to shape the tone of each channel. Turn clockwise to boost frequencies, counter-clockwise to cut.
- Set Channel Level: Adjust the LEVEL control for each channel to achieve a balanced mix.
- Master Output: Use the main STEREO LEVEL control to adjust the overall output volume.
2. Bluetooth Connectivity
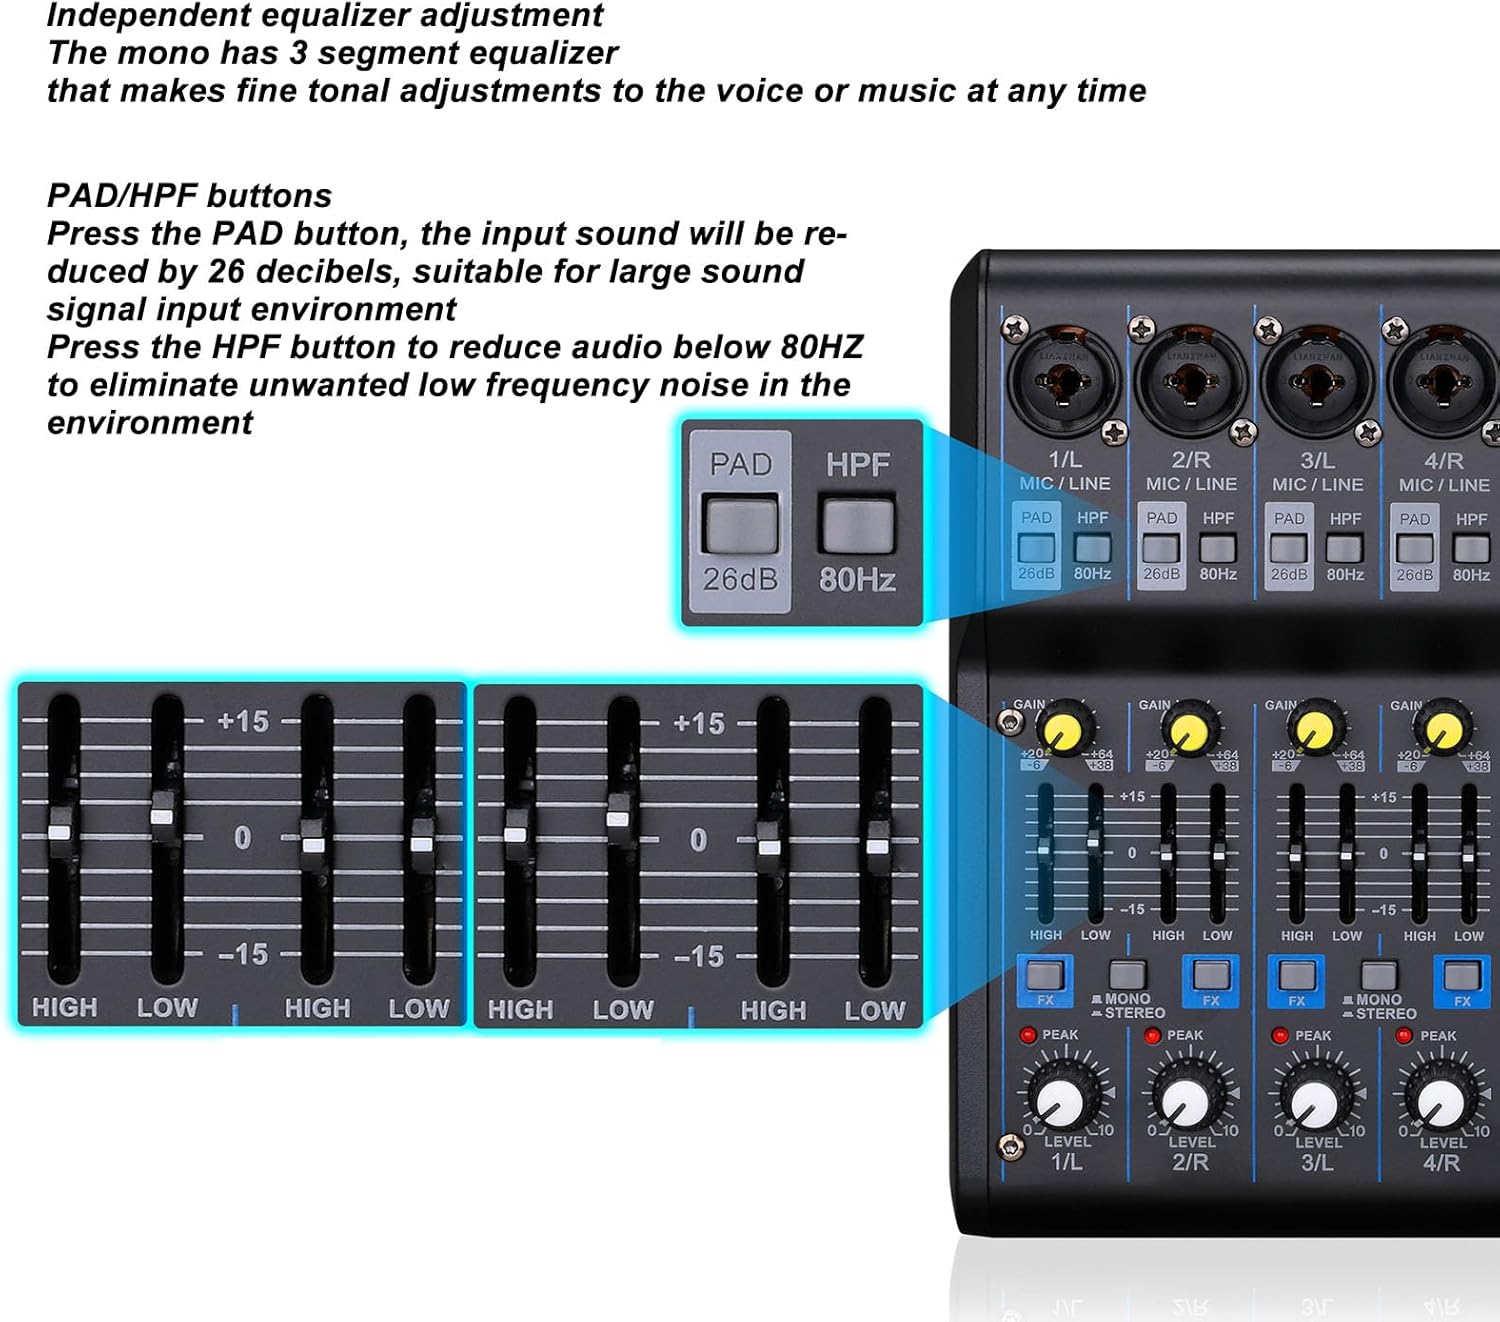
Figure 4: Illustrates wireless music streaming from a smartphone to the mixer via Bluetooth.
- Ensure your mixer is powered on.
- On your mobile device, enable Bluetooth and search for available devices.
- Select the mixer (usually named "BT-AUDIO" or similar) from the list to pair.
- Once paired, you can stream audio wirelessly from your device to the mixer. Adjust the STEREO/USB channel level for Bluetooth audio.
3. USB Playback and Recording
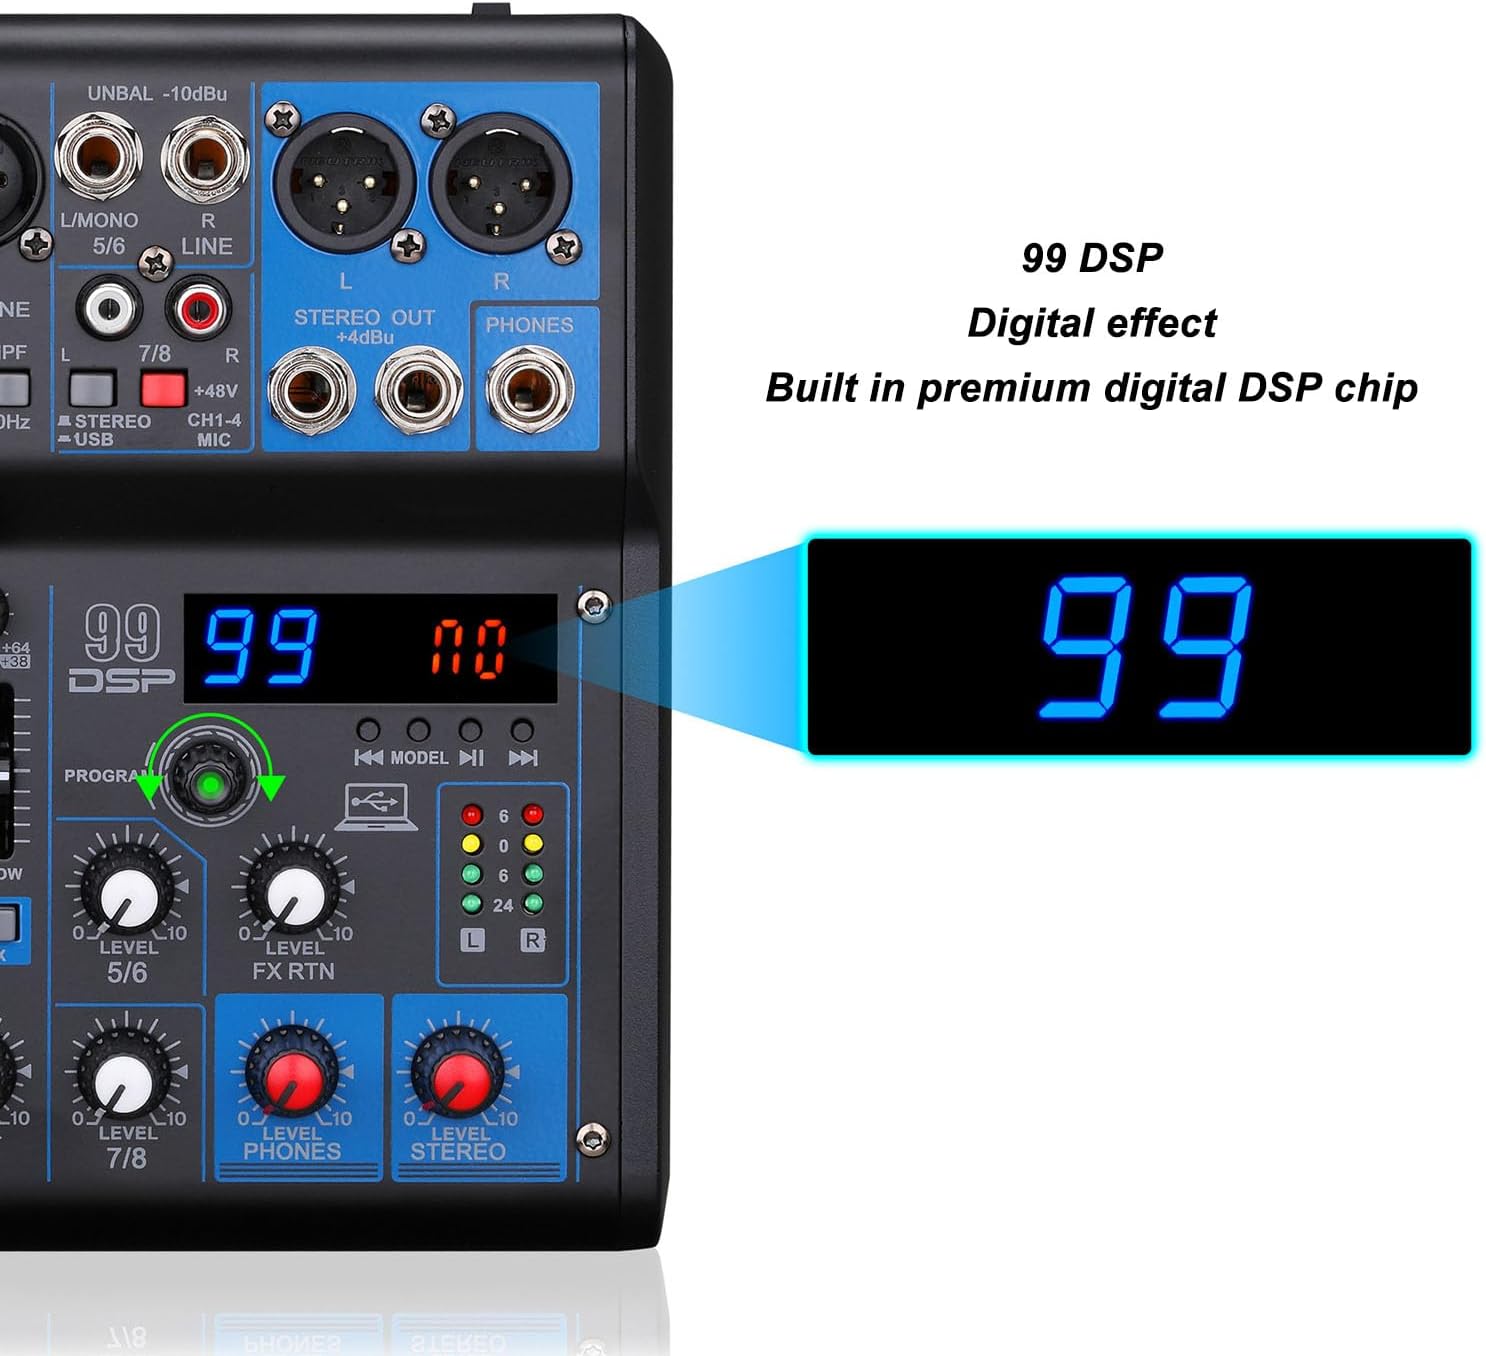
Figure 5: Demonstrates connecting a USB flash drive for MP3 playback or connecting the mixer to a computer for recording.
- USB Flash Drive Playback: Insert a USB flash drive containing MP3 files into the USB port. The mixer's digital display will show playback information. Use the transport controls (play/pause, skip) to navigate tracks. Adjust the STEREO/USB channel level.
- Computer Connection (Recording/Playback): Connect the mixer's USB port to your computer using a USB cable. The mixer will function as an audio interface. You can record audio from the mixer to your computer or play audio from your computer through the mixer.
4. DSP Effects
The mixer includes 99 built-in Digital Signal Processing (DSP) effects to enhance your sound.
- Select Effect: Use the PROGRAM knob to scroll through the 99 available effects displayed on the digital screen. Press the knob to select an effect.
- Apply Effect to Channel: Use the FX control on each channel to send a portion of that channel's signal to the selected DSP effect.
- Adjust Effect Return: Use the FX RTN (Effect Return) level control to adjust the overall volume of the applied effect in the main mix.
5. Monitoring
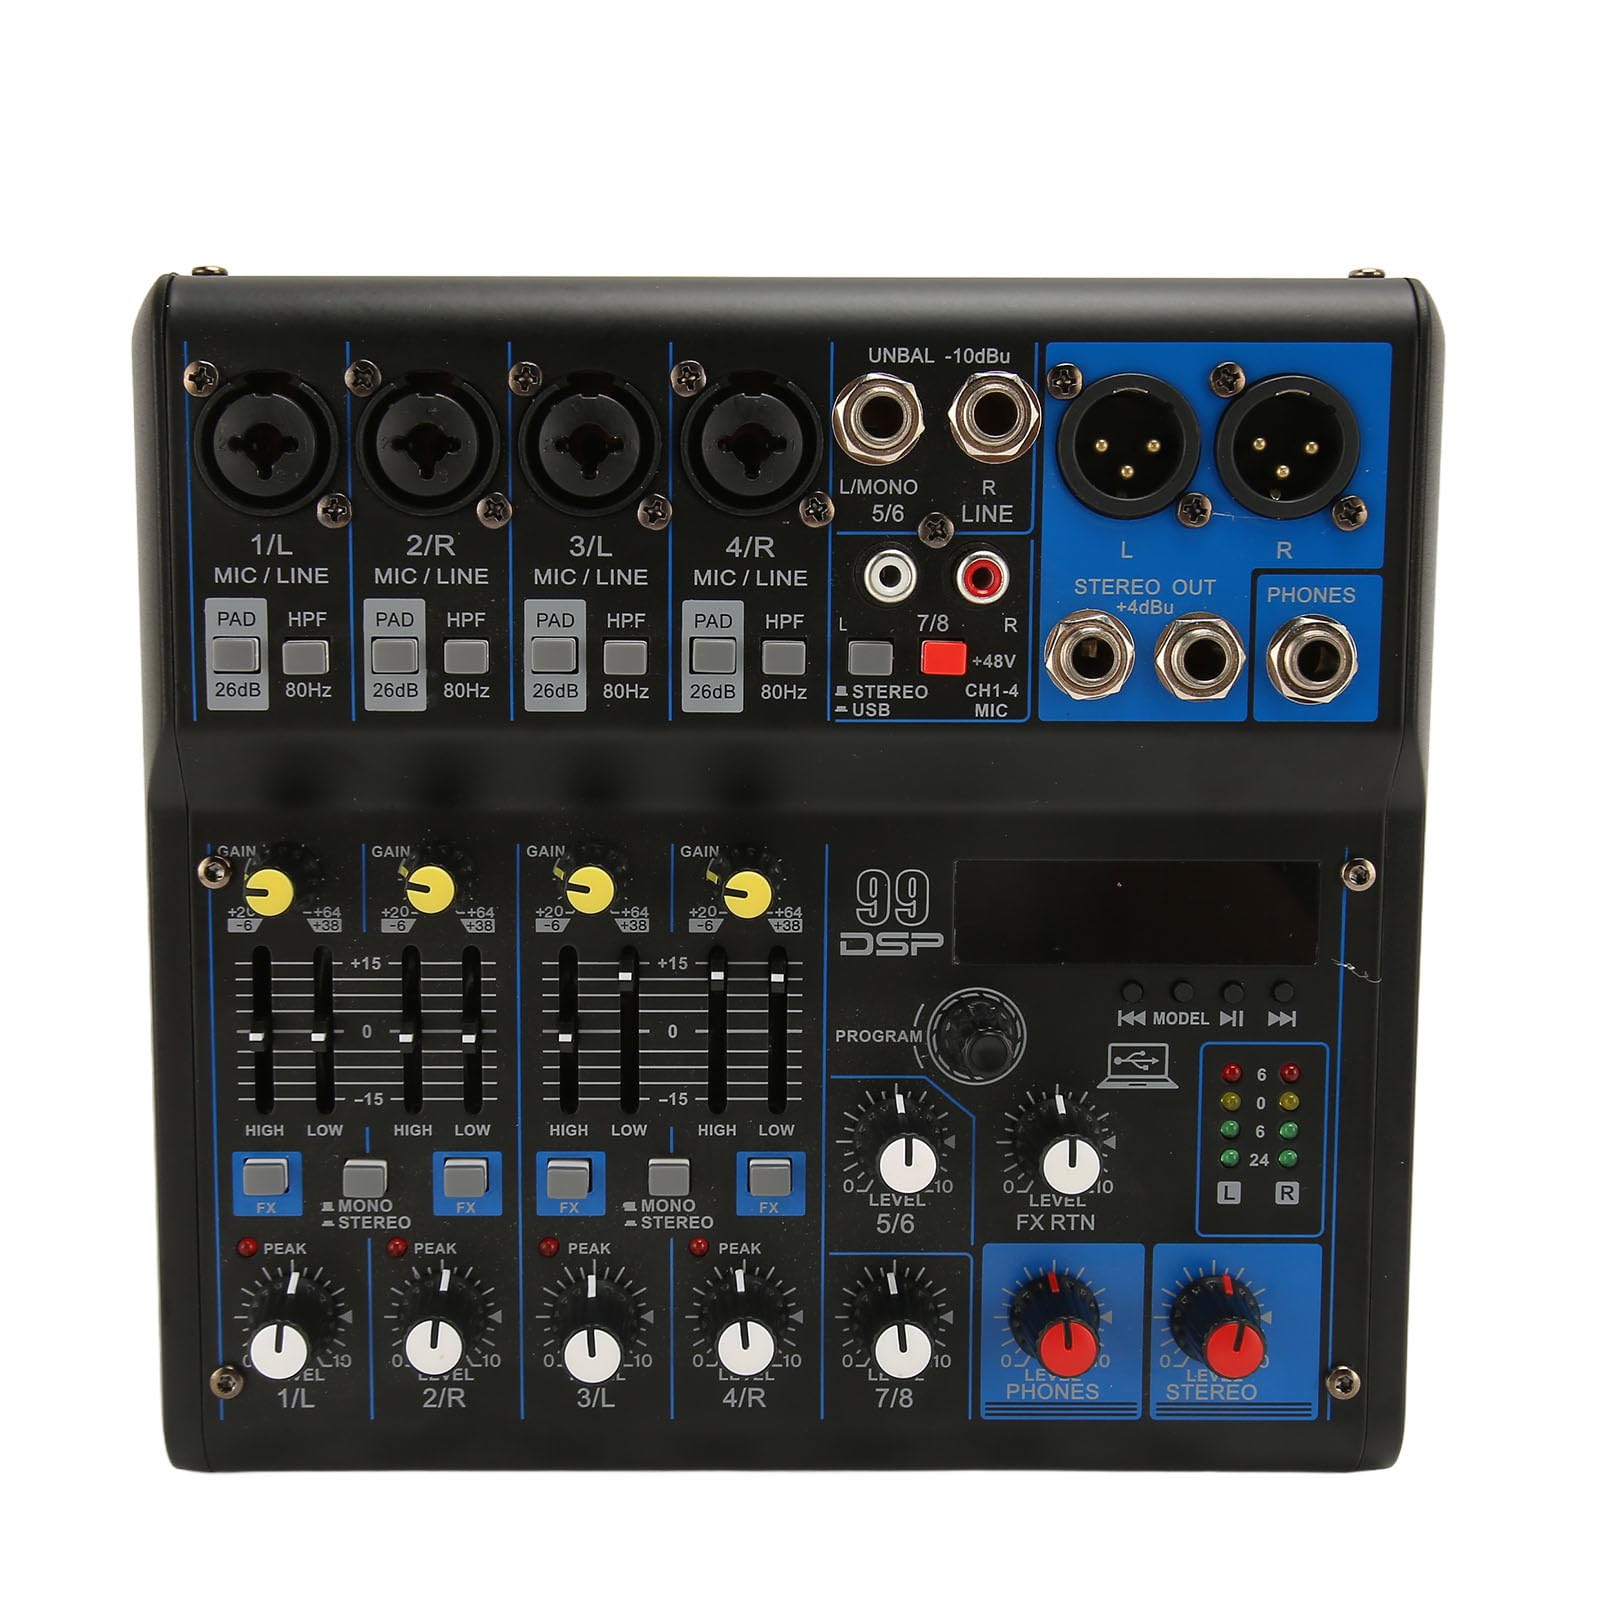
Figure 6: Real-time monitoring setup with headphones connected to the mixer, allowing for sound feedback and adjustments.
Connect headphones to the PHONES output to monitor the main mix. Adjust the PHONES LEVEL control to set your desired headphone volume.
6. PAD and HPF Functions

Figure 7: Detail of the PAD (26dB attenuation) and HPF (80Hz high-pass filter) buttons for input signal conditioning.
- PAD Button: Press this button if your input source is too loud, causing distortion even with the GAIN knob at its lowest setting. It reduces the input signal by 26 decibels.
- HPF Button: Press this button to activate a High-Pass Filter. This reduces unwanted low-frequency noise (e.g., rumble, stage vibrations) below 80Hz, improving clarity for vocals and certain instruments.
Maintenance
- Cleaning: Disconnect the power before cleaning. Use a soft, dry cloth to wipe the surface of the mixer. Do not use liquid cleaners or aerosols.
- Storage: Store the mixer in a cool, dry place away from direct sunlight and extreme temperatures.
- Handling: Avoid dropping or subjecting the mixer to strong impacts.
Troubleshooting
| Problem | Possible Cause | Solution |
|---|---|---|
| No power | Power cable not connected; Power switch off; Faulty power outlet. | Ensure power cable is securely connected. Turn power switch ON. Test outlet with another device. |
| No sound output | Output cables disconnected; Master volume low; Channel level low; Speakers off/unplugged. | Check all output connections. Increase STEREO LEVEL. Increase individual channel LEVELs. Ensure speakers are powered on and connected. |
| Distorted sound | Input GAIN too high; Output level too high; PAD button not engaged for hot signals. | Reduce input GAIN. Reduce STEREO LEVEL. Engage PAD button for high-level inputs. |
| Bluetooth not connecting | Mixer not in pairing mode; Device Bluetooth off; Interference. | Ensure mixer is discoverable. Turn device Bluetooth off/on. Move closer to mixer. |
| USB playback not working | USB drive not formatted correctly; Incompatible file types; Drive not fully inserted. | Ensure USB drive is FAT32 formatted and contains MP3 files. Reinsert USB drive. |
Specifications
| Feature | Detail |
|---|---|
| Model Number | EBTOOLSke4c0p78fs-12 |
| Channels | 8 |
| Microphone Inputs | 4 (XLR/TRS Combo) |
| Channel EQ | 2-band (High, Low) |
| DSP Effects | 99 Presets (DELAY, HALL, PINGPONG, KARAOKE, TREMOLO, ROOM, ECHO, CHORUS, FLANGE, AUTO TUNE, etc.) |
| Bluetooth | Yes |
| USB Interface | For MP3 playback from USB flash drive and computer audio interface functionality |
| Power Consumption | 10W |
| Voltage | 100-240V (US Plug) |
| Dimensions | 15.63 x 9.65 x 3.58 inches (approx.) |
| Weight | 2.86 pounds (approx.) |
Warranty and Support
For warranty information or technical support, please refer to the documentation provided with your purchase or contact EBTOOLS customer service. Keep your proof of purchase for any warranty claims.


