Introduction
Thank you for choosing the Cecotec Power Espresso 20 Pro Latte coffee machine. This manual provides essential information for the safe and efficient operation, maintenance, and troubleshooting of your new espresso and cappuccino maker. Please read these instructions carefully before first use and keep them for future reference.

Image: The Cecotec Power Espresso 20 Pro Latte coffee machine, designed for ease of use and aesthetic appeal in any kitchen.
Important Safety Instructions
When using electrical appliances, basic safety precautions should always be followed to reduce the risk of fire, electric shock, and/or injury to persons, including the following:
- Read all instructions before operating the appliance.
- Do not touch hot surfaces. Use handles or knobs.
- To protect against fire, electric shock, and injury to persons, do not immerse cord, plugs, or appliance in water or other liquid.
- Close supervision is necessary when any appliance is used by or near children.
- Unplug from outlet when not in use and before cleaning. Allow to cool before putting on or taking off parts, and before cleaning the appliance.
- Do not operate any appliance with a damaged cord or plug or after the appliance malfunctions, or has been damaged in any manner.
- The use of accessory attachments not recommended by the appliance manufacturer may result in fire, electric shock, or injury to persons.
- Do not use outdoors.
- Do not let cord hang over edge of table or counter, or touch hot surfaces.
- Do not place on or near a hot gas or electric burner, or in a heated oven.
- Always attach plug to appliance first, then plug cord into the wall outlet. To disconnect, turn any control to "off", then remove plug from wall outlet.
- Do not use appliance for other than intended use.
Product Components
Familiarize yourself with the main parts of your Cecotec Power Espresso 20 Pro Latte coffee machine:
- Control Panel with Buttons and Pressure Gauge
- Portafilter Handle
- Filter Baskets (Single and Double Shot)
- Steam Nozzle / Wand
- Removable Water Tank (1.5 L capacity)
- Removable Milk Tank (550 ml capacity)
- Drip Tray and Grid
- Cup Warming Tray
- Measuring Spoon with Tamper

Image: A clear front view of the coffee machine, highlighting the control panel, portafilter, and steam wand.
Setup
1. Unpacking and Initial Cleaning
- Remove all packaging materials and promotional labels from the coffee machine.
- Clean the water tank, milk tank, portafilter, and filter baskets with warm soapy water. Rinse thoroughly and dry.
- Wipe the exterior of the machine with a damp cloth.
2. Filling the Water Tank
- Ensure the machine is unplugged.
- Remove the water tank from the back of the machine.
- Fill the tank with fresh, cold water up to the MAX level indicator. Do not exceed the MAX line.
- Place the water tank back into its position, ensuring it is securely seated.

Image: Demonstrates the process of removing and filling the 1.5-liter water tank.
3. First Use and Priming
- Plug the machine into a grounded power outlet.
- Turn on the machine using the power button. The indicator lights will illuminate.
- Place a large cup under the portafilter (without coffee) and another under the steam wand.
- Run a cycle of hot water through the portafilter and steam wand to prime the system and rinse any manufacturing residue. Repeat this process 2-3 times.
- The machine is now ready for use.
Operating Instructions
1. Pre-heating Cups
For optimal coffee temperature, place your espresso cups on the cup warming tray located on top of the machine. This helps maintain the coffee's heat after brewing.

Image: Cups being placed on the integrated cup warming tray to ensure your coffee stays hot.
2. Making Espresso
- Select the appropriate filter basket (single or double shot) and place it into the portafilter.
- Fill the filter basket with finely ground espresso coffee.
- Use the tamper to press the coffee grounds firmly and evenly. Wipe any excess grounds from the rim.
- Attach the portafilter to the brewing head by inserting it and turning it firmly to the right until it locks.
- Place one or two pre-heated cups under the portafilter spouts.
- Press the espresso button on the control panel. The machine will begin brewing.
- Once the desired amount of espresso is brewed, press the espresso button again to stop the flow.
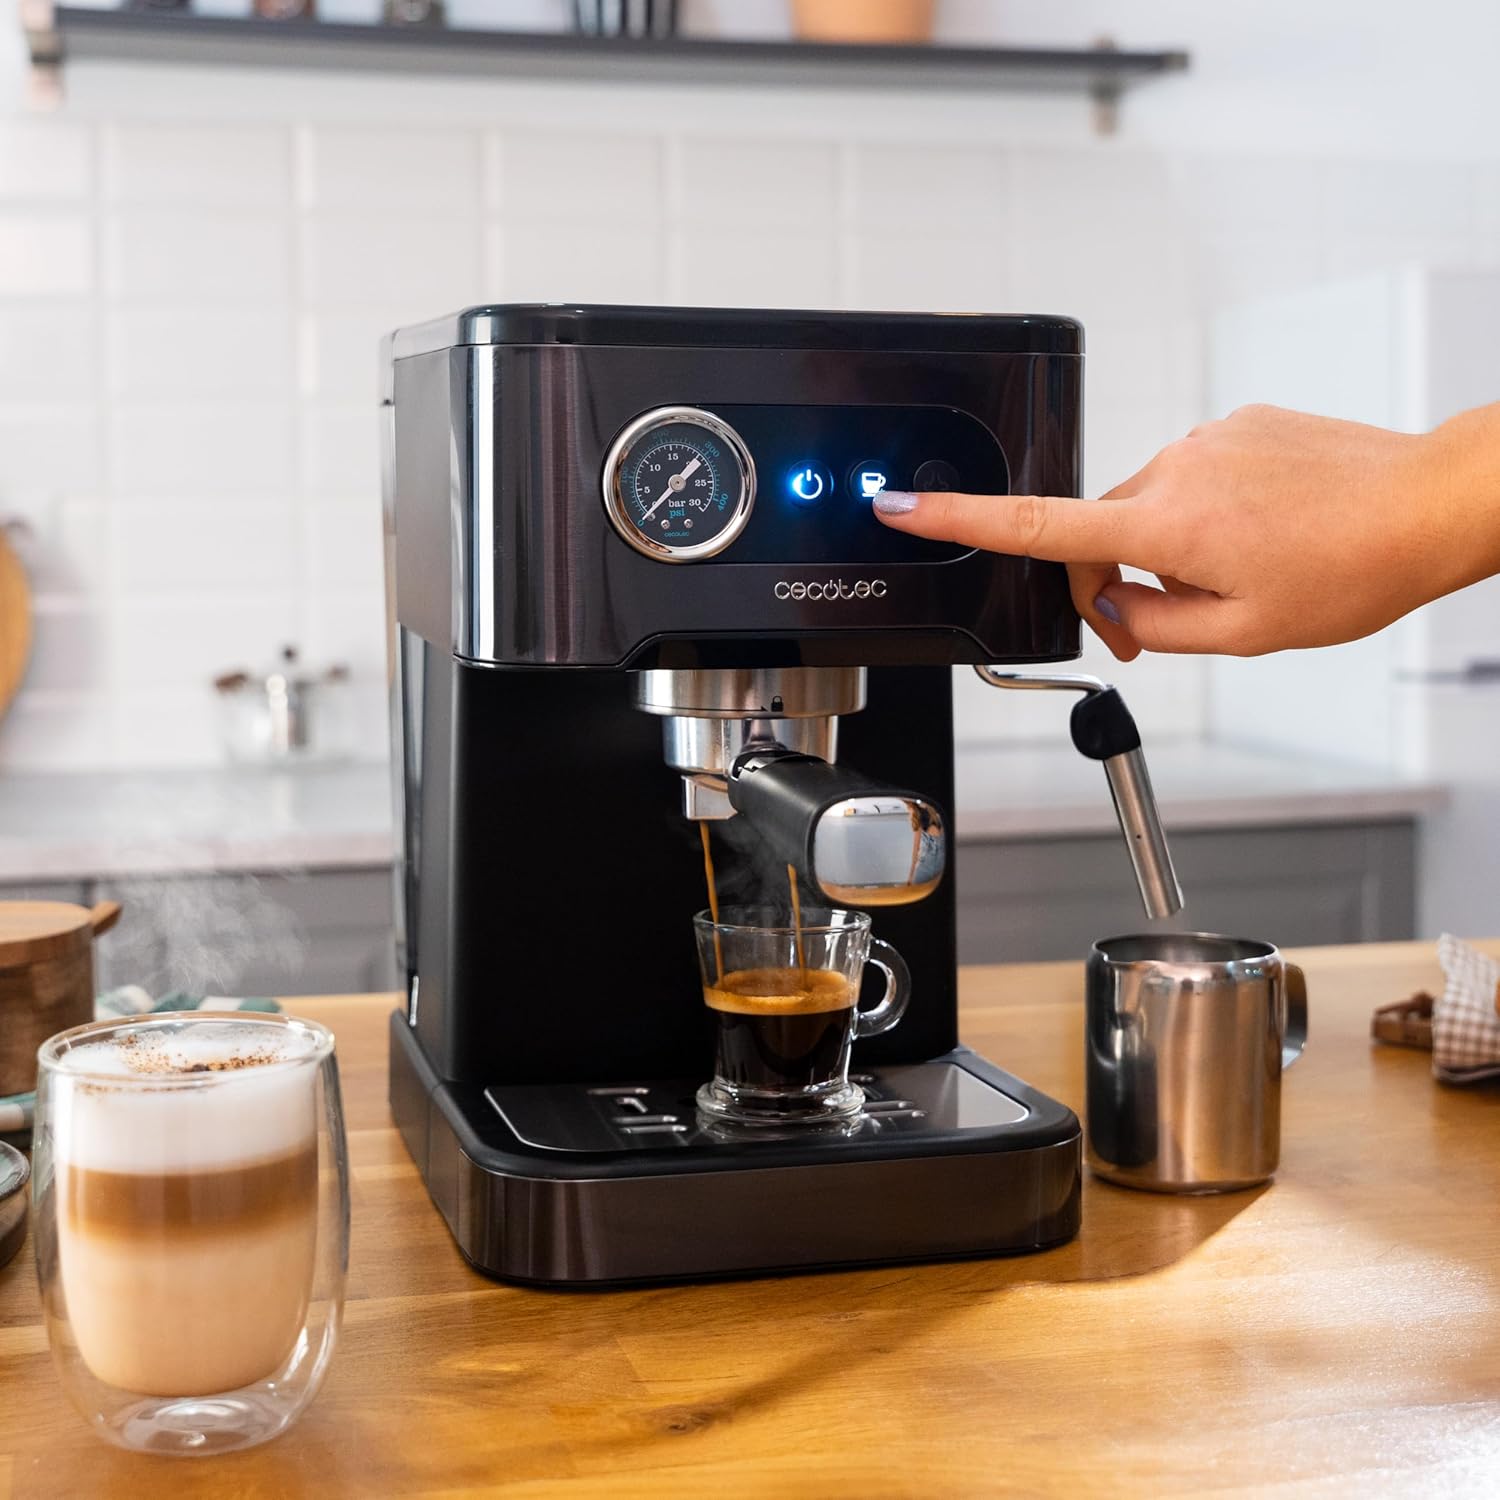
Image: The machine actively brewing espresso, demonstrating the intuitive button controls and pressure gauge.

Image: The machine brewing two shots of espresso, showcasing its dual-spout capability.
3. Frothing Milk with the Steam Nozzle
- Fill a stainless steel frothing pitcher with cold milk (dairy or non-dairy) up to one-third full.
- Turn the steam function on using the dedicated button. Wait for the steam indicator light to illuminate steadily, indicating the machine has reached steaming temperature.
- Position the steam nozzle just below the surface of the milk.
- Open the steam control knob slowly to release steam. Move the pitcher up and down to create foam.
- Once the milk is frothed to your desired consistency and temperature, close the steam control knob and turn off the steam function.
- Wipe the steam wand immediately with a damp cloth to prevent milk residue from drying.

Image: Demonstrates the use of the steam wand for frothing milk, essential for lattes and cappuccinos.
4. Using the Milk Container for Latte/Cappuccino
The Cecotec Power Espresso 20 Pro Latte features a dedicated 550 ml milk container for automated milk frothing and dispensing.
- Fill the milk container with cold milk.
- Attach the milk container to the designated port on the machine.
- Place your cup under the milk dispenser spout.
- Select your desired drink (e.g., Latte or Cappuccino) from the control panel. The machine will automatically brew espresso and froth/dispense milk into your cup.
- After use, remove the milk container and clean it thoroughly.
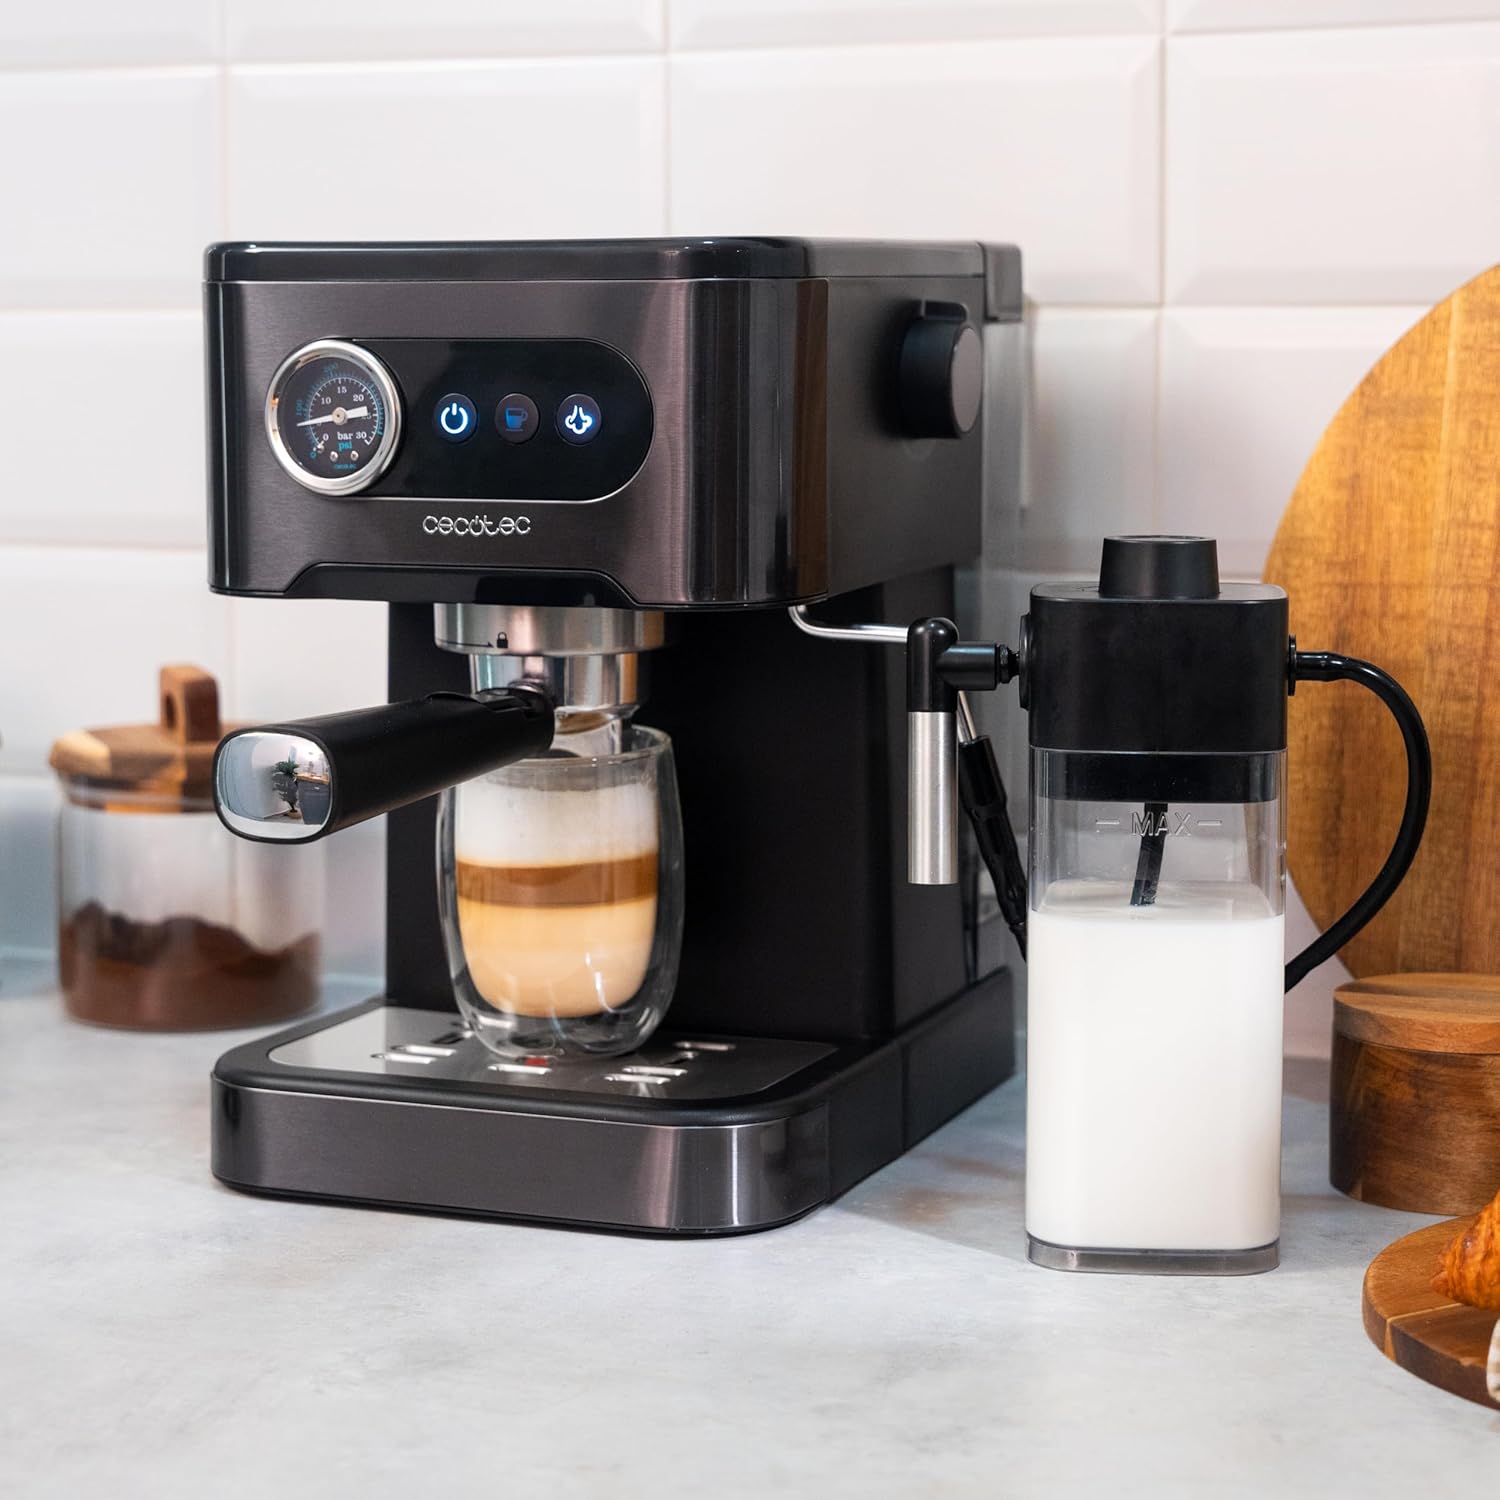
Image: The coffee machine with the milk container attached, ready to prepare milk-based beverages.
Maintenance
1. Daily Cleaning
- Portafilter and Filter Baskets: After each use, remove the portafilter, discard the coffee grounds, and rinse the portafilter and filter basket under hot water. Use a brush to remove any stubborn residue.
- Steam Wand: Immediately after frothing milk, wipe the steam wand with a damp cloth. Purge a small amount of steam to clear any milk residue from inside the wand.
- Drip Tray: Empty and rinse the drip tray daily or when the indicator floats up.
- Water Tank: Rinse the water tank daily and refill with fresh water.

Image: Cleaning the portafilter after use, a crucial step for maintaining coffee quality and machine longevity.
2. Descaling
Regular descaling is essential to remove mineral buildup and ensure optimal performance and longevity of your machine. The frequency depends on water hardness and usage.
- Use a commercial descaling solution specifically designed for coffee machines, following the manufacturer's instructions.
- Alternatively, a solution of white vinegar and water (1:1 ratio) can be used.
- Fill the water tank with the descaling solution.
- Run several brewing cycles without coffee until the tank is empty.
- Rinse the tank thoroughly and run several cycles with fresh water to remove any descaling solution residue.
3. Cleaning the Milk System (Milk Container)
If you use the milk container, it requires regular cleaning to prevent blockages and bacterial growth.
- After each use, empty any remaining milk from the container.
- Disassemble the milk container components (lid, tube, spout).
- Wash all parts with warm soapy water and a soft brush. Rinse thoroughly.
- Ensure all milk residue is removed from the tubes and nozzles.
- Allow all parts to air dry completely before reassembling.
Troubleshooting
Refer to the following common issues and their solutions. For problems not listed here, please contact customer support.

Image: A visual troubleshooting guide addressing common operational concerns.
Why does so little coffee come out?
- If coffee flows very slowly, or barely comes out at all, check that the grind size is not too fine.
- Ensure that the brewing volume is set correctly.
- Verify that the machine has been purged and descaled recently.
Why does my coffee have no crema?
- If your coffee lacks crema, check that the grind size is not too coarse.
- Ensure the brewing volume is set correctly.
- To prevent this, clean and check the filters and brewing unit regularly.
Why isn't my coffee hot enough?
- Pre-warm your cup before brewing.
- Ensure the machine has finished its pre-heating cycle.
- Descaling is required to prevent limescale build-up in the Thermoblock, which can affect heating efficiency.
How to use the milk container
- To get the perfect froth for your coffee, use cold, whole milk.
- Turn the knob towards the '+' or '-' icon to adjust it according to your preference.
- Please note that the colder the foam temperature, the lower the temperature will be.
Specifications
| Feature | Detail |
|---|---|
| Brand | Cecotec |
| Model Number | A01_EU01_100208 |
| Color | Dark Inox |
| Product Dimensions (L x W x H) | 37.5 x 22 x 30 cm |
| Capacity (Water Tank) | 1.5 Liters |
| Capacity (Milk Tank) | 550 ml |
| Power | 1350 Watts |
| Voltage | 220 Volts |
| Pressure | 20 Bar |
| Item Weight | 3.53 Kilograms |
| Coffee Maker Type | Espresso Machine |
| Exterior Finish | Matte |
| Included Components | 1 coffee machine, 1 portafilter arm, 1 user manual |
| Country of Origin | Spain |
Warranty and Support
Cecotec is committed to providing quality products and customer satisfaction.
- Spare Parts Availability: Spare parts for this model are available for up to 10 years from the date of purchase.
- For warranty claims, technical support, or service inquiries, please refer to the contact information provided in your purchase documentation or visit the official Cecotec website.


