1. Introduction
This manual provides comprehensive instructions for the installation, operation, and maintenance of your Genmitsu Camera for Kiosk Laser Engraver. This high-precision camera is specifically designed for Genmitsu Kiosk and Kortek laser engraving machines and is compatible with LightBurn software. It enables precise item positioning, accurate zone-focused engraving, and real-time work preview, enhancing both efficiency and safety in your laser engraving projects.
2. Safety Information
Always prioritize safety when operating laser engraving equipment. While the camera provides remote monitoring, direct exposure to laser light can be harmful. Ensure the laser engraver's safety enclosure is properly closed during operation. Avoid looking directly at the laser beam. Always wear appropriate laser safety glasses when working near an active laser engraver, even with the camera installed, to minimize eye exposure to harmful laser light.
3. Package Contents
Before beginning installation, please verify that all components are present in your package:
- Genmitsu Camera Module
- USB Cable
- Focus Calibration Card
- Mounting Hardware (screws, etc.)
- User Manual (this document)

Figure 3.1: Contents of the Genmitsu Camera package, including the camera module, USB cable, focus calibration card, and mounting hardware.
4. Setup
The Genmitsu Camera is designed for effortless setup. Follow these steps for proper installation and calibration:
4.1 Physical Installation
- Ensure your Kiosk or Kortek laser engraving machine is powered off and disconnected from the power source.
- Locate the designated mounting area for the camera module on your laser engraver.
- Securely attach the camera module using the provided mounting hardware. Ensure it is firmly in place and has a clear view of the engraving area.
- Connect the camera's USB cable to your computer.

Figure 4.1: The Genmitsu Camera module securely installed within the laser engraver's enclosure, ready for operation.
4.2 Focus Calibration
Accurate focus is crucial for precise engraving. Use the included focus calibration card:
- Place the focus calibration card flat on the engraving bed.
- Follow the step-by-step instructions in your LightBurn software for camera calibration. This typically involves capturing images of the calibration card at various positions.
- Adjust the camera lens as needed until the software indicates optimal focus and alignment.

Figure 4.2: An overview of the Genmitsu Camera setup, showing the camera module integrated with the laser engraver and connected to a monitor running LightBurn software.
4.3 Installation and Calibration Video
Video 4.1: This video demonstrates the installation process for a LightBurn camera kit and its calibration, providing a visual guide for setting up your Genmitsu Camera.
5. Operating Instructions
The Genmitsu Camera significantly enhances your engraving workflow through precise positioning and real-time monitoring.
5.1 Job Preview and Positioning
- With real-time camera guidance in LightBurn, the system intuitively aligns your design on the material's surface. This eliminates guesswork, ensuring precise results every time, even with irregular patterns.
- The camera accurately detects all laser zones, allowing it to locate and engrave items sequentially without manual intervention. This boosts productivity by enabling multiple projects to be completed simultaneously.

Figure 5.1: A visual representation of the work preview feature, showing the design overlaid on the material in real-time via the camera feed.
5.2 Real-Time Monitoring
Stay in control from a distance with real-time monitoring on your computer. This reduces the need to closely observe the laser in action, further minimizing eye exposure to harmful laser light and allowing for continuous oversight of the engraving process.
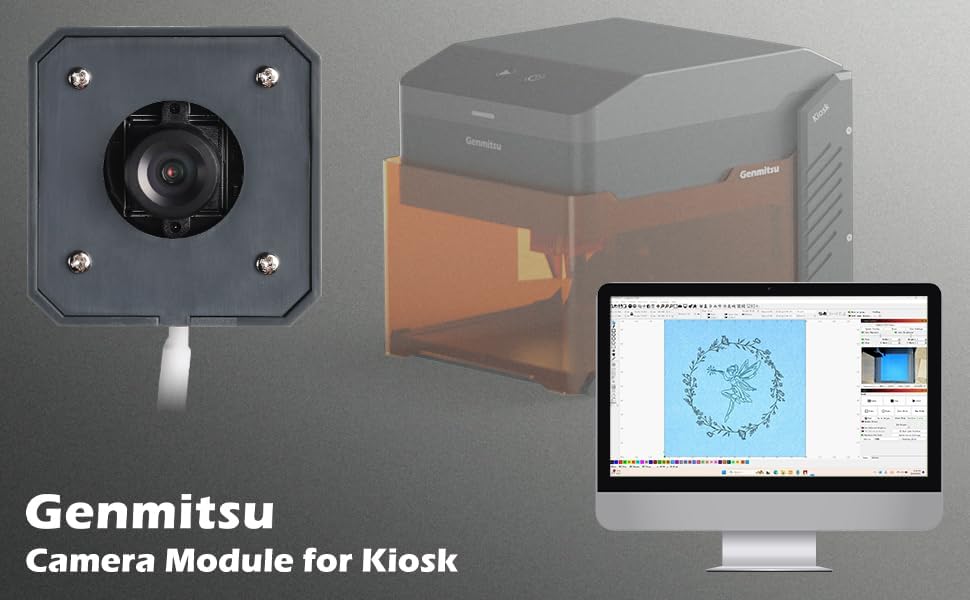
Figure 5.2: A laptop displaying the real-time camera feed from the Genmitsu Camera, allowing for remote monitoring of the engraving process.
5.3 Kiosk Engraver Overview
Video 5.1: This video provides an overview of the Kiosk laser engraver, demonstrating its capabilities and how the camera integrates into its operation for various projects.
5.4 Kiosk Accessories
Video 5.2: A demonstration of various accessories available for the Genmitsu Kiosk Laser Engraver, including how they can be used to expand the machine's functionality.
6. Maintenance
To ensure the longevity and optimal performance of your Genmitsu Camera, follow these maintenance guidelines:
- Cleaning the Lens: Gently wipe the camera lens with a soft, lint-free cloth. For stubborn smudges, use a lens cleaning solution designed for optical surfaces.
- Dust Removal: Regularly use compressed air to remove dust and debris from the camera module and its surroundings.
- Cable Inspection: Periodically check the USB cable for any signs of wear or damage. Replace if necessary to maintain a stable connection.
- Software Updates: Keep your LightBurn software updated to the latest version to ensure compatibility and access to new features or bug fixes for the camera.
7. Troubleshooting
If you encounter issues with your Genmitsu Camera, refer to the following common problems and solutions:
- Camera Not Detected:
- Ensure the USB cable is securely connected to both the camera and your computer.
- Try connecting the camera to a different USB port or a different computer to rule out port or driver issues.
- Restart LightBurn and your computer.
- Poor Image Quality/Blurry Feed:
- Recalibrate the camera focus using the focus calibration card as described in Section 4.2.
- Clean the camera lens for any smudges or dust.
- Ensure adequate lighting in the engraving area.
- Incorrect Positioning/Alignment:
- Perform a full camera alignment in LightBurn.
- Verify that the material is placed flat and securely on the engraving bed.
- Software Freezes/Crashes:
- Ensure your LightBurn software is up to date.
- Check for any conflicting software or drivers on your computer.
8. Specifications
| Feature | Specification |
|---|---|
| Manufacturer | Genmitsu |
| Part Number | 486141128 |
| Item Weight | 4.9 ounces |
| Product Dimensions | 8.27 x 5.91 x 0.79 inches |
| Item Model Number | 486141128 |
| Color | Black |
| Material | ABS |
| Batteries Included? | No |
| Batteries Required? | No |
| ASIN | B0DK4SYXZJ |
| Date First Available | October 16, 2024 |
9. Warranty and Support
The Genmitsu Camera comes with a 1-year quality warranty. For technical support, troubleshooting assistance, or warranty claims, please contact SainSmart customer service through their official website or the platform where you purchased the product. Please have your model number (486141128) and purchase date ready when contacting support.


