
1. Introduction
Thank you for purchasing the THOMSON CP100T Projection Alarm Clock Radio. This manual provides essential information for setting up, operating, and maintaining your device. Please read it thoroughly before use to ensure proper function and to maximize your user experience.
2. Safety Information
- Do not expose the unit to rain or moisture to prevent fire or electric shock.
- Do not place objects filled with liquids, such as vases, on the unit.
- Ensure proper ventilation. Do not block ventilation openings.
- Use only the provided AC adapter.
- Keep the unit away from direct sunlight, heat sources, and strong magnetic fields.
- Do not attempt to disassemble or modify the unit. Refer all servicing to qualified personnel.
3. Package Contents
Please check that all items are present:
- THOMSON CP100T Projection Alarm Clock Radio
- AC Power Adapter (5V 1.5A 7.5W)
- User Manual
4. Product Overview
The THOMSON CP100T is a versatile alarm clock radio featuring FM radio, dual alarms, time projection, and environmental monitoring. Below are the main components and their functions.
Front Display

Image: Front view of the THOMSON CP100T displaying time, FM frequency, humidity, and temperature.
- Time Display: Shows current time in 12-hour or 24-hour format.
- FM Frequency: Displays the current FM radio station.
- Temperature: Shows indoor temperature in Celsius or Fahrenheit.
- Humidity: Displays indoor humidity percentage.
- Alarm Indicators: Icons for Alarm 1 and Alarm 2.
Top and Rear Controls
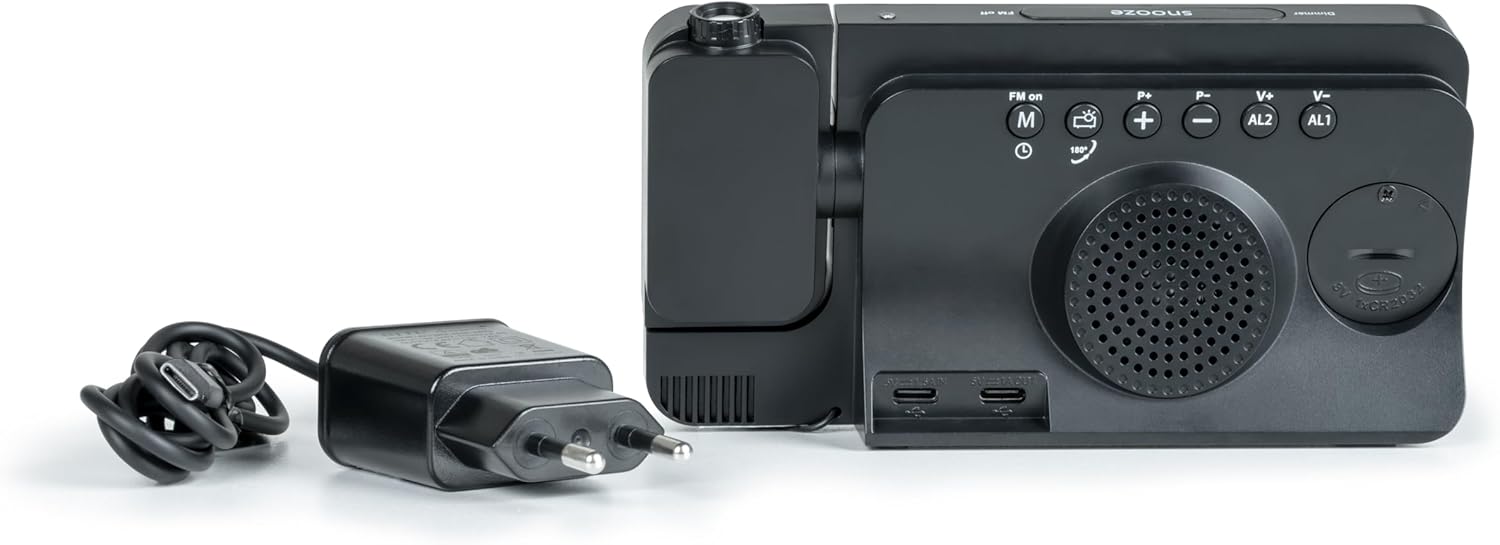
Image: Rear view of the THOMSON CP100T with various control buttons and ports.
- Snooze/Dimmer Button: Located on top, used for snooze and display brightness adjustment.
- M Button: Mode/Menu button for setting time, alarms, and radio functions.
- FM On/Off Button: Toggles FM radio power.
- P-/P+ Buttons: Used for tuning radio stations or navigating menus.
- V-/V+ Buttons: Adjust volume or change settings values.
- AL1/AL2 Buttons: Activate/deactivate and set Alarm 1 and Alarm 2.
- 180° Button: Rotates the projection display.
- Projection Lens: Located on the side, projects time onto a surface.
- USB-C Input: For power supply.
- USB-A Output: For charging external devices (5V 1A).
- Battery Compartment: For CR2032 backup battery.
5. Setup
5.1 Power Connection
Connect the provided AC power adapter to the USB-C input port on the back of the alarm clock and then plug it into a standard wall outlet. The display will light up.

Image: The alarm clock radio with its included AC power adapter.
5.2 Battery Backup Installation
For time backup during power outages, install a CR2032 button cell battery (not included) into the battery compartment on the back of the unit. This battery preserves time settings but does not power the display or alarms.
- Open the battery compartment cover.
- Insert one CR2032 battery with the positive (+) side facing up.
- Close the battery compartment cover securely.
6. Operating Instructions
6.1 Setting Time and Date
- Press and hold the M button to enter time setting mode. The hour digits will flash.
- Use the V+ or V- buttons to adjust the hour.
- Press M again to confirm the hour and move to minute setting. The minute digits will flash.
- Use the V+ or V- buttons to adjust the minute.
- Press M again to confirm the minute.
- Continue pressing M to cycle through 12/24-hour format, year, month, and day settings, adjusting each with V+ or V-.
- Press M one last time or wait a few seconds for the settings to save automatically.
6.2 Setting Alarms (AL1 / AL2)
The unit features two independent alarms.
- Press the AL1 or AL2 button once to activate the respective alarm. The alarm icon will appear on the display.
- Press and hold the AL1 or AL2 button to enter alarm setting mode. The alarm hour will flash.
- Use V+ or V- to set the alarm hour. Press AL1/AL2 to confirm.
- Use V+ or V- to set the alarm minute. Press AL1/AL2 to confirm.
- Use V+ or V- to select the alarm source (FM radio or Buzzer). Press AL1/AL2 to confirm.
- Use V+ or V- to set the alarm volume. Press AL1/AL2 to confirm.
- Use V+ or V- to select the alarm frequency (Every day, Weekdays, Weekends). Press AL1/AL2 to confirm.
- The alarm is now set. To deactivate an alarm, press its respective AL1 or AL2 button until the alarm icon disappears.
6.3 Snooze Function

Image: Top view highlighting the Snooze button.
When an alarm sounds, press the large Snooze button on top of the unit to temporarily silence the alarm. The alarm will sound again after a few minutes (default snooze time is typically 9 minutes, refer to specific model settings if adjustable).
6.4 Radio Operation
- Press the FM On/Off button to turn on the FM radio.
- Automatic Scan: Press and hold the M button to automatically scan and save available FM stations (up to 20 presets).
- Manual Tuning: Briefly press P+ or P- to fine-tune the frequency. Press and hold P+ or P- to automatically scan for the next available station.
- Recalling Presets: In FM mode, briefly press the M button to cycle through saved preset stations.
- Use V+ or V- to adjust the radio volume.
- Press the FM On/Off button again to turn off the radio.
6.5 Projection Feature

Image: The alarm clock projecting the current time onto a bedroom wall.
The CP100T can project the current time onto a wall or ceiling.
- Activate/Deactivate: The projection is typically always on when the unit is powered.
- Adjust Angle: Rotate the projection lens on the side of the unit to adjust the projection angle.
- Rotate Display: Press the 180° button on the back to flip the projected time display for optimal viewing.
- Adjust Focus: Rotate the ring around the projection lens to sharpen the projected image.
6.6 Display Brightness Adjustment
The display has 3 brightness levels (0-100%).
- Briefly press the Dimmer button (often combined with Snooze) to cycle through the brightness levels.
6.7 Sleep Timer
The sleep timer allows the radio to play for a set duration before automatically turning off.
- While the radio is playing, press the M button repeatedly until the sleep timer icon appears and the duration starts flashing.
- Use V+ or V- to set the desired sleep duration (5 to 90 minutes).
- The radio will automatically turn off after the set time.
6.8 USB Charging Port

Image: A smartphone connected to the USB-A charging port on the back of the alarm clock.
The USB-A port on the back of the unit can be used to charge external devices such as smartphones (5V 1A output).
- Connect your device's USB charging cable to the USB-A output port.
- Ensure the alarm clock is powered by the AC adapter.
6.9 Temperature and Humidity Display
The alarm clock continuously displays the indoor temperature and humidity levels. No specific setting is required for this feature.
7. Maintenance
- Cleaning: Wipe the unit with a soft, dry cloth. Do not use abrasive cleaners or solvents.
- Battery Replacement: Replace the CR2032 backup battery annually or when the time settings are lost during a power outage.
- Storage: If storing the unit for an extended period, disconnect it from power and remove the backup battery.
8. Troubleshooting
| Problem | Possible Cause | Solution |
|---|---|---|
| No display / Unit not powering on | Power adapter not connected or faulty. | Ensure the AC adapter is securely connected to the unit and a working power outlet. |
| Time settings lost after power outage | Backup battery is dead or not installed. | Install or replace the CR2032 backup battery. |
| Radio reception is poor | Weak signal or interference. | Adjust the position of the unit. Avoid placing near electronic devices that may cause interference. |
| Alarm does not sound | Alarm not activated or set incorrectly. | Ensure the alarm icon is displayed. Recheck alarm time, volume, and frequency settings. |
| Projection is blurry or unclear | Focus not adjusted. | Rotate the ring around the projection lens to adjust the focus. Ensure the projection surface is within optimal range. |
| Display is too bright/dim | Brightness level needs adjustment. | Press the Dimmer button to cycle through the available brightness levels. |
9. Specifications
- Brand: Thomson
- Model Number: CP100T
- Color: Black
- Dimensions (L x W x H): 11 x 3.81 x 6 cm (4.33 x 1.5 x 2.36 inches)
- Weight: 350 grams (0.77 lbs)
- Material: Plastic
- Power Input: 5V 1.5A (via USB-C)
- USB Output: 5V 1A (USB-A for charging)
- Backup Battery: CR2032 (not included)
- Display Type: LED
- Radio: FM with autoscan, 20 memorizable stations
- Features: Dual alarm, snooze, adjustable time projection, indoor temperature and humidity display, 12h/24h format, sleep timer (5-90 min), 3 display brightness settings.
10. Warranty and Support
Specific warranty information and customer support details are not provided within this manual. For warranty claims, technical assistance, or further inquiries, please refer to the retailer where you purchased the product or visit the official Thomson website for your region.


