
YESWELDER MIG-185DS PRO
Contents
YESWELDER MIG-185DS PRO 5-in-1 Multi-Process Welder Instruction Manual
Model: MIG-185DS PRO
1. Important Safety Information
Welding can be dangerous. It is essential to follow all safety precautions to prevent injury or death. Read and understand this manual completely before operating the YESWELDER MIG-185DS PRO welder.
- Electric Shock Can Kill: Do not touch live electrical parts. Wear dry welding gloves and protective clothing. Insulate yourself from the work and ground.
- Fumes and Gases Can Be Dangerous: Keep your head out of the fumes. Use enough ventilation or exhaust at the arc to keep fumes and gases away from the breathing zone.
- Arc Rays Can Burn Eyes and Skin: Wear a welding helmet with a proper shade filter. Wear safety glasses with side shields. Use protective clothing to cover all exposed skin.
- Fire and Explosion Hazard: Remove all flammables from the welding area. Have a fire extinguisher nearby.
- Hot Parts Can Cause Severe Burns: Allow cooling time before touching welded material or equipment.
- Magnetic Fields: Pacemaker wearers should consult their doctor before operating.
Always wear appropriate Personal Protective Equipment (PPE) including welding helmet, gloves, protective clothing, and safety shoes.
2. Product Overview
The YESWELDER MIG-185DS PRO is a versatile 5-in-1 multi-process welding machine designed for a wide range of welding applications. It supports Gasless Flux Core MIG, Gas MIG, Spool Gun MIG, Lift TIG, and Stick welding, offering flexibility for both beginners and experienced professionals.

Image 2.1: The YESWELDER MIG-185DS PRO 5-in-1 Multi-Process Welder, shown with a box of E7018 welding rods.
Key Features:
- 5-in-1 Functionality: Supports Flux Core MIG, Gas MIG, Spool Gun MIG, Lift TIG, and Stick welding.
- Aluminum MIG Capability: Compatible with an additional spool gun for aluminum welding.
- 185 Amp Output: Provides reliable and stable welding performance.
- Dual Voltage: Operates on both 110V and 220V power supplies.
- Synergic MIG Control: Automatically matches voltage to wire feeding speed for ease of use, especially for beginners.
- Manual MIG Control: Allows experienced users to manually adjust wire feeding speed and voltage.
- Digital Display: Advanced display for clear visual feedback and improved operation efficiency.
- Adjustable Stick Welding Features: Hot Start, Arc Force, and Anti-Stick functions enhance stick welding performance.

Image 2.2: Close-up of the intelligent digital screen display, showing various welding parameters and mode selections.

Image 2.3: Visual representation of the five welding functions: Gas MIG, Flux Core, Stick, Lift TIG, and Spool Gun welding.
3. Package Contents
Upon unpacking, verify that all items listed below are present and undamaged. If any items are missing or damaged, contact YESWELDER customer support immediately.

Image 3.1: The YESWELDER MIG-185DS PRO welder shown with its standard accessories, including the MIG torch, ground clamp, and power cable.
- YESWELDER MIG-185DS PRO Welding Machine
- MIG Welding Torch
- Ground Clamp with Cable
- Electrode Holder with Cable (for Stick Welding)
- Power Adapter (for 110V/220V connection)
- Gas Hose (for Gas MIG)
- Contact Tips and Nozzles
- Wire Feed Rollers
- E7018 3/32'' 5LB Welding Rods
- User Manual
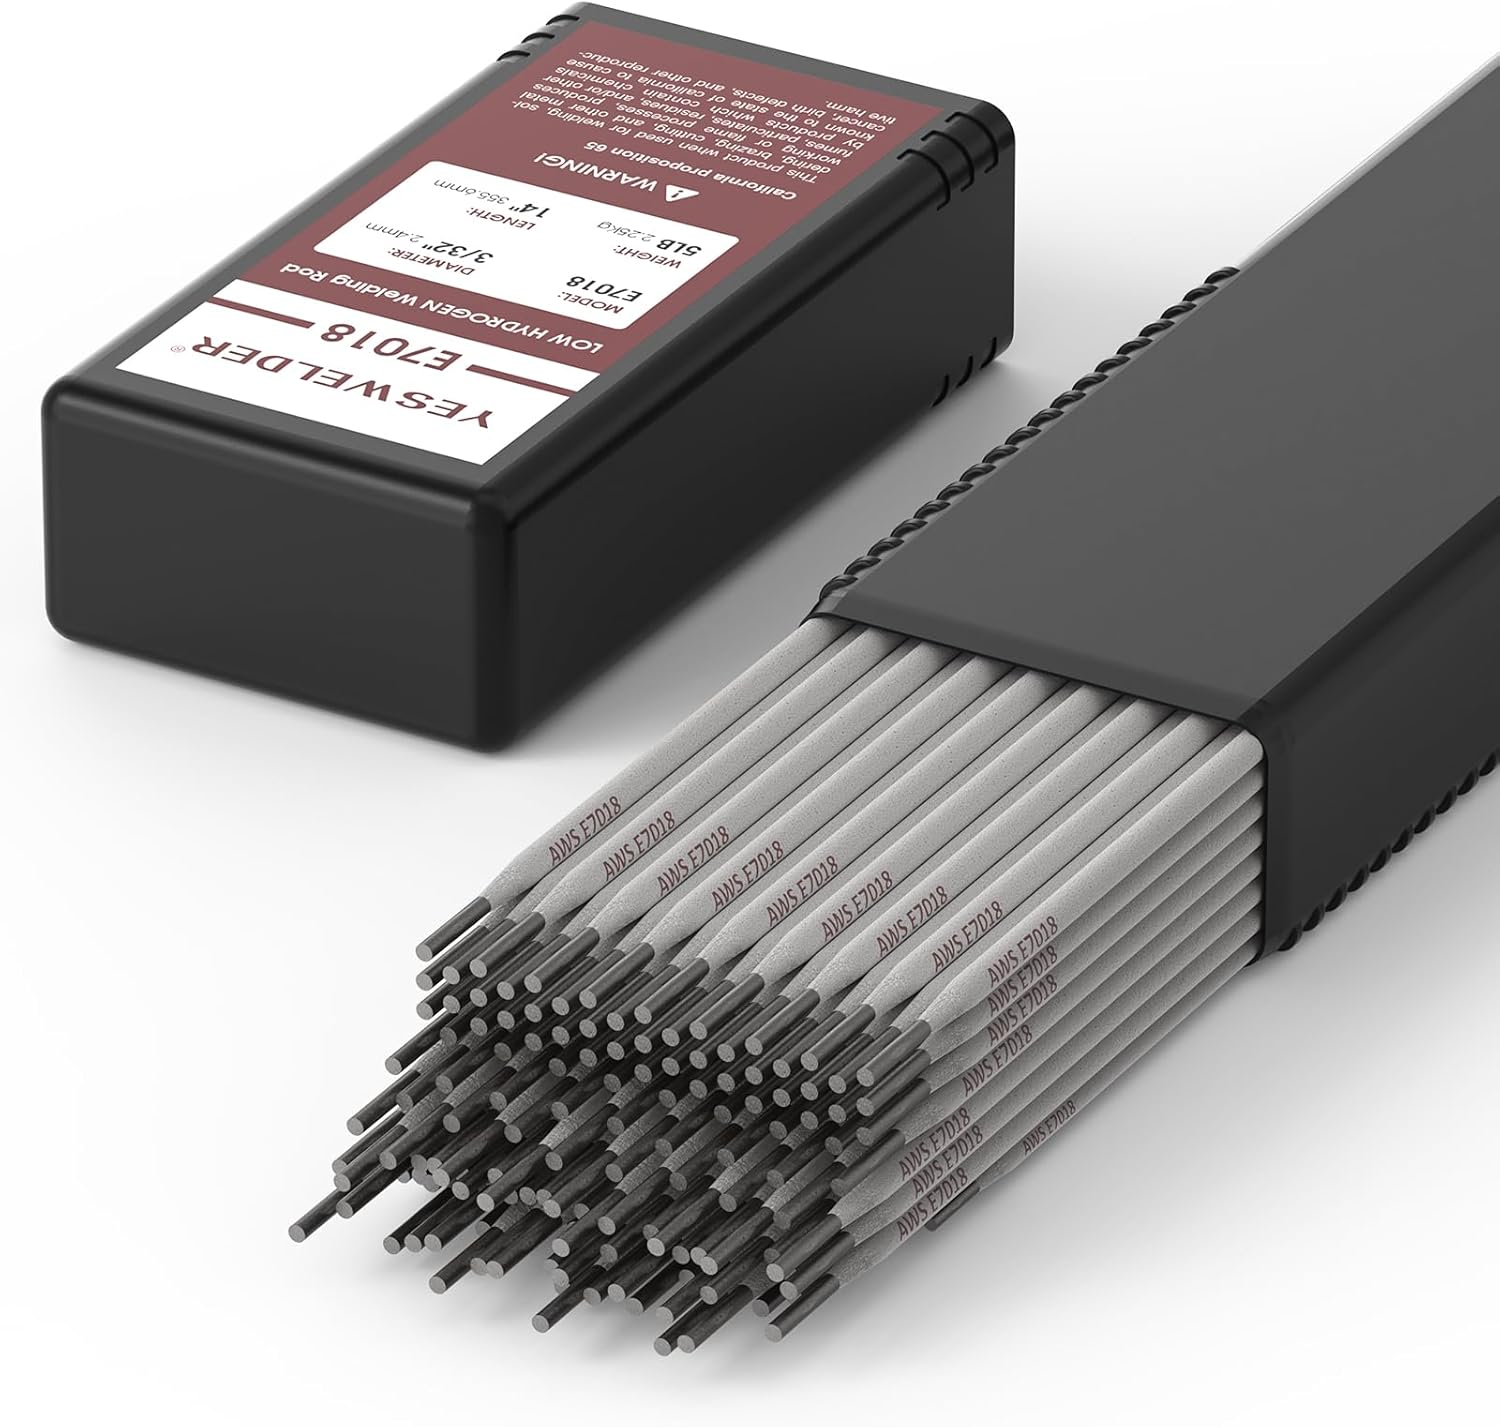
Image 3.2: A box containing YESWELDER E7018 3/32 inch 5LB low hydrogen carbon steel stick electrodes, included with the welder.

Image 3.3: Illustration showing the length of the E7018 welding rods (14 inches / 355.6mm) and various diameters (3/32", 1/8", 5/32").
4. Setup Instructions
4.1 Power Connection
- Ensure the welder's power switch is in the OFF position.
- Connect the appropriate power cord to the welder and then to a suitable power outlet (110V or 220V). The machine automatically detects the voltage.
- Ensure the power source can provide sufficient amperage for welding operations.
4.2 Wire Spool Installation (MIG/Flux Core)
- Open the wire spool compartment.
- Place the wire spool onto the spindle, ensuring it rotates freely.
- Thread the welding wire through the wire feed mechanism and into the MIG torch liner.
- Adjust the wire feed roller tension according to the wire diameter.
- Close the compartment.
4.3 Gas Connection (for Gas MIG)
- Connect one end of the gas hose to the gas inlet on the rear of the welder.
- Connect the other end of the gas hose to your shielding gas regulator, which should be attached to a suitable gas cylinder (e.g., Argon/CO2 mix for steel, 100% Argon for aluminum).
- Ensure all connections are tight to prevent gas leaks.
4.4 Torch/Electrode Holder/Ground Clamp Connection
- MIG Torch: Connect the MIG torch cable to the appropriate connector on the front panel.
- Ground Clamp: Connect the ground clamp cable to the negative (-) terminal for MIG/Flux Core/Lift TIG, or positive (+) for Stick welding (depending on electrode polarity). Secure the clamp to the workpiece or welding table.
- Electrode Holder (Stick): Connect the electrode holder cable to the positive (+) terminal for most E7018 electrodes.
- Lift TIG Torch (Optional): Connect the Lift TIG torch to the appropriate connector. (Requires additional torch, not included).
- Spool Gun (Optional): Connect the spool gun to the designated port. (Requires additional spool gun, not included).
5. Operating Instructions
5.1 General Operation
- Turn on the welder using the power switch.
- The digital display will illuminate. Use the control knobs and buttons to select the desired welding process (MIG, Stick, Lift TIG) and material type (Fe, Fe/Ss, AL, Flux).
- Adjust welding parameters (wire speed, voltage, amperage) according to your specific welding task and material thickness.
5.2 Synergic MIG vs. Manual MIG
- Synergic MIG: When selected, adjusting the wire feeding speed automatically sets a recommended voltage. This simplifies setup for beginners.
- Manual MIG: Allows independent adjustment of wire feeding speed and voltage, providing greater control for experienced welders.
5.3 Flux Core MIG Welding (Gasless)
This mode uses flux-cored wire, which contains a fluxing agent that produces its own shielding gas, eliminating the need for an external gas cylinder.
- Select "Flux" mode on the control panel.
- Ensure the correct polarity is set (typically DCEN - Direct Current Electrode Negative).
- Adjust wire speed and voltage.
- Begin welding, maintaining a consistent travel speed and arc length.
5.4 Gas MIG Welding
This mode uses solid wire and an external shielding gas (e.g., Argon/CO2 mix) to protect the weld puddle from atmospheric contamination.
- Select "Fe" (Steel) or "Fe/Ss" (Stainless Steel) mode and ensure gas is connected and flowing.
- Set the correct polarity (typically DCEP - Direct Current Electrode Positive).
- Adjust wire speed and voltage.
- Open the gas cylinder valve and set the flow rate on the regulator (typically 15-25 CFH).
- Begin welding.
5.5 Spool Gun MIG Welding (for Aluminum)
For optimal aluminum welding, an additional spool gun (e.g., B0B12JLSS9) is recommended. This allows for better wire feeding of softer aluminum wires.

Image 5.1: A welder using a spool gun to perform aluminum welding, demonstrating the machine's compatibility with this accessory.
- Connect the spool gun to the designated port on the welder.
- Load aluminum wire into the spool gun.
- Select "AL" (Aluminum) mode.
- Ensure 100% Argon shielding gas is connected and flowing.
- Adjust parameters as needed for aluminum welding.
5.6 Lift TIG Welding
Lift TIG welding provides precise control and high-quality welds. An additional Lift TIG torch (e.g., B07YP9TQV1) is required.
- Connect the Lift TIG torch and ground clamp.
- Select "Lift TIG" mode.
- Ensure 100% Argon shielding gas is connected and flowing.
- Set the desired amperage.
- Initiate the arc by gently touching the tungsten electrode to the workpiece and lifting it slightly.
5.7 Stick Welding (SMAW)
This mode uses coated electrodes (like the included E7018 rods) to create an arc and weld. The machine offers adjustable Hot Start, Arc Force, and Anti-Stick features.
- Connect the electrode holder and ground clamp with appropriate polarity (typically DCEP for E7018).
- Select "Stick" mode.
- Insert an electrode into the holder.
- Adjust amperage.
- Strike an arc and maintain a consistent arc length and travel speed.
6. Maintenance
Regular maintenance ensures the longevity and optimal performance of your welding machine.
- Cleaning: Periodically clean the welder's exterior with a dry cloth. Use compressed air to blow out dust and debris from inside the machine, especially around cooling vents. Ensure the machine is unplugged before cleaning.
- Wire Feed Rollers: Inspect wire feed rollers for wear and ensure they are clean and free of debris. Replace if worn.
- Contact Tips and Nozzles: Replace worn or spattered contact tips and nozzles on the MIG torch as needed to maintain good arc stability and weld quality.
- Cables and Connections: Regularly inspect all cables for damage (cuts, fraying) and ensure all connections are tight.
7. Troubleshooting
Refer to the table below for common issues and their potential solutions.
| Problem | Possible Cause | Solution |
|---|---|---|
| Welder does not power on | No power from outlet; Power cord damaged; Internal fuse blown | Check power outlet and circuit breaker; Inspect power cord; Contact service center. |
| No arc (MIG/Stick) | Poor ground connection; Incorrect polarity; Wire feed issue (MIG); Wet/damaged electrode (Stick) | Ensure ground clamp is on clean metal; Verify polarity settings; Check wire feed path; Use dry electrodes. |
| Poor weld quality / Porosity | Insufficient shielding gas (MIG); Contaminated workpiece; Incorrect parameters; Drafts in welding area | Check gas flow and connections; Clean workpiece thoroughly; Adjust voltage/wire speed; Weld in a sheltered area. |
| Wire feeding issues (MIG) | Incorrect roller tension; Worn contact tip; Kinked liner; Wrong size wire feed roller | Adjust roller tension; Replace contact tip; Inspect and clear liner; Ensure correct roller size for wire. |
8. Specifications
| Feature | Detail |
|---|---|
| Model | MIG-185DS PRO |
| Welding Processes | Flux Core MIG, Gas MIG, Spool Gun MIG, Lift TIG, Stick |
| Output Current | 185 Amps (Max) |
| Input Voltage | 110V/220V Dual Voltage |
| Wire Compatibility | 2LB/10LB spools; .023''/.030''/.035''/.040'' wire diameters |
| Control Type | Synergic and Manual MIG |
| Display | Digital LED Display |
| Included Rods | E7018 3/32'' 5LB Low Hydrogen Carbon Steel Stick Electrodes |
| ASIN | B0DK33FQWN |
| Date First Available | July 11, 2024 |

Image 8.1: The product is certified by the American Welding Society (AWS) to standard AWS A5.12M/A5.12:2009 Conformance, indicating adherence to industry standards.
9. Warranty and Support
YESWELDER products are designed for durability and performance. For warranty information, technical support, or service inquiries, please contact YESWELDER customer support through their official website or the retailer where the product was purchased.
Please have your model number (MIG-185DS PRO) and purchase date available when contacting support.
Documents and downloads
Ask a question about this manual
Ask about setup, troubleshooting, compatibility, parts, safety, or missing instructions. Manuals+ will review the question and use this page’s manual context to help answer it.