
1. Introduction
Thank you for choosing the Kaschun EX6 6-Channel Audio Mixer. This professional audio mixer is designed for a variety of applications, including studio recording, live performances, DJ events, karaoke, and streaming. It features 6 channels, built-in audio reverberation effects, +48V phantom power, Bluetooth connectivity, and a 2*250W power output. This manual provides essential information for the safe and efficient operation of your device. Please read it thoroughly before use and retain it for future reference.
2. Safety Information
- Power Supply: Use only the specified power adapter. Ensure the voltage matches your local power supply.
- Water and Moisture: Do not expose the mixer to water, rain, or excessive moisture. Avoid placing liquid-filled objects on the unit.
- Ventilation: Ensure adequate ventilation around the unit. Do not block ventilation openings.
- Heat: Keep the mixer away from heat sources such as radiators, heat registers, stoves, or other heat-producing appliances.
- Cleaning: Disconnect from power before cleaning. Use a dry, soft cloth. Do not use liquid cleaners or aerosols.
- Servicing: Do not attempt to service this product yourself. Refer all servicing to qualified service personnel.
- Placement: Place the mixer on a stable, level surface to prevent accidental falls.
3. Product Overview and Features
The Kaschun EX6 is a versatile 6-channel audio mixer with integrated power amplification and a range of features to enhance your audio experience.
Key Features:
- 6-Channel Input: Supports various audio sources.
- Built-in Power Amplifier: 2 * 250W output for direct speaker connection.
- +48V Phantom Power: For condenser microphones.
- Bluetooth Connectivity: Wireless audio streaming.
- USB Interface: For playback and recording.
- 99 DSP Effects: A wide range of digital sound effects.
- 7-Band Stereo Graphic Equalizer: Precise frequency control.
- Individual Channel Controls: Gain, EQ (High/Mid/Low), Pan, Effect Send.
Component Identification:

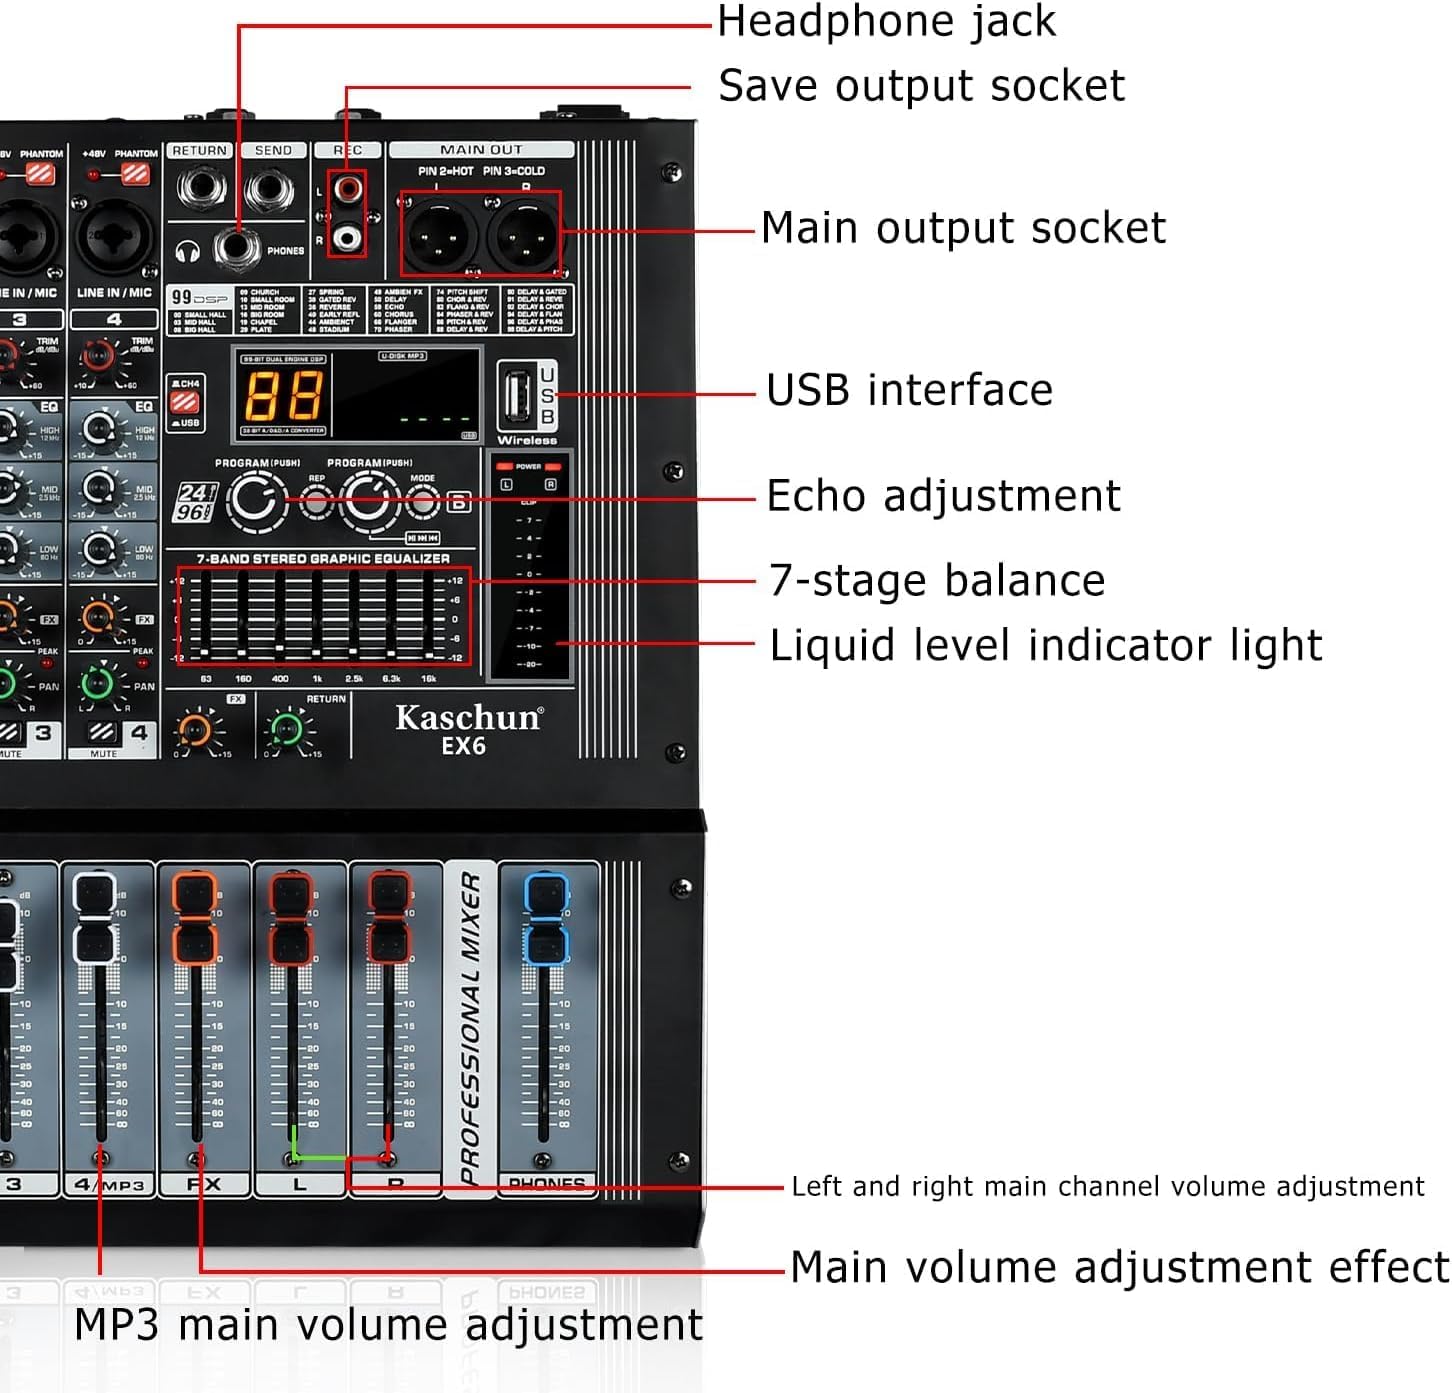


4. Setup
4.1 Initial Connection
- Power Connection: Connect the power cable to the mixer's AC input and then to a suitable power outlet. Ensure the power switch is in the OFF position before connecting.
- Speaker Connection: Connect your passive speakers to the main output terminals (LEFT.A, RIGHT.A, LEFT.B, RIGHT.B) on the rear panel. Ensure correct polarity.
- Input Devices:
- Microphones: Connect XLR or 1/4" TRS cables from your microphones to the LINE IN/MIC inputs. For condenser microphones, activate the +48V phantom power switch.
- Instruments/Line Level Devices: Connect instruments (guitars, keyboards) or other line-level devices to the LINE IN/MIC inputs using 1/4" TRS cables.
- External Audio Players: Use the RCA inputs or Bluetooth for connecting external audio sources like smartphones or media players.
- Headphones: Connect headphones to the headphone jack for monitoring.
4.2 Powering On
Once all connections are secure, turn on the mixer's power switch. The power indicator light will illuminate. Gradually increase the main volume and individual channel volumes to avoid sudden loud noises.

5. Operating Instructions
5.1 Channel Control
- GAIN Knob: Adjusts the input sensitivity for each channel. Set it to an appropriate level to prevent clipping (distortion).
- HIGH/MID/LOW Knobs: These are 3-band equalizers for adjusting the treble, midrange, and bass frequencies of each channel.
- FX Knob: Controls the amount of effect send from the channel to the built-in DSP effects processor.
- PAN Knob: Adjusts the stereo position (left/right) of the channel's signal.
- Channel Fader: Controls the individual volume level of each channel.
5.2 DSP Effects
The EX6 features 99 digital sound effects. Use the PROGRAM knob to select an effect and the PARAMETER knob to adjust its intensity or specific parameters. The FX fader controls the overall level of the effects sent to the main mix.
5.3 Bluetooth Operation
- Activate Bluetooth on your device (smartphone, tablet).
- On the mixer, select the Bluetooth input mode. The display will show "BT".
- Search for "EX6" on your device's Bluetooth list and pair.
- Once connected, you can play audio from your device through the mixer. Adjust the MP3 main volume fader for the Bluetooth audio level.
5.4 USB Playback/Recording
Insert a USB drive into the USB port for MP3 playback. Use the transport controls (play, pause, skip) on the mixer's USB section. The USB port also supports recording the main mix to a connected USB device (refer to specific recording instructions in the full manual if available).
5.5 7-Band Stereo Graphic Equalizer
Use the sliders on the 7-band graphic equalizer to fine-tune the overall frequency response of the main output. Each slider corresponds to a specific frequency band, allowing you to boost or cut frequencies as needed.
5.6 Monitoring
Connect headphones to the headphone jack to monitor the main mix or specific channels (if a PFL/AFL function is available, consult the full manual). Adjust the headphone volume knob to a comfortable listening level.
Video 5.1: EX6 Professional Audio Mixer Overview. This video provides a visual demonstration of the Kaschun EX6 mixer, showcasing its features and basic operation, including the movement of faders and interaction with controls.
6. Maintenance
- Cleaning: Regularly wipe the mixer's surface with a soft, dry, lint-free cloth. Do not use abrasive cleaners, solvents, or waxes.
- Dust: Use a soft brush or compressed air to remove dust from faders, knobs, and ventilation openings.
- Storage: When not in use for extended periods, store the mixer in a cool, dry place, away from direct sunlight and extreme temperatures. Cover the unit to protect it from dust.
- Cable Management: Ensure cables are not tangled or stressed, which can lead to damage.
7. Troubleshooting
| Problem | Possible Cause | Solution |
|---|---|---|
| No sound output |
|
|
| Humming or buzzing noise |
|
|
| USB port not working |
|
|
| No sound from a specific channel |
|
|
8. Specifications
| Feature | Detail |
|---|---|
| Model Number | EX6 |
| Brand | Kaschun |
| Number of Channels | 6 |
| Power Output | 2 * 250W |
| Phantom Power | +48V |
| Effects | 99 DSP Effects |
| Equalizer | 7-Band Stereo Graphic EQ |
| Connectivity | Bluetooth, USB, XLR, 1/4" TRS, RCA |
| Dimensions (approx.) | 36cm (W) x 37cm (H) x 13cm (D) |

9. Warranty and Support
For warranty information and technical support, please refer to the documentation included with your purchase or visit the official Kaschun website. Keep your proof of purchase for any warranty claims.
For further assistance, you may contact Kaschun customer service through their official channels. Details are typically found on the product packaging or the manufacturer's website.