1. Introduction
Thank you for choosing the Young Electric 200LBS EZ-FOLD Aluminum 2-Ebike Carrier with Ramp. This robust and user-friendly bike rack is designed to safely transport up to two e-bikes, mountain bikes, or road bikes, with a total capacity of 200 pounds. Its innovative features ensure secure attachment and convenient handling for various vehicle types.
Key Features:
- 200 LB Total Capacity: Transports up to 100 pounds per bike, compatible with e-bikes, mountain bikes, and road bikes with up to 5-inch fat tires.
- Safe and Secure: Features 2-arm fix, Anti-falloff 360° swirl structure, and anti-wobble structure to prevent swaying and knocking.
- Adjustable Tire Rack: Sturdy 5-inch wide steel tray fits various tire widths. Movable cradles adapt to different bike lengths and wheelbases up to 50 inches.
- User-Friendly Design: Easy one-handed fold-up for storage and parking.
- 2-Inch Hitch Receiver: Specifically designed for vehicles with 2-inch receivers, ensuring a stable and secure fit.
- Built-in Ramp: Facilitates easy loading and unloading of e-bikes.

Figure 1: Young Electric 2-Ebike Carrier with Ramp
2. Setup and Assembly
Most parts of your Young Electric bike rack come pre-assembled for a straightforward installation process. Ensure you have all components, including locking hitch pins and hardware, before beginning. Assembly typically involves attaching the main rack components and securing them with the provided bolts and tools.
Assembly Steps:
- Unpack all components and verify against the parts list (refer to your product packaging for a detailed list).
- Attach the main support bar to the hitch receiver component. Secure it firmly using the appropriate bolts and a wrench.
- Connect the bike trays to the main support structure. Ensure they are aligned correctly and secured tightly to prevent any wobbling.
- Install the adjustable upright arms and wheel cradles onto the trays. These should slide smoothly and lock into place.
- Insert the assembled rack into your vehicle's 2-inch hitch receiver. Secure it with the locking hitch pin.
- Perform a final check of all bolts and connections to ensure they are tightened securely before use.

Figure 2: Product Dimensions
3. Operating Instructions
Loading and Unloading Bikes:
- Extend the built-in ramp (if applicable) from the side of the rack.
- Carefully roll your bike up the ramp and onto the tire trays.
- Adjust the movable cradles to fit your bike's wheelbase (up to 50 inches).
- Secure the bike's wheels using the ratcheting straps. Ensure the strap is securely looped through the designated slot and tightened as shown in the correct usage illustration.
- Position the 2-arm fix and 360° swirl structure to firmly secure the bike frame, preventing any movement during transit.
- To unload, reverse the steps, ensuring all straps and clamps are released before rolling the bike down the ramp.

Figure 3: Built-in Ramp for Easy Loading

Figure 4: Correct Strap Usage
Folding and Tilting Features:
- Easy Fold: When not in use, the rack can be easily folded up with one hand. This is ideal for storage or when parking in a garage.
- Smart Tilting Design: The rack features a tilting mechanism that allows you to access your vehicle's trunk or tailgate without having to remove the bikes.

Figure 5: Easy Fold Mechanism
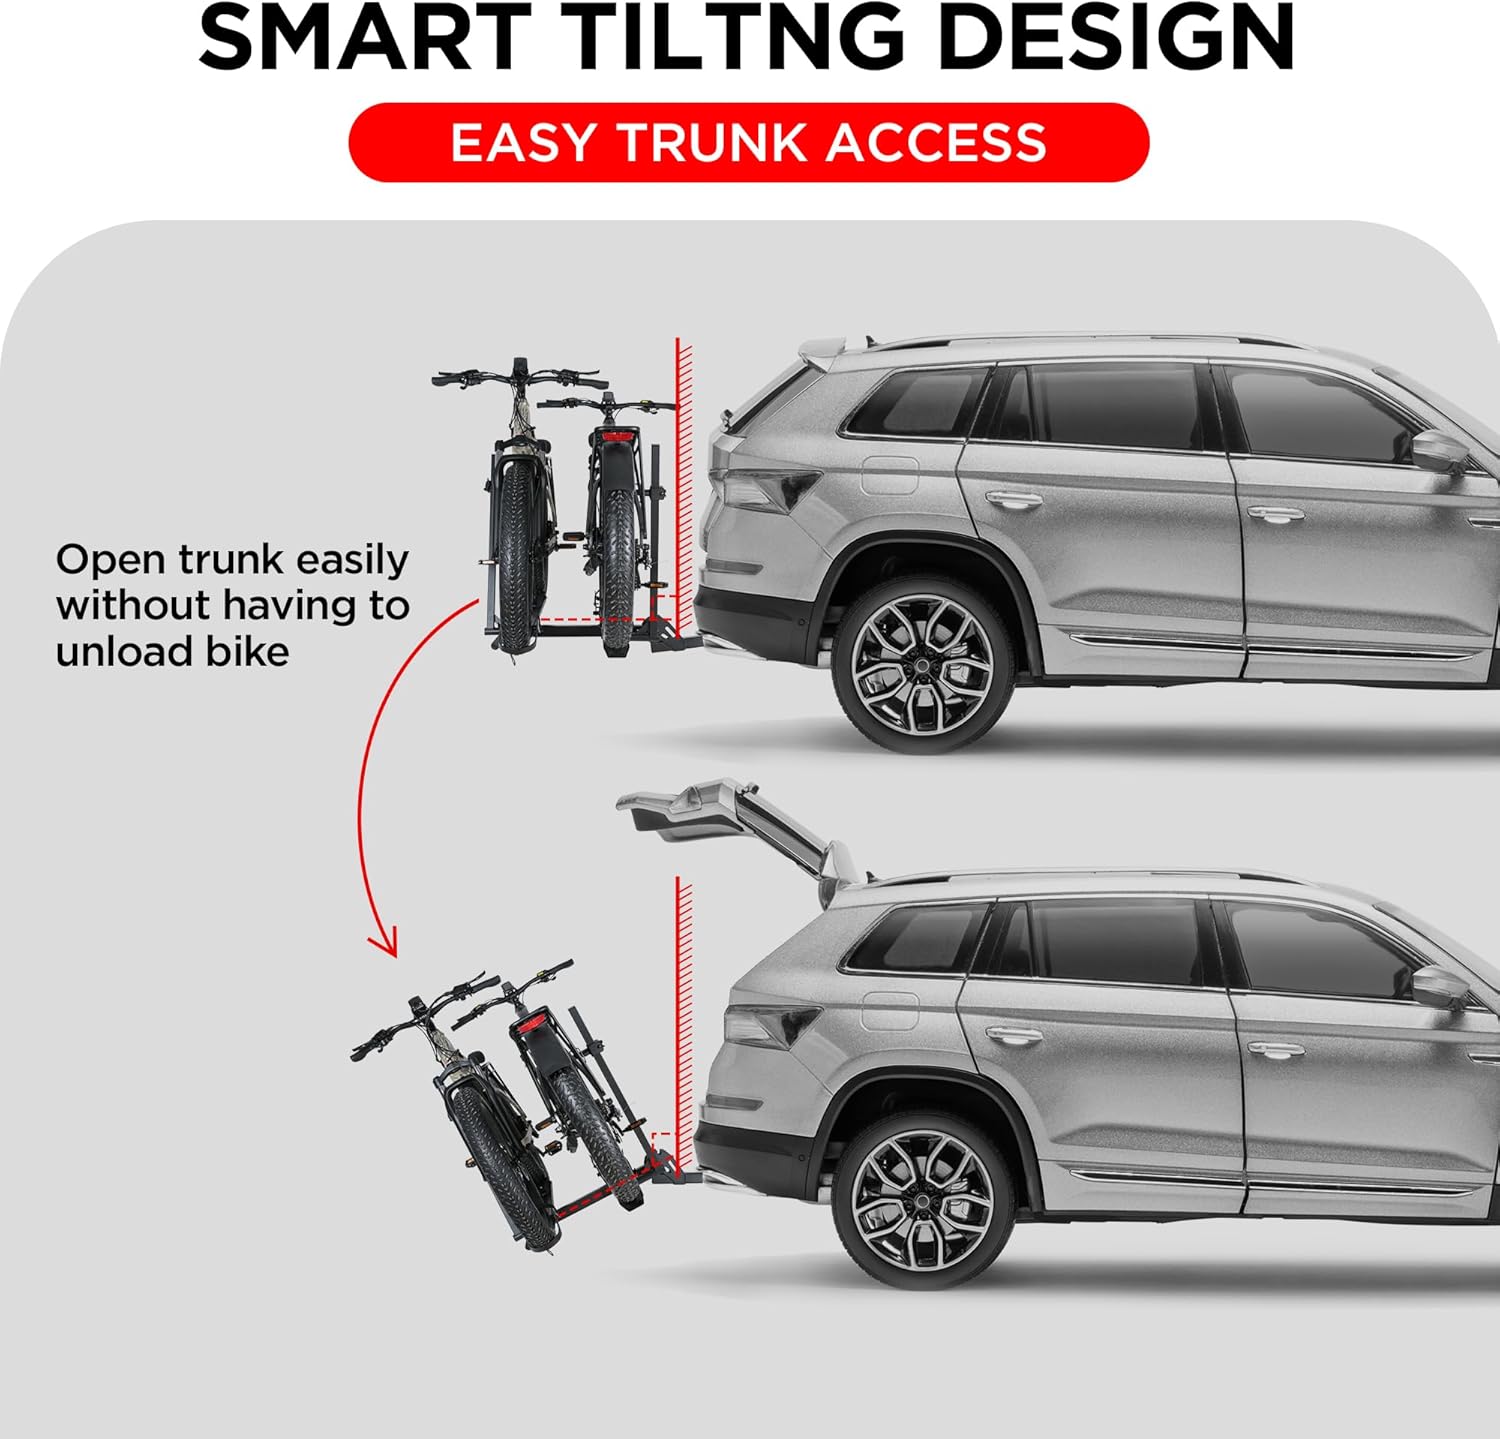
Figure 6: Smart Tilting for Trunk Access
4. Maintenance
Regular maintenance will ensure the longevity and safe operation of your bike carrier.
- Cleaning: Clean the rack regularly with mild soap and water, especially after exposure to dirt, salt, or harsh weather conditions. Rinse thoroughly and dry.
- Lubrication: Periodically lubricate moving parts, such as hinges and locking mechanisms, with a silicone-based lubricant to ensure smooth operation and prevent rust.
- Inspection: Before each use, inspect all straps, bolts, and connections for wear, damage, or looseness. Tighten any loose fasteners immediately. Check for any cracks or deformation in the metal components.
- Storage: When not in use, store the bike rack in a dry, protected area to prevent corrosion and damage.
5. Troubleshooting
Common Issues and Solutions:
- Rack Wobbles During Travel:
Solution: Ensure the rack is fully inserted into the 2-inch hitch receiver and the locking hitch pin is securely tightened. Verify that the anti-wobble structure is correctly engaged. - Bikes Sway or Move on the Rack:
Solution: Double-check that all wheel straps are properly threaded and ratcheted tight. Ensure the 2-arm fix and 360° swirl structure are firmly clamped onto the bike frames. Adjust movable cradles for optimal fit. - Difficulty Loading/Unloading Bikes:
Solution: Ensure the built-in ramp is fully extended and properly seated. For heavier e-bikes, consider using two people for loading if necessary. - Folding Mechanism is Stiff:
Solution: Apply a small amount of lubricant to the hinge points of the folding mechanism. Ensure no debris is obstructing the movement. - Missing or Damaged Parts:
Solution: Contact Young Electric customer support immediately for replacement parts. Do not attempt to use the rack with missing or damaged components.
6. Specifications
| Attribute | Detail |
|---|---|
| Brand | Young Electric |
| Model | Hitch Bike Rack (Item Model Number: 4155) |
| Color | Black |
| Load Capacity | 200 Pounds (100 lbs per bike) |
| Item Weight | 57.5 pounds |
| Product Dimensions (L x W x H) | 44.6 x 57.5 x 43.5 inches |
| Mounting Type | Strap |
| Automotive Fit Type | Universal Fit (2-inch hitch receiver only) |
| Max Wheelbase Supported | 50 inches |
| Max Tire Width Supported | 5 inches |
| Country of Origin | China |
7. Warranty and Support
Young Electric stands behind the quality of its products. For warranty information, technical support, or to inquire about replacement parts, please contact our customer service team. Details can typically be found on our official website or through the retailer where you purchased the product.
Please retain your proof of purchase for any warranty claims.


