
1. Safety Information
Welding operations involve inherent risks. Adhere to all safety precautions to prevent injury or damage. Always wear appropriate personal protective equipment (PPE), including welding helmet, gloves, and protective clothing. Ensure adequate ventilation in the work area. Read and understand the safety guidelines provided with your welding machine before operating this TIG torch.
- Electric Shock: Welding current can cause severe or fatal electric shock. Do not touch live electrical parts.
- Fumes and Gases: Welding fumes and gases can be hazardous to your health. Keep your head out of the fumes. Use ventilation or exhaust to remove fumes and gases from the breathing zone.
- Arc Rays: Arc rays can injure eyes and burn skin. Wear a welding helmet with a proper shade filter and protective clothing.
- Fire and Explosion: Welding can cause fire or explosion. Keep combustibles away from the work area. Have a fire extinguisher readily available.
- Hot Parts: Welding equipment and workpieces become hot. Allow them to cool before handling.
2. Product Overview
The AZZUNO WP-17V is an air-cooled TIG welding torch designed for precise and efficient welding. It features a durable construction and an ergonomic design for comfortable use during extended periods. This torch is equipped with a 35-50mm² quick connector and a 13-foot (4-meter) cable and gas hose, making it compatible with various AZZUNO MIG welding machines that support TIG functionality, such as the MIG-200F, MIG-250F, and MIG-200PRO.
Key Features:
- Air-Cooled Design: Provides effective cooling for consistent performance.
- Ergonomic Handle: Non-slip rhombus-patterned handle for improved grip and reduced fatigue.
- Extended Reach: 13-foot (4-meter) cable and gas hose for greater maneuverability.
- Quick Connector: 35-50mm² connector for easy and secure attachment to compatible welding machines.


3. Package Contents
Verify that all items listed below are included in your package. If any items are missing or damaged, contact AZZUNO customer service.
- TIG Torch (WP-17V) x 1
- Ceramic Cups (#4, #5, #6) x 3
- Collet (1.6mm, 2.0mm, 2.4mm) x 3
- Collet Body x 1
- Long Back Cap x 1
- Short Back Cap x 1
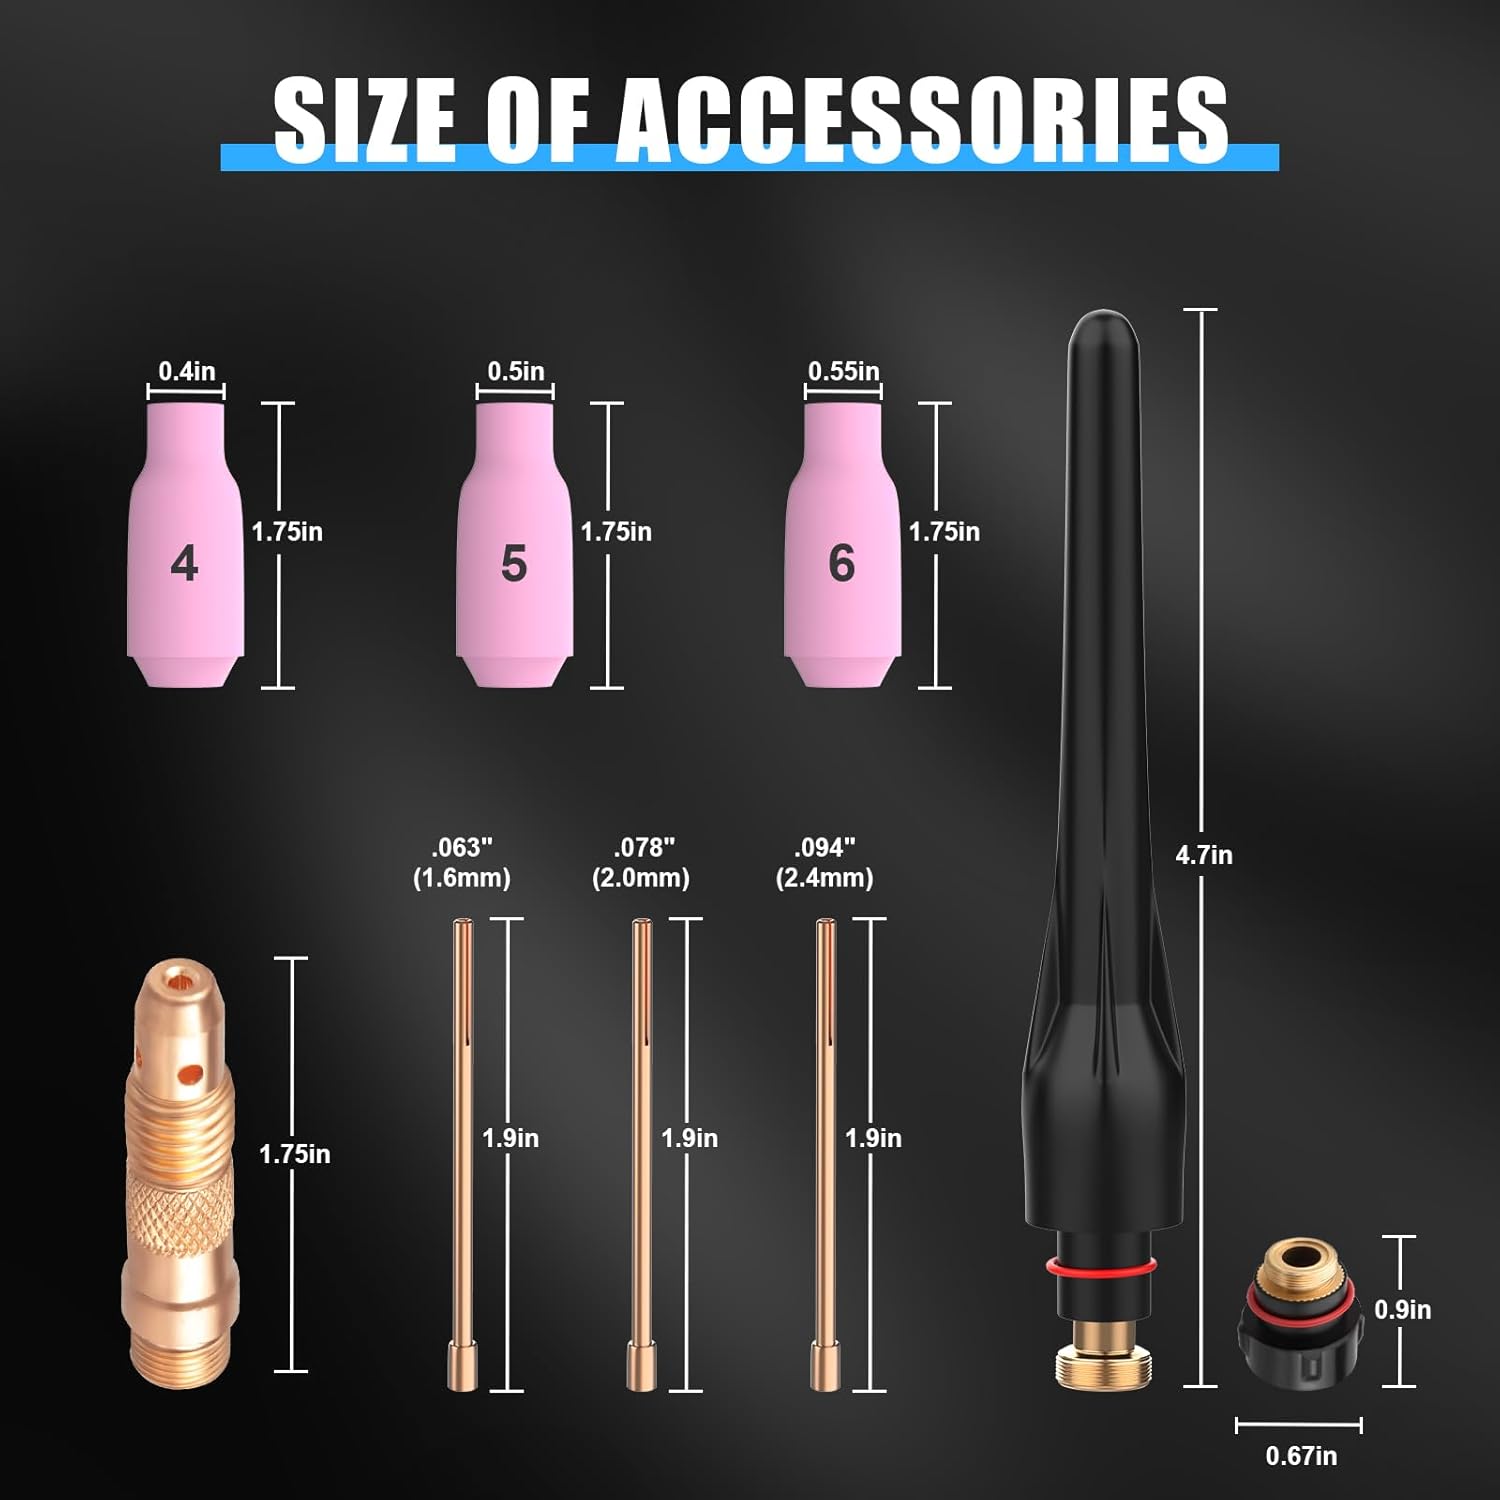
4. Setup
Follow these steps to properly set up your AZZUNO WP-17V TIG welding torch with a compatible welding machine.
4.1 Installing Consumables on the Torch Head
- Select the appropriate collet and collet body for your tungsten electrode size.
- Insert the collet into the collet body.
- Thread the collet body assembly into the torch head.
- Insert the tungsten electrode through the back cap and into the collet body, ensuring it protrudes the desired length from the torch head.
- Thread the back cap onto the torch head and tighten it to secure the tungsten electrode.
- Select a ceramic cup (nozzle) and firmly push it onto the torch head.

4.2 Connecting the Torch to the Welding Machine
- Ensure your welding machine is turned off and unplugged from the power source.
- Locate the 35-50mm² quick connector on the welding machine.
- Insert the power cable quick connector from the TIG torch into the corresponding receptacle on the welding machine and twist to secure it.
- Connect the gas hose from the TIG torch to your argon gas regulator. Ensure a tight, leak-free connection. It may be necessary to use an adapter if the regulator fitting does not match the hose fitting.
- Connect the control cable (if present and required by your machine) to the appropriate port on the welding machine.

5. Operating Instructions
This section provides general guidance for operating the AZZUNO WP-17V TIG torch. Refer to your welding machine's manual for specific settings and procedures.
5.1 Pre-Welding Checks
- Ensure all connections are secure.
- Check the argon gas cylinder pressure and set the flow rate on your regulator according to your welding requirements.
- Verify that the tungsten electrode is properly sharpened and free from contamination.
- Confirm that the workpiece is clean and properly grounded.
5.2 Welding Procedure (LIFT TIG)
- Turn on your welding machine and select the TIG welding mode.
- Set the desired welding current and other parameters on your machine.
- Open the gas valve on the TIG torch (if manual) or ensure the machine's gas solenoid is active.
- Bring the tungsten electrode into light contact with the workpiece.
- Slowly lift the torch a small distance (typically 1-3mm) from the workpiece to initiate the arc. Avoid scratching the tungsten on the workpiece.
- Maintain a consistent arc length and travel speed while feeding filler rod (if required) into the weld puddle.
- At the end of the weld, slowly withdraw the torch to allow the post-flow gas to shield the cooling weld puddle and tungsten, preventing oxidation.
- Close the gas valve on the torch (if manual) or turn off the machine.
6. Maintenance
Regular maintenance ensures the longevity and optimal performance of your TIG torch.
6.1 Cleaning
- Periodically clean the torch body and cable with a dry, clean cloth.
- Remove any spatter or debris from the ceramic cup and collet body.
- Ensure the gas passages are clear and free from obstructions.
6.2 Consumable Replacement
Replace consumables such as ceramic cups, collets, collet bodies, and tungsten electrodes as they wear out or become damaged. Worn consumables can negatively impact weld quality and torch performance.

7. Troubleshooting
This section addresses common issues you might encounter with your TIG torch. For more complex problems, consult your welding machine's manual or contact customer support.
| Problem | Possible Cause | Solution |
|---|---|---|
| No arc initiation | Poor ground connection, incorrect machine settings, contaminated tungsten, loose connections. | Check ground clamp, verify machine settings, clean/sharpen tungsten, tighten all electrical connections. |
| Poor weld quality (porosity, contamination) | Insufficient gas flow, gas leak, contaminated workpiece, incorrect tungsten size/type, worn consumables. | Check gas flow rate, inspect gas hose for leaks, clean workpiece, replace ceramic cup/collet, use correct tungsten. |
| Gas tube detaches from torch | Loose connection, insufficient clamping. | Reattach gas tube securely. Consider using a hose clamp or safety wire for added security if the connection is prone to loosening. |
| Gas fitting does not connect to regulator | Incompatible thread type (e.g., metric vs. standard). | Obtain an appropriate adapter for your regulator and gas hose fitting. |
| Torch overheating | Exceeding duty cycle, insufficient air cooling. | Allow torch to cool. Ensure proper ventilation around the torch and welding machine. Reduce welding current or increase off-time. |
8. Specifications
| Feature | Detail |
|---|---|
| Model | WP-17V |
| Cooling Type | Air-Cooled |
| Cable Length | 13 feet (4 meters) |
| Quick Connector Size | 35-50mm² |
| Item Weight | 2.81 pounds |
| Package Dimensions | 11.1 x 9.09 x 3.07 inches |
| Compatible Welders | AZZUNO MIG-200F, MIG-250F, MIG-200PRO (and others with 35-50mm² connector) |
| Included Components | TIG Torch x1, Ceramic Cups x3, Collets x3, Collet Body x1, Long Back Cap x1, Short Back Cap x1 |
9. Warranty & Support
AZZUNO products are manufactured to high-quality standards. For information regarding warranty coverage, technical assistance, or customer service inquiries, please refer to the documentation provided with your original purchase or visit the official AZZUNO website. Our customer service team is available to assist you with any questions or support needs.