1. Introduction
This manual provides essential information for the safe and efficient operation of your Furvveerr 80W CO2 Laser Engraver, Model KH7050. This machine is designed for precise engraving and cutting on a variety of materials, including wood, acrylic, fabric, and more. Please read this manual thoroughly before operating the machine to ensure proper usage and to prevent damage or injury.

Figure 1: Furvveerr 80W CO2 Laser Engraver (Model KH7050)
This image displays the Furvveerr 80W CO2 Laser Engraver, a red and black machine with its top lid open, revealing the internal honeycomb work bed and the laser head assembly. The machine features an emergency stop button and warning labels on its exterior.
2. Safety Information
WARNING: This is a Class 4 laser product (IEC 60825-1:2014) and can cause severe injury, including blindness, burns, and fire if not operated correctly. Always follow safety guidelines.
- Eye Protection: Always wear appropriate laser safety glasses when operating or observing the machine. The viewing window is fire-resistant but does not guarantee full protection against direct laser exposure.
- Ventilation: Ensure adequate ventilation to remove fumes and smoke generated during engraving and cutting. Connect the exhaust fan and pipe as instructed.
- Fire Safety: Keep a fire extinguisher nearby. Do not leave the machine unattended during operation. Be aware of flammable materials. The fireproof viewing window helps reduce fire risk, but vigilance is key.
- Material Compatibility: Only engrave or cut materials specified as safe for CO2 lasers. Avoid materials that produce toxic fumes or are highly reflective.
- Electrical Safety: Ensure the machine is properly grounded. Do not operate with wet hands or in damp environments. Disconnect power before performing maintenance.
- Emergency Stop: Familiarize yourself with the location and operation of the emergency stop button.
- Supervision: Do not allow unauthorized personnel or children near the machine during operation.
3. Package Contents
Verify that all components are present upon unpacking:
- Furvveerr 80W CO2 Laser Engraver (Model KH7050)
- Maintenance Tool Kit
- Smoke Exhaust Pipe
- Software USB Stick
- Power Line
- Data Line (USB cable, Network cable)
- Grounding Wire
- Water Pump
- Air Pump
- Exhaust Fan

Figure 2: Machine Dimensions and Included Components
This image illustrates the overall dimensions of the laser engraver (approximately 140cm x 95cm x 86cm) and provides a visual list of the included accessories: air compressor, exhaust pipe, water pump, user manual (represented by a USB stick), air pump, maintenance tool kit, network cable, and USB data line.
4. Specifications
| Feature | Specification |
|---|---|
| Model | KH7050 |
| Laser Power | 80W CO2 Laser Tube |
| Working Area | 700 x 500 mm (28" x 20") |
| Cutting Thickness (Max) | 15 mm (0.59 in) in one pass |
| Engraving Speed | Up to 500 mm/s (19.7 ips) |
| Laser Class | Class 4 (IEC 60825-1:2014), power output: 5mW |
| Laser Tube Lifespan | Up to 8000 hours |
| Control System | Digital Control Panel (RUIDA mainboard) |
| Software Compatibility | LightBurn, AutoCAD, CorelDraw, LaserDRW |
| Operating Systems | Windows, Linux, macOS |
| Connectivity | USB disk, USB cable, Network cable |
| Power Input | 110 Volts, 60Hz |
| Product Dimensions | Approx. 27.56"L x 19.69"W (Working Area) / 140cm x 95cm x 86cm (Overall) |
| Item Weight | 265 Pounds |
| Cooling Method | Water Cooling (Water Pump Included) |
| Air Assist | Included (Air Pump) |
| Exhaust System | Included (Exhaust Fan, Smoke Exhaust Pipe) |
| Viewing Window | Fireproof polyester with iron frames |

Figure 3: Honeycomb Work Platform Dimensions
This image highlights the spacious 700mm x 500mm (28" x 20") honeycomb work platform, designed for structural stability and accommodating various material sizes.
5. Setup Instructions
5.1 Unpacking and Placement
- Carefully remove the machine from its packaging. It is heavy (265 lbs), so use appropriate lifting equipment or assistance.
- Place the engraver on a stable, level surface in a well-ventilated area, away from flammable materials.
- Ensure there is sufficient space around the machine for operation, maintenance, and exhaust.
5.2 Connecting Components
- Exhaust System: Connect the smoke exhaust pipe to the machine's exhaust port and route it to an outdoor vent or a suitable filtration system. Install the exhaust fan.
- Water Cooling System: Connect the water pump to the laser tube's water inlet and outlet ports. Place the water pump in a reservoir of distilled water (not included). Ensure water circulates freely through the laser tube. This system is crucial for maintaining laser tube temperature and extending its lifespan.
- Air Assist System: Connect the air pump to the air assist nozzle on the laser head. This provides airflow to prevent material burning and ensures cleaner cuts.
- Grounding: Connect the grounding wire to a proper electrical ground.
- Power Connection: Connect the power line to the machine and then to a grounded 110V AC power outlet.
- Data Connection: Connect the machine to your computer using the provided USB cable or network cable. Alternatively, use a USB disk for file transfer.
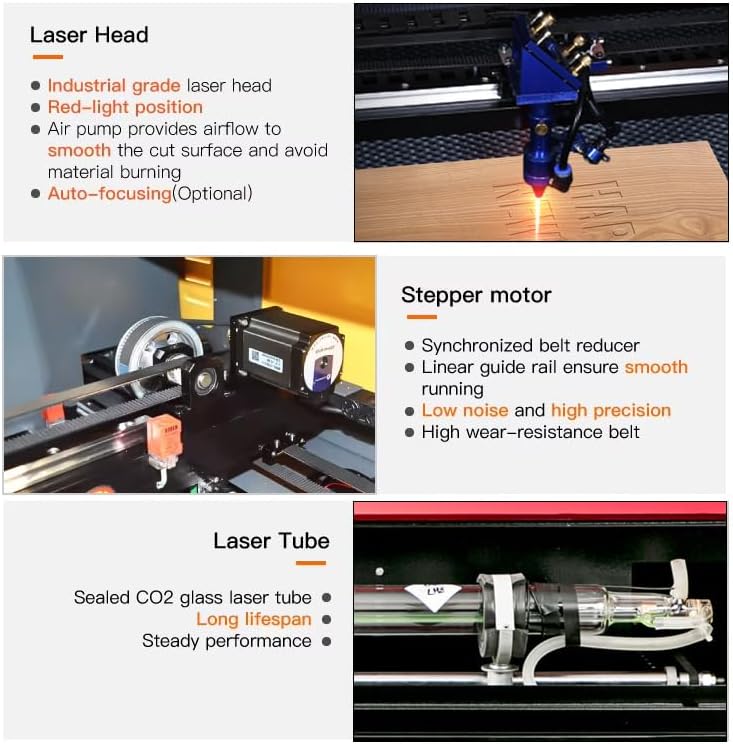
Figure 4: Internal Components Overview
This image provides close-up views of key internal components: the industrial-grade laser head with red-light position and air pump connection, the stepper motor with synchronized belt reducer for smooth and precise movement, and the sealed CO2 glass laser tube, highlighting its long lifespan and steady performance.
5.3 Software Installation
The included USB stick contains the necessary software and drivers. The machine is compatible with:
- LightBurn
- AutoCAD
- CorelDraw
- LaserDRW
Install the software on your Windows, Linux, or macOS computer following the instructions provided on the USB stick.
6. Operating Instructions
6.1 Powering On and Initial Checks
- Ensure all connections (power, water, air, exhaust, data) are secure.
- Turn on the water pump and air pump. Verify water flow through the laser tube and air assist functionality.
- Turn on the main power switch on the laser engraver.
- The digital control panel will power on.
6.2 Using the Digital Control Panel
The digital control panel allows for direct manipulation of parameters and process control.
- Digital Display: Provides visual feedback on current settings and job status.
- Parameter Adjustment: Use the navigation buttons to adjust laser power, speed, and other settings directly on the panel.
- Process Control: Buttons for Pause, Start, and Terminate allow control over ongoing engraving/cutting jobs.
- Origin/Frame: Set the origin point for your job and frame the work area to ensure correct placement.

Figure 5: Digital Control Panel
This image displays the digital control panel, featuring a screen and various buttons for controlling the laser engraver. Buttons include Reset, Pulse, Speed, Min Power, Max Power, File, and Start/Pause, along with directional controls for navigation. It also indicates compatibility with LaserDRW, CorelDraw, and AutoCAD software.

Figure 6: Control Panel and Interior Configuration
This image provides a closer look at the 3.5" display screen of the control panel, highlighting its offline operation, 128M storage, and graphic online preview capabilities. It also shows the interior configuration, including the Ruida mainboard, JMC driver, and power supplies, and the rear-mounted exhaust fan designed to extract fumes and odors.
6.3 Material Placement and Focusing
- Open the machine lid.
- Place your material securely on the honeycomb bed. For larger materials, utilize the front and back pass-through doors.
- Use the red-dot pointer on the laser head to identify the exact engraving point. Adjust the Z-axis (bed height) to achieve optimal focus. The laser head is designed for high cutting precision.

Figure 7: Laser Focus Precision
This image illustrates the benefit of a 0.01x0.01mm thin laser focus, demonstrating how it enables more powerful and precise engraving compared to a wider focus. It also shows that a thin focus allows for cutting up to 20mm in one pass, versus 10mm with a less precise focus.
6.4 Engraving and Cutting Process
- Prepare your design in compatible software (LightBurn, AutoCAD, etc.).
- Transfer the file to the engraver via USB, network, or USB stick.
- Set the appropriate power and speed settings for your material. Refer to the material compatibility table below.
- Initiate the job from the software or the control panel.
- Monitor the process through the fireproof viewing window. Do not leave unattended.
- Once complete, allow the machine to cool and safely remove the material.
6.5 Material Compatibility and Settings Guide
The following table provides general guidelines for cutting depth versus laser power. Actual results may vary based on material density, quality, and specific laser settings.
| Material/Power | 50W | 60W | 80W | 100W | 130W | 150W |
|---|---|---|---|---|---|---|
| Wood | 3.5mm | 5.5mm | 8.5mm | 10.5mm | 11.5mm | 13.5mm |
| Plywood | 2.5mm | 4.5mm | 8.5mm | 10.5mm | 11.5mm | 13.5mm |
| Leather | 1.5mm | 2.5mm | 3.5mm | 4.5mm | 5.5mm | 6.5mm |
| Acrylic | 3.5mm | 9.0mm | 13mm | 17mm | 20mm | 23mm |
| PVC | 1.5mm | 2.5mm | 3.5mm | 4.5mm | 5.5mm | 6.5mm |
| Plexiglass | 1.5mm | 7.5mm | 7.5mm | 9.5mm | 11.5mm | 14.5mm |
| Plastic | 0.5mm | 2.5mm | 2.5mm | 3.5mm | 4.5mm | 5.5mm |
| Rubber | 1.5mm | 2.5mm | 2.5mm | 3.5mm | 4.5mm | 5.5mm |
| Cloth | 1.5mm | 2.5mm | 2.5mm | 3.5mm | 4.5mm | 6.5mm |
| Bamboo | 1.0mm | 2.5mm | 2.5mm | 3.5mm | 4.5mm | 5.5mm |
| Paper | 0.5~5mm | |||||
Figure 8: Cutting Depth vs. Power for Various Materials
This table provides a guide for the maximum cutting depth achievable for different materials at various laser power settings (50W to 150W). Note that for some materials like glass, crystal, ceramic, marble, and stone, only engraving is applicable, not cutting.
7. Maintenance
Regular maintenance ensures optimal performance and extends the lifespan of your laser engraver.
7.1 Cleaning
- Laser Head and Optics: Regularly clean the laser lens and mirrors with specialized optical cleaning solutions and wipes. Dust and debris can significantly reduce laser power and quality.
- Honeycomb Bed: Clean the honeycomb bed frequently to remove debris and residue from cut materials. This prevents back-reflection and ensures a flat working surface.
- Interior: Keep the interior of the machine free from dust and material scraps.
7.2 Laser Tube Care
- Water Cooling: Ensure the water cooling system is always operational during laser use. Replace the distilled water regularly to prevent algae growth and mineral buildup. A consistent water temperature is vital for laser tube health.
- Lifespan: The laser tube has a lifespan of up to 8000 hours. Operating at lower power settings can extend its life.

Figure 9: High-Performance Laser Tube
This image shows a detailed view of the high-performance Yongli H2 CO2 laser tube, emphasizing its water inlet for cooling and the pre-connected wire for the anode side. This tube is designed to offer a high-efficiency laser beam and lasts up to 8,000 hours.
7.3 Air Assist and Exhaust System
- Air Pump: Periodically check the air pump for proper function and clean any filters.
- Exhaust Fan: Ensure the exhaust fan is clear of obstructions and effectively removing smoke and fumes. Clean the fan blades if necessary.
8. Troubleshooting
This section addresses common issues you might encounter. For problems not listed here, please contact customer support.
- No Laser Output:
- Check if the laser tube is powered on and receiving water flow.
- Verify all safety interlocks (lid closed, emergency stop disengaged).
- Inspect laser tube for damage or signs of wear.
- Ensure laser power settings are not set to zero.
- Poor Engraving/Cutting Quality:
- Check laser focus. Recalibrate if necessary.
- Clean laser lens and mirrors.
- Adjust power and speed settings for the specific material.
- Ensure material is flat and securely placed on the honeycomb bed.
- Machine Not Responding:
- Check power connection and ensure the machine is turned on.
- Verify data connection (USB/network cable).
- Restart the machine and your computer.
- Check for software errors or communication issues.
- Excessive Smoke/Fumes:
- Ensure the exhaust fan is operating correctly and the exhaust pipe is clear.
- Verify proper ventilation in the work area.
- Reduce laser power or increase speed if material is burning excessively.
9. Warranty and Support
9.1 Warranty Information
The Furvveerr 80W CO2 Laser Engraver (Model KH7050) comes with a 1-year warranty from the date of purchase. This warranty covers manufacturing defects and malfunctions under normal use. Please retain your proof of purchase for warranty claims. The warranty does not cover damage caused by misuse, improper maintenance, or unauthorized modifications.
9.2 Customer Support
For technical assistance, troubleshooting, or warranty inquiries, please contact Furvveerr customer support. Refer to your purchase documentation or the official Furvveerr website for contact details.
You can also visit the Furvveerr Store on Amazon for additional product information and support resources.


