Introduction
The SmallRig Mini NATO Side Handle 4840 is designed to enhance the stability and control of your camera setup during handheld shooting. Its ergonomic design and adjustable features aim to reduce arm fatigue and provide a comfortable grip for extended use. This manual provides detailed instructions for setup, operation, and maintenance of your side handle.

Image: SmallRig Mini NATO Side Handle 4840 attached to a camera cage, showcasing its compact design and integration with a camera system.
Package Contents
- Side Handle x 1
- Handle Adapter x 1

Image: The SmallRig Mini NATO Side Handle 4840 and its included handle adapter, laid out to show all components in the package.
Key Features
- Ergonomic Design: The handle features a non-slip silicone contact surface, designed to conform to the hand's shape for comfortable and stable shooting, even in varying temperatures.
- Adjustable Versatility: The side handle can be configured for both left and right-hand use. It offers 43mm (1.7 inches) of vertical adjustment, allowing users to find the optimal holding position for different camera sizes and setups. The maximum load capacity is 6kg (13lbs).
- Multiple Mounting Options: Integrated accessory points include a 1/4"-20 threaded hole, a strap hole, and a cold shoe. These allow for the attachment of various accessories such as monitor mounts, magic arms, LED video lights, and microphones.
- Integrated Magnetic Wrench: A magnetic wrench is built into the bottom of the handle for convenient access, facilitating quick assembly and disassembly.

Image: A detailed view of the handle's ergonomic shape and textured silicone for enhanced grip and comfort.

Image: Illustration demonstrating the 43mm (1.7 inches) up and down adjustment capability of the handle.

Image: Product details displaying the cold shoe, 1/4"-20 threaded hole, and strap slot for accessory attachment.
Setup and Installation
- Attaching to a Camera Cage: The Mini NATO Side Handle is designed to attach to camera cages equipped with a NATO rail. Align the handle's adapter with the NATO rail on your camera cage and slide it into place. Secure it by tightening the locking lever.
- Note on NATO Rail: If your camera cage does not have a built-in NATO rail, it is recommended to use it with a SmallRig NATO rail (e.g., models 1409 or 2172), which must be purchased separately.
- Adjusting Hand Orientation: To switch the handle between left and right-hand use, remove the connecting part of the handle adapter, rotate it, and reattach it to change the direction.
- Vertical Adjustment: Loosen the screws on the handle adapter using the built-in magnetic wrench. Slide the handle up or down by up to 43mm (1.7 inches) to achieve your desired height, then re-tighten the screws to secure.
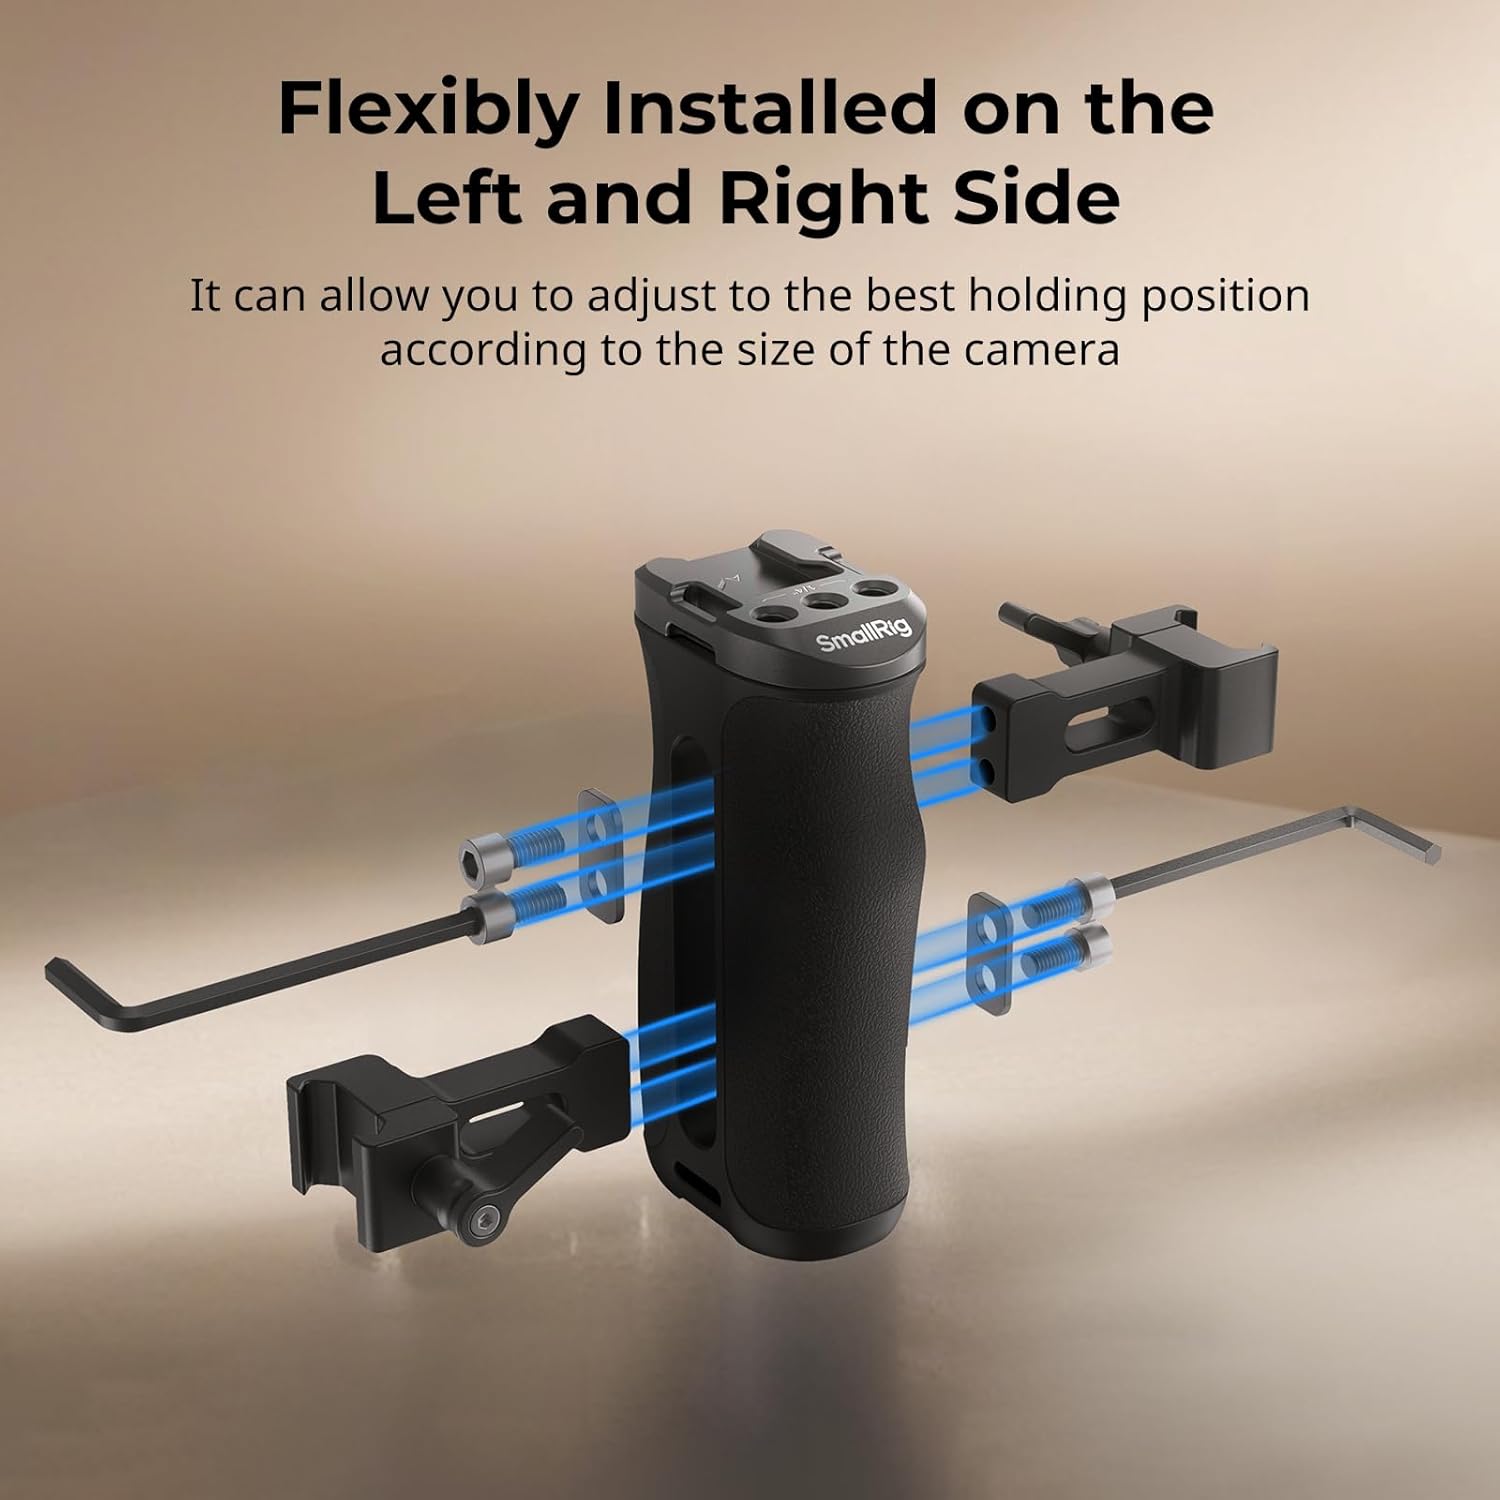
Image: The handle's adapter being installed on a camera cage, illustrating its flexible installation on either the left or right side.

Image: Visual guide on how to configure the handle for left or right-hand operation, including the location of the built-in magnetic hex wrench.

Image: A note indicating that the handle requires a NATO rail, suggesting separate purchase of SmallRig NATO rails 1409 or 2172 if not already present on the cage.
Setup Video
Video: A short demonstration of attaching a SmallRig NATO side handle to a camera cage, illustrating the quick snap-on mechanism.
Video: A user demonstrating the attachment of a SmallRig Mini Side Handle to a camera rig, highlighting its comfortable grip and ease of installation.
Operating Instructions
Once the handle is securely attached and adjusted to your preference, you can begin utilizing its various mounting points to expand your camera rig's capabilities.
- Cold Shoe: Attach accessories such as microphones, LED lights, or wireless receivers to the cold shoe mount located on top of the handle.
- 1/4"-20 Threaded Hole: Use this standard thread for attaching monitor mounts, magic arms, or other compatible accessories.
- Strap Hole: Secure a wrist strap or shoulder strap through the designated strap hole for added security during handheld operation.

Image: The handle supporting a camera rig with a monitor, power bank holder, and top handle, illustrating its maximum load capacity of 6kg (13lbs).
Specifications
| Feature | Detail |
|---|---|
| Product Dimensions | 4.15 x 2.68 x 2.12 inches (105.5 x 68.0 x 53.8mm) |
| Item Weight | 5.3 ounces (149 Grams) |
| Package Dimensions | 5.3 x 4.0 x 2.0 inches (136.0 x 102.5 x 51.0mm) |
| Package Weight | 7.0 ounces (198.0 Grams) |
| Material(s) | PC+10%GF, Silicone, Aluminum Alloy |
| Model Number | 4840 |
| Compatible Devices | Camera Cage (with NATO rail) |
Maintenance
To ensure the longevity and optimal performance of your SmallRig Mini NATO Side Handle 4840, follow these maintenance guidelines:
- Cleaning: Wipe the handle with a soft, dry cloth to remove dust and debris. For stubborn dirt, use a slightly damp cloth and mild soap, then dry thoroughly. Avoid harsh chemicals or abrasive materials.
- Storage: Store the handle in a clean, dry environment away from extreme temperatures and direct sunlight when not in use.
- Inspection: Periodically check all screws and connections to ensure they are tight. Use the built-in magnetic wrench to re-tighten any loose components.
Troubleshooting
If you encounter any issues with your SmallRig Mini NATO Side Handle 4840, consider the following common solutions:
- Handle feels loose: Ensure the locking lever on the NATO clamp is fully tightened. If the vertical adjustment is loose, use the magnetic wrench to tighten the screws on the handle adapter.
- Difficulty attaching to cage: Verify that your camera cage has a compatible NATO rail. If not, a separate SmallRig NATO rail is required. Ensure the handle adapter is correctly aligned with the rail.
- Accessories not fitting: Check that your accessories have standard 1/4"-20 threads or cold shoe compatibility.
Warranty and Support
For warranty information, technical support, or further assistance with your SmallRig Mini NATO Side Handle 4840, please contact SmallRig customer service or visit the official SmallRig website. Keep your purchase receipt as proof of purchase for any warranty claims.
You can also visit the Official SMALLRIG Store on Amazon for more products and support resources.


