1. Introduction
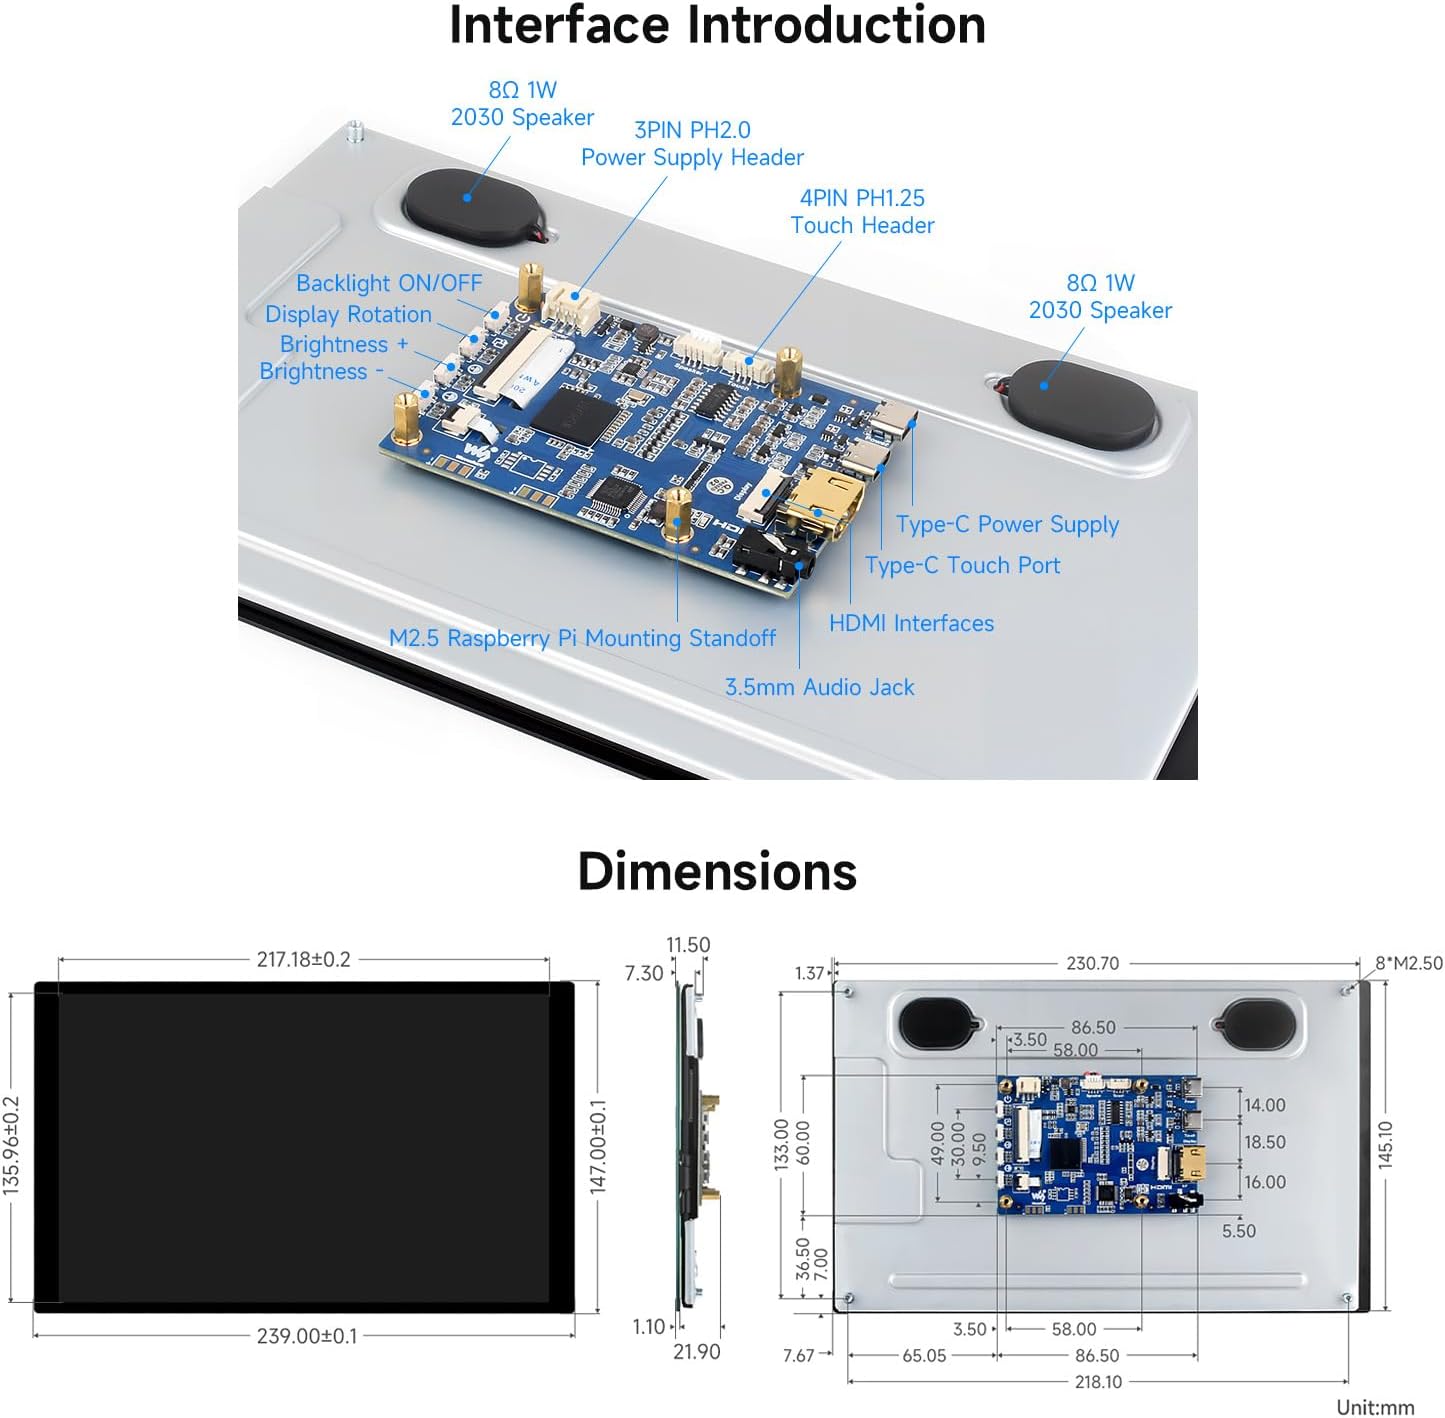
This manual provides detailed instructions for the Waveshare 10.1-inch High Resolution Capacitive Touch Display, Model 10.1EP-CAPLCD. This display features a 1920x1200 resolution IPS panel with a 178° wide viewing angle, offering clear and vivid color display effects. It supports 10-point capacitive touch, depending on the operating system, and includes a 6H hardness toughened glass panel with optical bonding for improved display quality and dust resistance. The display also features a one-button switch for landscape and portrait orientation and integrated ferrite Hi-Fi speakers for enhanced audio.
The display is compatible with a wide range of devices and operating systems, including Raspberry Pi 5/4B/3B/Zero/Zero W/Zero 2W/Pico, Windows 11/10/8.1/8/7, and Jetson Nano/TX2/Xavier NX/Orin.

2. Package Contents
Verify that all items listed below are included in your package:

- 10.1EP-CAPLCD Display x1
- HDMI Flat Cable (~1m) x1
- USB Type-A to Type-C Cable (~1m) x1
- Micro HDMI Adapter x1
- HDMI Adapter x1
- HDMI to Micro HDMI Adapter x1
- PH1.25 4PIN to Type-A Cable x1
- Capacitive Touch Pen x1
- 3PIN Cable x1
- HDMI-Cable-120mm (2pcs) x1
- Cleaning Cloth x1
- 5V 3A Power Supply x1
- Screws Pack x1
3. Specifications
The following table outlines the technical specifications of the Waveshare 10.1-inch Capacitive Touch Display:

| Feature | Specification |
|---|---|
| Product Dimensions | 0.42 x 9.4 x 5.78 inches |
| Item Weight | 2.07 pounds |
| Standing Screen Display Size | 10.1 Inches |
| Resolution | 1920x1200 |
| Aspect Ratio | 1.63:1 |
| Brand | waveshare |
| Image Contrast Ratio | 1000:1 to 3000:1 |
| Viewing Angle | 178° |
| Touch Type | Capacitive, 10-Point |
| Panel Material | 6H Hardness Toughened Glass, Optical Bonding |
| Audio Output | Ferrite Hi-Fi Speaker, 3.5mm Jack |
4. Setup and Installation
This section provides instructions for connecting the display to various devices. Ensure all power is disconnected before making any physical connections.

4.1. Connecting to Raspberry Pi
The display is compatible with Raspberry Pi 5/4B/3B/Zero/Zero W/Zero 2W/Pico. The following steps detail the installation process, using Raspberry Pi 5 as an example. For specific models, refer to the Waveshare Wiki for detailed instructions.

- Software Setup: Write the official Raspberry Pi OS (Bookworm recommended) image to a TF card using Raspberry Pi Imager. During the imaging process, configure hostname, username, password, and Wi-Fi settings.
- Configuration File Modification: After flashing, open the `config.txt` file in the root directory of the TF card. Copy the display-specific configuration code from the Waveshare Wiki (search for your model) and paste it at the end of the `config.txt` file, then save.
- Hardware Connection - Step 1: Insert the TF card into the Raspberry Pi's card slot.
- Hardware Connection - Step 2: Secure the Raspberry Pi to the display's PCB board using the provided screws.
- Hardware Connection - Step 3: Connect the 22PIN FFC cable from the display's DSI port to the DSI1 port on the Raspberry Pi motherboard. Ensure the cable's gold finger direction is correct.
- Hardware Connection - Step 4: Connect the 2PIN cable from the display's power port to the 5V and GND pins on the Raspberry Pi GPIO.
- Power On: Connect a 5V power supply to the Raspberry Pi. The display should automatically turn on and show the system interface. No additional drivers are typically required for basic display and touch functionality.
4.2. Connecting to Jetson Nano / PC
The display supports Windows 11/10/8.1/8/7 and Jetson Nano. For these platforms, the connection is generally simpler, primarily requiring HDMI for video and USB for touch.
- Video Connection: Connect the display to your Jetson Nano or PC using an HDMI cable. Use the appropriate HDMI adapter if necessary (e.g., Micro HDMI for some Raspberry Pi models, standard HDMI for PCs).
- Touch Connection: Connect the display's USB Type-C touch port to a USB port on your Jetson Nano or PC using the provided USB Type-A to Type-C cable.
- Power Supply: Connect the 5V 3A power supply to the display's power input.
- Driver Installation (if needed): For Windows and Jetson Nano, touch functionality is often driver-free. If touch does not work automatically, check the Waveshare Wiki for specific driver installation instructions for your operating system.
5. Operating Instructions
5.1. Screen Rotation
The display supports one-button switching between landscape and portrait display modes. This can be done via a physical button on the display or through software settings in your operating system.

For Raspberry Pi OS, screen rotation can be adjusted through the 'Screen Configuration' application. Navigate to 'Screen' -> 'DSI-2' -> 'Orientation' and select your desired rotation angle. The touch input will automatically adjust with the display rotation.
5.2. Brightness Adjustment
Brightness can be adjusted using two methods:
- Through System Settings (Raspberry Pi OS): Open the 'Screen Configuration' application. Navigate to 'Screen' -> 'DSI-2' -> 'Brightness' and select the desired brightness level.
- Using Waveshare Brightness Adjustment Application: Waveshare provides a dedicated application for brightness adjustment. Download and install it from the Waveshare Wiki. After installation, the application can be launched from 'Start Menu' -> 'Accessories' -> 'Brightness'.
5.3. Touch Functionality
The display supports up to 10-point capacitive touch. Ensure the USB touch cable is connected to your device. For Raspberry Pi OS, verify that the touch option is enabled in the 'Screen Configuration' application ('Screen' -> 'DSI-2' -> 'Touchscreen').

5.4. Audio Output
The display includes built-in ferrite Hi-Fi speakers and a 3.5mm audio jack. Audio output will typically be routed through the HDMI connection. Ensure your device's audio settings are configured to output sound via HDMI to the display.
6. Maintenance
- Cleaning: Use the provided cleaning cloth or a soft, lint-free cloth to gently wipe the screen. Avoid using harsh chemicals or abrasive materials.
- Storage: Store the display in a cool, dry environment. Avoid prolonged exposure to high temperatures, humidity, or direct sunlight, as this may damage the display panel.
- Handling: Handle the display with care to prevent drops or impacts. The toughened glass panel is durable but not indestructible.
- Power: Always use the recommended 5V 3A power supply. Incorrect voltage or current may cause permanent damage.
7. Troubleshooting
7.1. No Display / Black Screen
- Ensure the 5V power supply is correctly connected and providing power.
- Verify that the HDMI cable is securely connected to both the display and the source device.
- For Raspberry Pi, double-check the FFC cable connection to the DSI port and ensure the `config.txt` file has the correct display configuration code.
- Try a different HDMI cable or port on your source device if available.
7.2. Touch Not Responding
- Ensure the USB Type-C touch cable is securely connected to both the display and the source device.
- For Raspberry Pi OS, verify that the touch option is enabled in the 'Screen Configuration' application.
- If using Windows or Jetson Nano, check if any specific touch drivers are required from the Waveshare Wiki and install them.
7.3. Audio Issues (Buzzing/No Sound)
- Ensure your source device's audio output is set to HDMI.
- Adjust the volume settings on both the source device and the display (if applicable via OSD or software).
- Some users have reported a buzzing sound from the speakers. If this occurs, consider using the 3.5mm audio jack with external speakers or headphones, or reducing the volume.
7.4. No OSD Menu
- Please note that this specific model (10.1EP-CAPLCD) does not feature an On-Screen Display (OSD) menu for direct hardware adjustments. All display settings, such as brightness and rotation, must be managed through the connected operating system's display settings or Waveshare's provided software applications.
8. Warranty and Support
For warranty information, technical support, or additional resources, please visit the official Waveshare website or contact their customer service. The Waveshare Wiki provides extensive documentation and tutorials for their products.
Official Waveshare Website: www.waveshare.com
Waveshare Wiki: Refer to the product page for your specific model (10.1EP-CAPLCD) for detailed guides and software downloads.


