
1. Introduction
The UeeVii 5.8G Point to Point WiFi Bridge (CPE58G Flex) is designed to extend network connectivity wirelessly over long distances. This device eliminates the need for physical network cables between buildings, making it suitable for extending networks to locations such as garages, barns, shops, or for outdoor surveillance systems. It operates on the 5.8GHz frequency band, offering enhanced anti-interference performance and stability.
This manual provides detailed instructions for the installation, configuration, operation, and maintenance of your UeeVii CPE58G Flex wireless bridge.
2. Package Contents
Verify that all items listed below are present in your package:
- 2 x CPE58G Wireless Bridge Units
- 2 x 24V 100Mbps PoE Adapters
- 2 x 3FT Test Network Cables
- 2 x Bracket Mounts
- 1 x User Manual (this document)
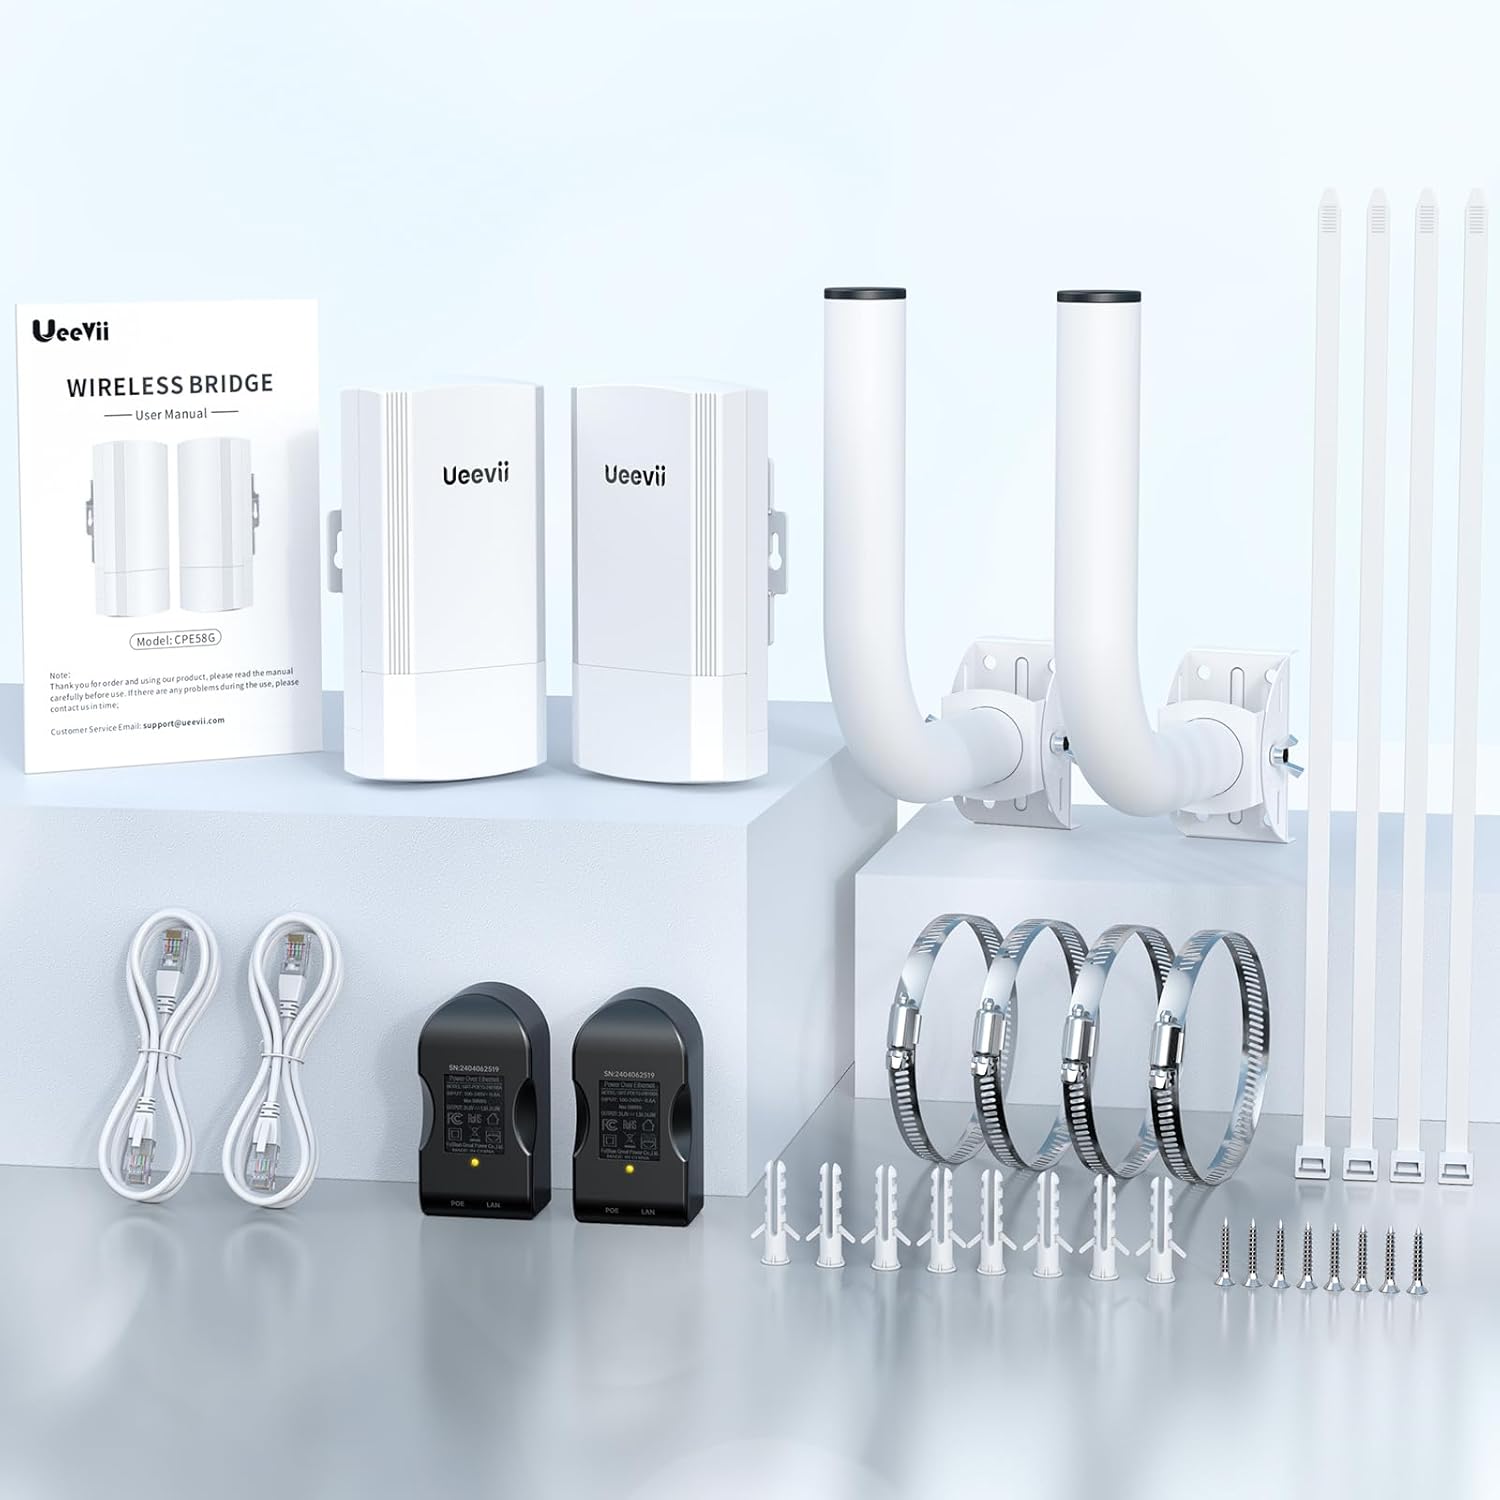
Image: All components included in the UeeVii CPE58G Flex package, including two bridge units, PoE adapters, network cables, and mounting brackets.
3. Product Overview
Each CPE58G Flex unit features essential ports and indicators for setup and operation.
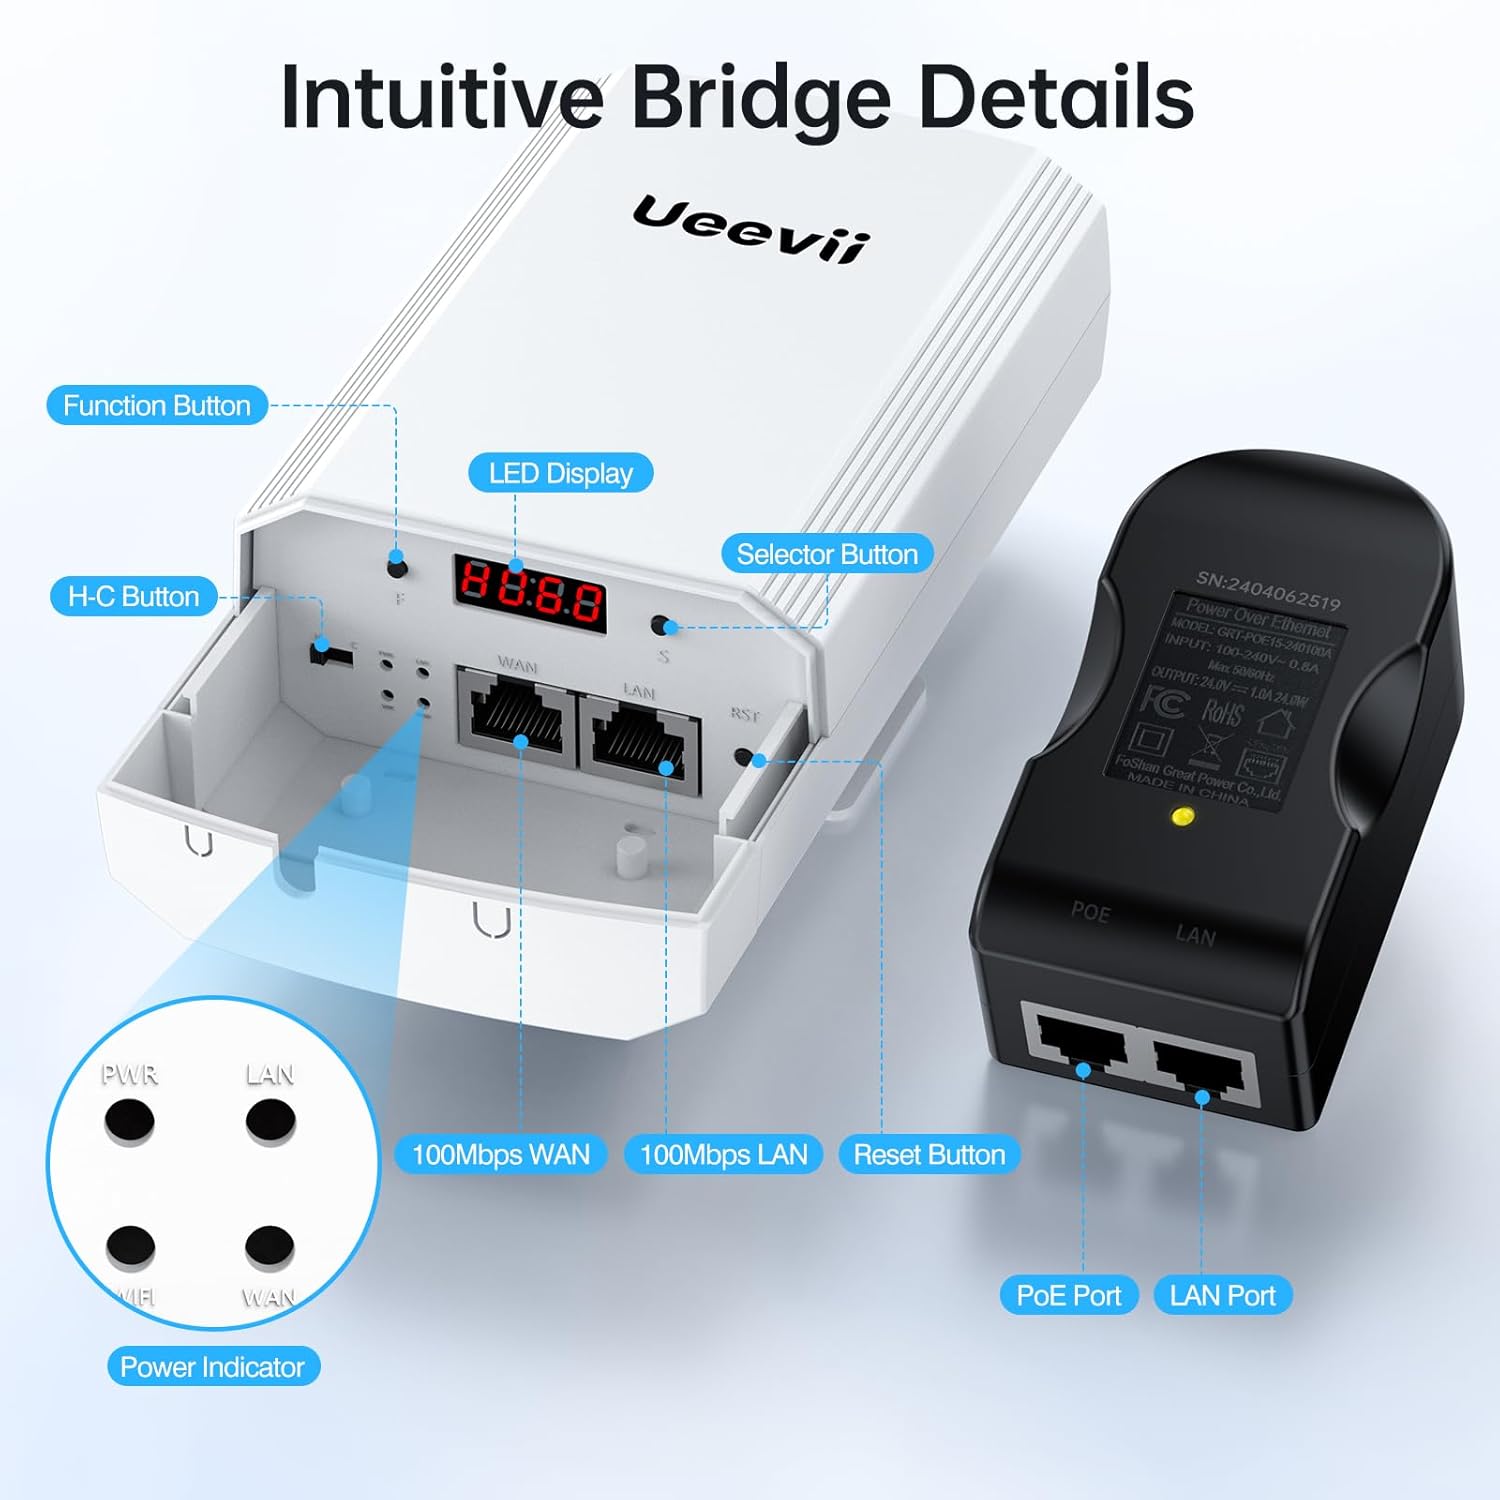
Image: Close-up of a UeeVii CPE58G Flex unit, highlighting the Function Button, H-C Button (Master/Slave selector), LED Display, Selector Button, WAN port, LAN port, and Reset Button. A PoE adapter is also shown with its PoE and LAN ports.
- WAN Port (100Mbps): Connects to the network source (e.g., router, modem) or provides power via PoE.
- LAN Port (100Mbps): Connects to local network devices (e.g., computer, switch, IP camera).
- Reset Button: Used for factory reset or pairing.
- H-C Button (Master/Slave Selector): Toggles between Host (Master) and Client (Slave) modes.
- LED Display: Shows operational status and signal strength.
- PoE Adapter: Provides power to the CPE unit through the Ethernet cable.
4. Setup
Follow these steps to set up your UeeVii wireless bridge for optimal performance.
4.1 Initial Pairing and Mode Configuration
- Place both CPE units in the same room for initial setup.
- Connect each CPE unit to its respective 24V PoE adapter. Connect the LAN port of the PoE adapter to a computer or router for configuration.
- Identify one unit as the Master (Host) and the other as the Slave (Client). The unit connected to your main internet source (router/modem) will be the Master.
- Ensure the H-C button on the Master unit is set to 'H' (Host/AP mode) and the Slave unit is set to 'C' (Client/STA mode). These are often pre-configured.
- To pair the units, power on both devices. Simultaneously press and hold the Reset Button on both units until the LED display indicates pairing mode (e.g., flashing lights). Release the buttons. The units will attempt to pair automatically.
- Once paired, the LED indicators on both units will show a stable light, indicating a successful connection.

Image: Two UeeVii CPE units with the H-C (Host/Client) selector button highlighted, indicating how to switch between Master and Slave modes.

Image: Two UeeVii CPE units with the reset button indicated, used for pairing or factory reset.

Image: Two UeeVii CPE units displaying identical LED patterns, indicating successful pairing and connection.
4.2 Physical Installation and Mounting
The CPE58G Flex units are IP65-rated for outdoor use and can be mounted on poles, walls, or roofs using the included brackets.
- Choose a mounting location for each unit that provides a clear line of sight between them. Obstructions like trees or buildings can significantly degrade performance.
- Attach the bracket mounts to your chosen surface (pole, wall, roof) using appropriate hardware.
- Securely attach each CPE unit to its bracket. The brackets allow for angle adjustment to fine-tune alignment.
- Run an Ethernet cable from the PoE adapter to the WAN port of each CPE unit. Ensure the cable is rated for outdoor use if exposed to elements.


Image: Examples of UeeVii CPE units mounted on a pole, an exterior wall, and a rooftop, demonstrating flexible installation options.
4.3 Network Connection Diagrams
Below are common setup scenarios for the UeeVii CPE58G Flex.

Image: Network diagram illustrating a point-to-point setup where the Master CPE connects to a main router, and the Slave CPE connects to a remote router, extending internet access to devices like phones and computers.

Image: Network diagram illustrating a point-to-point setup for surveillance, where the Master CPE connects to a DVR/monitor, and the Slave CPE connects to an IP camera, enabling remote monitoring.

Image: Network diagram depicting a point-to-multipoint configuration where a single Master CPE broadcasts to multiple Slave CPE units, each connected to an IP camera, enabling widespread surveillance.
5. Operating Instructions
5.1 Ensuring Clear Line of Sight
For optimal performance, ensure there is a clear, unobstructed line of sight between the Master and Slave CPE units. The device is designed for a 60-degree beamwidth, but direct alignment minimizes signal loss.

Image: A visual representation showing two UeeVii CPE units with a clear line of sight over a landscape, emphasizing the need for no obstacles for effective wireless transmission.
5.2 Web Interface Access
For advanced configuration, you can access the device's web interface:
- Connect your computer directly to the LAN port of the PoE adapter connected to either CPE unit.
- Configure your computer's IP address to be in the same subnet as the CPE (e.g., if CPE is 192.168.188.253, set your computer to 192.168.188.X, where X is not 253).
- Open a web browser and enter the default IP address of the CPE (refer to the device label or manual for the exact IP).
- Enter the default username and password to log in.

Image: Screenshots of the UeeVii wireless bridge web interface, showing the login screen and a dashboard with network statistics and configuration options.
5.3 Network Security
The CPE58G Flex supports various encryption protocols to secure your wireless link, including OPEN, WPA, WPA2, WPA-PSK, and WPA2-PSK. You can also hide the SSID to prevent unauthorized access.
6. Maintenance
The UeeVii CPE58G Flex is designed for minimal maintenance due to its IP65 weatherproof rating, protecting it against rain, dust, and freezing temperatures.
- Regular Inspection: Periodically check the physical mounting and cable connections for any signs of wear or damage, especially after severe weather conditions.
- Cleaning: If necessary, gently clean the exterior of the units with a soft, damp cloth. Avoid using harsh chemicals or abrasive materials.
- Firmware Updates: Check the manufacturer's website for any available firmware updates to ensure optimal performance and security.

Image: A UeeVii CPE unit mounted on a wall under a clear sky, with icons indicating protection against sunlight, rain, snow, and wind, highlighting its IP65 all-weather capability.
7. Troubleshooting
If you encounter issues with your UeeVii wireless bridge, refer to the following common troubleshooting steps:
- No Connection/Pairing Issues:
- Ensure both units are powered on and the PoE adapters are functioning correctly.
- Verify that the H-C switch is correctly set for Master (H) and Slave (C) units.
- Perform the pairing process again by simultaneously pressing the Reset buttons on both units.
- Check all Ethernet cables for proper connection and integrity. A faulty cable can prevent communication.
- Poor Signal/Slow Speed:
- Re-check the alignment of both units to ensure they are pointing directly at each other with a clear line of sight.
- Remove any new obstructions that may have appeared between the units (e.g., growing trees, new structures).
- Ensure the distance between units does not exceed the recommended 2km in a barrier-free environment.
- LED Indicators:
- A continuously cycling or chasing LED pattern on a unit may indicate a failure or an inability to connect. Try a factory reset.
- Note that the green indicator lights can be dim in bright daylight; cup your hands around them to verify their status.
- Factory Reset: To restore a unit to its factory default settings, press and hold the Reset button for approximately 10-15 seconds until the LED indicators change, then release.
8. Specifications
| Feature | Specification |
|---|---|
| Model Name | CPE58G Flex |
| Frequency Band Class | Single-Band (5.8GHz) |
| Wireless Communication Standard | 802.11a, 802.11ac, 802.11n |
| Antenna Gain | 12dBi Directional Antenna |
| Max Working Distance | Up to 2 km (in barrier-free environment) |
| LAN Ports | Dual 100Mbps LAN Ports |
| PoE Injector | 24V PoE Injector |
| Weatherproof Rating | IP65 |
| Security Protocols | OPEN, WPA, WPA2, WPA-PSK, WPA2-PSK |
| Mounting Options | Wall, Pole, Roof |
| Dimensions (per unit) | Approximately 12.99 x 8.31 x 7.24 inches (Package Dimensions) |
| Item Weight (per unit) | Approximately 4.66 pounds (Item Weight) |
9. Warranty and Support
Specific warranty information is not provided in the product details. Please refer to the UeeVii official website or contact your retailer for warranty terms and conditions.
For technical support or further assistance, please contact UeeVii customer service through their official channels. Contact information can typically be found on the product packaging or the UeeVii brand website.