
NICE-POWER Digital Microscope 48MP 4K
NICE-POWER Digital Microscope User Manual
Model: Digital Microscope 48MP 4K
Brand: NICE-POWER
1. Introduction
This manual provides comprehensive instructions for the setup, operation, and maintenance of your NICE-POWER Digital Microscope. This industrial video microscope camera is designed for detailed observation and recording, featuring high-resolution imaging and versatile connectivity options.
Package Contents:
- Microscope Camera (x1)
- 150X Zoom C-Mount Lens (x1)
- LED Ring Light (x1)
- Foldable Stand (x1)
- Remote Control (x1)
- Power Plug (x1)
- Instruction Manual (x1)
Note: Remote control battery (CR2025) is not included.

Figure 1: Complete package contents of the NICE-POWER Digital Microscope.
2. Key Features
2.1. 48MP 4K 1080P Microscope Camera
The microscope camera incorporates an imported sensor, capable of outputting 1080P HD images via HDMI and Type-C connections. It supports 4K video recording and captures still images at 48MP (8000x6000) resolution. Storage is supported via a TF card up to 64GB.

Figure 2: Camera specifications and capabilities.
2.2. 150X Zoom C-Mount Lens
The included 150X Zoom C-mount lens offers a magnification range of 1-150X on the display, with a working distance up to 1000mm. Magnification can be adjusted using the knob on the lens. This lens is suitable for various applications, including electronics repair and coin observation.

Figure 3: The 150X Zoom C-Mount Lens and its adjustable focus.
2.3. Bright LED Ring Light
The microscope is equipped with a 56-bead LED ring light, providing a color temperature of 6500K-7000K and a maximum illuminance of 60,000 Lux. The brightness is adjustable, ensuring clear images and videos during operation.

Figure 4: The adjustable LED Ring Light.
2.4. Flexible Stand and Remote Control
The upgraded foldable stand offers high flexibility and stability, with four adjustable parts to position the camera for optimal observation. A remote control is included for convenient operation, though its full functionality is primarily available in HDMI output mode.

Figure 5: Multi-angle adjustment capabilities of the foldable stand.
3. Setup Guide
3.1. Assembly
- Attach the foldable stand to a stable surface using the clamp.
- Mount the microscope camera onto the stand's adjustable arm.
- Secure the 150X Zoom C-Mount Lens to the camera.
- Attach the LED Ring Light to the lens or camera assembly, ensuring it illuminates the observation area.
3.2. Connecting to a Display/PC
- HDMI Output: Connect the microscope to an HDMI-compatible monitor or TV using an HDMI cable. This mode allows for direct viewing and remote control operation.
- Type-C/USB Output: Connect the microscope to a computer using a Type-C or USB cable. This enables viewing and recording via computer software.
- Power Connection: Connect the power plug to the microscope and a power outlet.
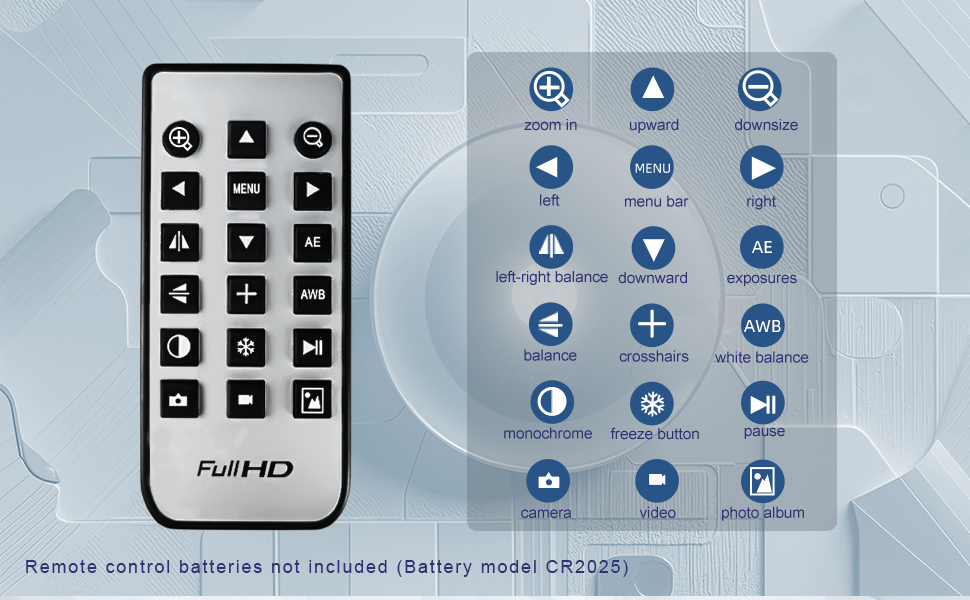
Figure 6: Connecting the microscope to a PC for software control.
4. Operation
4.1. Basic Adjustments
- Adjusting Working Distance: Use the flexible stand to move the camera up or down to achieve the desired working distance (range 50mm-1000mm).
- Focus Adjustment: Rotate the knob on the 150X C-Mount lens to bring the image into sharp focus.
- Brightness Control: Rotate the side knob on the LED ring light to adjust the illumination brightness.
Video 1: Demonstrates the stability of the stand, adjustable working distance, focus adjustment, and brightness control.
4.2. Using the Remote Control (HDMI Mode)
The remote control provides convenient access to various functions when the microscope is connected via HDMI. Functions include: menu navigation, zoom in/out, exposure settings (manual/automatic/one-touch), white balance (auto/manual, red, blue, green adjustable), brightness, contrast, saturation, sharpness, noise reduction, and more. Refer to the remote control diagram for specific button functions.

Figure 7: Remote control layout and function guide.
To access the menu, press the MENU button. Use the arrow keys to navigate and OK/UP to confirm selections. Short press MENU again to return to the menu bar.
4.3. Recording and Capturing
- TF Card Storage: Insert a TF card (up to 64GB) into the designated slot on the camera.
- Video Recording: Press the video button on the remote or camera to start/stop 4K video recording.
- Photo Capture: Press the camera button on the remote or camera to take 48MP still images.

Figure 8: High-quality image observation for maintenance and inspection.
5. Maintenance
- Cleaning the Lens: Use a soft, lint-free cloth specifically designed for optical lenses to gently wipe the lens surface. For stubborn smudges, a small amount of lens cleaning solution can be applied to the cloth, not directly to the lens.
- Cleaning the Body: Wipe the microscope body and stand with a dry or slightly damp cloth. Avoid using harsh chemicals or abrasive cleaners.
- Storage: Store the microscope in a clean, dry environment, away from direct sunlight and extreme temperatures. When not in use for extended periods, consider covering it to prevent dust accumulation.
6. Troubleshooting
| Problem | Possible Cause | Solution |
|---|---|---|
| No image on display/PC. | Incorrect connection, power issue, input source not selected. | Ensure all cables (HDMI/USB, power) are securely connected. Verify the correct input source is selected on your display. Check power indicator on microscope. |
| Image is blurry. | Improper focus, incorrect working distance. | Rotate the lens focus knob until the image is clear. Adjust the height of the microscope using the stand to find the optimal working distance. |
| Image is too dark/bright. | LED light brightness setting, exposure setting. | Adjust the knob on the LED ring light. In HDMI mode, use the remote control to adjust exposure settings (AE/AWB). |
| Remote control not responding. | Battery depleted, not in HDMI mode, line of sight blocked. | Replace the CR2025 battery in the remote. Ensure the microscope is connected via HDMI. Point the remote directly at the microscope's IR receiver. |
| Cannot record to TF card. | TF card full, not inserted correctly, incompatible format. | Check TF card capacity. Reinsert the TF card. Ensure the card is formatted correctly (FAT32 recommended). |
| Software issues on PC. | Driver issue, software compatibility, incorrect connection. | Ensure the correct drivers are installed. Verify software compatibility with your operating system. Try a different USB port or cable. Contact support for software download instructions if not provided. |
7. Specifications
| Feature | Detail |
|---|---|
| Camera Resolution | 48MP (8000x6000) for photos, 4K for video recording |
| Video Output | 1080P HD via HDMI and Type-C/USB |
| Lens Magnification | 150X Zoom C-Mount Lens (1-150X on display) |
| Working Distance | 50mm - 1000mm |
| Light Source | 56-bead LED Ring Light |
| Illuminance | Max 60,000 Lux |
| Storage | Up to 64GB TF card |
| Connectivity | HDMI, Type-C/USB |
| Item Weight | 3.67 pounds |
| Package Dimensions | 18.11 x 8.23 x 2.72 inches |
8. Warranty and Support
For any questions regarding your NICE-POWER Digital Microscope, including technical support or warranty claims, please contact NICE-POWER Official customer service. We are committed to providing assistance and will respond to inquiries within 24 hours.
Please refer to your purchase documentation for specific warranty terms and conditions.
Related documentsDigital Microscope 48MP 4K


Ask a question about this manual
Ask about setup, troubleshooting, compatibility, parts, safety, or missing instructions. Manuals+ will review the question and use this page’s manual context to help answer it.