1. Product Overview
The LIJIANI HRD757 is a versatile shortwave radio designed for multi-band reception and various utility functions. It features a compact design, making it suitable for both indoor and outdoor use, including travel, camping, and emergency preparedness.
Key features include:
- Bluetooth TF Card Playback: Connect your phone or use a TF card to enjoy music, podcasts, or audiobooks. Features 6 EQ Modes and dual woofers for customizable listening.
- All World Bands: Supports AIR/VHF/AM/FM/Shortwave/Weather bands for wide-ranging reception.
- Digital Recording: Ability to record radio stations or external audio directly to a TF card. Recordings can be managed and deleted.
- Multiple Power Options: Can be powered by 3 AA batteries or a BL-5C rechargeable battery. Includes a TYPE-C input for alternative power.
- Integrated Tools: Equipped with a high-beam flashlight, reading lamp, backlit display, and backlit buttons for convenience in low-light conditions.
- Time Management: Includes an alarm clock and sleep timer functions.

Figure 1.1: Front view of the LIJIANI HRD757 Shortwave Radio.
2. Package Contents
Verify that all items are present in the package:
- LIJIANI Shortwave Radio (HRD757)
- Owner's Manual
- BL-5C Rechargeable Battery (pre-installed or separate)
- USB Type-C Charging Cable
3. Controls and Display
Familiarize yourself with the radio's controls and display elements for optimal use.
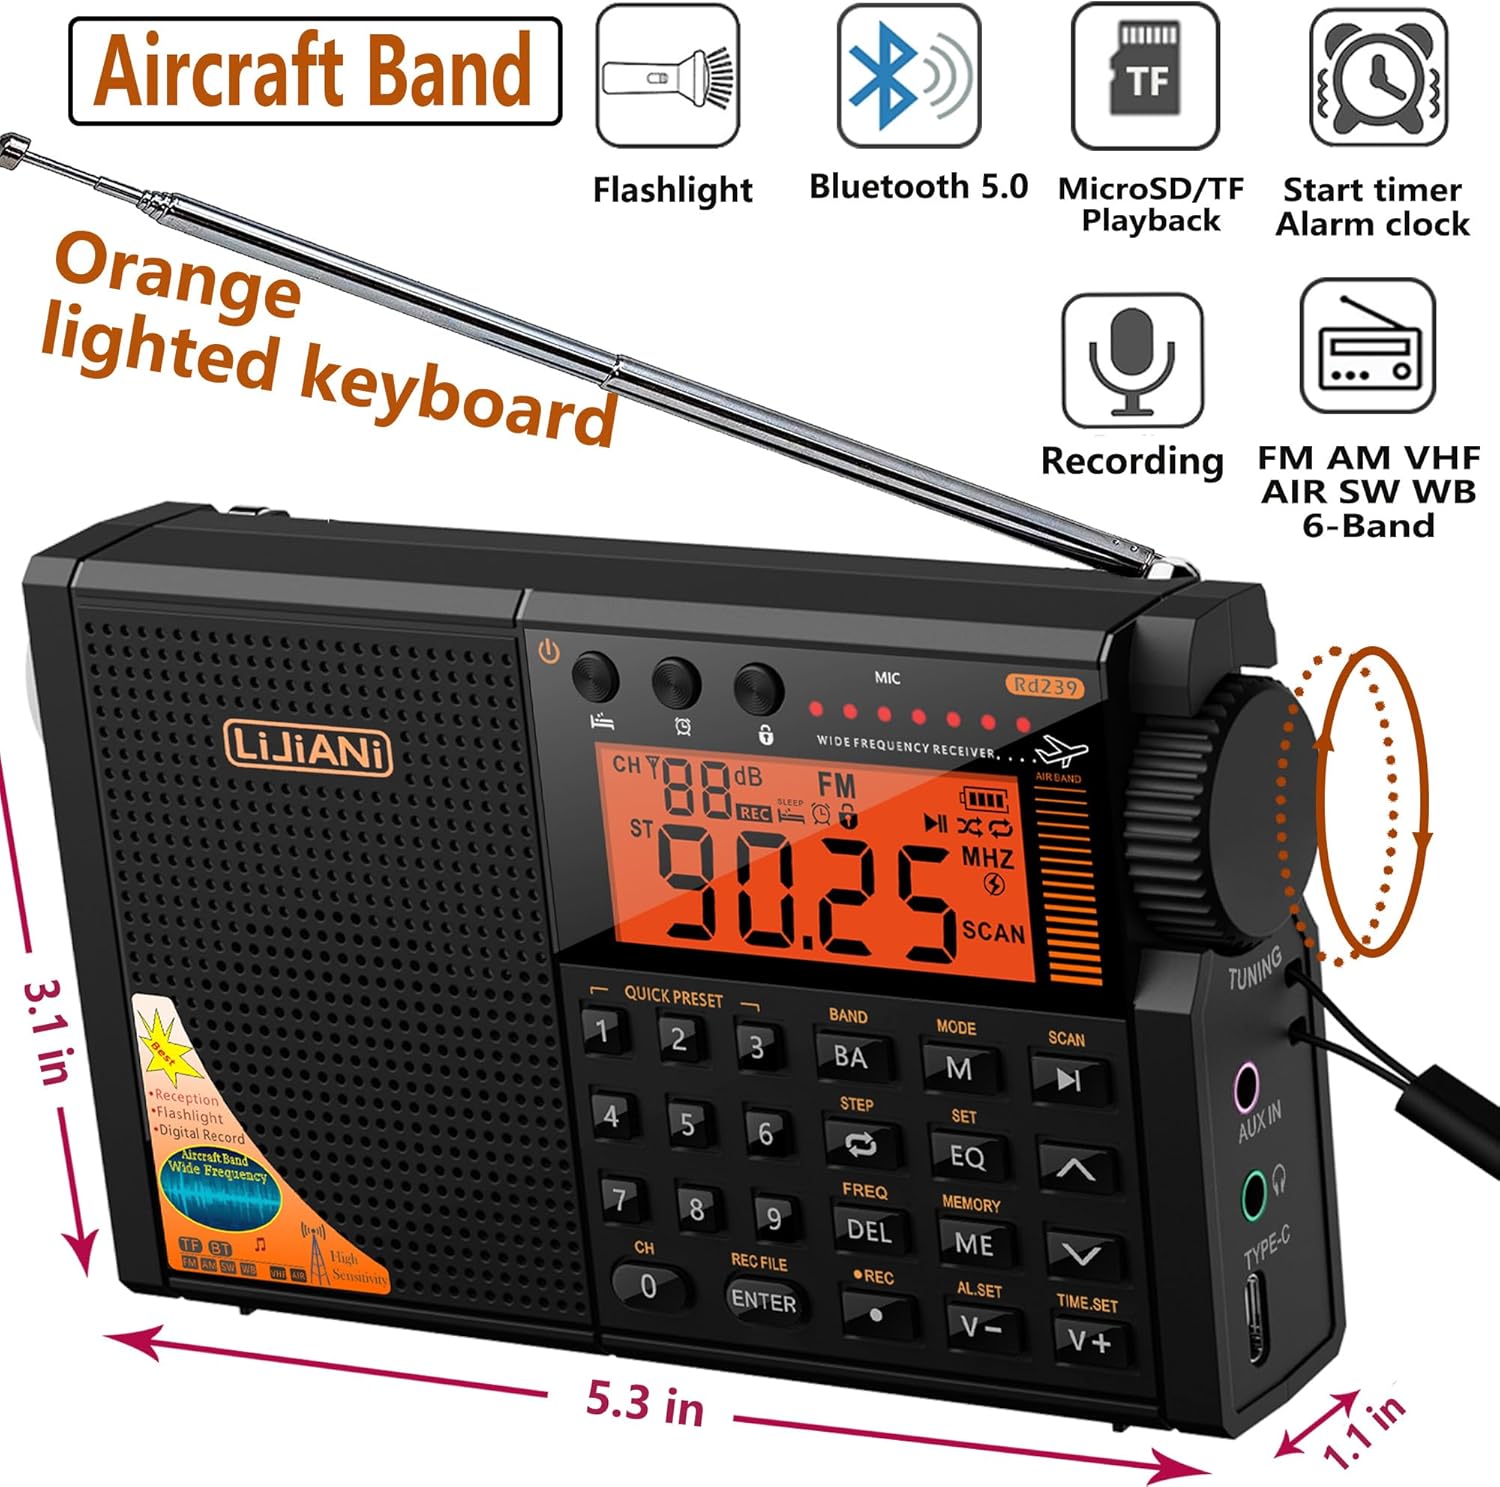
Figure 3.1: Front view with dimensions and feature icons. Dimensions: 5.3 inches (length) x 3.1 inches (height) x 1.1 inches (width).
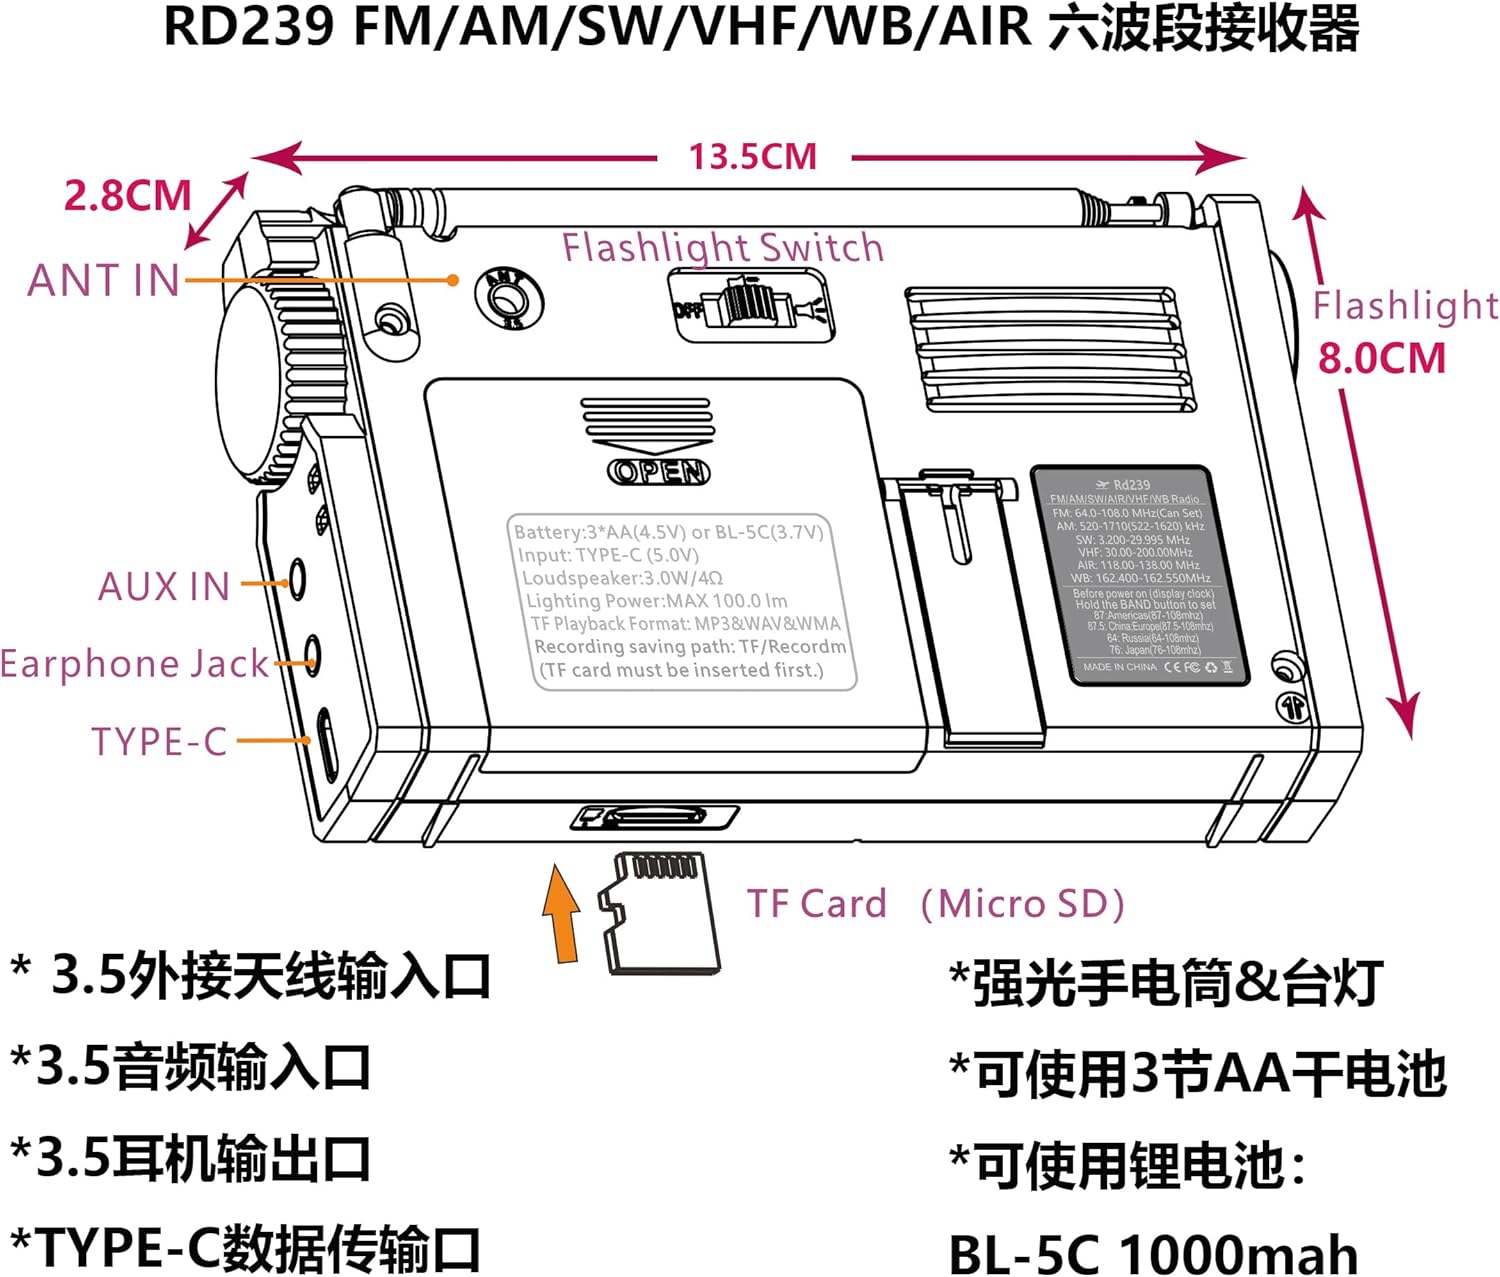
Figure 3.2: Rear view showing ANT IN, AUX IN, Earphone Jack, and Type-C port. Also shows the flashlight switch and battery compartment.
3.1. Front Panel
- Display Screen: Digital display showing frequency, time, mode, and other indicators. Features an orange backlight.
- Numeric Keypad (0-9): Used for direct frequency input (for presets) and other functions.
- MODE Button (M): Switches between different operating modes (e.g., FM, AM, SW, Bluetooth, TF Card).
- BAND Button (BA): Cycles through available frequency bands.
- SET Button (SET): Used to confirm settings or access advanced options.
- EQ Button (EQ): Adjusts equalizer settings for audio output.
- SCAN Buttons (Up/Down Arrows): Initiates automatic scanning for radio stations.
- Volume Buttons (V+/V-): Adjusts the audio volume.
- REC Button (REC): Initiates or stops audio recording.
- DEL Button (DEL): Deletes recorded files.
3.2. Side Panel
- Tuning Knob: Used for manual frequency tuning.
- ANT IN (3.5mm): External antenna input for improved reception.
- AUX IN (3.5mm): Audio input for connecting external devices.
- Earphone Jack (3.5mm): For private listening with headphones.
- TYPE-C Port: For charging the BL-5C battery or powering the unit.
3.3. Top/Rear Panel
- Telescopic Antenna: Extend for optimal radio reception.
- Flashlight Switch: Activates the built-in flashlight.
- Battery Compartment: Houses 3 AA batteries or the BL-5C rechargeable battery.
- TF Card Slot: For inserting a MicroSD/TF card for playback and recording.
4. Setup
4.1. Battery Installation
The radio can be powered by either 3 AA batteries or a BL-5C rechargeable battery.
- Open the battery compartment cover on the rear of the radio.
- For BL-5C Battery: Insert the BL-5C Li-ion battery, paying attention to the correct polarity (+/-). Ensure the electrode is inserted first.
- For AA Batteries: Insert 3 AA (1.5V) batteries, observing the correct polarity as indicated inside the compartment. If using AA batteries, remove them if the radio will not be used for an extended period to prevent leakage.
- Close the battery compartment cover securely.
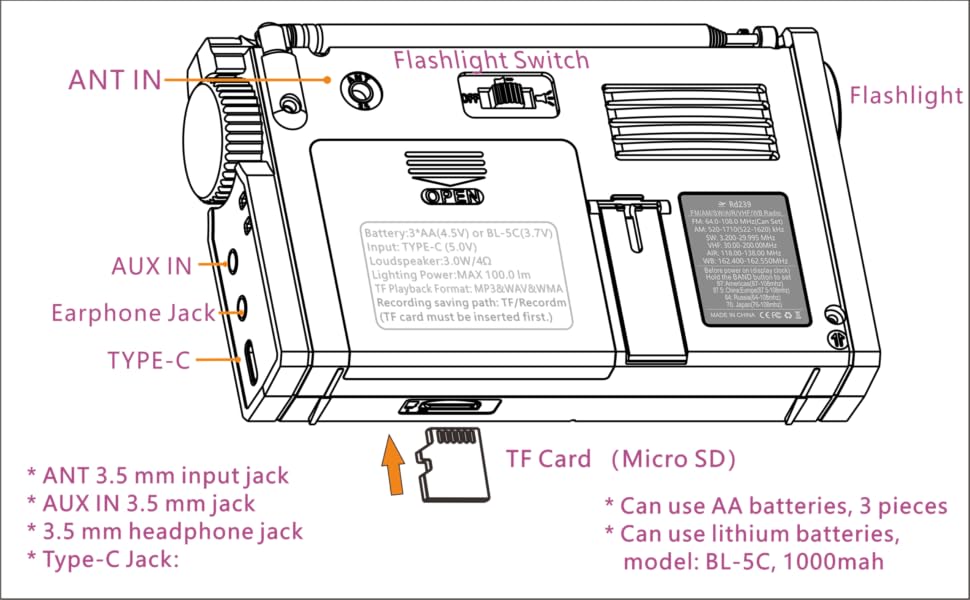
Figure 4.1: Battery installation schematic for both BL-5C and AA batteries.
4.2. Charging the BL-5C Battery
To charge the BL-5C battery, connect the supplied USB Type-C cable to the radio's Type-C port and the other end to a USB power source (e.g., computer, wall adapter). The charging indicator will illuminate.
4.3. Inserting a TF Card
For TF card playback and recording, insert a MicroSD/TF card into the designated slot on the side of the radio. Ensure it is inserted correctly until it clicks into place.
5. Basic Operation
5.1. Power On/Off
Press the Power button (usually located on the top left of the front panel) to turn the radio on or off.
5.2. Band Selection
Press the BAND (BA) button repeatedly to cycle through the available frequency bands: FM, AM, SW, VHF, AIR, and Weather Band (WB).
5.3. Tuning and Scanning
- Manual Tuning: Use the Tuning Knob on the side to manually adjust the frequency.
- Automatic Scan: Press the SCAN (Up/Down Arrows) buttons to automatically search for the next available station. Long press the "Up" key to automatically search for the previous station.
- Direct Frequency Input: Use the numeric keypad to enter a specific frequency.
5.4. Volume Adjustment
Adjust the volume using the V+ (Volume Up) and V- (Volume Down) buttons on the front panel.
Video 5.1: Demonstration of radio functions including band switching, tuning, and flashlight operation. This video also shows the orange backlit keyboard and the radio's night use effect.
6. Advanced Features
6.1. Bluetooth and TF Card Playback
Press the MODE (M) button to switch between TF Card, Bluetooth (BT), and other modes. In Bluetooth mode, pair with your mobile device. In TF Card mode, the radio will automatically play audio files from the inserted card.
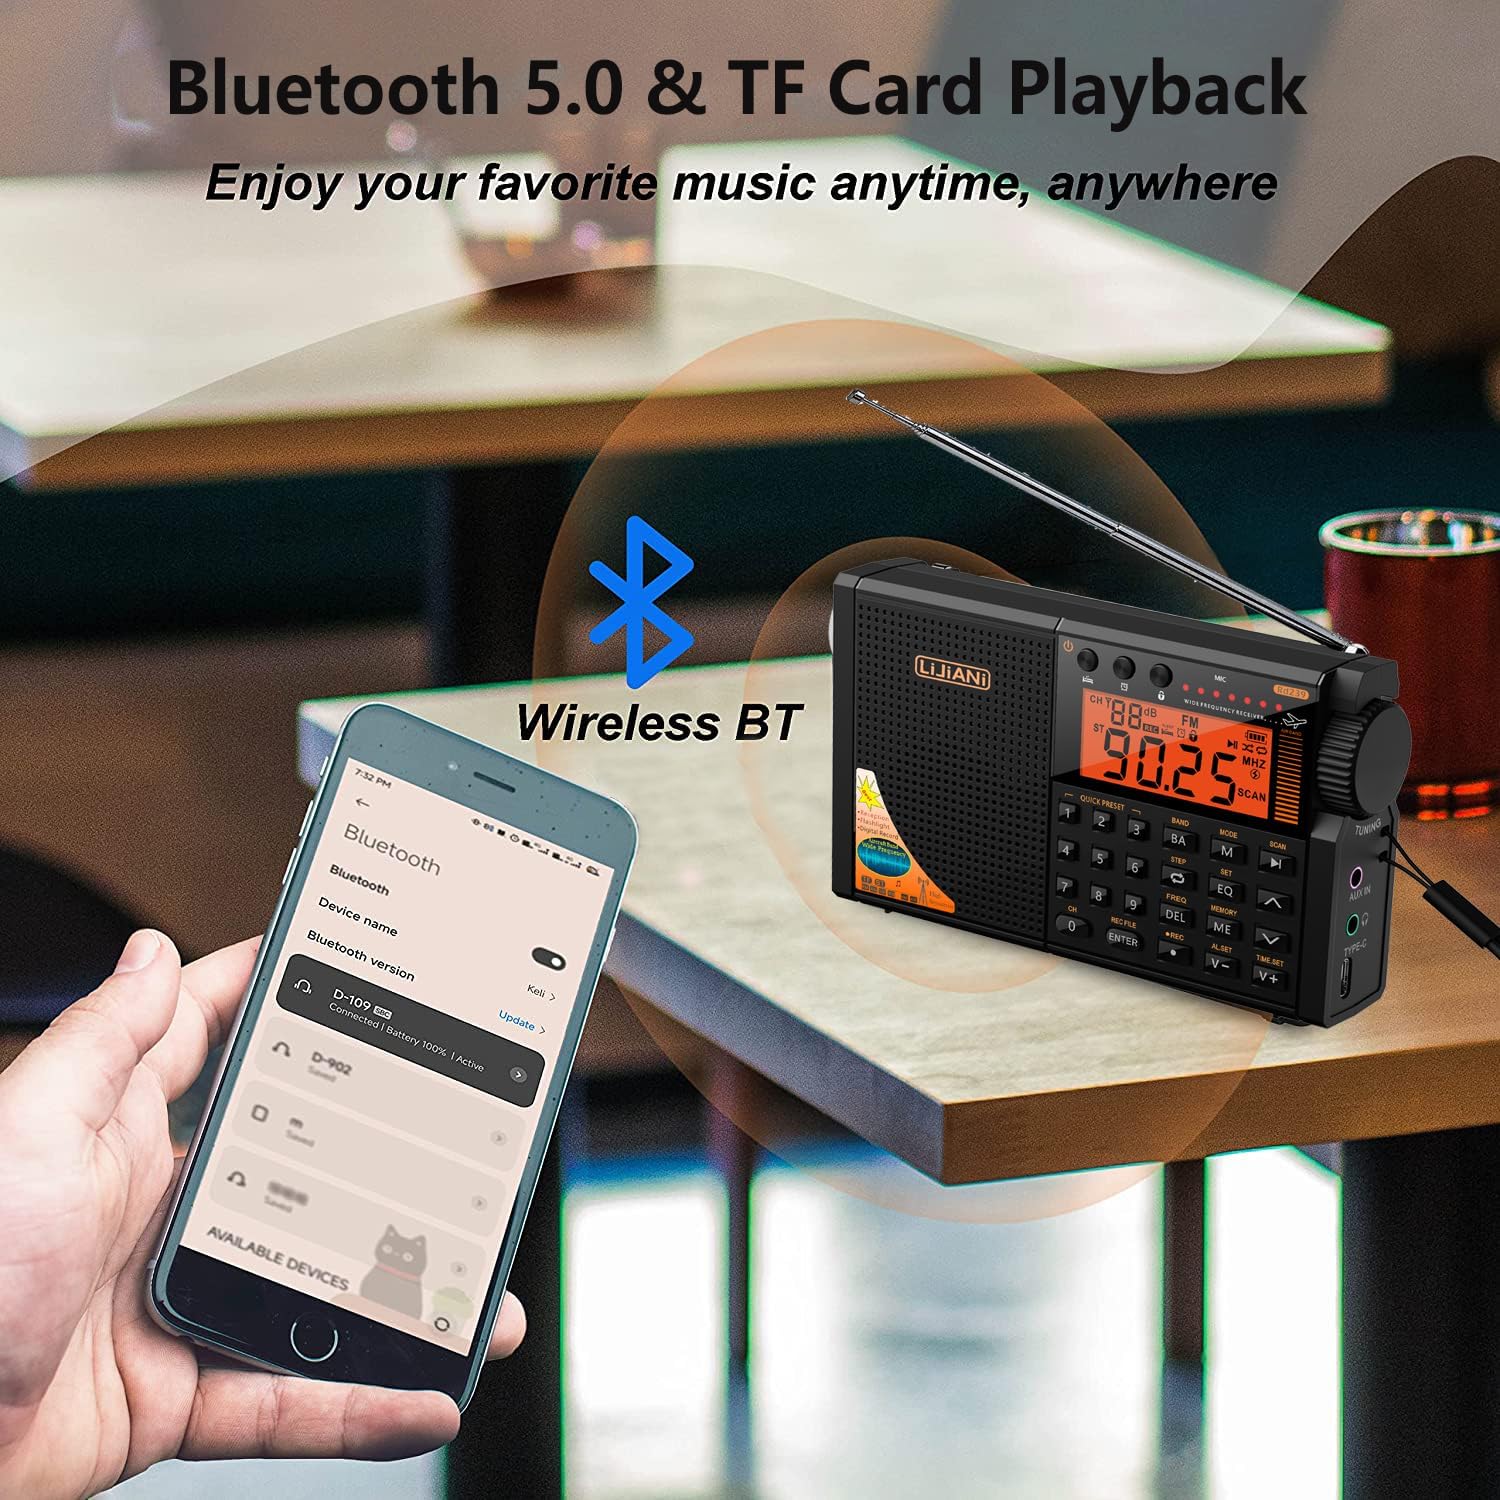
Figure 6.1: Bluetooth 5.0 and TF Card Playback functionality.
6.2. Digital Recording
To record, ensure a TF card is inserted. Long press the REC button to start recording (MIC recording). Long press the REC button again to end the recording. When playing a recorded file, you can long press the DEL key to delete the recording.
Figure 6.2: The radio supports both MIC and radio recording.
6.3. Flashlight and Reading Lamp
The radio includes a built-in flashlight and a side reading lamp. Use the Flashlight Switch on the rear of the unit to activate these features.

Figure 6.3: The integrated high-power flashlight provides illumination in dark environments.
6.4. Alarm Clock and Sleep Timer
The radio features an alarm clock and a sleep timer. Refer to the detailed instructions in the included Owner's Manual for setting these functions.

Figure 6.4: The sleep timer function allows for timed radio playback before automatically turning off.
7. Maintenance
- Keep the radio dry. Avoid exposure to rain, moisture, or liquids.
- Clean the radio with a soft, dry cloth. Do not use harsh chemicals or abrasive cleaners.
- Avoid dropping or subjecting the radio to strong impacts.
- When not in use for extended periods, remove AA batteries to prevent leakage.
- Store the radio in a cool, dry place away from direct sunlight and extreme temperatures.
8. Troubleshooting
| Problem | Possible Cause | Solution |
|---|---|---|
| No power/Radio does not turn on. | Low or depleted batteries; incorrect battery installation. | Replace AA batteries or charge the BL-5C battery. Ensure batteries are inserted with correct polarity. |
| Poor radio reception. | Antenna not extended; weak signal area; interference. | Fully extend the telescopic antenna. Try moving to a different location. For SW/VHF/AIR bands, consider using an external antenna connected to the ANT IN port. |
| No sound from speaker/headphones. | Volume too low; headphones not fully inserted; speaker damaged. | Increase volume using V+ button. Ensure headphones are properly connected. Test with different headphones or without them. |
| Bluetooth not connecting. | Radio not in Bluetooth mode; device not in pairing mode; too far from device. | Press MODE button to select BT mode. Ensure your device's Bluetooth is on and in pairing mode. Keep devices within range (approx. 10 meters). |
| TF card not recognized or playing. | TF card not inserted correctly; unsupported file format; corrupted card. | Reinsert TF card. Ensure audio files are in supported formats (MP3, WAV, WMA). Try a different TF card. |
| Volume is too loud by default (as noted in some reviews). | Default volume setting. | Immediately adjust volume down using the V- button upon powering on. There is no persistent volume memory. |
9. Specifications
| Feature | Detail |
|---|---|
| Product Dimensions | 5"L x 3"W x 1"H (12.7 x 7.6 x 2.5 cm) |
| Item Weight | 9.5 ounces (269 grams) |
| Model Number | HRD757 |
| Power Source | 3 AA batteries or BL-5C Li-ion battery |
| Connectivity Technology | Bluetooth |
| Radio Bands Supported | 6-Band: FM, AM, SW, AIR, VHF, WB (Weather Band) |
| Tuner Technology | FM AM SW AIR VHF WB |
| Special Features | Built-In Flashlight, Built-In Key backlight, Digital Record, Alarm Clock, Sleep Timer |
10. Warranty and Support
For warranty information and customer support, please refer to the documentation included with your purchase or contact LIJIANI customer service directly. You can also find additional resources and a downloadable PDF version of the user manual at the following link:


